
IN THIS CHAPTER
Although GNU/Linux is many things, it has been and always will be a programmer’s plaything. The GNU Project began with a C compiler and a text editor. Linux began as a porting project. Although the intertwined projects have grown considerably beyond their hobbyist roots, they will never completely outgrow them.
In this and the next few chapters, you’ll learn about the tools SUSE Linux provides both the beginning programmer and the most seasoned software engineer. From simple compilers to full-blown integrated development environments (IDEs), Linux can help you program in dozens of languages and in an environment best suited to your style.
Open-source development isn’t always a solitary task, however. Concurrent Versions System (CVS) and Subversion each make it easier to collaborate with others. And after you’ve created a quality program, you may want to make it readily available and easy to install for the public at large. For that, there are several solutions, most notably the Red Hat Package Manager (RPM).
This chapter focuses on some of the tools available for programming in C, C++, and Java. You’ll also learn about a trio of Linux IDEs: Eclipse, KDevelop, and Anjuta. You’ll see how CVS and Subversion can be used to manage your source code and collaborate with other programmers. Finally, you’ll learn how you can use RPM to disseminate your final product.
This is not a book on how to program complex software programs, and novices should not expect to learn more than the barest rudiments here. Learning programming is a worthwhile, if challenging, pursuit. It is also one of the best ways to “give back” to the Linux community for all the wonderful applications you’re using with your copy of SUSE Linux. If you are intrigued by what you read in this and in the coming chapters, there are more than a few good books on the subject, some of which will be highlighted here.
Unix and the C programming language have been partners from the very beginning. The vast majority of Unix and Linux code (including the Linux kernel) is written in C, and that tradition continues. C is a platform-neutral language; the code is not dependent on any particular system architecture.
C is a compiled language, so you won’t need any other special programs to run your applications aside from the editor and compiler you use to write it. Interpreted languages, such as Perl and Python, need a separate program known as an interpreter to run.
You first enter your C program’s statements (called source code) into a text file. This code is then fed to a compiler that translates the source code you’ve written into a binary file—the ones and zeros that the machine can read. Often, a linker is used to connect the program with other system libraries or with other programs.
As you saw in Chapter 5, “Getting Started with SUSE Linux,” SUSE Linux offers a variety of text editors. Most contain special features for programming in assorted languages, such as highlighting commands in different colors and checking for mismatched parentheses and brackets. Programmers will also find the following essential tools in SUSE Linux:
The GNU Compiler Collection, which will compile and link programs written in seven programming languages.
The GNU Debugger (
gdb), which identifies and helps you troubleshoot problematic code.The Make utility, which pulls multiple source-code files into a single working package.
Autoconf, which allows a programmer to create customized compiling and installation configurations for a program’s source code.
Note
These programming tools are not installed by default when you install SUSE Linux. You can easily get them using YaST, and they must be installed before any of the programs mentioned in this chapter will work on your system.
C program source code files come in two types: header, or include, files and programs or procedural files. Standard C program files have a *.c extension and contain at least one function. Functions are a set of commands a program carries out to accomplish its tasks. Header files have an *.h extension and carry variable descriptions, declarations, and other data common to all source files in the project.
Writing simple programs in C is a six-step process:
Open your favorite text editor.
Type the source code.
Save the file with the appropriate extension (.
cfor a program or.hfor a header file).Repeat steps 2 and 3 as necessary if your application’s source code will be broken down into multiple files.
Compile the program with GCC.
Run the program and then debug any problems.
Since time immemorial, the first program taught to students of a new language is called “Hello World” and consists of printing those two words on your screen. It’s a short program, but its aim is to demonstrate the basic syntax of the language. We will follow the steps listed previously to write a “Hello World” program in C.
Open your favorite text editor and write the following source code text, exactly as you see it. Press Enter to insert a new line after the final brace.
#include <stdio.h>
int main(int argc, char* argv[]){
    printf("Hello, World.
");
    return 0;
}
Details vary from editor to editor, but chances are good that your braces are highlighted in color, as is the quoted phrase. Now save this file as a plain text document named hello.c to a source directory, either in Home (/~/source) or in Documents (/~/Documents/source).
The GNU C Compiler (GCC), first written by Richard Stallman in 1987, has grown over time to support six other languages: Ada, C++, Fortran, Java, Objective-C, and Objective-C++. This is why the official name changed to the GNU Compiler Collection. Version 4.0 came out in April 2005.
Open a shell, change to the directory you saved your program to, and compile your program:
gcc -o hello hello.c
Tip
Your editor may have a direct link or command to run the compiler, so you can test your program without leaving the editor. Consult the editor’s documentation.
Tip
The GCC determines which compiler to use based on the file extension of your source code. Table 28.1 shows common extensions for the supported languages. You can override this behavior by using the -x option (see man 1 gcc for more information).
The compiler creates an executable program called hello from the source file, hello.c. Heed any warnings you may get from the compiler. If you get any, you’ve mistyped something or forgot to press Enter (new line) at the end of the code. If necessary, compile again until you get a fresh prompt with no feedback. GCC delivers only bad news; if things work, it just does its thing.
If you look in the directory you will see a new file called hello with no extension. Now you can run the program:
./hello
Hello, World.
What did you do? You saved the source code with a .c extension to note what language this code is written in. The compiler created the executable hello (the name specified by the –o option), and then you executed the program. Because the program is not located in one of the standard executable directories, usr/bin or /usr/local/bin, you must use the dot-slash “execute” command in the directory where the program is located.
Additional GCC language front ends exist for Pascal, Modula-2, Modula-3, Mercury, VHDL, and PL/I; these are developed by teams separate from the GCC team and are not available via YaST. The Objective-C++ component is also missing from SUSE. You can access these languages at http://gcc.gnu.org/frontends.html.
IBM has been a big backer of the Java language since its birth in the mid-1990s, and possibly even a bigger backer of Linux and open-source software since the turn of the twenty-first century. It isn’t a big surprise that as a result, the IBM-sponsored Eclipse Java development platform is open source and works well in Linux.
Eclipse began as, and basically still is, an environment for building applications in the Java language. Because it is endlessly extensible with plug-ins, much more can be done with it. Developers regularly use it to program in Python, PHP, and other languages.
The Eclipse package that you install with SUSE Linux contains these core features: the Eclipse Java Development Tool (JDT), the Plug-In Development Environment (PDE), and the Eclipse Software Development Kit (SDK). SUSE Linux also includes the Ant build application, the JDI debugger, the JUnit testing framework, and a refactoring tool. Other plug-ins are installable through the Eclipse Update Manager, a YaST-like tool that checks for new software versions and installs them.
Tip
Using the Eclipse Update Manager with SUSE Linux can be troublesome at first, but it is not exceptionally difficult to fix.
When YaST installs Eclipse, all the files and directories are owned by Root and the group Root. The average user has access only by default, but the Eclipse Update Manager needs write access to create and update files in the /usr/share/eclipse directory.
You solve this problem by logging in as the SuperUser and creating a new system user called eclipse, and a group of the same name, with the new user as its only member.
Finally, because Root owns this directory and its branches, you need to adjust the permissions for /usr/share/eclipse. Go to this directory and type: chgrp -R eclipse *. This makes the eclipse group responsible for the directory and all its subdirectories. Now you can use chmod to allow this group to read and write files in the same directories: chmod -R 661 *. You should now be able to run Update Manager without any trouble.
The first time you run Eclipse, you’ll get a Welcome screen. Feel free to walk through the tutorials and examples offered there, and when you’re done, click Workbench to get started.
Tip
Eclipse uses the Mozilla browser to deliver its online help, including the Welcome to Eclipse tutorials. If you don’t have Mozilla installed, or if you prefer a different browser, go to Preferences in the Window menu in the Eclipse Workbench. Under Help, choose Custom Browser and identify your preferred application.
In Figure 28.1, you can see a sample “Hello World” program written in Java in the Eclipse Workbench. We’ll go into the program in more detail later, but the Workbench gives you quite a lot at your fingertips.
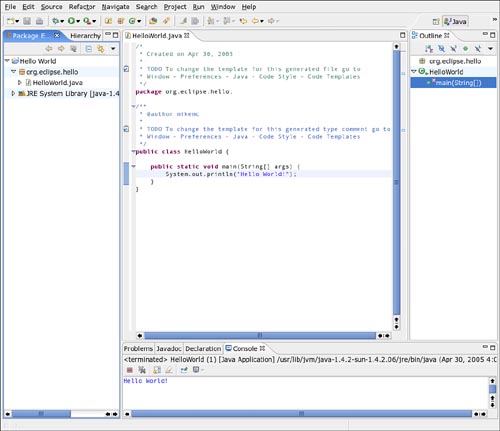
In the upper-left corner is the Package Explorer, which lets you move around and open files in your project editor. The editor is in the center. You can have any number of files open in the editor at any given moment, but only one active at a time. You’ll see any others in a tab in this area. In the upper-right corner is the Outliner, which shows each element in the active program. Clicking any item in the Outliner highlights that element in the editor.
Across the bottom, Eclipse watches for problems in your code and flags them for you. If your program displays some text on your shell (also known as the console), it will display a Console tab as well.
Perspectives are a set of related views and windows that help complete the task at hand. Each Perspective is tailored to a specific task. By default, Eclipse displays the Resource Perspective, with which you can start creating any sort of project.The Java Perspective was shown earlier in Figure 28.1.
You can change Perspectives by going to the Window menu and selecting Open Perspective. The default list of choices changes depending on the Perspective you’re starting from, but you can always display the entire list of Perspectives with the Other option.
For our “Hello World” example, begin by selecting the Java Perspective. Eclipse will respond by moving the default windows around a little bit to set up the Java Perspective layout. You can further customize this view by maximizing windows, adding others, and closing some (if you find a particular setup useful, you can save a custom Perspective as well from Window, Save Perspective As).
You will need a new project to store your code in. Go to File, New, Project (or use the New Project toolbar button), and a wizard appears. Create a new Java Project, and name it Hello World (spaces are permitted in project names). You can further specify build settings, but that’s for projects more complex than this one and the defaults will suit us fine.
Now your program (actually a Java class) can be created. Go to File, New, Class to launch the Class Wizard. Name it HelloWorld, this time with no space. You should also define a package, because the use of the default package is discouraged (a package puts the class in a folder with related classes). The convention for the Eclipse Platform is to use org.eclipse as the default; for this one, use org.eclipse.hello. Check the box to create a void main method stub, and then click Finish. You’ll see the result, HelloWorld.java, in the Java editor window.
The Main() function needs something to do. In the Outliner, click main(string[]). You’ll see main highlighted in the editor. Go to the end of the line (with the left brace) and press Enter. Type System.out.println(“Hello World!”);. Your code should resemble the following:
package org.eclipse.hello;

public class HelloWorld {
    public static void main(String[] args) {
        System.out.println("Hello World!");
    }
}
When you’ve finished entering your code, go ahead and save your work either with File, Save or the Ctrl+S key combination.
Now it’s time to run the program. Make sure HelloWorld.java is selected in the Package Explorer window on the left. Go to Run, Run As, Java Application. If all has gone well, you should see the Console window open on the bottom, as shown in Figure 28.1, displaying Hello World. If you have any problems, you can use the Debug view to help you sort it out.
Eclipse offers you an easy way to export your project when it’s time to finally release it. To export our new Hello World application as a JAR file, make sure the Hello World project’s root is selected in the Package Explorer pane and select File, Export. The Export Wizard will appear.
The first step of the wizard will prompt your for the type of export; select JAR file and click Next. Continue through the steps, ensuring that you set the export destination for your archive, and specify the main entry class. Eclipse will package your application and you can share it now with whomever you please.
KDevelop began as an IDE to rapidly produce C++ code for use in KDE projects. Since its inception it has grown to support 13 compiled and scripting languages. It is not part of the standard SUSE Linux installation, but you can install the necessary packages in YaST.
KDevelop automates many of the tasks needed to create new programs. In fact, you won’t even need to write anything yourself to produce a “Hello World” program in several languages! You will, however, get a sense of how such a program is built in the real-world KDE environment. Let’s walk through the process of creating quality, free GUI software for KDE.
Begin by opening KDevelop; it’s located in the KDE menu under Development, Integrated Environment. A clean screen appears. Go to the Project menu and select New Project. A wizard appears. You’ll see the array of available languages and default projects. Open the C++ tree and then the KDE branch. Scroll down to Simple KDE Application. When you select this option, a screenshot and description will display in the right panel, as shown in Figure 28.2.

Name the project KHello. Note that the Final Location line will revise itself. If you don’t already have a source directory in your home directory, use the Browse button to create one. Click Next to continue.
The second screen sets general information about you, the developer, and defines the license this program will carry. By default, KDevelop selects the GPL, but you can use the drop-down menu (as shown in Figure 28.3) to choose another license if you like.

KDevelop pulls your name and email address from your KDE settings, but these fields are completely editable. It is a very good idea to include a valid email address, if not necessarily your primary one, with your free software, so users can contact you with bug reports and the like. Click Next to continue.
The third and fourth screens set up your header file and your program template. Both include the standard GPL announcement, regardless of what license you selected in the previous screen. You may want to edit or delete this if you are using a different license (you may also add other text to your header file or CPP file in these templates). When you are finished editing the templates, click Finish to create HelloWorld.cpp.
KDevelop displays its code in what it calls the IDEAl user interface (see Figure 28.4). You can adjust this in the Settings if it’s not to your liking.

Figure 28.4. KDevelop generates a complete “Hello World” KDE program in C++ and displays it in this window.
If you use Execute Program from the Build menu, KDevelop will ask to run Automake and Configure first. This is good practice. KDevelop will do that and then run the application.
After the program runs, click the File Selector tab on the left side of the KDevelop window. These files were all created by the wizard and are standard pieces of Linux applications. Click any file and it will open in the editor. In your real programs, be nice to your users. Modify the INSTALL file if users need to do something unusual to get your program working. Include README information and NEWS on this version’s progress. If you have specific plans for the program, by all means share those plans in the TODO file.
Anjuta is a relatively new tool to help create GTK+ and GNOME applications with C and C++. It works with the Glade-2 GUI generator for GTK/GNOME and other packages to create nice-looking GNOME applications. As we saw with KDevelop, writing a Hello World application here won’t require us to write any code. We’ll get a sense though of how an application can be written in Anjuta.
You can install Anjuta with YaST, but the package dependency information is incomplete, so it does not install all the packages it needs. To be safe, try installing the -devel packages in the YaST Development libraries. Under Install and Remove Software, click the Package Groups display from the drop-down menu at the top. Go to Development, Libraries, GNOME. Many packages there will be called <PackageName>-devel. These packages contain all the necessary files to create (that is, develop) new programs.
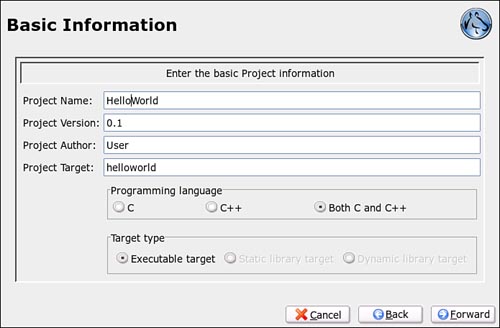
When you open Anjuta, you have the choice of creating a new project, importing an existing project, or opening an existing Anjuta project or file. Click the Application Wizard button to begin a new project, and the screen shown in Figure 28.5 appears.

In the second screen (see Figure 28.6), you select the name of the project and the language to be used. Project names are one word and are duplicated in the Project Target box.
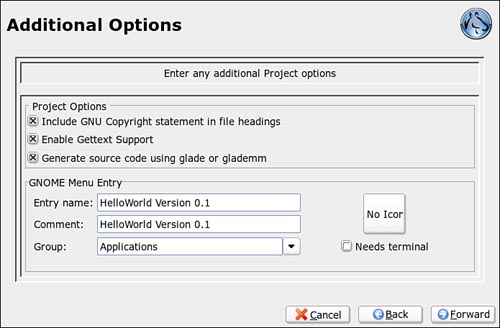
The third screen asks you to describe your project. You can be pretty long-winded if you choose. In the final settings screen (see Figure 28.7), you set up where to put your program in the GNOME menu, as well as several other items. Enabling gettext support allows you to internationalize your application with other human languages. You may also specify an icon for your application if you want it to appear in the GNOME Application menu.
Confirm the settings you want the project to have and apply them to generate Yet Another Hello World program. Anjuta now runs its own Autogen program, which generates a configure file based on the wizard settings (see Figure 28.8).
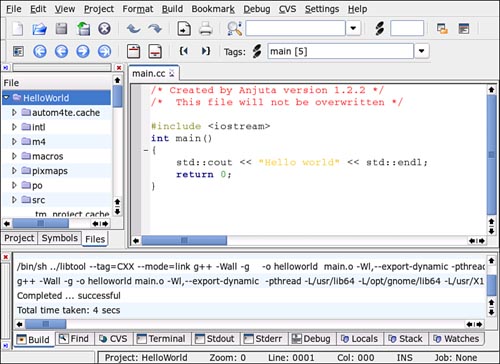
Figure 28.8. When Anjuta generates source code, you still must compile, build, and execute the code.
After Anjuta has generated the source code and a configure script, you must compile and build the application before you can run it. Go to the Build menu and select Compile. You should not get any errors. Then go back to the Build menu and select Build All. After the application has been compiled and built, from the same menu, select Execute. You should see a terminal pop open with “Hello World!” and instructions on how to close the window.
The original revision control system (rcs) utility has features to manage small application projects, but when an application grows larger or is maintained by several developers, a better tool is needed. The Concurrent Versions System (CVS) arose to manage a corps of far-flung open-source developers and files that can potentially change on a minute-by-minute basis.
CVS controls the source code by storing it exclusively in one place, called a repository, and setting rules for access to the files. A CVS repository from the client perspective is like an FTP site or other remote access directory. It contains all the files in a particular development project. The difference between CVS and FTP is that a CVS repository is like a library, and FTP is like a bookstore. To work on a file or set of files, you must check them out of the repository and check your changes back in (or commit your changes, in the CVS vernacular). The administrators of the repository can decide whether more than one person can check out a file at a time, how to process multiple changes, when to build the new version of the application, and what files will be included.
With CVS, you can get a complete record of changes in files without having multiple copies taking up space on your hard drive or server volume. Source files can be compared against the list of changes between versions, and any version can be reconstructed for review. Because any version can be reconstructed at any time, bugs can be tracked more easily and better test cases can be developed.
Incidentally, version control isn’t good only for software projects. Any electronic file that undergoes frequent revisions or that is grouped with other files in a larger entity (for example, a book and its chapters) might do well to exist in a repository. It is reasonably simple to create a CVS repository on your local drive.
Create a base directory for all your CVS projects, such as ~/cvsroot. Then point CVS to that directory:
cvs -d ~/cvsroot
You can now add files and directories (projects) to cvsroot, which can, in turn, be versioned over time using CVS. The six key CVS commands are the following:
import—Add a batch of new files or projects to the repository.remove—Make files currently in the repository disappear (other copies may exist elsewhere, however).update—In a local repository, confirm that everything is current. In a remote repository, get the latest changes in your working directory.
CVS isn’t perfect, however, and in 2001 some CVS developers moved to another project, Subversion, which they hoped would solve some of CVS’s nagging problems. This project, designed to eventually replace CVS as the open-source project management tool of choice, released version 1.0 in 2004 and has won many converts.
Both CVS and Subversion work in substantially the same way. Subversion adds several new features, including the capability to track versions of directories, a binary differencing algorithm, and more efficient branching and tagging of new versions of files.
Both CVS and Subversion are command-line applications, but Cervisia provides a GUI front-end to CVS and Subversion for KDE users. It can be used either as a standalone application or integrated into a Konqueror window. Cervisia allows you to connect to your repository and update and work directly with it. Eclipse also has a CVS plug-in that works the same way.
You have created this wonderful piece of software that you want to share with the rest of the Linux world. Because you are a kind and considerate programmer, you want to make it easy for nonprogrammers to install and run it on their systems. The best way to do this, especially on a SUSE Linux system, is to build an installation package with RPM.
You learned the basics of the RPM system in Chapter 21, “Keeping Your System Current: Package Management.” That section looked at RPM from the user’s standpoint: the standard way of installing software on SUSE Linux. In this section, you’ll get a brief introduction to how to create RPM packages from your source code. You’ll find a more detailed approach, with everything you need to know, by reading Ed Bailey’s Maximum RPM at http://www.rpm.org/max-rpm.
You can make an RPM package out of any program for which you have working source code. This means you can use programs you have created, but also any other open source program you think needs an RPM. Helping to package new RPMs for a project is an easy, excellent way to contribute to the open-source community. The process is quite simple:
Obtain the source code for the application.
Build the program source.
If necessary, make a patch including any changes required to build the code successfully if the original would not build on your system.
Ensure that the necessary RPM-specific directories exist somewhere on your system:
BUILD,SOURCES,SPECS,RPMS, andSRPMS.Create a spec file for your package.
Build the RPM package.
Test the package.
As a sample project, let’s make an RPM for the “Hello World” application you wrote using KDevelop.
Because you already have a working KHello program compiled from source, the first three steps in the process are complete. The key step is creating the spec file that tells the rpm application how to install KHello on someone’s system. The spec file can be created using any text editor.
There are eight sections in an RPM spec file: a header, a prep section, a build instruction section, an installation section, file cleanup, pre- and post-installation and optional uninstallation scripts, a list of files in the package, and a changelog.
The header section gives a basic description of the package and has a number of elements. Following is our header section for KHello:
Summary: "Hello World" for KDE
Name: khello
Version: 0.1
Release: 1
Copyright: GPL
Group: Applications/Games

Source: /home/mikemc/source/KHello/KHello.tgz
Distribution: SuSE Linux

%description
KHello prints the words "Hello World" in a KDE window.
The summary element is a one-line description of our RPM package. The application’s name and version are identified using name and version, respectively. A release number is used to identify sequential bug fixes if the extent of the recoding doesn’t warrant a version increase. The program’s licensing can be specified with copyright. The group element is used to identify which section under the K menu a shortcut icon will be placed.
The source element should point to a pristine copy of our source code (without any patches applied). More than one file can be specified by using source0, source1, source2, and so on. If you did need to apply a patch, those should be listed in the same manner as the source code using the Patch element.
The %description allows us to insert a complete description of what our application does; it can take up more than one line if necessary.
With our header section complete, we can now turn our attention to the prep session. The prep session consists of an sh script to prepare the working directory and source code. We can also use predefined RPM macros to perform common tasks. All we’ll need to have in our prep section is a reference to RPM’s %setup macro:
%prep
%setup
If you had a patch file, you would also want to reference the %patch macro on a separate line after %setup.
The Build section is relatively straightforward. You should put any commands here that you would need to use to build the software after you had untarred the source, patched it, and cd’ed into the directory. This is just another set of commands passed to sh, so any legal sh commands can go here (including comments).
Your current working directory is reset in each of these sections to the top level of the source directory, so keep that in mind. You can cd into subdirectories if necessary.
%build
make
The Install section works much the same way as Build. Ideally, you can run make install, but if the Makefile doesn’t provide the capability to automatically install an application, it will be necessary to write the sh script to accomplish this here.
%install
Make install
The Cleanup section is used mostly for testing purposes. Use the %clean macro to remove any leftover files from the BuildRoot directory before running a second time.
You can run pre- or post-installation scripts by using the %pre or %post macros in this section. Similarly, you can run scripts before or after an uninstallation using %preun or %postun.
All the files included in your package must be listed in the Files section. You will generate a file list in your first test build, which you can then copy to this section. There are also some macros to help with this listing, which you can find at http://www.rpm.org/RPM-HOWTO/build.html.
The last section of the spec file is a changelog, listing new features and fixes in this version. Each entry begins with a standard string:
*date +"%a %b %d %Y" <YourName> <YourEmailAddress>
A subsequent line begins with a – and lists the changes. For our example, because you’re just at the first version, type something like First version. You can enter anything, but the changelog should be as informative as possible.
%changelog
*Fri Sep 30 2005 mikemc [email protected]
- Created first version.
Save this file in the KHello directory, and you’re just about ready to go.
The contents of %files are critical because if a file is not listed, it will not be included in the final RPM package. One way to generate a good file list for your spec file is to get the source to build cleanly without using RPM. To do this, unpack the sources and preserve the directory by changing its name to KHello.orig. Then unpack the source again so you have two directories. Go into the KHello source directory and build it.
If you had to edit any code, you’ll need a patch. After you get things to build, clean out the source directory from any files that were made from the configure script. Then cd back out of the source directory to its parent. Use the diff utility to create a patch file:
diff -uNr KHello.orig KHello > KHello-bugfix.patch
This will create a patch for you that you can use in your spec file. Note that the buxfix that you see in the patch name is just an identifier. You might want to use something more descriptive as to why you had to make a patch. It’s also a good idea to look at the patch file you are creating before using it to make sure no binaries were included by accident. Afterward, copy the file list generated by the build into your spec file.
Now that you have a useful spec file, it’s time to copy your files to their proper place in the RPM directories created earlier and build your RPM. The original sources and patches should be copied to the SOURCES directory and the spec file is copied to the SPEC directory.
Build the RPM by entering into the SPEC directory and issuing this command:
rpm -ba khello.spec
The command will build both a binary RPM and a source RPM. If you want only a binary package built, use the -bb argument instead, or use -bs if you want only a source package.
RPM will use the BUILD directory to compile the application from the source code and patches and then place the finished binary package file in RPMS. The finished source package file will be placed in SRPMS. With some good fortune, you should now be able to change into the RPMS directory and run rpm –ivh khello.rpm to install your new package.
If possible, try installing the package on at least one other computer. After you have successfully built your RPM, register at freshmeat.net and announce your new application!
This very brief introduction to the tools of programming cannot possibly scratch the surface of what you need to know to get started in the field. If you have further interest in programming, here are a few of the better books on bookstore shelves:
Sams Teach Yourself C++ in 21 Days, by Bradley Jones and Jesse Liberty
The C++ Programming Language, by Bjarne Stroustrup
Sams Teach Yourself C in 21 Days, by Bradley Jones and Peter Aitken
The C Programming Language, by Brian W. Kernighan and Dennis M. Ritchie
Sams Teach Yourself Java 2 in 21 Days, by Rogers Cadenhead and Laura Lemay
Eclipse Kick Start, by Carlos Valcarcel
Eclipse in Action, by David Gallardo, Ed Burnette, and Robert McGovern
http://gcc.gnu.org—Home of the GNU Compiler Collection.
http://gcc.gnu.org/frontends.html—Front ends for other languages available for GCC.
http://www.gnu.org/software/autoconf—The Autoconf configuration utility.
http://gcc.gnu.org/java—GCC’s Java compiler, GCJ.
http://subversion.tigris.org—The very well-designed Subversion site.
http://svnbook.red-bean.com/en/1.0—The online book, Version Control with Subversion.
https://www.cvshome.org—The CVS site, secure and also well organized.
http://www.linux.ie/articles/tutorials/cvs.php—A somewhat cheeky CVS tutorial.
http://eclipse.org—The hub of the Eclipse community. Everything you need to get going and keep going.
http://www.eclipseplugincentral.com—The place to find your needed Eclipse plug-ins, with news, too.
http://www-128.ibm.com/developerworks/java/jdk/eclipse/—The IBM Development Package for Eclipse. Includes the IBM Java Development Kit optimized for Eclipse.
http://www.kdevelop.org—News, forums, documentation, and a real-time chart indicating the number of downloads per hour of this IDE.
http://anjuta.sourceforge.net—The GNOME/GTK+ IDE.
http://www.digitalfanatics.org/projects/qt_tutorial—Tutorial for C++ developers to learn Qt.
http://doc.trolltech.com/3.3—The official reference documentation for the current version of Qt.
http://www.rpm.org—Home for information on the Red Hat Package Management system. The site includes an online version of Ed Bailey’s 2000 book, Maximum RPM.
http://www.rpm.org/RPM-HOWTO—An excellent guide to creating an RPM.