
IN THIS CHAPTER
SUSE Linux makes hundreds of Linux applications available to you with just a few clicks of your mouse. Many of these are installed along with your system, but you can install many more at any time.
New and updated applications are released constantly. Most applications developed for Linux are not produced by a single company needing to get out a new version on a given date to make this quarter’s sales projections. They are released when they are ready.
When security issues are discovered in an application, patches can appear within hours. Keeping up with all these changes could be an administrative nightmare, but SUSE Linux makes it easy for you. YaST is, after all, Yet another Setup Tool. The Install/Remove Software and YaST Online Update (YOU) modules are designed exactly to make it easy to install the tools you need and keep them as up-to-date as possible.
In this chapter, you’ll learn everything you need to know about installing, removing, and updating your system and its applications. In addition to the YaST software tools, you’ll learn how to update your system with the Advanced Package Tool (apt), originally created for the Debian distribution and adapted for use with SUSE Linux.
You got a taste of how YaST installs software during the initial system installation. You chose from among four standard installation types: Minimum (command-line only, no X), Minimum Graphical (with X, but no desktop environment), Standard with GNOME, or Standard with KDE. YaST then assembled the packages included in your selection and installed them.
Sooner or later, you will need an application not included in that standard system installation. Unless that application is brand new, chances are you’ll find it on the SUSE Linux CDs. This means you’re just a few minutes away from having it installed on your system.
Follow these steps to install any new software package(s) from the SUSE Linux installation disks.
After inserting the first SUSE Linux installation CD, start YaST. Enter your SuperUser password and YaST will open to the Software page. Click Software Management. After reading the current package setup, YaST displays the Search page (see Figure 21.1).

This is a standard search page, and it is excellent for finding specific applications, either by name or function. You can use Search if, for example, you want to see what Perl modules you have installed and what others are included in the distribution. Enter perl- into the Search box (the hyphen is there because all Perl module packages use the syntax perl-<module name>).
Sometimes you might want to explore the CDs for interesting applications or to look for a particular type of program. The Package Groups filter lets you do that. Use the drop-down Filter menu to display the Package Groups (see Figure 21.2).

Figure 21.2. Use the Package Groups filter to browse through a list of similar or complementary applications.
With Package Groups, everything is organized in a tree by type of application. Click a branch to see all the relevant packages. Some branches are further subdivided for a narrower selection, but the Multimedia branch displays everything in CD, Sound, Video, and Other.
Whatever filter you choose, YaST will show all the matching packages in the upper-right pane, with pertinent details. Click any individual package for a more detailed description of that package in the lower-right pane. Installed packages will be checked. To install any others, check the box. You can also right-click any package and choose from the following menu options:
Install—Selecting this option will install the package.
Do Not Install—Selecting this option specifies that the package should not be installed.
Keep—Selecting this option specifies that a previously installed package should remain installed and not be modified.
Delete—Selecting this option uninstalls the package.
Update if Newer Version Available—Selecting this option specifies that an already installed package be updated only if a newer version exists in the installation source.
Update Unconditionally—Selecting this option specifies that the already installed package be updated with the version residing in the installation source, regardless of its version.
Taboo—Never Install—Selecting this option specifies that the package is to never be installed.
Protected—Do Not Modify—Selecting this option specifies that the package is already installed and should not be modified.
You can also configure special installation options without right-clicking the package using the check box. Clicking the check box next to an installed package once displays the Update icon, which is really a reinstall. Double-clicking the check box marks the package for removal. Some installed packages appear in red type; this means that the version you have installed now is newer than the package on the CD. Choosing Update on these packages will revert the current version to the version on the CD.
When you have finished choosing packages, click Accept to complete the installation. Occasionally, you’ll see one of two additional screens. One screen tells you that some other packages will be installed in addition to your selected packages to satisfy some dependencies (see more about dependencies in the next section “The Basics of the Red Hat Package Management System [RPM]”). The other screen indicates that one or more of your selections will conflict with an existing package and offers suggestions about how to deal with the conflict.
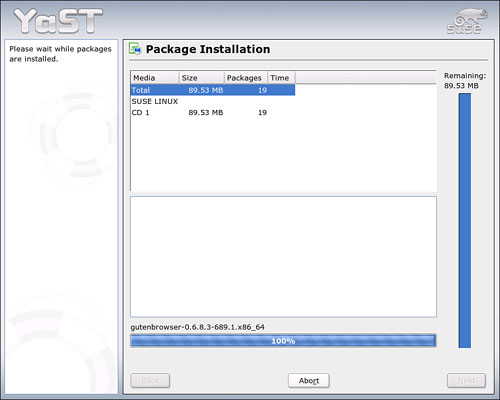
YaST then installs the selected packages (see Figure 21.3), processes any other requests made in this session, and runs SUSEConfig to make sure everything’s in order. When completed, YaST asks whether you want to install any other packages. Click Install More to do so or click Finish to close the Install module.
You can also use YaST to install a package from the command line. To do this, you must first know the name of the package you want to install. When you do, enter the following:
yast -i package_name
For example, if you wanted to install the dosbox package, you would enter the following:
yast -i dosbox
Just as when using the Software Management module, installing a package from the command line performs a dependency check and automatically installs any dependent packages required.
After installing any new package, you should always run YOU to check for updated versions of the software. This protects your system against any bug or security problem that may have been discovered and fixed since the last SUSE Linux release; it often gives you new features, as well.
You’ll learn more about YOU later in this chapter.
In the preceding example, you used YaST to install additional packages from the SUSE installation CDs. However, you can use YaST to specify other locations from which packages should be installed. You can select an FTP or HTTP server on the Internet, a server on your local network, or a directory on your local hard drive (assuming the packages have been copied there).
Having an alternative installation source can be a lifesaver when you need to install a new package, but have misplaced or damaged your SUSE Linux CDs. Installing from the Internet also ensures that the packages you are installing are the most current available.
Let’s take a look at how to add a SUSE mirror site on the Internet as an additional installation source. Complete the following:
Open a web browser and navigate to http://www.novell.com/products/linuxprofessional/downloads/ftp/int_mirrors.html. This website provides a listing of mirror sites you can use as installation sources.
Note the URL of the mirror sites closest to you.
Start YaST and provide your root password.
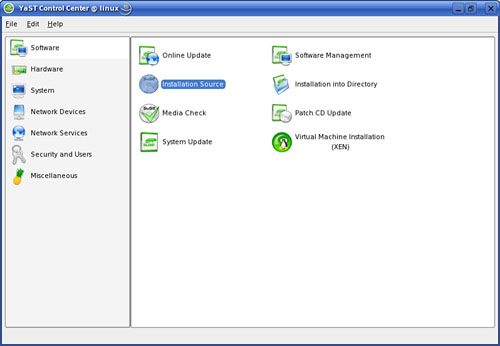
In YaST, select Software. You will see a module in the right pane called Installation Source, as shown in Figure 21.4.
Select Installation Source. The screen in Figure 21.5 is displayed.
Notice in Figure 21.5 that your CD or DVD drive is already configured as your installation source by default.
Select Add, FTP or HTTP, depending on the protocol used by the mirror site you’ve selected. The screen in Figure 21.6 is displayed.
Under Protocol, mark the correct protocol for the mirror site you are going to use.
In the Server Name field, enter the DNS name or IP address of the mirror server you’ve selected. For example, if you were going to use the mirror at Oregon State University, you would enter
ftp.oregonstate.eduin this field. Be sure you don’t enterftp:// or http://.In the Directory on Server field, enter the path to the root of the distribution you want to use, without leading or trailing forward slashes.
This part is a little tricky. The issue here is that every mirror site uses a slightly different directory structure. You will need to open a browser window, navigate to the mirror site, and then burrow down through the links until you arrive at the root. For example, on the Oregon State mirror, you would need to delve through to
/pub/suse/suse/i386/10.0/to arrive at the root of the SUSE Linux 10.0 distribution on the site. Then, in the Directory on Server field, you would enterpub/suse/suse/i386/10.0.Select OK. You should see the mirror site added as an additional installation source.
Ensure the Status of the mirror site is set to On.
YaST checks installation sources in the order they appear in this screen. If you want YaST to use the mirror site before your local CD or DVD drive, select your mirror site and select Up until it appears first in the list.
Select Finish.


Note
If you enter the wrong path, you’ll see an error message that states something to the effect of ERROR(InstSrc:E_no_instsrc_on_media). if you see this message, one of two things has happened. Usually, this error occurs when you use a leading or a training forward slash in the directory path. It can also occur if you use the wrong path. Remember that the path must point to the root of the distribution on the mirror site, not to the directory where the package files reside.
At this point, you can test your new installation source by opening the Software Management module in YaST. When you do, you’ll see that the module retrieves its package information from the remote mirror site instead of from your local CD or DVD drive.
With this in mind, we need to relate a little background about applications and packages.
The RPM system was inaugurated in 1995 to manage applications in Red Hat Linux 2.0. It was the successor to a collection of Perl scripts that functioned as the earliest Linux packaging tools. Rewritten in the C language in 1996, it quickly became the de facto standard for managing application installations for several distributions, including SUSE Linux.
The basic idea behind RPM is to have a single “pristine” archive of an application’s source code that can build packages for different systems and that can track new versions. An RPM database of all available applications is installed on your computer (in /var/lib/rpm) and is accessed by YaST and other configuration tools to determine exactly what is on your system, what might be new and updated, and what files each package provides that another package might need to run properly.
This last part, the dependency resolver, is one of the features that made RPM so successful among Linux developers and distributors. When you look at a package in YaST, click the Dependencies tab in the lower-right corner. Here, under Provides, is a list of every file included in the package. After the Provides list, the Requires list tells you every file that this package needs to run, and the Prerequisites list tells you what needs to be installed before you install this package (down to the minimum version number, if necessary). Next up is the list of packages that this package will replace or make obsolete. You have to hope that some other package doesn’t require one of these; if it does, you’ll get a warning. Finally is a list of conflicts; installing this package will create problems for applications on this list.
RPM packages are now more secure, as packagers can include digital signatures encrypted with GNU Privacy Guard (GnuPG). All packages produced by SUSE Linux are signed, so you know they are genuine.
Note
Interested in packaging your own software with RPM? See Chapter 28, “Using the GNU Compiler Collection and Other Programming Tools.”
SUSE Linux is known for including the largest number of application packages of the major Linux distributions, but it doesn’t include every application ever created. Because Linux developers come up with new ideas all the time, there’s always something new to try as well.
You can download and install just about any RPM package from any source and run it on your SUSE Linux system.
It’s possible that new packages may have some ill effect on your system’s stability, but that’s rare, especially with RPMs.
When you visit a software repository like freshmeat.net, you can see dozens of new and updated applications posted daily. Many developers build RPMs for their applications to make things relatively easy for users to install. Some even build separate RPMs for Red Hat and SUSE users.
You should create a single directory for your downloaded files. It should be in your home directory. Set up your browser(s) to download all files to that directory. The reason to do this is because you can then add that directory to YaST’s installation sources and directly install new RPMs in YaST.
To add your ~/download directory to YaST’s installation sources, follow these steps.
Open YaST. Select Software, Installation Source.
Click Add and select Local Directory from the drop-down menu.
Type in, or browse to, the
~/downloaddirectory. Click OK to confirm.YaST will check for a “product,” and then give you a message asking you to click Continue to make RPM packages available in the packages section. Do that. The directory should appear in the main window with status On.
Now when you download an RPM package to that directory, you can open YaST’s Software Management module and install that package.
An Internet connection is all you need to keep your SUSE Linux system current. This section tells you about using YOU and its companion application, SUSEwatcher, to maintain your system in tip-top shape. Every package posted to a YOU server has been tested by SUSE staff to ensure that it works correctly with your system.
For the most control over the update process, run YOU manually. You can choose which server to access, which applications to update (or not), and get more information on the patch applied to the application. It takes a little time, but it is not especially complex.
Open YaST and click Online Update. Figure 21.7 will appear.
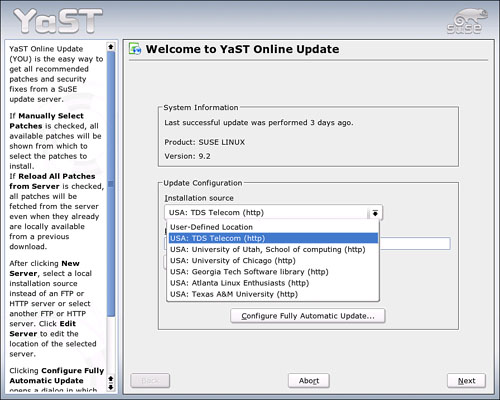
For a long time, SUSE maintained just a few online update servers, in Germany and in a few other European locations. YOU always checked for a new list of servers whenever it opened, but the list changed rarely. In early 2004, many more update servers came online, and YOU delivered a geographic list to users.
Select one of the choices from the drop-down menu. You have the option to define a location from the menu, add a new server, or edit the current server address from buttons on this screen. You should rarely, if ever, have to do that.
Click Next to check for updates. YaST will compare its list of currently installed packages to the packages in the Update directory. If there are updates available, you’ll see a screen similar to Figure 21.8. At the top of the screen is the list of available updates. Security updates are marked in red. If you had the Select Packages Manually box checked on the Server page, you may see some packages that aren’t relevant to your system, but you can install them nonetheless by checking the appropriate box.

Figure 21.8. The YOU Update screen lists security updates (marked in red) with detailed descriptions of the problem the fix solves.
You can see a detailed description of each patch in the left middle pane. In the case of security patches, this describes the problem solved by the patch. For more mundane updates (bug fixes, new releases, and other patches unrelated to system security), the level of detail in the descriptions runs the gamut. Click Accept to download and install the updated packages.
YOU will download and install the selected packages, giving you an onscreen progress report (see Figure 21.9). When the download is complete, check the Remove Source Packages After Update box to conserve space on your hard drive, and then click Finish to run SUSEConfig and return to the YaST Control Center.

As with installing packages, you can also update your SUSE Linux system from the command line. This is done using the online_update command. This utility utilizes the following options:
-u—Specifies the URL where updates should be downloaded from.-g—Download the updates, but don’t install them.-i—Install downloaded updates.-k—Check for new updates.-p—Product for which updates should be downloaded.-v—Product version for which updates should be downloaded.-a—CPU architecture for updates.-d—Download updates and simulate installation (for testing).-s—Display a list of available updates.
That’s all there is to it. With the exception of kernel updates, you should never have to reboot the system to complete an update.
Since version 8.2, the SUSEwatcher utility monitors your designated YOU server for updates and notifies you when there’s something new.
Included in the KDE-SUSE package, SUSEwatcher (and its companion, the Plugger hardware detection utility) sits in the KDE and GNOME panels. Most of the time, you’ll just see the green smiling face of the SUSE Linux mascot, Geeko, indicating you are current. But occasionally, the icon will turn an eye-catching red with an exclamation point. This tells you that new security updates are available. More rarely, the icon will turn yellow, indicating that a nonsecurity update has been posted.
Click the SUSEwatcher icon to display the dialog box shown in Figure 21.10. This dialog box is the only settings interface for SUSEwatcher.
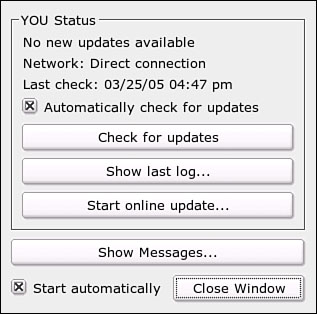
Figure 21.10. SUSEwatcher checks the YOU server for updated software. Click Start Online Update to run YOU.
To run YOU, click Start Online Update. YOU will ask for the SuperUser password and then run normally.
Unless you have a real aversion to taskbar icons, you should have SUSEwatcher set to start automatically. If you have a broadband or LAN connection to the Internet, you should have SUSEwatcher automatically check for updates. It will then check the server once every 24 hours. If you have a modem connection, you have two options: If you want to have the servers checked automatically, you need to have your modem set in YaST to Dial on Demand. See “Configuring Your Dial-Up Internet Connection” in Chapter 12, “Connecting to the Internet,” to learn how. If you want to run SUSEwatcher yourself, click the icon regularly and choose Check for Updates from the dialog box.
Tip
Can’t find the SUSEwatcher icon? From the KDE menu (or the main menu in GNOME), go to System, Desktop Applet to start SUSEwatcher.
Maybe you don’t want to know exactly what package is getting updated at any given time. Maybe you don’t want to take a few minutes every so often to keep your system secure and updated. You don’t have to sacrifice security for a little laziness. YaST can do this for you.
When you open YOU, click Configure Fully Automatic Update. Figure 21.11 appears.

Figure 21.11. Configure YOU to run daily or weekly and you never have to worry about keeping your system current and secure.
Check the Enable Automatic Update box and the default times appear. If you are more concerned with pulling down security updates, choose to update daily. If you connect to the Internet with a modem, be sure to select a time when you are always online, or configure your modem to Dial on Demand. Click OK to confirm. You can still run YOU manually if, for example, SUSEwatcher identifies a new update.
In addition to the RPM system, the APT packaging system developed for the Debian Linux distribution is the other most popular Linux install and update tool. APT’s ease of use rates highly. Using APT to install most packages from the command line involves typing apt-get install <package> and APT does the rest.
Developers for the Brazilian Linux distribution Conectiva first created apt4rpm to bring the benefits of APT to RPM-based distributions. Richard Bos further adapted the program to SUSE’s eccentricities. APT is not yet included in the official SUSE distribution, but is readily available from the APT for SUSE website, http://linux01.gwdg.de/apt4rpm. Many APT repositories have also been created to make using APT to download and install new software that much easier.
APT works a lot like YOU. Both applications require the SuperUser to run them; each application accesses the same RPM database when they start up to determine what application packages are installed on your system. To find new versions of current applications, and completely new packages, YaST and APT seek out designated remote servers, but YaST has a list of Novell/SUSE-owned servers that are known to mirror the existing SUSE Linux distribution. APT uses a special server-list file, /etc/apt/sources.list, to access file repositories. APT repositories include mirrors of the SUSE Linux distribution and other sites hosting SUSE-compatible RPMs. With the separate apt4rpm utility, you can even host your own APT repository.
A broader range of packages appear in APT repositories than on the official SUSE servers, and updated versions of many popular applications (web browsers, desktop environments, The GIMP, and the like) appear much faster on the APT repositories than on the SUSE servers. The downside of this speed is that SUSE doesn’t put an updated package on the YOU server until it has been tested and functions well under SUSE Linux. It doesn’t happen often, but you can run into trouble using new applications installed with APT, although no more trouble than you would experience downloading an RPM from another website yourself and installing it.
To download and install APT, go to the APT for SUSE site and scroll to the Software Installation section. Click the link for your SUSE version and architecture (9.2 for x86 PCs, 9.2-x86_64 for 64-bit processors). Download both the apt and apt-libs packages; then run the YaST Software Management module to install the two packages.
Before you can use APT, you need a sources.list text file to point to SUSE APT repositories. You can find a good default file at the APT for SUSE site in the Advanced Package Tool Configuration section. As before, choose the link for your version and architecture.
Caution
If you have a 64-bit processor, resist the temptation to add 32-bit apt repositories to your sources.list file. You may discover that there’s a “new” 32-bit update for one of your 64-bit packages, and apt will cheerfully download the package and then announce it can’t install the new package because the filenames are different.
Save the text file to your home directory, edit the file to your liking, and then copy it as the SuperUser to /etc/apt/sources.list.
Caution
Many of the repositories included in the sample sources.list file link to experimental packages that may make your system relatively unstable. If you just want to use apt to install stable packages, comment out these sections: kernal-of-the-day kraxel suse-people suse-projects. You may also want to comment out the suser-<name> sections, as well. If you want to keep up with apt upgrades, however, include suser-rbos.
When you have your sources.list file installed, you can run APT. Connect to the Internet and open a shell as the SuperUser. From the shell, gather the list of current files at the repositories by typing the following:
apt-get update
The first time you run this, it may take a little while, especially if you have a modem connection.
Note
Always run update before performing any other operations in apt. New and updated packages can appear in a repository at any time, and any given package may supply a dependency for the package you’re using apt to get. Synaptic will do this automatically when you open it (if you haven’t updated in the previous 48 hours).
When the repository update is completed, you can install (or update) any package in the repository. One package you might like to start with is the fine GUI front-end for APT, called Synaptic. Type the following:
apt-get install synaptic
After it is installed, Synaptic adds itself to both the KDE and GNOME System Configuration menus, so you can launch it from there. After prompting you for the SuperUser password, Synaptic will display a YaST-like Search screen, but you might prefer to browse through the list of available updates. In the lower-left corner are four package views, including the Search view you’re seeing now. The Sections view corresponds to YaST’s sections, and you can see both installed and available packages here. The Status view groups packages by whether they are installed, upgradable, or not installed. Click Status to display this view (see Figure 21.12).

Figure 21.12. Synaptic makes it easy to manage application packages. Installed packages with available updates have the fill-in check box with a star in the corner.
In the smaller left pane, you’ll see five or six status categories. To see all packages with available updates, click Installed (upgradable). Notice that the check box to the left of each package is filled in with a yellow star in the upper-right corner. Click any package to see a description in the right bottom pane. Right-click and choose Mark for Upgrade from the context menu. If you want to upgrade everything on this list, click Mark All Upgrades from the toolbar. As with RPM, Synaptic (and APT as well) may add and remove packages to resolve dependency issues and will tell you before you commit to the changes.
Caution
Always check to see that APT is not removing critical packages without replacing them, lest you find yourself unable to boot later. And always back up your system and other critical files like the kernel, the bootloader, your desktop environment, databases, and the like before upgrading major packages.
Before committing to any new update, click the Custom view button, and then click Marked Changes to see the list of packages you are updating, installing, or removing. When you’re ready to run APT, click Apply from the toolbar. APT will download all the marked packages and then install them one by one. You will see a progress bar and be notified of any problems. To get more information about the installation process while it is happening, go to Settings, Preferences, and check the Apply Changes in a Terminal Window box.
Ximian started out as a company that built applications for the GNOME desktop, and it did some terrific stuff, especially the Evolution personal information manager. Ximian started branching out from the GNOME focus with an updating product it called Red Carpet. Because Ximian was acquired by Novell a few months before SUSE, Novell has been integrating Ximian products into its own product line. Red Carpet now is the main updating tool for the Novell Linux Desktop. In the guise of Novell ZENWorks Linux Management, Red Carpet also updates the Novell Open Enterprise Server.
Like the other tools covered in this chapter, Red Carpet simplifies the task of updating and installing software for your distribution. Some terminology is different, however. For example, a Red Carpet download site is called a channel, to which you subscribe to see what’s new. You should, nonetheless, find Red Carpet easy to understand and learn.
As with APT, Red Carpet is not available through YaST. To get the latest version, visit ftp://ftp.ximian.com/pub/redcarpet2/ with a web browser or FTP client. Choose your SUSE version and architecture (32-bit Intel x86 or 64-bit x86_64).
You will see several RPM packages in this directory. Download these three: rcd-<version><architecture>.rpm (this is the daemon that runs in the background), rug-<version><architecture>.rpm, and red-carpet<version><architecture>.rpm. The combined file size of these three files is about 3MB, so it won’t take long to download.
You can use YaST to install these packages, but it may work better to run this from the command line. Log in as SuperUser, change to your download directory, and install the Red Carpet daemon first with this command:
rpm rcd-<version><architecture>.rpm
You’ll see some brief activity, and if successful, the rpm program will return you to the prompt. Repeat the process with the command line and GUI packages.
rpm rug-<version><architecture>.rpm
rpm red-carpet-<version><architecture>.rpm
Each should now install and run on your system. The Red Carpet daemon must be running for either of the other programs to work, so there’s one last step in your installation. Type rcd to complete the installation. The Red Carpet daemon will now run in the background.
The fastest way to use Red Carpet to update your system is through the rug command-line utility. As always when installing new software, you should be logged in as the SuperUser when using rug.
Just typing rug at the shell prompt will give you a list of rug commands. The first time you run rug, it will locate your existing RPM database, so it knows what is on your system now. To see what channels Red Carpet is using to update your system, type rug ch. You should see something like this:
subd? | Alias | Name
------+-----------------------+----------------------
| redcarpet2 | Red Carpet 2
| rcd-snaps | rcd snapshots
| suse-92-x86_64 | suse-92-x86_64
| suse-92-x86_64-kernel | suse-92-x86_64-kernel
The first column, subd?, tells you if you are subscribed to a channel—that is, whether you can access and download from the listed site. In this instance, no channels are subscribed to. Let’s sign up for the Red Carpet updates and the SUSE server as well. Type the following:
rug sub redcarpet2 suse-92-x86_64
Now if you get the channel list again with rug ch, you should see this:
subd? | Alias | Name
------+-----------------------+----------------------
Yes | redcarpet2 | Red Carpet 2

| rcd-snaps | rcd snapshots
Yes | suse-92-x86_64 | suse-92-x86_64
| suse-92-x86_64-kernel | suse-92-x86_64-kernel
Tip
The German server that delivers SUSE packages to APT users also is configured as a Red Carpet service. You can add it as a channel with this command:
rug service-add http://open-carpet.org/services/gwdg/
The Red Carpet graphical application operates very much like Synaptic for APT, rather than the way YaST goes about updating. It uses a tabbed interface to keep you in the know without overwhelming you with lots of material on a page. To begin in KDE, go to System, Configuration, Red Carpet. Red Carpet checks your channels for new stuff and tells you if there are updates for your installed applications (or tells you if you are current).
Click Available Software to see what applications are available in your channels that you have not installed. Use the Section menu to break all the packages down by function, if you are looking for something specific, or just browse through the alphabetical list.
If you find something on this tab that you want, select it and click Mark for Installation. An icon appears and your choice is added to the Pending Actions list on the left (see Figure 21.13).
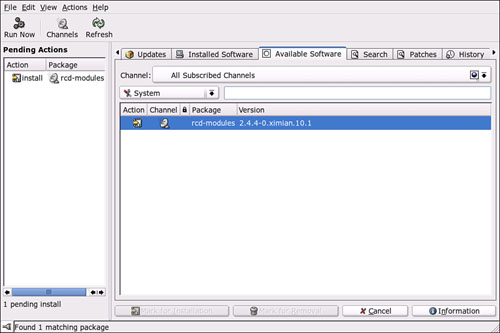
Figure 21.13. In Red Carpet, you can see the choices you make in the Pending Actions list on the left.
When you’ve identified the applications you want to install or update, click Run Now to begin. Red Carpet checks dependencies and lists all tasks to be carried out. Click Continue.
Red Carpet downloads and installs your selection(s). Click OK when it is finished. You will return to the main screen, where you can choose more applications to install, or exit.
Tip
There are so many applications included in the SUSE Linux distribution, sometimes you may not know everything you’ve installed. Even if you’re not the SuperUser, Red Carpet can help you if you just want to see if you have installed that application you just read about in a magazine. Open the Red Carpet graphical application and click Installed Applications.
Some programs are too complex or too specialized for the programmer to go to the trouble of creating RPMs for them. So the programmer archives the source code in a tarball and sends it out. Often, simply extracting the code into an appropriate directory is all that’s needed to make the application work, as you’ve seen with several of the blogging tools in Chapter 14, “Creating Basic Websites,” and the Azureus BitTorrent client in Chapter 17, “Secure File Transfer.”
Other programs must be compiled before they can work. This section will help you do this. Before beginning, you will need to have the GNU Compiler Collection (gcc) installed to handle this task.
First, when compiling new source code, create a new subdirectory in your home directory called source. This will let you compile your code as a user and help prevent any bad (or even malicious) code from harming your system.
Now the task is to extract the archive into the new ~/source directory. You can do this in GNOME File Roller or Ark for KDE, but it will be faster from the shell. Change directory to the ~/download folder (or wherever your source archive is sitting). Depending on the archive format of the original file, type one of the following commands:
tar xzvf <package>.tgz -C ~/source

tar xzvf <package>.tar.gz -C ~/source


tar xjvf <package>.bz -C ~/source

tar xjvf <package>.tar.bz2 -C ~/source
The first two are different extensions for a tar/gnuzip archive, whereas the last two were archived using BZip. The -C switch extracted the archived files to the ~/source directory. If you are not sure what archiving method was used, use the file command to help you determine the format. Type file <package>.
Now change to the extracted program directory under the ~/source directory. Look for a file (usually named in ALL CAPS so you can find it better) called something like README or INSTALL. This file will have detailed instructions on how to compile and make the program work. Chances are these instructions will be some variation on the Configure/Make/Make Install process. This means you will first run a script called configure, as follows:
./configure
This script confirms that all dependencies are met and the build environment is solid. When this script runs successfully, compile the program with the make utility included in gcc:
make
Finally, log in as the SuperUser and install the program with the same make utility:
make install
http://www.novell.com/coolsolutions/feature/11504.html—A screenshot-filled YaST tutorial from Novell’s Cool Solutions site.
http://www.suse.de/~sh/YaST2-Package-Manager—Written to explain the big changes in YaST with v8.1, there’s a lot of good information here on how YaST works.
http://portal.suse.com/sdb/en/2003/04/82_susewatcher.html—Documentation for SUSEwatcher, including descriptions for the icons.
http://www.rpm.org—Home for information on the Red Hat Package Management system. The site includes an online version of Ed Bailey’s 2000 book, Maximum RPM.
http://linux01.gwdg.de/apt4rpm—Everything you need to know to use apt for SUSE Linux.
http://www.nongnu.org/synaptic—The Synaptic GUI for apt. Download the current source from here, if you can’t wait for a new package via apt.
http://packman.links2linux.org—Excellent repository for packages not yet included in the official distribution. Download directly or use APT.
http://speakeasy.rpmfind.net—The U.S. mirror for the RPMFind search engine.
http://rpmseek.com—Find more RPM packages here.
http://freshmeat.net—A giant repository of Linux and other open source software, organized by date received. Thus, the “freshest meat” is at the top.