
5.1 The Animated Sequence
animating a single interaction sequence of registered images
The last section showed how an interaction sequence can unfold by showing successive frames as a storyboard. In essence, time unfolds over space. Another approach is to animate the sequence, where the story unfolds by displaying successive frames in the same location over time. That is, the animated sequence becomes a movie.
The Slide Show
Chapter 3.6 described how presentation tools such as PowerPoint can simplify the task of creating individual sketches. Presentation tools are also very suitable for creating an animated sequence. The idea is simple: you create your storyboard as a sequence of successive PowerPoint frames. Then you go into slideshow mode to animate the sequence. But to make this work, you first need to know about the registration problem, and how to solve it by registering images.
The Registration Problem
Imagine the simple interface below (an equipment rental system), shown as a storyboard illustrating a person’s interaction while renting a pair of gloves and a jacket.

You want to animate this scene by using these images as frames. Each frame will be a slide in a slide deck in your presentation tool. We animate them by playing the slide deck as a slide show.
But what would happen if each image was in a slightly different position on each slide? The images would jump around, and the illusion of animation would be broken. For example, if we take the first four frames and simply place them atop each other without paying attention to aligning them, we may get something similar to what is shown below. This clearly won’t work, as the viewer doesn’t expect the static elements in the image – the window frame, its title, the position of unchanging content – to jump around between frames.

The Solution: Registering Images
The easiest way to solve the registration problem is to create a series of templates, where static items are always in the same fixed position on the slide (templates were introduced in Chapter 3.8). You would then modify these templates to create your actual frames. As long as you don’t move the fixed items around, your static items will then appear in the same place in your animated sequence.
1. Create a Master Frame Template
Create a master template that contains only those elements that are constant in each frame – the lowest common denominator of graphical items across frames. This will help you create other templates.
In our example interface, this will comprise the window itself, its title bar and title text, as well as the button and its text. We also specified some key positions of some items relative to another. First, we marked the upper left corner of the frame (or screen) edge, and specified the position of the window relative to that corner. This ensures that the window will always appear in the same spot on the frame. Second, we marked the window content margins at the left and right part of the window, because we always want the window contents to appear within this fixed margin.
Finally, because we will make copies of this template, we can expect the sizes and positions of all these elements will stay in the same place. Just in case, we’ve annotated the template with several key positions and sizes.

The beauty of using presentation software is that we can insert editable placeholders in the template, where the position of the placeholder content will remain unchanged even after we edit it. In our master template, for example, the left-adjusted title bar text and the centered button text will always be in the right position, even after we edit its text. Similarly, we can edit the text in the other more specialized templates, such as the information text on our text window and the items (and amounts) in our item selection window. The trick is to anticipate what our editable content will be, and to create and position our items accordingly so they can be edited in future frames.
2. Create Specialized Frame Templates
You can now refine the master template to make more specialized frame templates. Within a presentation tool such as PowerPoint, all you have to do is copy the slide holding the master frame template, and then edit that copy accordingly.

Finally, you can then copy and modify the template to create your final frames. For example, here are two frames created from the template for item selections. To compose these frames, you would just edit the existing text, and add and move a ‘cursor’ to indicate what the user has selected. The key is that all elements in the graphics are in the correct position across all frames, i.e., they are registered.

4. Place Each Frame in the Desired Sequence in Your Presentation Software
Because each frame is just a copy of a template, and because items are in constant locations, all you need to do now is place the frames in the order you want them played out as a sequence. This should be the same as your storyboard. For example, this is what the sequence looks like in PowerPoint. The left bar shows each frame in the sequence.
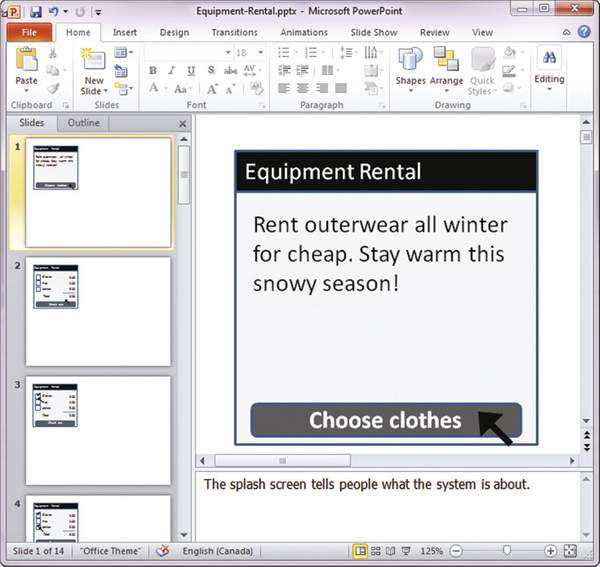
You can use the ‘speaking notes’ facility in a presentation tool to annotate your frames. For example, the bottom region in the figure explains what this particular frame is for.
While we illustrate our example using slideware, registering images can be used for other forms of media. Chapter 5.5 illustrates how the same technique can apply in video production.
Most presentation tools will let you just show your sequence as a series of slides. You can advance between slides either manually (e.g., by pressing the space bar) or automatically (e.g., by specifying a time between slides). The former is an effective way to show and explain your sequence to others, while the latter could be a means to let others see your sequence when you are not around (but you may want to annotate each frame to explain what is going on if there is any ambiguity). In either mode, you will notice that the animation is not fluid, mostly because the cursor jumps from one position to another. We will fix this in the next chapter.

You Now Know
Animating a storyboard is a simple matter of displaying each frame, one after another, at the same location. Image registration makes this effective, where the static elements across frames are displayed in exactly the same place. If your graphics jump around, it will break the illusion of continuity. You can create templates to help you register images, where your frames are just modified copies of each template. Because the static elements are in the same position, the elements will not jump around as you switch from one frame to another in your sequence.