
Letting Project Level Overallocated Resources for You
Instead of leveling individual tasks and assignments on your own, you can have Project calculate task or assignment delays to remove resource overallocations. Project searches through the project, looking for resources that display the Leveling indicator. Using the settings in the Resource Leveling dialog box, which is described later in this chapter, in the section “Configuring Settings in the Resource Leveling Dialog Box,” Project selects tasks to be delayed in order to resolve overallocations for resources that display the Leveling indicator.
NOTE
Project doesn’t delay material resource assignments. However, if the leveling operation changes the duration of a task, the material assignments might be contoured also.
If the project is scheduled from a start date, Project adds positive delays to tasks to remove overallocations. If a critical task is delayed, the leveling procedure causes the project to finish later. If the project is scheduled from a finish date, Project adds negative delays to tasks to remove overallocations. A negative delay causes a task to finish earlier and therefore to be scheduled to start earlier. If the task is a critical task, the effect of leveling on a fixed-finish-date project is to schedule an earlier start date for the project.
TIP
Do not attempt to use the Leveling command until after you enter all the tasks and all the information about each task and resource. If you use leveling prior to entering all information, you need to repeat the leveling operation after adding more tasks or redefining resources and resource assignments to accurately reflect the changes.
Configuring Settings in the Resource Leveling Dialog Box
There are a number of settings you should confirm or change before using Project’s Leveling command. The Resource Leveling dialog box contains the controls for the leveling operation (see Figure 11.36). You should generally open this dialog box when a task view is active because then you will have access to all the buttons and fields.
Figure 11.36. The Resource Leveling dialog box has many settings that determine how Project calculates the schedule when it does leveling calculations for you.

Whether a Leveling indicator is displayed in a resource table depends on your selection in the Look for Overallocations in a list box. As you change this selection, the highlight for overallocated resources is not affected, but the Leveling indicator appears less often if you select larger time units. Thus, if you increase the time basis from Day by Day to Week by Week, some Leveling indicators may disappear.
Table 11.3 outlines the choices and tools in the Resource Leveling dialog box and provides a brief description of each choice.
The following are the three possible values for the Leveling Order drop-down list box:
ID Only— If the ID number is the only basis for selecting which of several tasks will be delayed, tasks with higher ID numbers (those that are further down on the task list) are always delayed before tasks with lower ID numbers (those that are higher up on the task list). If the task list is created in chronological order—with earlier tasks listed at the top of the list and with one sequence of tasks leading to the finish date—the ID Only scheme essentially delays tasks with the later start dates. Delaying the tasks with later start dates minimizes the number of successor tasks affected by imposing leveling delays.
Standard— The Standard order, which is the default leveling order for Microsoft Project, uses seven factors (described later in this section) to determine which of several conflicting tasks is to be leveled first. One of those factors is the Priority rating that you can assign to tasks. In the Standard order, the Priority rating has relatively less weight than most of the other factors.
Priority, Standard— The same factors considered in the Standard order are used for the Priority, Standard order. Primary weight is given to the Priority assignment of each task (a factor that you can control).
In deciding which of two tasks should be delayed and which should be left unchanged, the Standard and Priority, Standard orders use the same set of seven factors, the difference being only in the greater weight assigned to the tasks’ Priority value in the Priority, Standard order. These are the factors, listed in descending order of importance:
Predecessor— Tasks that do not have successor dependencies are picked before those that have successor dependencies.
Amount of total slack— Tasks with more total slack are chosen before those with less slack.
Start date— Tasks that start later are delayed before those that start earlier.
Priority— You can raise or lower each task’s priority value to affect the selection of those to delay. The lower-priority tasks are chosen for delay before the higher-priority tasks. In the Leveling Order choice Priority, Standard, this factor is moved to the top of the list.
Constraints— Tasks with constraints are less likely to be delayed than those without constraints.
Other fields influence how Project treats tasks and resources when leveling is applied. These fields determine how likely it is that a task or an assignment will be delayed or split. With these fields, you can instruct Project to exempt a specific resource or task from being delayed or split by leveling:
Can Level— This resource field contains a Yes or No value. If the value is the default Yes, Project can delay assignments for that resource if it needs to in its leveling calculation. If the value is No, Project does not delay the resource’s assignments. The field does not appear on any prepared views or information forms. You can add the field to any resource table and enter No for those resources whose assignments you want to keep from being delayed.
Level Assignments— This task field contains a Yes or No value. If the value is the default Yes, Project can delay assignments to the task if it needs to in its leveling calculation. If the value is No, Project does not delay the task’s assignments. This field overrides the Leveling Can Adjust Individual Assignments on a Task check box in the Resource Leveling dialog box. You must add this field to a task view because it doesn’t appear in any standard tables.
Leveling Can Split— This task field contains a Yes or No value. If it’s the default Yes, Project can split tasks in its leveling calculations. This field overrides the Leveling Can Create Splits in Remaining Work check box in the Resource Leveling dialog box. You can add this field to a task view that contains a table.
TIP
If you give a task the priority value 1,000, Project never delays or splits the task when leveling (although you can manually assign a delay or split yourself). Project also leaves unchanged any leveling delay or split for such a task when you apply the Clear Leveling command.
You can assign priority values to projects as well as to tasks. When you level resources that are assigned to multiple projects, tasks in those projects with lower priority values are chosen for delay before tasks in projects with higher priority values. The priority value 1,000 ensures that no task in that project will be given a leveling delay when leveling the plan.
The priority value for the project overrides the relative priority values for tasks. For example, if one project has a higher priority value than the other, all tasks in the higher-priority project (even those with priority values close to zero) have higher priority than any task in the lower-priority project (except for those that have a priority value of 1,000, which are never delayed).
To assign a priority value to a task, follow these steps:
1. |
Select the task in a view that displays one or more task fields. You can select multiple tasks if you want to set them all to the same priority value with one step. |
2. | Figure 11.37. Setting priorities for a task controls how likely it is to be delayed because of leveling.
|
3. |
Select the General tab and type the priority value into the Priority box, using values between 1,000 (highest priority—least likely to be delayed) and 0 (most likely to be delayed). Or use the spin control to raise or lower the default priority value, which is 500. Remember that the higher the number, the less likely it is that the task will be delayed because of leveling operations; tasks with the priority value of 1,000 are never delayed. |
4. |
Click OK to close the dialog box. |

To change the priority level for a project, follow these steps:
1. |
Open the project. |
2. | |
3. |
In the Priority box, enter the priority level, using values between 1,000 (highest priority— least likely to be delayed) and 0 (most likely to be delayed). Or use the spin control to raise or lower the default value of 500. |
4. |
Using the Level Now Command
After establishing your choices in the Resource Leveling dialog box, you can instruct Project to level the project by using the Level Now command. If you select this command from a task view, the leveling occurs immediately, without prompts. If you select the command from a resource view, you see the Level Now dialog box (see Figure 11.38), which prompts you to choose between leveling all resources and leveling only the resources that you have selected.
Figure 11.38. You can level assignments for all overallocated resources or for just those that you have selected.

If you choose Selected Resources, only the overallocations for the resources in the selection are reviewed for leveling operations. If you select Entire Pool, all resources and all tasks are reviewed.
When you click OK, Project tries to resolve the resource overallocations by adding leveling delays to tasks—within the bounds you specify in the Resource Leveling dialog box. For the first overallocation problem it encounters, Project identifies the tasks causing the overallocation and notes the tasks that cannot be delayed. These include tasks that have hard constraints, tasks that have higher-priority assignments, and tasks that are already started. Note that task deadline dates do not keep Project from delaying a task. If more than one task that can be delayed exists, Project uses the set of seven factors previously discussed to select one or more of the tasks to delay.
NOTE
You can undo the changes made via the Level Now command if you choose Edit, Undo Level before changing anything else in the project.
Figure 11.39 shows the result of the leveling operation for the resource Howard Thompson. A deadline date has been added to the Create Advertising Plan task to illustrate how Project respects deadlines when leveling (it doesn’t).
Figure 11.39. After the Level Now command has changed the schedule, the Leveling Gantt Chart view displays preleveled taskbars for comparing the original schedule with the delayed schedule.
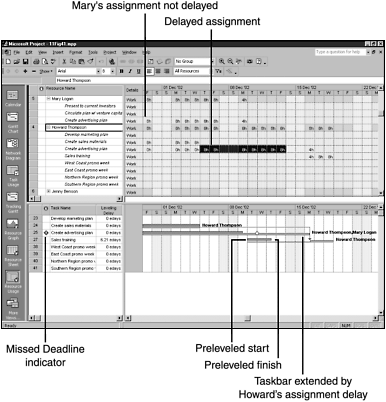
Only one delayed task is shown in Figure 11.39—Sales Training is delayed by 6.21 elapsed days. However, Howard’s assignment to the Create Advertising Plan task was also delayed (see the highlighted timephased work data in Figure 11.39), but Mary Logan’s assignment was not delayed. This combination of assignments extended the task’s duration past the deadline date for the task (note the deadline date marker in the figure) and the Missed Deadline indicator appears in the Indicators column, to alert you that the task deadline will be missed in the current schedule.
Note the new taskbars in the Gantt Chart view. When the Level Now command is executed, Project saves the current (before leveling) start and finish dates of all tasks into fields called Preleveled Start and Preleveled Finish. The Leveling Gantt Chart view displays these dates as preleveled taskbars above the scheduled bars for tasks so that you can easily see the scheduled dates before and after the leveling operation. Notice in Figure 11.39 that the lower bar for Sales Training is shifted to the right of the preleveled bar just above it, thus reflecting the leveling delay.
If one or more assignments are found where overallocations can’t be resolved, you see a message similar to the message in Figure 11.40.
Figure 11.40. Sometimes the Level Now command can’t resolve all the overallocation problems and Project prompts you for directions.

To respond to the unresolved overallocations message, you can do one of the following:
Click Skip to have Microsoft Project skip this resource and continue looking for other overallocations.
Click Skip All to have Project skip this resource and all others that cannot be resolved without pausing to alert you to those that cannot be resolved.
Click Stop to stop the leveling process and erase all the delays that have been entered so far.
Clearing the Effects of Leveling
You can use the Clear Leveling tool in the Resource Leveling dialog box to have Project reset leveling delays to zero for all tasks or for just the selected tasks. As mentioned previously, Project does not clear the leveling delay for tasks that have a priority setting of 1,000.
To use the Clear Leveling command, you must be in a task view. Choose Tools, Resource Leveling, Clear Leveling. The Clear Leveling dialog box appears (see Figure 11.41). Select Entire Project or Selected Tasks and click OK. All Leveling Delay fields are reset to 0 for the entire project or for the selected tasks.
Figure 11.41. You can quickly remove all leveling delays from the entire project or from selected tasks with the Clear Leveling command.

Understanding the Pitfalls of Automatic Leveling
The first option on the Resource Leveling dialog box is Automatic Leveling. If you select this option, Microsoft Project watches for resource overallocations as you assign resources and as the project schedule changes. The moment Project detects an overallocation, it quietly attempts to resolve it by delaying tasks in the background as you go on building the schedule. This seems like a powerful and useful option, but it has some drawbacks.
Most importantly, you are a far better judge than Project of the best choices for your schedule. You can’t provide Microsoft Project with all the information you bring to the decision-making process as you make scheduling choices. If you select Automatic Leveling, you will not be aware of the leveling decisions going on in the background. In some cases, if you saw a Leveling indicator, you might able to think of an alternative that doesn’t require delaying tasks or the project finish. It’s not uncommon to wind up with a bloated schedule that has lots of unproductive time because of all the leveling delays.
You also should note that Project doesn’t optimize the leveling strategy. Project doesn’t examine all possible combinations of task delays in order to choose the best solution in terms of lowest cost, earliest project finish date, or any other consideration.