Managing Resource Assignments
Many organizations use a two-phased approach to developing project schedules: An initial project schedule, using generic resources, is used to quickly establish a project’s preliminary schedule and cost, and then the final, detailed, schedule is created, using actual resources.
Enterprise templates, which are described later in this chapter, are a quick and easy way for project managers to create initial project schedules, using generic resources.
In addition, the Professional edition provides three tools that help project managers add resources to schedules and/or assign resources to tasks when creating preliminary or final project schedules: The Team Builder, the Assign Resources dialog box, and the Resource Substitution Wizard.
Each of these tools is described in detail in this chapter.
Using the Team Builder
Before you can effectively use the Team Builder, all enterprise resources must already be stored in the enterprise resource pool, and each resource must be assigned one or more enterprise outline codes or custom fields from the Enterprise Global template.
→ If you don’t know what the enterprise resource and project outline codes, custom fields, and generic resource names are for your organization, talk to your portfolio manager or administrator. If you are the portfolio manager or administrator and you need detailed information on how to plan, create, and use enterprise outline codes, see “Using Enterprise Outline Codes and Custom Fields,” p. 1021.
For example, assume that you are a project manager for Elkhart Software Corporation and you are responsible for developing a preliminary schedule for a new software development project in Elkhart Software’s Denver, Colorado office. Elkhart Software’s portfolio manager has provided you with the following information:
The enterprise generic resources that you need are already defined in the Enterprise Global template.
The RBS Enterprise Outline Code indicates the location of the resources (that is, Denver or Seattle).
Enterprise Project Outline Code 1 specifies the location of the project.
Enterprise Project Outline Code 2 specifies the project’s phase.
The start date for your new project is June 10.
You should save your schedule with the Elkhart base calendar.
Also, for the purposes of this example, assume that there are no enterprise templates that meet your needs, so you have made the following modifications to the project template Software Development as the basis for your preliminary schedule:
You have added several system administration tasks.
You have modified the effort or duration of each task in the schedule, based on your organization’s estimation methods.
You have modified each task’s predecessors and successors, as appropriate.
The following steps show how you can use the Team Builder to add enterprise generic resources to your new preliminary schedule. Note that these same steps can also be used to add enterprise actual resources to a schedule.
1. |
With your modified Software Development schedule open, select Tools, Build Team from Enterprise. If more than 1,000 Resources are available for display, a prefilter dialog box automatically appears. You can use an existing filter or a custom filter to reduce the list of resources displayed. → Because the schedule’s resources aren’t assigned to an enterprise calendar yet, you receive the warning “Enterprise Standard Calendars Are Needed,” which you can ignore for now. see “Managing Enterprise Calendars,” in Chapter 28 for information on using enterprise calendars. NOTE If the Build Team from Enterprise option is unavailable, you are either not connected to Microsoft Project Server, you have opened your schedule in read-only mode, or you do not have a schedule open. |
2. |
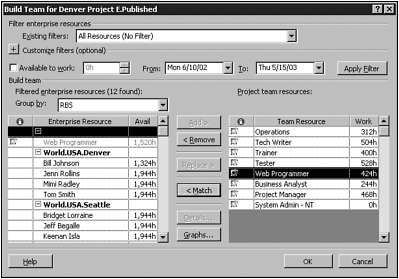
To replace the local resources in your Software Development file with generic resources from the enterprise resource pool, first you should list just the generic enterprise resources in the Enterprise Resource list. To do this, expand the Customize filters, enter generic in the Field Name, enter equals as the Test, enter Yes as the Value, and click the Apply Filter button. You should see just the generic resources in the Enterprise Resource list, as shown in Figure 26.1. Figure 26.1. You can use the filter mechanisms to reduce or identify the attributes of the resources in the enterprise resource pool.
|
3. |
To perform the replace function, select the team resource named Project Manager, select the enterprise resource named Project Manager, and click the Replace button. Repeat this process to replace each team resource with its corresponding enterprise resource, as follows:
|
4. |
Save your schedule as Denver Project E. |
So far you’ve used the Filter, Add, and Replace features of the Team Builder. The following list describes all the features of the Team Builder, as shown in Figure 26.1:
Existing Filters— This is a pull-down list of all filters currently available to you. You can create new filters by using the Save Filter button on the Customize Filter dialog box.
Customize Filters— You can use Customize Filters to create and save new filters. This optional field is collapsed when you first enter the Team Builder. You can click the + button to expand this selection and display a grid with tools for building a filter. You can use the Apply Filter command to apply a filter to the list of enterprise resources, and then you can save your new filters by clicking the Save Filter button.
Available to Work— You can use the Available to Work check box when you want to reduce the list of available resources to only those that have an amount of available time greater than or equal to the amount you enter, between the dates you specify. For example, if you need everyone on a project to be 100% available over a 6-month period, you enter 6mo in the Available to Work field and then select the start and end dates that are assumed to be the start and end dates of the project.
Group By— You can use Group By to organize the resources in the enterprise resource pool differently than the default alphabetical order. Because Elkhart Software has established the enterprise Resource Breakdown Structure (RBS) code to represent resource location, if you want to know who in the enterprise resource pool list is from Denver, you can enter RBS in the Group By field to group the enterprise resources by location.
Enterprise Resource— The resources in this column on the left side of the dialog box are defined in the enterprise resource pool. You can select any of these resources to build a project team. The Avail column shows how many hours each resource is available to work within the date and filter range criteria. Remember that other projects in Elkhart Software are using people from the same resource pool, so you might need to coordinate the selection of the resource for your project with the resource’s manager. Notice that each generic resource has a small icon to the left of its name.
NOTE
With all the Team Builder resource lists, you can click and use Shift+click and Ctrl+click to select resources.
Team Resource— The resources in this list are already assigned to the project or will be added to the project schedule when you click OK. The Work column shows how many hours each resource is assigned to work within the project’s start and end dates.
Add— You use the Add button to move a resource from the enterprise Resource list to the Team Resource list. As you add resources to the project plan, the Work column reflects the load on those resources across all projects. This gives you an idea of how much work those resources are scheduled to perform for other projects in the enterprise.
Remove— You use the Remove button to remove the selected member(s) from the Team Resources list. You are warned if the resource is assigned to tasks in the current project, and you cannot remove the selected member(s) until the resource(s) is no longer assigned to any tasks in the current project.
Replace— You use the Replace button to replace the selected team resource with the selected enterprise resource. You can select only one team resource and one enterprise resource in order for the function to work. If the resource you are attempting to replace has actual hours reported within the project, a pop-up window appears, indicating that you must do the resource substitution by alternate means.
Match— You use Match to find resources in the enterprise resource pool that meet the enterprise resource outline code criteria specified by the resource being matched. For example, if you have a resource named Tech Writer-French who has two enterprise resource outline codes—Tech Writer (Code1) and French (Code2)—and if both enterprise resource outline codes are marked as Use This Code for Matching Generic Resources in the Enterprise Global template, only resources in the enterprise resource pool that exactly match those two criteria will be displayed. See the section “Using the Assign Resources Dialog Box,” later in this chapter, for information on the steps for using the Match function.
TIP
If you have problems getting the Match function to work, look at the filter created in the Team Builder when you click the Match button. If, for example, your actual resources have skill levels per skill, you can either create a generic resource that matches each skill per skill level or you can create your own, custom, filters that find actual resources based on any combination of skill code and skill level.
Details— You use the Details button to view the information sheet for the selected resource.
Graphs— You use the Graphs button to view the availability graphs of the currently selected resources. This is a convenient way to visually determine the workload and availability for the resources you’ve selected. When you use this feature, you can inspect scheduled work or remaining availability for each person selected along a calendar time line. You can zoom to desired timescale increments, including every 15 minutes, hourly, daily, weekly, monthly, quarterly, biannually, and yearly resolutions.
After you have created a preliminary schedule using generic resources, you might want to ask the portfolio manager to turn your preliminary schedule into an enterprise template.
Using the Assign Resources Dialog Box
TIP
You can add actual enterprise resources to a schedule at any time while you’re building a schedule. However, it is a good idea to wait until you are ready to apply resources to tasks. If you add actual resources to a schedule too early, those people might not be available when your project needs them because they are deployed on other projects. Therefore, you should use generic resources on tasks until you’re sure the people you need will actually be available.
You need to transform the preliminary schedule to a detailed schedule by adding actual resources to the project and assigning them to tasks. To discuss how to do this, let’s continue with the Elkhart Software example. As the project manager, you are looking for project team members from Denver who have the appropriate skills and are available hours for work for the duration of your project.
Follow these steps to complete the detailed schedule by using the Assign Resources dialog box:
1. |
Open your Denver Project E schedule by using Project Professional. |
2. | |
3. |
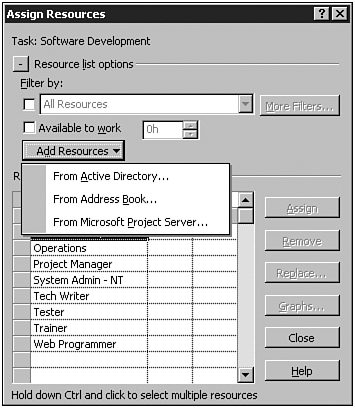
Click Add Resources, as shown in Figure 26.2. The pull-down menu provides three options: Figure 26.2. By using the Assign Resources dialog box you can add resources to a schedule from an active directory, from an Outlook address book, or from a Microsoft Project server.
CAUTION You should only use resources from the enterprise resource pool on a Project server unless your portfolio manager permits other options. If you use resources that are not found within the enterprise resource pool, Project Server analysis reporting functions might reflect inaccurate data.
|
4. |
Identify the enterprise resources that are from Denver and that match skills with the enterprise generic resources in your schedule by selecting RBS from the Group By pull-down list, selecting one of the team resources, and clicking Match (see Figure 26.3). Figure 26.3. The Team Builder’s features are all available from the Assign Resources dialog box.
|
5. |
As shown in Figure 26.3, in your enterprise resource pool, four Web programmers in Denver have enough available hours. Replace the generic resource Web Programmer with the enterprise actual resource Mimi Radley by selecting Mimi Radley from the Enterprise Resources column, selecting Web Programmer from the Team Resources column, and clicking Replace. Select and replace each of the remaining generic team resources. |
6. |
To assign two Web programmers to Web development tasks in the schedule, you need to add the second Web programmer to the schedule now, and then assign that resource to the appropriate tasks when you return to the Assign Resources dialog box. Add Denver Web programmer Tom Smith to the schedule by selecting Tom Smith in the Enterprise Resource column and clicking Add. |
7. |
You are done adding resources to your schedule, so return to the Assign Resources dialog box by clicking OK on the Team Builder screen. |
8. |
Assign Web developer Tom Smith to tasks by using the Assign Resources dialog box. To do this, select the tasks in the schedule, select Tom Smith from the list of resources, and click Assign (see Figure 26.4). Note in Figure 26.4 that resources that are assigned to a task are automatically brought to the top of the list of resource names, making it easier to manage long resource lists. Figure 26.4. You can assign multiple resources to a task by using the Assign Resources dialog box.
|
CAUTION
Be very careful when adding new local resources to a schedule. If a new local resource name exactly matches an enterprise resource name, you will have a hard time distinguishing between the two resources when you are using the Assign Resources dialog box. Also, data on local resources is not included in the views provided in the Project Center and the Resource Center.
TIP
To prevent accidental creation of local resources, open Microsoft Project Professional and select Tools, Options. Then select the General tab and uncheck Automatically Add New Resources and Tasks. Microsoft Project then prompts you when you attempt to add new resources to the local resource pool.
Your portfolio manager should provide you with the rules associated with using local resources for your organization.
So far you’ve used the Add Resources pull-down list and assigned resources by using the Assign Resources dialog box. The following are two other features of the Professional edition’s Assign Resources dialog box that are shown in Figure 26.4:
Resource List Options— Expanding the resource list options by clicking on the + sign allows you to use preexisting and available to work filters to reduce the list of displayed resource names.
R/D— You can request or demand that a resource not be substituted when using the Resource Substitution Wizard. See the section “Using the Resource Substitution Wizard,” later in this chapter, for details.
Using the Resource Substitution Wizard
In addition to assigning actual resources to tasks based on enterprise resource outline codes, the Resource Substitution Wizard can also ‘optimize’ the allocation of resources across project schedules to minimize the duration of those schedules. If an actual resource is overallocated, the wizard looks in its resource pool for available resources with the same attributes to work the tasks.
 | There might be times, however, when you do not want an actual resource substituted. You can use the Assign Resource dialog box’s Request/Demand field to control the Resource Substitution Wizard (see Figure 26.5). |
Figure 26.5. The Request/Demand options are Blank, Request, and Demand.

The Request/Demand field can be set to one of the following values for each resource on a task:
Blank— By default the field is blank. This tells the Resource Substitution Wizard that it can freely substitute another resource for this one, as long as it meets the skill and availability criteria for the task.
Request— You should choose Request to tell the Resource Substitution Wizard to keep this resource assigned to this task but allow the wizard to make a substitution if the resource is found to be overallocated.
Demand— You should choose Demand to tell the Resource Substitution Wizard to keep this resource assigned to this task, even if it leaves the resource overallocated. You then have to level the resource yourself.
NOTE
Microsoft Project does not allow you to request or demand generic resources.
The primary advantage of using the Resource Substitution Wizard is that it is the fastest way to assign enterprise resources to the tasks in a schedule. If you use templates or project schedules that have generic resources assigned to all tasks, and those generic resources have skill codes defined, the Resource Substitution Wizard can quickly substitute actual enterprise resources for the generic resources.
The following are some Resource Substitution Wizard behaviors that you need to consider before using the wizard:
The wizard substitutes for two or more generic resources on the same task, but it does not allow you to substitute two different actual resources for one generic resource that is allocated at 200%. For example, if you want two different Visual Basic programmers assigned to a task, you have to manually add the second Visual Basic programmer to the task.
The wizard substitutes correctly for any resource unit value.
If there are multiple enterprise resources that match an enterprise generic resource, the wizard substitutes using the first available actual resource that meets the criteria before moving on to the next available actual resource that meets the criteria. This might be fine for resources with skills such as tech writer or programmer, where resources are reasonably interchangeable; however, for skills such as project manager, where you most likely want the same project manager assigned to the entire project, it probably isn’t appropriate.
The wizard replaces overloaded resources with alternates (from the pool that you have specified) that have the right skills and are not overloaded. If you prefer to not replace resources, you should use the Request/Demand feature in the Assign Resources dialog box.
The wizard does not level resources within schedules, although by optimizing resource allocation, it usually comes close. You should make it a practice to level resources within schedules after the Resource Substitution Wizard has applied resources to tasks.
Although you might not mind the fact that the wizard assigned multiple different actual resources to testing tasks in the same project, you probably don’t want to have multiple project managers assigned to the project management tasks. To resolve this you might want to consider using the Team Builder’s Replace function for project manager type tasks, locking those assignments in place. To do this, you use the Assign Resource dialog box’s Request/Demand feature and then use the Resource Substitution Wizard to complete the substitutions.
Two things must be in place before you can use the Resource Substitution Wizard:
Enterprise resource outline codes must have been assigned to the actual resources within the enterprise resource pool.
You must have opened a schedule that has the following characteristics:
All working tasks have generic or actual resources assigned to them.
Each generic resource that is assigned to a task has enterprise resource outline codes attached.
The system administrator example at the end of Chapter 25 describes an actual enterprise resource named Brad Smalling who is an expert in both Citrix and NT. Suppose that you have added some new system administration tasks to your schedule and have assigned the generic resource called System Admin—NT to them.
You need to follow these steps to substitute an actual resource (Brad Smalling, in this example) for the System Admin—NT generic resource:
1. |
Open the Denver Project E schedule. Make sure that the new Windows NT network administration tasks have been added to the schedule and that the enterprise generic resource System Admin—NT is assigned to each of those tasks. |
2. |
Start the Resource Substitution Wizard by selecting Tools, Substitute Resources, Resource Substitution Wizard. Click Next on the welcome screen. All open schedules should be listed as part of the wizard’s Step 1, as shown in Figure 26.6. Select only the projects needed for resource substitution, in this case Denver Project E, and then click Next. Figure 26.6. You can select the open project(s) in which you want to substitute resources by selecting the check box to the left of the project’s name.
TIP If you choose more than one project in which to substitute resources, you are actually asking the wizard to optimize resource assignments across all those projects. To avoid resource assignment confusion with the other projects, which might be under way, you should consider using the wizard to assign resources to your new schedule first and then optimizing resource assignments across projects as a later step. |
3. |
On Step 2 of the Resource Substitution Wizard you need to identify the subset of resources from the enterprise resource pool that are to be considered during the resource substitution. As shown in Figure 26.7, for Denver Project E you need to include resources at the RBS level of Denver, specify a resource freeze horizon of the current date, and then click Next. Figure 26.7. You can specify that only resources from Denver are to be considered by the wizard for assignment to tasks.
You can choose from the following three options to specify the subset of resources to be used by the wizard: The Resource Substitution Wizard considers only assignments made after the Resource Freeze Horizon date. If, for example, you established a Resource Freeze Horizon that is 2 weeks out, all resources would have 2 weeks to complete or hand off their current assignments before moving on to their new projects and/or assignments. If you are substituting resources for a new schedule only, then you can let the Resource Freeze Horizon default to the current date. |
4. |
Step 3 of the wizard shows a list of related projects and their relationships, as shown in Figure 26.8. Because we are substituting resources for the Denver Project E only, make sure that none of the related projects are selected, and then click Next. Figure 26.8. You should select none of the related Denver projects because you want the wizard to substitute resources only in the Denver Project E.
Projects are considered related if the projects share any resources from the pool of resources that you’ve established for the wizard or if the projects have cross-project links active between them. |
5. |
Step 4 of the Resource Substitution Wizard allows you to prioritize the projects you have selected and to establish the resource substitution options for each project being substituted for. You need to let the Denver Project E’s priority default to 500 (the priority doesn’t matter because you are substituting for only one resource). Then choose Use Resources in Pool as the scheduling option (because the actual resource you want to substitute with, Brad Smalling, is in the wizard’s pool), as shown in Figure 26.9. When you are finished choosing scheduling options, click Next. Figure 26.9. You can specify scheduling options for the selected projects.
The priority field specifies which projects the wizard should substitute resources for first. The priority scheme used by the Resource Substitution Wizard is the same priority scheme used to prioritize tasks within a schedule: Priority numbers range from a low of 0 to a high of 1,000, with 500 as the default priority. The Options field specifies whether the wizard can substitute resources from the project only or from the pool of resources specified earlier. For the Denver Project E example, the wizard’s resource pool consists of all enterprise resources with an RBS of world.usa.denver, as defined in Step 2 of the wizard. NOTE The priority and options settings that you assign in the Resource Substitution Wizard are not recorded anywhere in the Project server. |
6. |
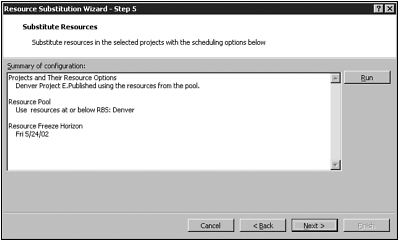
Step 5 of the Resource Substitution Wizard displays a summary of your configuration options so far, as shown in Figure 26.10. If you want to change one or more of these configuration items, click Back. In this example, these are the configuration items you want, so click Run. When the wizard finishes running, the Next button becomes available, and you need to click it to move to Step 6 of the wizard. Figure 26.10. You can click Run if the summary of instructions is correct.
|
7. |
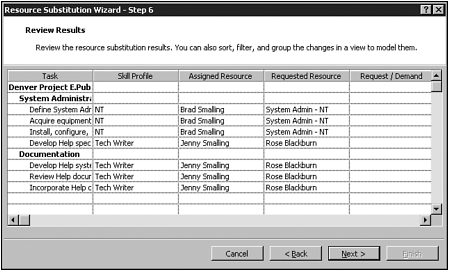
The wizard computes a substitution solution, as shown in Figure 26.11. If you are happy with these substitutions, you can click the Next button to accept the results. If you are not happy with the results, you can click Cancel to start over or Back to return to the previous step. Figure 26.11. You can review the detailed results of the resource substitution in this screen.
Notice that in this example, Brad Smalling was successfully substituted for the generic resource System Admin—NT. In addition, though, Rose Blackburn must have been overallocated (and not marked with Demand) on several tasks because the tech writer Jenny Smalling was substituted for Rose on those tasks. Click Next to accept these changes. |
8. |
As shown in Figure 26.12, you are prompted for how you want to save the results of the Resource Substitution Wizard. You have two options: Figure 26.12. You can both update the projects with the results and store a report containing the results of the wizard.
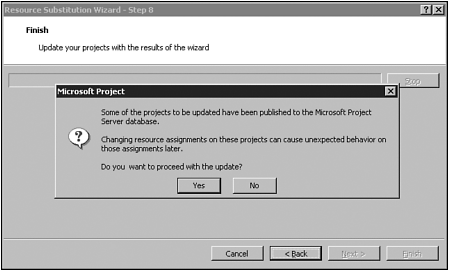
After you have selected options, click Finish. When you are applying the substitution results, you might receive the confirmation dialog shown in Figure 26.13. This confirmation simply lets you know that you have modified the resource assignments for projects that have been published to the Project Server, and you will need to level and analyze the results of these changes before republishing them to the Project server. If you get this message, click Yes to continue. Figure 26.13. You might see this error when applying the Resource Substitution Wizard’s results to the related project schedules.
|
9. |
Your Denver Project E schedule has been updated with the resource substitutions, but it has been neither saved nor published to the Project server. You need to remember to save changed schedules after you inspect the results. For example, you might want to save these modified project schedules to a different version so they can be analyzed and/or approved. |
