
4. Delegation and Core Location
In this chapter, we introduce delegation, a recurring design pattern of Cocoa Touch development, and demonstrate its use with the Core Location service, which provides the location-finding features of the iPhone.
Delegation
We spend a lot of time sending messages to objects. Sometimes, however, we want objects to send messages to us — a callback. A callback is a function that is triggered when an event occurs. Usually, this is an event that happens in response to user input. We don’t exactly know when this event might occur, but we set up a callback so that when it does occur, our code will be called. In some systems, callbacks are sent to objects that are known as listeners.
In Cocoa Touch, callbacks are implemented using a technique known as delegation. Let’s start with an example. Every instance of UITextView has a delegate property, which is a pointer to an object. That object is “the delegate” of the text view. You can set that pointer to refer to any object, as long as that object conforms to the protocol of the class for which it is a delegate. For instance, when you create a class that will be a UITextView delegate, you need to declare it to conform to the UITextViewDelegate protocol. You declare which protocols a class conforms to by listing the names of the protocols in a comma-delimited list in angled brackets after the name of the superclass:

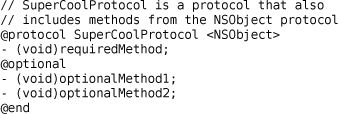
A protocol is simply a list of method declarations. (Other languages, like Java, sometimes call them interfaces.) When a class conforms to a protocol, it is promising to implement all required methods from that protocol and is reserving the option to implement any optional methods. For example, here is the protocol that declares all the delegate methods for UITextView:

Notice that this particular protocol doesn’t have any required methods (which is not unusual). Also notice that the first argument to all of the delegate methods is a pointer to the object that is sending the callback. This lets the delegate know exactly which object is sending it a delegate message and is always the case with delegate methods.
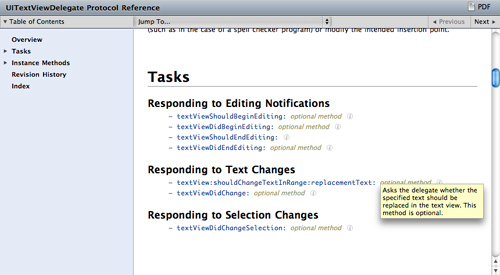
In Apple’s developer documentation, every protocol has its own page that lists and describes its methods. To get to the documentation, go to the Help menu and click Developer Documentation. There you can search for the protocol. By convention, the name of a delegate protocol is the name of the class doing the delegation suffixed with Delegate. For example, to find all of the delegate methods for a UITextView, search for UITextViewDelegate. The “UITextViewDelegate Protocol Reference” is shown in Figure 4.1.
Figure 4.1. UITextViewDelegate Documentation
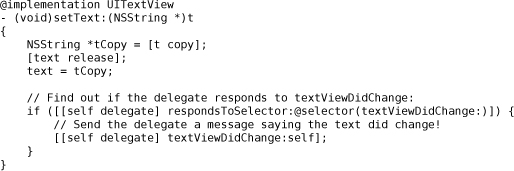
Once you have declared a class as conforming to a protocol, you find the methods you need in the documentation, implement them for that class, and you’re good to go. For example, if the delegate of a UITextView has implemented the method textViewDidChange:, then that method will be called every time the user changes the text of that text view, as shown in Figure 4.2.
Figure 4.2. A UITextView delegate

When implementing a delegate method, it is important to make sure you match the name and the types of arguments exactly as they are declared in the protocol. If you change the name in any way (capitalization or spelling errors are the most common “changes”), the method will not get called. If you change the types of the arguments, your application may not work as you intend it to.
There are two basic categories of delegate methods. Some are “for-your-information” methods. These methods are sent to a delegate to inform it that something has happened. For example, you would implement textViewDidChange: to be informed when the text in a UITextView changes.
Other delegate methods are “what-should-I-do?” methods. These methods expect a response back from the delegate that will dictate the behavior of the delegating object. For example, if a delegate implements textView:shouldChangeTextInRange:replacementText:, it can prevent an inappropriate edit by returning NO.
Sometimes protocols have required methods. A class that conforms to a protocol that has required methods must implement those methods or else the compiler will warn you and your application will probably crash. How can you tell if a method is required? In the protocol reference, the absence of the text optional method next to the method name indicates that it is a required method. (Some versions of the documentation label the required methods instead of optional methods.)
You can also determine which methods are required by looking at the header file in which the protocol is declared. Any required methods appear above the @optional directive in the protocol body. Methods that appear below the @optional directive are optional and do not have to be implemented by a class that conforms to that protocol. (If there is no @optional tag, then all methods in that protocol are required.)
Many classes use delegates: AVAudioPlayer, CLLocationManager, NSNetServices, NSStream, NSURLConnection, NSXMLParser, CALayer, UIAccelerometer, UIApplication, UIPickerView, UIImagePickerController, UIScrollView, UITableView, UITextField, UIWebView, and UIWindow. Take a moment to browse through some of these protocol references. (Here’s a shortcut: in Xcode, hold down the Option and Command keys and double-click the name of the protocol. The documentation browser will appear displaying a list of every method for that protocol.)
To review, in order implement delegate methods for an object, you must
1. declare a class to conform to the object’s delegate protocol
2. implement the necessary delegate methods (required ones and optional ones you want to use) in the class
3. set the delegate pointer of the object to point to an instance of your class
Beginning the Whereami Application
To help you understand delegation, you’re going to write an application called Whereami that uses delegation over and over again. This application will display a map and allow the user to scroll, zoom, and tag the device’s current location with a pin and a title. This exercise spans two chapters. At the end of this chapter, the application won’t look like much, but the final product — and the clearer understanding of delegation — will be worth it. Create a Window-Based Application and name it Whereami.
Using frameworks
Open WhereamiAppDelegate.h and find the following line of code at the top. (You may have noticed it at the top of your other application delegate files, too.)
#import <UIKit/UIKit.h>
This translates to “From the UIKit framework, import the UIKit.h header.” A framework is a collection of related classes, and Cocoa Touch is a set of frameworks. One of the benefits of Cocoa Touch being organized into frameworks is that you only need to import what your application needs. The UIKit framework is in every iPhone application because it contains all of the user interface classes like UIButton and UILabel. Whereami will also need the Core Location framework. It won’t need, for example, the Media Player framework.
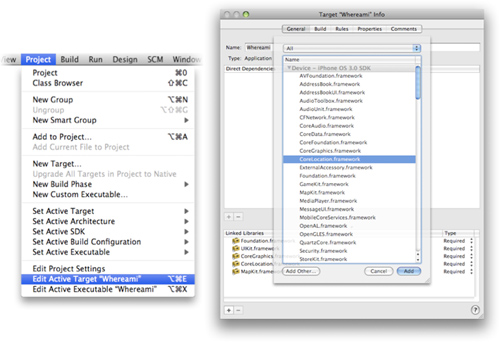
The UIKit framework is added automatically by Xcode, but to use the code in the Core Location framework, you need to add it to your project. Select Edit Active Target from the Project menu. In the Target Info window that appears, select the General tab. At the bottom of the window is a list of Linked Libraries. Click the + button on the bottom-left corner of the window. A sheet will drop down from this window listing all of the available frameworks for iPhone OS. Choose CoreLocation.framework from that list and click the Add button as shown in Figure 4.3. This application can now use the classes and functions available in the Core Location framework.
Figure 4.3. Adding the Core Location framework
While there are other ways to add frameworks to your project, this is the recommended way because it allows you to switch freely between target SDKs. For example, you could recompile your application for a different version of the iPhone OS without making any other changes to your project in Xcode.
Make sure you remember how to add a framework to a project — you will have to do it fairly frequently!
Core Location
Location Services enables applications to determine the device’s geographical location. Core Location is the framework that you use to talk to Location Services. No matter what type of device is being used, the Core Location code you write does not change.
The class that interfaces with the hardware is called CLLocationManager. Instances of this class are given a pointer to a delegate and then told to find the device’s location in the world. At this point, the CLLocationManager starts doing its own thing while the rest of the application continues with other tasks — like accepting user input or updating the interface. This is possible because the location manager operates on another thread.
When a CLLocationManager instance succeeds or fails in determining the location of the device, it informs its delegate by sending it one of the messages in the CLLocationManagerDelegate protocol.
For the Whereami application, you need to create an instance of CLLocationManager and give it a delegate. WhereamiAppDelegate is the controller object for this exercise; it will contain a CLLocationManager and also be its delegate. Therefore, WhereamiAppDelegate must conform to the CLLocationManagerDelegate protocol. Add the following code to WhereamiAppDelegate.h

A CLLocationManager instance has properties you can set to specify how often it should update and how accurate it should be. The property distanceFilter determines how far the device must move in meters before CLLocationManager informs its delegate of a new location. Its setter method is setDistanceFilter:.
The second property, desiredAccuracy, can be set with the method setDesiredAccuracy:. The desired accuracy is important because it has consequences for battery power and CPU time. There is a tradeoff between the accuracy and the amount of battery life and CPU time required to determine a location. Moreover, the accuracy is ultimately dependent on the type of device the user has, the availability of cellular towers and satellites, and the availability of known wireless access points.
In the method application:didFinishLaunchingWithOptions:, you will instantiate a CLLocationManager to track a device’s location. For this application, you will set its properties to request the most accurate location data available from the CLLocationManager as often as possible. (This will use the most amount of battery and take the longest amount of time.)
Add the following to WhereamiAppDelegate.m.

Notice that you have set the locationManager’s delegate to self. Because we are within the implementation block for WhereamiAppDelegate, self refers to this instance of WhereamiAppDelegate. Therefore, all of the delegate methods for this instance of CLLocationManager will be implemented in WhereamiAppDelegate.m.
Also, the locationManager does not retain its delegate. In fact, delegates are never retained by the object doing the delegating. Why? Because a controller object usually owns the object for which it is a delegate. If an object then retains its delegate, it would create a problem called a retain cycle. Right now, you have other things to concentrate on, so we will leave the discussion of retain cycles for a future chapter; just remember that setting a delegate is always an assignment and that delegates are never retained or copied.
Because the delegate is not retained, it is important that the delegate pointer is never “dangling.” For example, if the instance of WhereamiAppDelegate could get deallocated, we would be sure to set the delegate pointer to nil:

Receiving updates from CLLocationManager
When a CLLocationManager has enough data to produce a new location, it creates an instance of CLLocation. That CLLocation object is sent to the CLLocationManager’s delegate via the locationManager:didUpdateToLocation:fromLocation: delegate method as shown in Figure 4.4. (This method is from the CLLocationManagerDelegate protocol.)
Figure 4.4. A CLLocation object

CLLocation objects contain the latitude and longitude of the user’s device. Each location object will also contain the accuracy of its reading in the horizontalAccuracy property. Depending on the device, information like the elevation above sea level and the current heading of the device may also be recorded.
In order to start receiving CLLocation instances from the CLLocationManager, you must implement the delegate method locationManager:didUpdateToLocation:fromLocation: from the CLLocationManagerDelegate protocol. For now, implement this method in WhereamiAppDelegate.m so that it prints out the CLLocation’s description to the console. (Be careful that there are no typos in the method signature; remember, the name of the method must exactly match the declaration in the protocol. The compiler won't tell you if you made a mistake. It will just think you are defining a brand new method. Most developers copy and paste methods from the documentation.)

You also need to know if the CLLocationManager fails to find its location and why. When it fails, it sends a different message to its delegate locationManager:didFailWithError:. Implement that method in WhereamiAppDelegate.m.

Build and run the application. After giving permission for the application to use location services and waiting for a few seconds while the location is determined, your console should read something like this:
<+37.33168900, -122.03073100> +/- 100.00m (speed -1.00 mps / course -1.00)
So that’s how delegation works with a real example. If it feels odd or doesn’t quite make sense, don’t worry. It can be hard to understand at first, but you’ll get it in time. In the next chapter, you are going to finish off the Whereami application. And yeah, you guessed it, you will be using more delegation in that chapter, too.
Releasing Controller Instance Variables
Deallocating objects while an application is running is important because it frees up memory for future objects. When an application terminates, the memory it was consuming is returned to the operating system. In most applications, however, controller objects exist the entire time an application is running. They never get released and therefore never get deallocated.
This holds true for Whereami: the instance of WhereamiAppDelegate will never get released because it needs to exist the entire time the application is running. Therefore, you do not need to implement the dealloc method for this class. Most of the applications in this book have controller objects that exist the entire time an application is running. This is the behavior for many controller objects in real applications for two reasons:
• Controller objects are the brains of an application. They take on a lot of roles and typically are needed throughout the execution of an application.
• Controller objects do not consume a lot of memory themselves. They only hold pointers to view and model objects, which are the two types of classes that consume the majority of memory. If memory is running low, the controller can get rid of the big objects it has pointers to (and, ideally, be able to reload those objects when needed).
Now, this isn’t to say that all controller objects exist throughout an application’s lifetime. Some controller objects can exist temporarily for a specific task. In these circumstances, you will need to release the appropriate instance variables in the controller’s dealloc method.
We won’t waste your time showing you the implementation of dealloc methods that will never get called, but you can’t go wrong by getting in the habit of always writing correct dealloc methods. (An unused method never hurts you.)
In Snow Leopard, a static analyzer was added to Xcode. The static analyzer evaluates your code and looks for potential problems like memory leaks or uninitialized variables. (You can run the static analyzer on your code by selecting Build and Analyze from the Build menu.) It’s not without flaws, though. If you have a controller object that you never intend to release, the static analyzer may warn you that you are leaking that object. You can ignore those warnings.
Challenge: Heading
Using delegation, retrieve the heading information from the CLLocationManager and print it to the console. (Hint: You need to implement at least one more delegate method and send another message to the location manager.)
For the More Curious: Compiler and Linker Errors
Building an application in Xcode is a multi-step process. Two of these steps are compiling and linking, and each comes with its own type of error.
Compiling, one of the first building steps, takes your Objective-C code and turns it into the binary code a computer understands. Each implementation file (suffixed with .m) is turned into an object file that contains that binary code.
If an error is found in your code during this phase, the compile fails. (And if an implementation file fails to compile, the corresponding object file is not created.) An error during this phase is called a compile-time error or syntax error. These errors mean that the compiler cannot understand your source code – usually because of little things like misplaced semicolons, unbalanced brackets ([]) or braces ({}), spelling or capitalization errors.
A syntax error is also generated if you declare a variable of a type that the compiler doesn’t recognize. For each Objective-C class, there is a header file that declares it, and importing the header file tells the compiler about that class. To see an example of a syntax error, comment out the following line in WhereamiAppDelegate.h:
//#import <CoreLocation/CoreLocation.h>
Build your application again. It will fail, and the Build Results window will show you several errors (Figure 4.5).
Figure 4.5. Build results with compile-time error
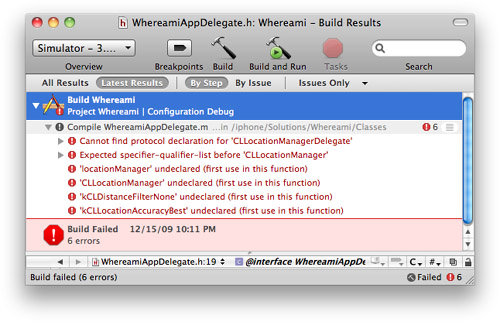
These errors tell you that the compiler doesn’t know about CLLocationManager or its delegate protocol. That’s because the declarations for these things are in CoreLocation/CoreLocation.h. Now that you’ve seen this error, you know how to fix it. Uncomment the #import directive, build again, and the errors will disappear. (So, what does importing a file really do? When an implementation file is compiled, each import directive is replaced with the text of the imported file. The text is effectively copied and pasted at the spot of the import directive.)
The next step in the building process is linking. The linker reads all of the object files, determines what functions and classes are being used, and then links them to the object file that contains the definition for those functions and classes. If the linker cannot find a definition, it generates a linker error. Typically, you get this error when you forget to add a framework to a project.
Linker errors are more difficult for new developers to understand because they use unfamiliar terms (like “symbol” and “literal-pointer”). So let’s go ahead and cause a linker error just for practice. Select the CoreLocation.framework icon from the project window and press the delete key to remove it from your project. Build your application again, and the Build Results window will tell you of your folly (Figure 4.6).
Figure 4.6. Build results with linker error
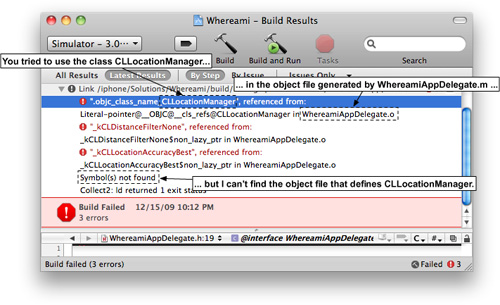
This error tells you that the compiler knew about CLLocationManager (because you imported the header file), but the linker can’t find the object file that defines it. Add the Core Location framework back to your project to eliminate this error.
For the More Curious: Protocols
A protocol is a list of methods. Here’s an example:

In the iPhone SDK, most classes that have a delegate property define a protocol that declares the methods that can be sent to their delegate. Typically, a delegate protocol only has optional methods. (Not all protocols are delegate protocols; you’ll work with other protocols later in this book. In fact, while “delegate protocol” is a handy term for a protocol that declares delegate methods, there is no such thing as a delegate protocol according to the compiler; a protocol is just a protocol.)
When an object wants to send an optional delegate message to its delegate, it first sends the message respondsToSelector: to see if the delegate implements the optional method. For example, when text is added to an instance of UITextView, it informs its delegate through an optional delegate method. If you were writing the UITextView class, the implementation of UITextView would look something like this:
However, with a required method, an object does not check before sending the message; it assumes that this method is implemented. If you don’t implement a required delegate method for an object, your application will throw an unrecognized selector exception when the object sends the required message to its delegate.
Some classes in the iPhone SDK are borrowed from Mac OS X and do not declare a delegate protocol even if they have a delegate property. Usually these classes are prefixed with NS and are part of the Foundation framework. These classes were written before Objective-C 2.0 when there was no @optional directive. Back then, every method in a given protocol had to be implemented by a class that conformed to that protocol.
In order to have optional delegate methods, these classes declared their protocols in informal protocols. Informal protocols are a bit of a legacy and beyond the scope of this book. However, it’s good to know about them for the purpose of reading the documentation. If you’re looking for delegate methods for one of these classes, you’ll find them in the same documentation page as the class that uses them instead of in a separate protocol reference.