
2. Objective-C
iPhone applications are written in the Objective-C language, a simple extension of the C language. This book doesn’t have enough pages to cover the entire C language. Instead, this book will assume you know some C and understand the ideas of object-oriented programming. If C or object-oriented programming makes you feel uneasy, Kochan’s Programming in Objective-C is a worthwhile read.
In this chapter, you will learn the basics of Objective-C and create RandomPossessions, a command-line tool that you will reuse in an iPhone application later in the book. (So even if you’re familiar with Objective-C, you’ll still want to go through this chapter in order to create RandomPossessions.)
Objects
Let’s say you need a way to represent a car. That car has a few attributes that are unique to it, like a model name, four wheels, a steering wheel, and whatever other fancy stuff they put on automobiles since the old Model T. The car can also perform actions, like accelerating and turning left.
In C, you would define a structure to hold the data that describes a car. The structure would have data members, one for each of these attributes. Each data member would have a name and a type.
To create an individual car, you would use the function malloc to allocate a chunk of memory large enough to hold the structure. You would write C functions to set the value of its attributes and have it perform actions.
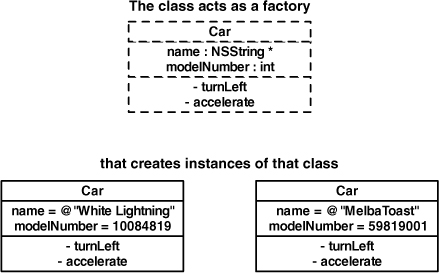
In Objective-C, instead of using a structure to represent a car, you would use a class. Following the car analogy, think of this class as a car factory. When you write the Car class, you build a factory that knows how to create cars.
When you ask the Car class to make you a car, you get back a car object. This object, like all objects, is a chunk of data allocated from the heap. The car object is an instance of the Car class, and it stores the values for its attributes in instance variables (Figure 2.1).
Figure 2.1. A class and its instances
A C structure is a chunk of memory, and so is an object. A C structure has data members, each with a name and a type. Similarly, an object has instance variables, each with a name and type.
But there is an important difference between a structure in C and a class in Objective-C: a class has methods. A method is similar to a function: it has a name, a return type, and a list of parameters that it expects. A method also has access to an object’s instance variables. If you want an object to run the code in one of its methods, you send that object a message.
Using Instances
An instance of a class (an object) has a life span: it is created, sent messages, and then destroyed when it is no longer needed.
To create an object, you send an alloc message to a class. In response, that class creates an object in memory and gives you a pointer to it. In code, creating an object looks like this:
NSMutableArray *arrayInstance = [NSMutableArray alloc];
Here an instance of type NSMutableArray is created, and you are returned a pointer to it in the variable arrayInstance. When you have a pointer to an instance, you can send messages to it. The first message you always send to a newly allocated instance is an initialization message.
[arrayInstance init];
Although sending the alloc message to a class creates an instance, the object isn’t valid until it has been initialized. Since an object must be allocated and initialized before it can be used, we always combine these two messages in one line.
NSMutableArray *arrayInstance = [[NSMutableArray alloc] init];
This line of code says, “Create an instance of NSMutableArray and send it the message init.” Both alloc and init return a pointer to the newly created object so that you have a reference to it. Typically, you will use the assignment operator (=) to store that pointer in a variable, as in this previous line of code.
Combining two messages in a single line of code is called a nested message sends. The innermost brackets are evaluated first, so the message alloc is sent to the class NSMutableArray first. This returns a new, uninitialized instance of NSMutableArray that is then sent the message init.
Methods come in two flavors: instance methods and class methods. Instance methods (like init) are sent to instances of the class, and class methods (like alloc) are sent to the class itself. Class methods typically either create new instances of the class or retrieve some global property of the class. (We will talk more about class and instance methods later.)
What do you do with an instance that has been initialized? You send it more messages. Messages have three parts:

One such message you can send an NSMutableArray instance is addObject:
[arrayInstance addObject:anotherObject];
(How do you know you can send this message? addObject: is a method of NSMutableArray. Sending the addObject: message to an instance of NSMutableArray will trigger the addObject: method.)
The addObject: message is an example of a message with one argument. Objective-C methods can take a number of arguments or none at all. The message init, for instance, has no arguments. On the other hand, you can also send the message replaceObjectsInRange:withObjectsFromArray:range:, which takes three arguments (Figure 2.2).
Figure 2.2. Anatomy of a message
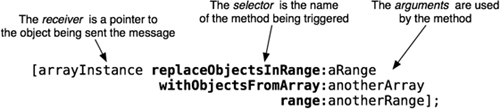
Each argument has a label, and each label ends with a colon. One thing that confuses Objective-C beginners is that the name of the message is all of the labels in a selector. For example, addObject: has one label (addObject:) for its one argument. The message replaceObjectsInRange:withObjectsFromArray:range: has three arguments, so it has three labels.
In C++ or Java, this method would look like this:
![]()
In these languages, it isn’t completely obvious what each of the arguments sent to this function are. In Objective-C, however, each argument is paired with the appropriate label:
![]()
Objective-C developers learn to appreciate the clarity of having a label for each argument even though it requires a little more typing. For example, you can have two methods replaceObjectsInRange:withObjectsFromArray:range: and replaceObjectsInRange:. These methods do not have to be related; they are two distinct messages that you can send to an instance of NSMutableArray.
To destroy an object, you send it the message release.
[arrayInstance release];
This line of code destroys the object pointed to by the arrayInstance variable. (It’s actually a bit more complicated than that, and you’ll learn about the details of memory management in the next chapter.) It is important to note that although you destroyed the object, the variable arrayInstance still has a value — the address of where the NSMutableArray instance used to exist. If you send a message to arrayInstance, it will cause a problem because that object no longer exists. However, if arrayInstance is set to nil, the problem goes away. (nil is the zero pointer. C programmers know it as NULL. Java programmers know it as null.)
arrayInstance = nil;
Now there is no danger of sending a message to the outdated memory address. Sending a message to nil is okay in Objective-C; nothing will happen. In a language like Java, sending messages to nil is illegal, so you see this sort of thing a lot:
![]()
In Objective-C, this check is unnecessary because a message sent to nil is just ignored. (A corollary: if your program doesn’t do anything when you think it should be doing something, an unexpectedly nil pointer is often the culprit.)
Writing the RandomPossessions Tool
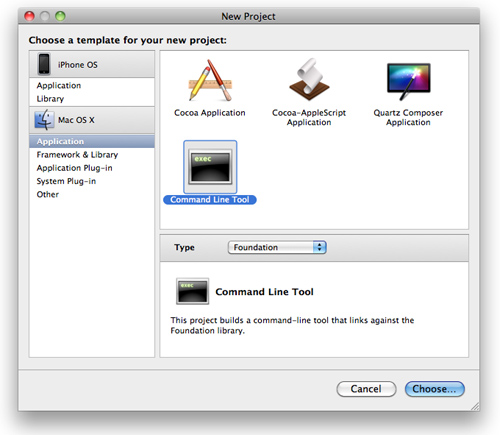
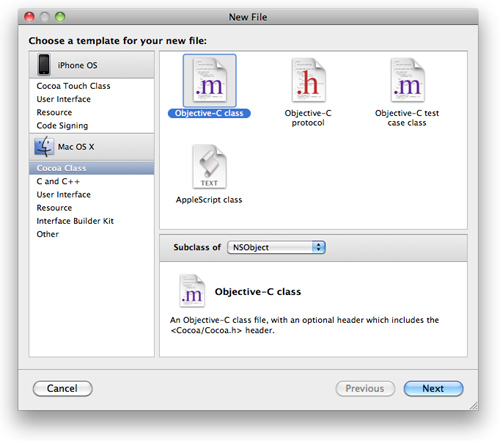
Before you dive into the UIKit (the set of libraries you use to create iPhone applications), you’re going to write a command-line tool that will let you focus on the Objective-C language. Open Xcode and select New Project... from the File menu. On the lefthand table, select Application from underneath the Mac OS X section. Select Command Line Tool from the upper right panel. A list of options will appear in the pop-up menu of the bottom right panel. Choose Foundation from this pop-up menu as shown in Figure 2.3. Click the Choose... button.
Figure 2.3. Creating a command line utility
Name this project RandomPossessions. A project window will appear.
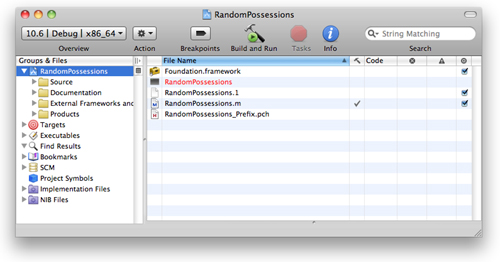
One source file (RandomPossessions.m) has been created for you in the Source group on the lefthand side of the project window (Figure 2.4).
Double-click on this file to open it, and you’ll see some code has already been written for you — most notably, a main function that is the entry point of any C (or Objective-C) application.
Time to put your knowledge of Objective-C basics to the test. Delete the line of code that NSLogs “Hello, World!” and replace it with a line that creates an instance of an NSMutableArray.
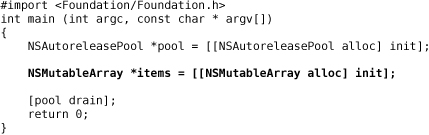
Once you have an instance of NSMutableArray, you can send it some messages. In this code, the receiver is the object pointed to by items. Add a few strings to this array instance.
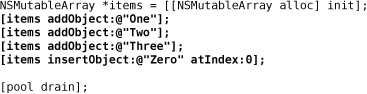
When you want a string object in Objective-C, you prefix a literal C string with an @ symbol. This tells the compiler that you want to use an instance of NSString (another Objective-C class) to contain this string.
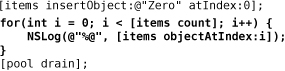
When this application executes, it creates an NSMutableArray and fills it with four NSString instances. However, you need to confirm your success. After adding the final object to the array, loop through every item in the array and print them to the console. (You can find out how many items are in an NSMutableArray by sending it the message count.)
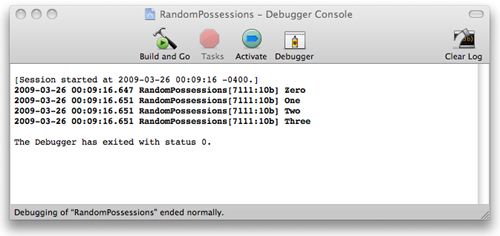
Select Build and Run from the Build menu. It may seem like nothing has happened since the program exits fairly quickly, but the console tells another story. From the Run menu, select Console. Ah, there we go — your hard work has paid off, and you now have output from your application (Figure 2.5).
NSArray and NSMutableArray
What exactly is this NSMutableArray? An array is a collection object (also called a container). In the Cocoa Touch frameworks, there are a few collection objects, such as NSDictionary and NSSet, and each has a slightly different use. An array is an ordered list of objects that are accessed by an index. Other languages might call it a list or a vector. An NSArray is immutable, which means you cannot add or remove objects after the array is instantiated. You can, however, access objects within the array. NSArray’s mutable subclass, NSMutableArray, lets you add and remove objects dynamically.
In Objective-C, an array does not actually contain the objects that belong to it; instead it holds a pointer (a reference) to each object. When an object is added to an array,
[array addObject:object];
the address of that object in memory is stored inside the array.
Arrays can hold any type of Objective-C object. This means primitives and C structures cannot be added to an array. For example, you cannot have an array of ints. Also, because arrays only hold a pointer to an object, you can have objects of different types in a single array. This is different from many other compiled languages where an array can only hold objects of its declared type.
Note that you cannot add nil to an array. If you need to add holes to an array, you must use the NSNull object. NSNull is an object that represents nil and is used specifically for this task.
[array addObject:[NSNull null]];
To retrieve the pointer to an object later, you send the message objectAtIndex: to the array
NSString *object = [array objectAtIndex:0];
How do you know the order of the objects in an array? When an object is added to an array with the message addObject:, it is added at the end of the array. You can ask an array how many objects it is currently storing by sending it the message count. This information is important because if you ask for an object from an array at an index that is greater than the number of objects in the array, an exception will be thrown. (Exceptions are very bad; they will most likely ruin your application and cause it to crash.)
int numberOfObjects = [array count];
You can also insert objects at a specific index — as long as that index is less than or equal to the current number of objects in the array.
![]()
Objects added to an array are sent the message retain. When an object is removed from an array, it is sent the message release. When an array is deallocated, all of its objects are sent the message release. If you don’t know what retain, release, and deallocate mean, that’s okay; you’ll learn about them in the next chapter.
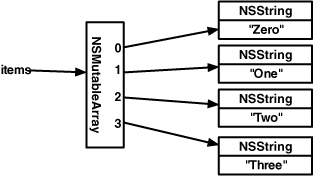
So, to recap, you created an instance of NSMutableArray to which you added four instances of NSString as shown in Figure 2.6.
Figure 2.6. NSMutableArray instance
Then, you looped through every instance in that array. Each time you iterated through this loop, you called the C function NSLog with a single parameter. That single parameter was the description of the object at the ith index of the array.
The NSLog function is to Objective-C as the printf function is to C. The NSLog function uses the same format list with one addition: you can print Objective-C objects. To print an Objective-C object, the format is “%@”. When the format string is parsed, the NSLog function finds the matching argument in the argument list and sends it the message description. (Every object has a description method.) The string returned from that method then replaces the format string. And remember, the NSLog function expects an NSString for the format list, so you have to prefix an @ character before the string literal.
Subclassing an Objective-C Class
Where does the description method come from? Every class has exactly one superclass — except for the root class of the entire hierarchy: NSObject. That means, at minimum, every class inherits from NSObject. NSObject implements a method named description.
Sending the description message to an NSObject returns an NSString containing information about that instance. By default, that string is the object’s class and its address in memory. A subclass of NSObject, like NSString, will override this method to return something that does a better job describing an instance of that subclass. For NSString, description just returns the string itself since that is the best way to describe an NSString instance.
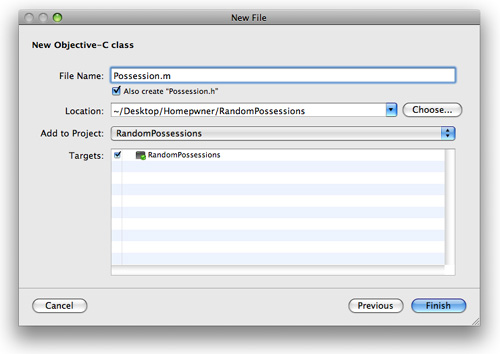
So how do these subclasses get created? Glad you asked because now you are going to create one of your own. From the File menu, select New File.... Select Cocoa Class from the Mac OS X section in the lefthand table. Then, select Objective-C class from the upper right panel. Choose NSObject from the pop-up menu as shown in, Figure 2.7.
Hit the Next button, and you will be given a chance to configure this new Objective-C class. Change the filename to Possession.m. The files for this class will be created and added to your project when you click Finish (Figure 2.8).
Figure 2.8. Configuring a new class
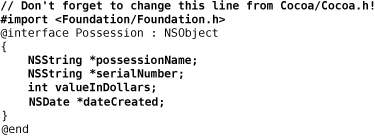
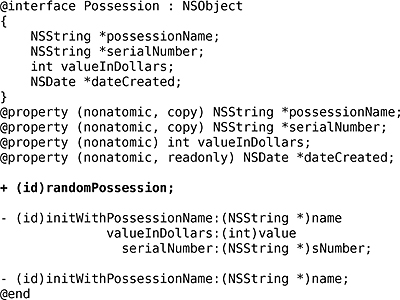
For every Objective-C class, there are two files: a header file and an implementation file. The header file (also called an interface file) declares the name of the new class, its superclass, the instance variables that each instance of this class has, and any methods this class implements. This file is suffixed with .h. Open Possession.h by double-clicking it in the Groups & Files table in the project window.
The goal of the header file is to declare an Objective-C class.
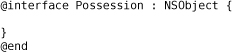
Let’s break down this interface declaration to figure out what it all means. First, note that the C language retains all of its keywords, and any additional keywords from Objective-C are distinguishable by the @ prefix. To declare a class in Objective-C, you use the keyword @interface followed by the name of this new class. After a colon comes the name of the superclass. Possession’s superclass is NSObject. Objective-C only allows single inheritance, so you will only ever see the following pattern:
@interface ClassName : SuperclassName
Next comes the space for declaring instance variables. Instance variables must be declared inside the curly brace block immediately following the class and superclass declaration. After the closing curly brace, you declare any methods that this class implements. Once you declare methods here, you must implement them in the implementation file or the compiler will give you a warning. Finally, the @end keyword finishes off the declaration for your new class.
Instance variables
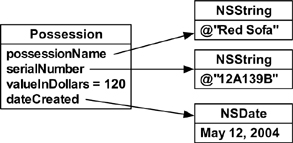
So far, the Possession class doesn’t add a whole lot of interesting information to its superclass NSObject, so let’s give it some possession-like instance variables. A possession, in our world, is going to have a name, serial number, value, and date of creation. You are going to declare an instance variable for each of these attributes (Figure 2.9).
Figure 2.9. A Possession instance
Type this new code into Possession.h. Also, make sure to change the imported header from Cocoa to Foundation. We are going to reuse this class later for an iPhone application, and the Cocoa framework doesn’t exist on the iPhone.
Accessors and properties
Now that you have instance variables, you need a way to get and set them. In object-oriented languages, we call methods that get and set instance variables accessors. Individually, we call them getters and setters. Without these methods, one object cannot access the instance variables of another object.
Prior to Objective-C version 2.0, we had to explicitly declare and define every accessor method. That was a lot of typing. Fortunately, Objective-C 2.0 introduces a shortcut called properties. By creating a property, you are declaring two accessor methods. Before properties were introduced, you would have declared those two accessor methods as follows:
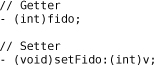
You might wonder why the name of the getter is simply fido instead of getFido. This is another Objective-C style convention. The name of the instance variable you are accessing is the name of the getter method for it. While there is no compiler warning or error if you use get, stylish iPhone programmers stick to the convention.
With properties, you can declare the same two accessors in one line of code:
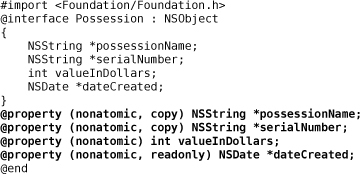
@property int fido;
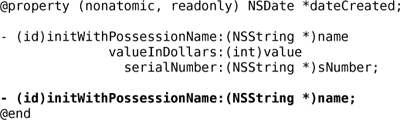
When you create a property, the accessors are declared according to the naming convention above. Properties also declare how the accessors are implemented by setting property attributes. One attribute addresses how the setter method will set the variable. The default is simple assignment. You can change this to copy or retain. (The reasons why you might do this will make more sense after we talk about memory management in the next chapter.) Another attribute deals with whether the variable can be changed. The default is readwrite, but it can be set to readonly. In that case, only the getter method is declared. A third attribute tells us if the variable requires a lock. This attribute defaults to atomic, which means a lock must be acquired to get or set the variable. Specifying a property as nonatomic means no lock is required. In this book, you’ll stick to nonatomic because it’s a touch faster.
Property declarations are made in the same place as method declarations — after the closing curly brace. Add the following property declarations to Possession.h.
Just declaring these properties doesn’t implement the accessor methods; you have to synthesize them. To do this, you turn to the second file associated with an Objective-C class — the implementation file with the .m extension. This file is where you implement all of your methods and synthesize any properties. Synthesizing properties defines their accessor methods.
At the top of an implementation file, you always import the header (.h) file of that class. The implementation of a class needs to know how it has been declared. All of the method definitions in the implementation file will be inside an implementation block. An implementation block begins with the @implementation keyword followed by the name of the class that is being implemented. Methods are defined until you close out the block with the @end keyword.
Open Possession.m. Use the @synthesize keyword followed by a comma-delimited list of all properties you are synthesizing. Remember that this must occur inside the implementation block.

If you chose to write your own accessors for valueInDollars, instead of using @synthesize, they would look like this:
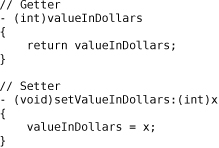
Build your application to ensure that there are no compiler errors or warnings. Now that your properties have been synthesized, you can send messages to Possession instances to get and set instance variables. For example, synthesizing valueInDollars allows you to send the messages valueInDollars and setValueInDollars: to instances of Possession.
Instance methods
Not all instance methods are accessors. You will regularly find yourself wanting to send messages to instances that perform other code, like description. Because Possession is a subclass of NSObject (the class that originally declares the description method), when you re-implement this method in the Possession class, you are said to be overriding the method.
When overriding a method, all you need to do is define it in the implementation file; you do not need to declare it in the header file because it has already been declared by the superclass. Override the description method in Possession.m. (Be sure to include the - in the first line of code. It denotes that description is an instance method, not a class method.)
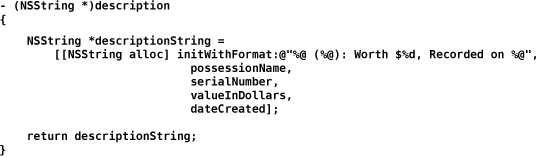
Now whenever you send the message description to an instance of Possession, it returns an NSString that describes that instance. (To those of you familiar with Objective-C and managing memory, don’t panic — you will fix the obvious problem with this code soon.)
What if you want to create an entirely new instance method, one that you are not overriding from its superclass? You typically declare a method in the header file and define it in the implementation file. A good method to begin with is an object’s initializer.
Initializers
At the beginning of this chapter, we talked about how an instance is created: its class is sent the message alloc, which creates an instance of that class and returns a pointer to it, and that instance is sent the message init. The init message isn’t a special type of instance method, though; it is simply a naming convention. Your initialization method could have a totally different name, like finishMakingInstance. However, by convention, all initialization methods begin with the word init. Objective-C is all about naming conventions, which you should strictly adhere to. (Seriously. Disregarding naming conventions in Objective-C results in problems that are worse than most beginners would imagine.)
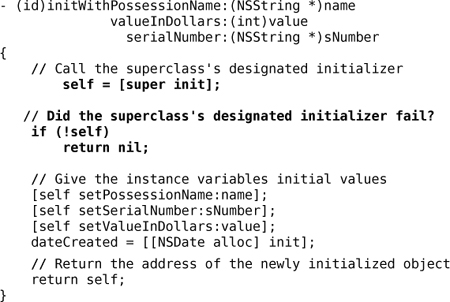
The class NSObject implements a method named init. This is the initializer message you need to send to an instance of NSObject to initialize it. Because init is the main (or, in this case, only) initialization method for NSObject, we call it the designated initializer. Classes can have multiple initializers, but for every class, there is one designated initializer. The designated initializer must make sure that each of the instance variables has a valid value. Only then will the newly created instance be valid. (“Valid” has different meanings, but the meaning in this context is “when you send messages to this object after initializing it, you can predict the outcome and nothing bad will happen.”) Typically, the designated initializer is the initializer method with the most arguments.
Your Possession class has four instance variables, but only three are writeable. (The NSDate object used to set the read-only variable dateCreated is created inside the body of the method instead of being passed in.) Possession’s designated initializer needs to accept three arguments: one for each of the writable instance variables. In Possession.h, declare the designated initializer:
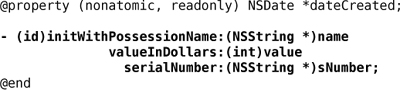
Take another look at this method declaration. Its return type is id. The id type definition is “a pointer to any object.” (This is a lot like void * in C.) init methods are always declared to return id. (Why? If Possession gets subclassed, its initializer will need to return the subclass’s type. When you override a method, you cannot change its return type in the subclass. Therefore, initialization methods should always return id. Objects know which class created them anyway; the type they are declared is more or less a hint for the compiler.)
This method’s name, or selector, is initWithPossessionName:valueInDollars:serialNumber:. This selector has three labels (initWithPossessionName:, valueInDollars:, and serialNumber:), and the method accepts three arguments.
These arguments each have a type and a parameter name. The type follows the label in parentheses. The parameter name then follows the type. So the label initWithPossessionName: is expecting an instance of type NSString. Within the body of that method, you can use pName to reference the object that was passed in.
Now that you have declared the designated initializer, you need to implement it. Open Possession.m. Recall that the definitions for methods go within the implementation block in the implementation file. Add the designated initializer inside the implementation block.

In the designated initializer, you always call the superclass’s designated initializer using super. The last thing you do is return a pointer to the successfully initialized object using self. So to understand what’s going on in an initializer, you will need to know about self and super.
self
Inside a method, self is an implicit local variable. There is no need to declare it, and it is automatically initialized to the address of the object running the method. Typically, self is used so that an object can send a message to itself:
Most object-oriented languages have this concept, but some call it this instead of self.
In the last line of an init method, you always return the newly initialized object:
return self;
If things go badly and the init method fails, you will return nil instead of the new object.
super
Often when you are overriding a method in a subclass, you want to do some special subclass stuff and then invoke the implementation of the method as it was defined in the superclass. To make this possible, there is a compiler directive in Objective-C called super:
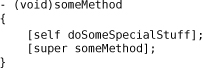
How does super work? Usually when you send a message to an object, the search for a method of that name starts in the object’s class. If there is no such method, the search continues in the superclass of the object. The search will continue up the inheritance hierarchy until a suitable method is found. (If it gets to the top of the hierarchy and no method is found, an exception is thrown.) When you send a message to super, you are sending a message to self but demanding that the search for the method begin at the superclass.
In a designated initializer, the first thing you do is call the superclass’s designated initializer using super. What if the superclass’s initializer fails and returns nil? It is probably a good idea to save the return value of the superclass’s initializer into the self variable and confirm that it is not nil before doing any further initialization. In Possession.m, edit your designated initializer to confirm the initialization of the superclass.
Initializer chain
Let’s say you are creating an instance of Possession, but you only know its name — not its value or serial number. You can create another initializer that accepts just one NSString meant for the possessionName instance variable. Declare another initializer for when you only know the name of the possession in Possession.h.
An initializer that is not the designated initializer must always call its own class’s designated initializer message with default values for the parameters that are not specified. To implement your new initializer in Possession.m, simply call the designated initializer using the passed-in parameter and default values for the other arguments. (Make sure this code is in between the @implementation and @end directives and not inside the curly brackets of another method!)
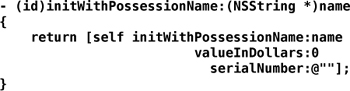
When an instance of Possession is created with this initializer, it uses the name of the possession passed to it. The valueInDollars instance variable defaults to 0, and the serialNumber defaults to the empty string. Using initializers as a chain like this reduces the chance for error and makes maintaining code easier. You only write the core of the initializer once in the designated initializer; other initialization methods simply call that core with default values.
Furthermore, a subclass needs to override its superclass’s designated initializer to invoke its own designated initializer. Right now, an instance of Possession could be sent the message init. To the programmer and compiler, the object would appear valid. However, only the superclass’s (NSObject) instance variables would have been initialized — all of the stuff added by the Possession class would not be. To make sure this doesn’t happen, override init to invoke Possession’s designated initializer with default values in Possession.m.

(Remember, because you’re overriding this method, you don’t have to declare it in Possession.h.)
Class methods
So far, you have been creating instance methods. These are messages you can send to any instance of Possession. However, in Objective-C, classes can also receive messages. We call these class methods. (alloc is an example of a class method.) Class methods do not operate on an instance or have any access to instance variables.
Syntactically, class methods differ from instance methods by the first character in their declaration. An while instance method uses the - character right before the return type, and a class method uses the + character. Also, class methods can only be sent to the class itself, never to an instance of that class.
One common use for class methods is to provide convenient ways to create instances of that class. For the Possession class, it would be nice if you could create a random possession. That way, you could test your possession class without having to think up a bunch of clever names. Declare a class method in Possession.h that will create a random possession.
Notice the order of the declarations for properties and methods. Properties come first, followed by class methods, followed by initialization methods. Further instance methods will follow after these. This is a convention that makes your header files easier to read.
Class methods that return an instance of their type are simply creating an instance as you normally would (with alloc and init), configuring it, and then returning it. In Possession.m, implement randomPossession to create, configure, and return a Possession instance:
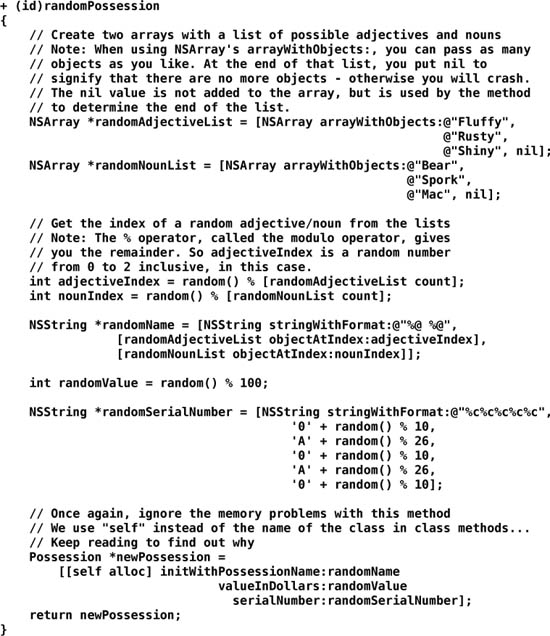
This method creates a string from a random adjective and noun, another string from some random numbers and letters, and a random integer value. It then creates an instance of Possession and sends it the designated initializer with these random objects as parameters.
You might notice that you actually used a class method of NSString in the implementation of this method. The message stringWithFormat: is sent directly to NSString; it is a class method that returns an NSString instance with the parameters that are sent to it. In Objective-C, class methods that return an object of their type (like stringWithFormat: and randomPossession) are called convenience methods.
Notice the use of self in randomPossession. This method is a class method, so self refers to the Possession class itself. Class methods should use self in convenience methods instead of their class name so that if you create a subclass of Possession, you can send that subclass the message randomPossession. Using self (instead of Possession) guarantees that the object returned by this method is the same type as the class being sent the message.
Now you get to use the neat little class you’ve created. Open RandomPossessions.m. In the main function, you were adding NSString instances to the NSMutableArray instance you created and then printing them to the console. Now you can add Possession instances to the array instead. Don’t forget to import the header file Possession.h.
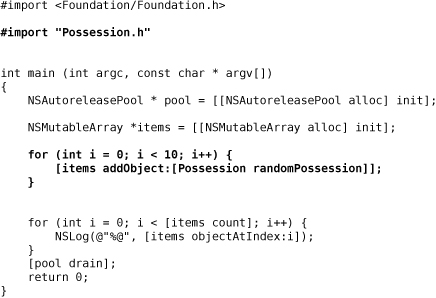
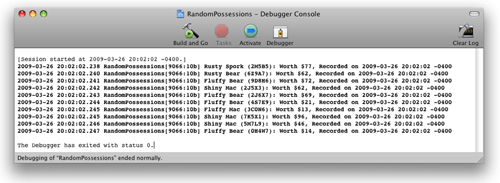
Build and run your application, making sure to show the console again. All you did was replace what objects you added to the array, and the code runs perfectly fine with a wildly different output (Figure 2.10). Creating this subclass was a success.
Figure 2.10. Application result
Check out the new #import statement at the top of RandomPossessions.m. Why did you have to import Possession.h when you didn’t you have to import, say, NSMutableArray.h? Well, NSMutableArray comes from the Foundation framework, so it is included when you import Foundation/Foundation.h. On the other hand, your subclass exists in its own file, so you have to explicitly import it into RandomPossession.m. Otherwise, the compiler won’t know it exists and will complain loudly.
Importing a file is the same as including a file in the C language except you are ensured that the file will only be included once.
If you don’t want to import the header file for a class, but you want the compiler to know that the class exists, you can use a forward declaration like this:
@class Possession;
In a large project, judicious use of @class can speed up compiles considerably.
Exceptions and the Console Window
In a language like C, we have functions. When we call a function, code is executed. If we try and call a function that doesn’t exist, the compiler says, “Hey, that’s not right!” and the code will fail to compile. This is known as a compile-time error.
Objective-C, being a dynamically typed language, isn’t able to figure out at compile time whether an object can respond to a message. An object can only respond to a message if its class implements the associated method. The compiler will warn you if it thinks you are sending a message to an object that won’t respond, but the code will still compile. If, for some reason (and there are many), you end up sending a message to an object who doesn’t respond, your application will throw an exception.
In RandomPossessions.m, add the following line of code after you create your array:
NSMutableArray *items = [[NSMutableArray alloc] init];
[items doSomethingWeird];
The class NSMutableArray does not implement a method called doSomethingWeird. Sending this message to an instance of NSMutableArray is going to throw an exception. Build and run your application.
Open the console window. When you ran this application before, the console contained the contents of the array. Now it is saying this:
2009-07-19 01:34:53.602 RandomPossessions[25326:10b]
*** -[NSCFArray doSomethingWeird]: unrecognized selector sent to instance 0x104b40
This is what an exception looks like. What exactly is this output saying? In every output statement to the console, the date, time, and name of the application are printed out. You can ignore that information. You are concerned with the information after the “***.” That line tells us that an unrecognized selector was sent to an instance. You know that selector means message. You sent a message to an object, and that object does not implement that method.
The type of the receiver and the name of the message sent are also in this output. This makes it easier for you to debug. An instance of NSCFArray was sent the message doSomethingWeird. (The - at the beginning tells you the receiver was an instance of NSCFArray. A + would mean the class was the receiver.) Remove the line of code you added and take away this very important lesson: always keep the console window open. Run-time errors are just as important as compile-time errors.
(What does NSCFArray mean? The CF stands for Core Foundation. We’ll get into that later in the book. For now, you can just drop the CF out of the name. An NSArray, the superclass of NSMutableArray is the type of the object that was sent this bad message.)
Some languages use try and catch blocks to handle exceptions. While Objective-C has this ability, we don’t use it very often. Typically, an exception is a programmer error and should be fixed in the code instead of handled at runtime.
Objective-C 2.0 Additions
The newest version of Objective-C added a few syntax-level changes to the language specification. The most useful one is fast enumeration. Before Objective-C 2.0, iterating through an NSArray looked like this:

Now you can write that code segment much more succinctly with fast enumeration.
for (Possession *item in items)
NSLog(@"%@", item);
Try changing the for loop in your main function to use fast enumeration.
Another addition to Objective-C 2.0 is dot-notation for property accessors. Instead of using brackets to invoke an accessor method, you can use a . operator instead and get the same results.
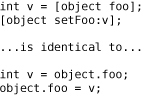
According to the compiler, these two snippets are the same. There is no difference in speed — they are seriously identical.
Because these lines are identical, I think dot-notation is goofy. However, others do not. Whether to use dot-notation has become something of a religious war in the Objective-C community. (And no one is ever right in those wars.)
The argument for using dot-notation is that the dot signifies that the code is accessing the state of an object whereas using the brackets signifies that it is asking the object to perform some behavior. This supposedly gives the code clarity. The arguments against dot-notation are that it creates ambiguity with the C structure access operator and it confuses beginning programmers, especially when it comes to memory management.
This book will not use dot-notation because it is confusing to beginning programmers. If you choose to use dot-notation after you’ve mastered the concepts behind Objective-C, more power to you. For now, you will be better served by sticking with the brackets.