STEP SEVEN
Sharpen Your Presentation Skills
OVERVIEW
Ensure that what the audience hears is engaging and effective
Interact with the audience
At this point, you should feel nearly prepared to deliver your presentation. After all, you have
- planned the material to be as concise and effective as possible
- designed the visuals to work with the tools at your disposal
- targeted your audience
- determined where all the interaction should go and built it into your delivery plan to reduce the chances of forgetting something.
Audience members gauge the power of a presentation based on two factors:
- What they see. This includes onscreen annotation tools, PowerPoint visuals, and shared applications.
- What they hear. This includes your vocal qualities like tone, pitch, speed, and volume.
Think in terms of a great traditional presentation. No matter how compelling the content, audience members will find it really hard to concentrate and listen if the presenter is constantly saying um or is standing in front of the projector so the presentation appears half on the wall and half on his or her shirt.
For experienced presenters, learning to present online is a matter of degree. Presenting live and presenting virtually are similar— the latter just uses slightly different muscles. Compare it to the difference between playing tennis and badminton. Both are racquet sports with similar goals, but they’re not exactly the same.
For inexperienced, or even uncomfortable, presenters, you’re in luck—you have fewer bad habits to unlearn, and you don’t even have to leave your chair. You can sit in a comfortable spot and drink a glass of water, and no one can see you wearing your lucky socks.
Make What the Audience Sees Appear Smooth and professional
People are visual creatures, so a great deal of the value they derive from your presentation and their initial reactions to it will be based on what they see. Good-looking visuals are a great start. How you work with them, how you integrate them into the flow of your presentation, and your ease with the platform also matter a great deal. Remember that what the audience sees isn't what you see. As the presenter, it's your job to help participants navigate around and get the most from the tools. As you can see in Figures 7.1 and 7.2, the audience isn't looking at as much of the control panel (or dashboard) as you are.
Learn to look smooth and in control while
- transitioning between PowerPoint slides
- using annotation tools such as highlighting, text, and stamps
- sharing applications and programs.
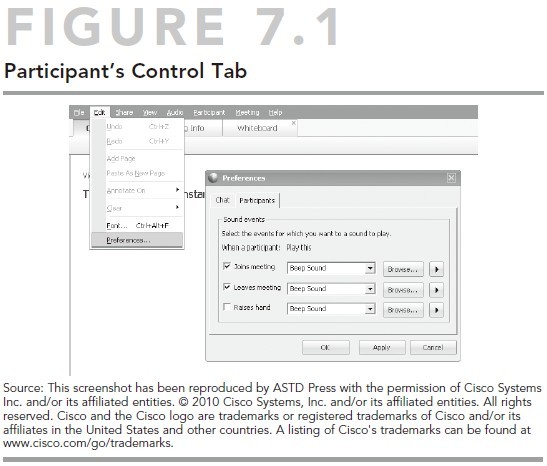
A Note About Participant Controls
Besides what the audience will see, you might also want to control what the audience can do with the tools. You don’t want people getting restless and suddenly using their drawing tool to put a moustache on your picture. (On second thought, you might. When doing training, I encourage that kind of silliness to get participants comfortable with the tools and encourage constructive interaction. Let your conscience and the content guide you.)
Most platforms have a “participants’ controls” tab, where you can set what you let them do with each tool. For example, you might want them to be able to chat with you to ask questions but not with each other. With large marketing webinars, sometimes with hundreds of participants, you want people to be able to send you questions and comments that you or your designated assistants can read, but not send disruptive messages out where everyone can see them.
When it comes to audience permissions, most new web presenters want to control everything. On the one hand, it limits the amount of multitasking you will have to do and keeps you focused. On the other hand, it makes for a passive presentation and reduces its overall richness and effectiveness. Your audience members can’t take part if you don’t let them.

POINTER
Moving from one visual to the next should be fairly straightforward. After all, you push the arrow, and the slide magically appears on your audience’s screens. In the real world, though, this simple operation can create a couple challenges for presenters.
First, you can only hope that what you see is what your audience sees. Second, transitioning from one slide to the next (which usually means switching topics) presents an opportunity for dead air and a loss of concentration.
To make sure that the audience sees what you see, set up a second computer. Use the first to log in as yourself (the presenter); use the second to log in as a participant. This provides a huge advantage because with most platforms differences exist between what the presenter sees and what the audience sees.
This gives you the edge in two ways:
- Clearly describing for participants how to perform functions like raising their hand and chatting is easier when you can see what the audience sees.
- You can see how quickly what you do on your screen shows up on theirs. Lag time often occurs between when things change on your screen and they change for your audience. This is especially true for annotation tools and when you make changes to documents and the whiteboard.
Loading Your Slides
Web presentation platforms fall into two camps: those that ask you to “upload” your presentation to their servers and those that broadcast directly from your computer screen. WebEx, Dimdim, and Live Meeting, for example, ask you to share your PowerPoint slides. 7 GoToMeeting, Glance, and some others ask you to have your presentation open on your computer and share it when ready. Frankly, which platform you go with doesn’t really matter—just know that with the “upload” version, you’ll usually have less chance of your computer slowing down, but you’ll also lose some of the functionality (especially animations and video).
For Uploading-Type Platforms
All the common platforms have a “share presentation” (or “share presentation or document”) button on their toolbar. Simply click that button to get a Windows browser. Locate your file on your computer and double-click. It will automatically open in “slide show” view.
For Sharing Platforms
Such platforms as GoToWebinar have a button on the control panel that says “share content.” Open your PowerPoint presentation and minimize it so you can see it on the task bar at the bottom of your computer screen. Click the drop-down menu to find the name of your presentation. Some platforms will give you the option of showing the presentation without showing your task bar. Whenever possible, take that option—nobody needs to know the content of your computer.
Transitioning Between PowerPoint Slides
Moving from slide to slide is actually pretty easy. Most platforms have an arrow icon that points either forward (to move the slides forward) or backward (to go back). Some platforms have an upward- or downward-pointing arrow that does the exact same thing. Put your mouse on the button and click once. Voilà: You should see the next PowerPoint slide.
Skipping Ahead and Between Slides
Often you will want to move ahead quickly from one slide to another, skipping visuals you’ve built and planned to use. Maybe you are running out of time and need to do some editing on the fly, or someone asks a specific question and you want to find the right visual.
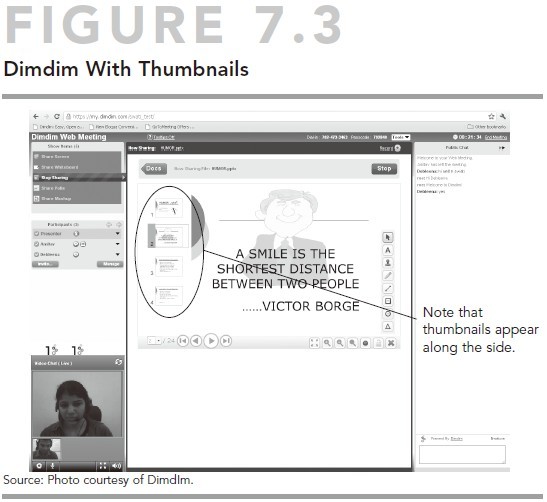
If you can, avoid simply clicking quickly through the slides until you find the right one. First, this looks unprofessional and creates awkward pauses. The bigger problem is that you can actually cause technical problems for your audience. When you present a visual, all that information goes from the platform provider through the Internet to your audience’s computers. Whether you’re showing a visual for 10 minutes (let’s hope not) or a split second, skipping ahead quickly can cause lag time, delays, and even crashes that can ruin your presentation. As you can see in Figure 7.3, the thumbnails let the presenter see the next few slides in the series to transition smoothly from one to the next. You can easily skip ahead by double clicking on the slide you wish to go to, without scrolling through all of them and irritating your audience in the process.
Find the slide you want to show and click it once. It will appear on the audience’s screens, without revealing that you’re jettisoning your regular presentation. Depending on your platform, you can do this in one of two ways.
The first is most common. A drop-down box shows you the name and slide number of whichever visual is on display. If you click the drop-down box, you can simply scroll up or down until you find the slide you’re looking for and click it.
The other way involves using the option to show the “thumbnail” version of the slides along the side or bottom of your screen. When using platforms such as Dimdim, I use this option a lot, because it allows me to actually see the next few slides. This helps cue me as to what’s coming next and enables me to make smoother verbal transitions from one visual or topic to the next.
Transitioning Verbally
Step 5 discussed writing out the transitions you’re going to use. By planning your transitions in advance, you can avoid some of the most common challenges presenters face. These include
- going blank and forgetting what slide is next. This can result in dead air or worse, the audience hearing you muttering to yourself.
- using the same words every time. Phrases like “Now let’s move on to the next topic” are fine. If you use them for every transition, however, it will drive your audience slowly mad.
- finding out it takes a second or two for the audience to see the new visual, and filling it with clever comments like um.
The rhythm to presenting new visuals goes like this:
- Finish the visual you’re on.
- Click to the next visual as you make your transition statement.
- Pause; take a breath. Intermittently, check with your audience. “You should be seeing a slide with a picture of a horse—everyone see that?” Participants can chat with you, raise a hand, or just tell you verbally. Once you have the timing down, you should be fine, although one or two check-ins, especially during a long presentation, are a good idea.
Annotation Tools
One of my favorite features of web presentations are the “annotation tools.” These features add color and life to static presentations, help your audience engage in and retain critical information, and boost your credibility as a presenter.
No matter how focused and well intentioned your audience is, or how important the topic, staying riveted to a single visual for a long time is a lot to ask. The average person will start looking around after 30 seconds and be completely bored within a minute or two. (With senior executives, you have about half that time.)
While changing visuals frequently helps keep the audience engaged and support your points (don’t expect participants to remember everything you talk about without some visual reinforcement), in reality sometimes you will speak to a single visual or series of bullet points for more than a couple of minutes. Give people something to look at after a minute or two. Almost every platform has annotation tools that allow you to add a splash of color or visual interest, even if the visual itself doesn’t change.
These tools can include
- highlighter, drawing tools, and arrows
- stamps, such as check marks and Xs
- text tools.
Annotation tools can make the difference between a static snoozefest and a useful, engaging presentation. Notice in Figure 7.4 that in this case you have a choice of pointers, text, different stamps and arrows and can even choose your color. No matter which platform you use, it's important to take the time to understand exactly what you as a presenter can do with it.

Highlighter, Drawing Tools, and Arrows
You will use these annotation tools more often than any others. Follow these tips for using them effectively:
- Spontaneously highlight words and information. Sure, you can use PowerPoint to underline text and use bold fonts to tell your audience what’s important. But, something more compelling comes from a sudden flash of green underlining the information as you say, “Here’s what I want you to remember”: the appearance of spontaneity (even though you’ve carefully planned its use). You can also use this tool, among other functions, to trace your route on a map.
- Settle on a color for your annotations before the session starts. Most platforms assign a color for your annotation tools when you log in (usually the same color as the little dot beside your name on the participant roster). The problem is that the default color might not work with your presentation. If your PowerPoint has a dark blue background, the yellow highlight pen won’t show up well at all. During rehearsal, choose the color that looks best, and as soon as you log in to the presentation, select the color for your tools.
- Give the impression of animation. In live presentations, presenters often take advantage of PowerPoint’s animation features to build a bulleted list—hiding the next bullet until they’ve completed their discussion of the current one. This often doesn’t work online, but no problem. Use your annotation tools to check off the bullet you’re talking about, and then move on to the next one and do the same. This way, if you spend a fair amount of time on a particular slide, a jolt of color and action will catch the audience’s eye and help reengage viewers who might start to slip away.
- Use the precision tools for precise work. Even with a real felt-tip marker, I’m a graphic idiot. Trying to circle something smoothly using a mouse and a cursor is a lost cause. One of my favorite annotation tools is the circle feature. With a little practice, you can quickly drop a perfectly neat, round circle around text or important parts of your visual without using squiggly, distracting lines. You can nail this with a little practice. It looks slick and takes less work than trying to use the highlighter or pencil tool.
- Arrows beat little red dots. Sometimes you want to point to specific information on a spreadsheet or at a particular area of your visual. In a live presentation, you might be tempted to use a laser pointer. Some presentation platforms actually have a laser pointer feature that uses a little red dot as a cursor, but using an arrow may be more effective. Take care not to continually move the arrow, as that distracts the audience. Point at what you want, and then take your hand off the mouse.
- Don’t talk and draw at the same time. The single biggest cause of losing your place, besides those horrifying ums and uhs, is trying to do two things at once. Using annotation tools effectively makes you look professional and slick. Using them clumsily or throwing yourself off by doing two things at once can definitely work against you. Get into the following rhythm when using your tools:
- Finish what you’re saying. “And that’s why we need to shear the llamas. Now let me show you something . . .”
- Pause.
- Select your annotation tool in silence, and move your cursor where you want it.
- Make your mark.
- Resume speaking. “As you can see, some people shear little designs in the critters.”
Talking while using these tools will often trip you up for another reason. Your voice will tend to follow your eyes. As you look in one direction for the right button and then turn in another direction, your audience will hear your struggles.
Stamps
Most platforms have tools that allow you to make Xs, check marks, and other indicators on your screen. You can use these tools not only to enhance your presentation but also to involve your audience. Here’s how:
- Check off your points one by one. Add emphasis to your points by checking them off as you go. Simply choose a stamp or symbol, such as a check mark, and as you finish each point, check it off. This adds color and motion to bulleted slides you spend a lot of time on.
- Let the audience vote. During training, a great way to turn a simple discussion into an assessment exercise is to let audience members vote by using their own stamps and annotation tools. Depending on your platform, you have a series of choices (“Which of the following is the right action to take under these circumstances?” for example) and let the audience members use their X stamps to vote. This engages people physically and allows you to assess their buy-in or understanding. Make sure you practice this before trying it with a live audience. When it works, it works great. When it doesn’t, it can frustrate the audience and create more stress than you need.
Text Tools
The text tool provides a great way to inform members of your audience of some facts and then ask them a question. You can use the text tool (usually represented by a large T) to type in the answer, making it appear on the screen as if by magic.
The text tools are usually best used in conjunction with the whiteboard feature. If you’re using a really robust platform like WebEx’s Training Center, you can even break up into small discussion groups or “break outs.” Then you can use the whiteboard to write down your answers or brainstorm suggestions.
- Add a splash of spontaneity. Give the audience members information, and then ask them a question by typing directly onto the whiteboard or slide. Have them type out their answer to test understanding or buy-in.
- Color helps identify who said what. Most platforms assign a color automatically to each participant who is going to use text or annotation tools. This allows you to know who made what suggestion or wrote which answer. If people really object to being identified with pink letters, most platforms let them choose their color but that can be time consuming.
- The text tools can be a bit chaotic if everyone writes at once, and many presenters maintain tight control over who is allowed to use it. Be sure to practice with this tool as it tends to take a while for text to show up on other people’s screens. This can be frustrating at first.
Plan for which tools to use when—and practice. The simplest way to look good using the tools is to plan for their use and practice using them in every situation. Spontaneity may be grand, but most presenters will either stumble around (possibly losing credibility) or, much more likely, get caught up in presenting and forget to use the tools at all, lowering the overall impact of their presentation.
Sharing Applications, Webpages, and Documents
One of the great, and often underused, features of web meetings is the ability to share—not just pictures of software you’re demonstrating or documents you’re working on but the real thing. Something about this engages the audience.
The ability to see how something works in real time helps a viewer understand the product on a deeper level than just looking at static pictures. A team leader can enhance buy-in by inputting people’s contributions into the document as discussion goes on. Here emerges the true potential of the presentation platform as a unique tool in itself, and not just a poor replacement for being in the same room at the same time. Yet, many presenters shy away from using this to its full advantage.
Share the actual document or application at the following points in your presentation:
- You see the actual functionality of the application will increase understanding and buy-in. Saying that your software is intuitive is one thing, but actually demonstrating and letting the audience participate in its use is something else entirely.
- You really want or need audience input. In a live presentation, the discussion becomes much more compelling when you use a flip chart or otherwise capture participant input. Now imagine working on a budget in Excel. If someone thinks he or she should spend more money on travel, you can input the suggested number and see the impact on the final budget right away. You can generate some great energy and cooperation by using this feature well.
- You’re training people on processes or procedures. Telling your audience how to log in to a website and start using it is easy. Actually calling up the website and letting participants fill in the information themselves is something else. People learn by doing, not by listening and taking notes. Facilitating audience participation can boost the effectiveness of your training exponentially.
Sometimes you shouldn’t attempt to share applications or documents, for example in the following situations:
- You are leery of the bandwidth your audience is working with. Of all the tools in your new presentation kit, application sharing (especially showing video) hogs the most bandwidth. If you suspect your audience may have poor connectivity, test this in advance and have a back-up plan in place to use if needed.
- You are unfamiliar with the technology yourself and unsure what it will do. Showing off your expertise with software is one thing; demonstrating that you’re not so sure about it yourself and damaging your credibility is quite another. A major exception to this rule occurs when the whole idea is to poke around with a tool as a team, perhaps to evaluate it or get people’s input.
You should know a couple of things before sharing applications and live documents with your audience:
- Test it first. Members of your audience need to have a pretty fast Internet connection (at least DSL) and all their pop-up blockers off. Test and test again with people on a different network or behind a different firewall than you are. If you have remote teammates, test your web platform with them before conducting a high-stakes presentation of any kind. Once you know it works on their computer, this tool can be very effective and engaging.
- Be aware of the lag time (the time between clicking a button or moving something on your end and the audience’s screens reflecting that change). Move slowly and methodically. The faster you go, the more likely screen freeze or frustration will occur.
- Check in with your audience members on a regular basis to make sure they see what you want them to see.
- Don’t show the audience members more than they want to know. For example, when demonstrating a piece of software, you need not take them through the log-in process (odds are they know how to do that); take them instead to the first relevant piece of information as quickly as possible. Logging in prior to the start of your presentation helps you prepare.
- Having the audience provide you with information that then appears onscreen is powerful. For example, showing them a completed form or spreadsheet is one thing, but asking them for the information and then showing it onscreen serves much more like a live demo or brainstorm—and the information better relates to them because it’s their information.
Tips for Sharing Applications or Documents
Start at the first important step. Everything you show the audience slows the bandwidth a bit. Don’t tempt fate or test people’s patience. Everyone has logged in to a software program at some point. Start at the first visual that will actually keep audience members’ attention.
Move slowly and deliberately, especially when going through websites (or anything with links). Remember that every visual you show goes to your audience’s computers no matter how long you stay on it. If you are searching a website, for instance, and have to click through a couple of links to get to the screen you’re seeking, know that your audience will still have to load each page to get to the visual you want.
Don’t talk and drive at the same time. Surely you see the pattern by now:
- Tell them what you’re about to do.
- Pause.
- Click.
- Resume your demonstration.
Use your annotation tools to point out important features. If you want people to pay attention to particular features of the application, highlight them using your annotation tools. Point out important links and where participants can find the help screen. Use the highlighter or circle tool to indicate specifications or features that are important to the success of your presentation.
POINTER
By practicing, taking your time, and not multitasking more than necessary, you can take full advantage of these presentation tools and look professional doing it. Remember this type of presentation is not about technical wizardry but about moving people toward your objective!
Ensure That What the Audience Hears is Engaging and Effective
Any presentation, online or not, comprises three elements: visual, verbal, and vocal. Depending on how rich and robust your visuals are, a greater proportion of the impact must be carried by what the audience hears. Your verbals and vocals are what you say and how you say it.
Verbal content is defined as the word choices you make and how you interpret your content for your audience. Vocal content is the tone of your voice, the speed at which you speak, and the ease with which the audience can actually hear you.
Verbal Content
What audience members hear has a huge emotional impact on their willingness to accept your message and take the desired action. If they get the impression that you are sincere, focused on them (rather than on yourself), and confident in your subject matter, they are much more likely to buy into your presentation than if they see you as unsure of your actions, timid, and only concerned with yourself. That means that the examples you use, the choices you make about terminology, and whether you sound like you understand your audience carry great weight. 7
Verbal factors to consider include the following:
- Use real examples. If you want members of your audience to recognize that you understand their situation, the examples you use must relate to their world. If audience members are the end users of your software, don’t tell them “it’s an easy-to-use interface for database searches.” Try using their examples. “Are you tired of taking forever to find out who hasn’t completed their paperwork yet? Here’s how easy it is . . . .”
- Use “apples to apples” comparisons. You want to convince members of your audience that what you’re asking them to do (whether learn a skill or buy your software) is going to make their life easier and applies to them. For that reason, make sure that the examples you use relate to that audience. If, for example, your audience is made up of small business owners, bragging about how IBM uses your stuff might have the wrong impact; they might think of you as too complicated or expensive. If you have a small business audience, use small business examples. If you’re teaching individual contributors to process their paperwork correctly, use an example from their world.
- Keep success stories and examples short and sweet. Bragging or getting carried away with your examples is easy. Some people present as if they believe that quantity of evidence beats quality. In fact, short, focused examples work best. If the audience wants more, members will ask for it during the question-and-answer period. Write your success stories out and practice them so you’re not tempted to go freestyle and ramble. A good example or success story contains three components:
- The situation. “We had a client like you who was struggling with_____.”
- The solution. “We used our patented consulting process to discover the client’s biggest issue was ________.”
- The result. “As a result, we didn’t have to spend a lot of time and money on other things; we just focused on ______ and got the client back up and running in less than a week, and we saved the client thousands of dollars.”
- Don’t use jargon or acronyms. Unless members of your audience know as much about your topic as you do, be careful of using terminology or acronyms that might throw them off. What sounds to you like expertise can come across to your audience as condescending or off-putting. If participants don’t know what you’re saying, they’ll find it hard to buy in. If you do use an acronym, always explain it the first time you use it, and putting it on a visual so people can read it also helps. In addition, use audience members’ terminology if possible. If you call employees “associates” and they call them “cast members,” as they do at Disney, change your terminology accordingly.
- Avoid repetitive language and “comfort words.” Over time presenters develop habits that might go unnoticed by them but are picked up by their audience. One of the most common involves using the same word over and over (often in place of the dreaded um). For example, I’m notorious for inserting the word now before a new thought or idea. Basically is another common culprit. Get honest feedback during rehearsal on your comfort language and terms before you drive your audience crazy.
- Use participant names. People respond automatically when they hear their names mentioned. Even if they have started to drift off or have gone to email land, if you use examples including their names (“Let’s say that Jeanie has a customer with a delivery problem”), people will automatically reconnect.
Tips for Vocal Excellence
The tone and quality of your voice can make it comfortable for audience members to listen to and keep them engaged—or make it difficult for them to listen to, which will shorten their attention span. A good voice has plenty of energy, speaks neither too quickly nor too slowly, and uses few “fillers.”
Keeping the Energy Level Up
- Volume is the key. Being interesting is almost impossible when speaking in a quiet, whispering tone. Yet many people seem more concerned about their officemates or the person in the next cubicle than about their audience. Speak at the same volume you would use in a meeting where your voice has to project to the end of the conference table.
- Don’t look at the monitor. Your voice tends to follow your eyes. Consider being on the phone with someone and whether or not you can tell when he or she is hunting for a piece of information. Your audience is just as observant as you are. When you forget you’re talking to an audience and simply talk to the monitor, your voice will get quieter, first because your voice is overruled by your eyes and you wouldn’t naturally shout at something only a few inches away, and second because your brain tells you that the computer is an inanimate object. Look over your monitor and imagine the faces of the people you’re speaking to. I pick three different spots on the wall and present to those spots as if they are live participants.
- Keep your hands free to drive—and to gesture. Even though in most cases the audience can’t see you for most of your presentation, you want to gesture and use your hands when you speak. This will keep the energy level in your voice high, and your audience will be able to tell. Use a headset if at all possible, or at least a good speakerphone (if you’re dialing in by telephone) and a quiet room. Don’t worry about what the people sitting around you think—your concern is your audience, not the fellow residents of your cubicle farm.
Watch the Speed and Inflection in Your Voice
- Don’t be afraid to pause. One inevitable result of not being able to see your audience is the tendency to speak more quickly than you ought to, which occurs because you’re not getting the nonverbal cues that tell you to slow the heck down. Whether you’re transitioning between slides, using the annotation tools, or just changing thoughts, know that the pause sounds infinitely longer to you than it does to your audience.
- Speak to your audience; don’t present. When you present to an audience, you can sound stilted and unnatural. When you just speak to people, however, you sound natural and relaxed. Try a bit of a mental exercise: Don’t imagine yourself giving a big formal lecture; imagine the other people seated across the table from you and speak naturally.
- Use professional but informal language whenever appropriate. Unless they have a compelling reason not to, most people prefer to listen to natural-sounding language as opposed to very formal speech. The more natural you sound, the fewer barriers people will put up to your message. You shouldn’t be unprofessional or use inappropriate language, but don’t try to sound smarter than your audience either. Using language you wouldn’t ordinarily use is a recipe for tripping yourself up and forgetting words.
- Don’t try to get everything letter-perfect. One of the most surprising findings in my work with clients is that people care more about the humanity of the speaker than the perfection of the speech. Getting every word precisely right and never tripping up actually can sound robotic to the audience, and the quest for perfection can really mess with your head. Relax: The audience doesn’t mind an occasional missed word or mispronunciation. Just apologize, laugh it off, and move on—the audience will.
- Don’t read to your audience. Nobody over the age of eight likes being read to. Many presenters presume that because they want to get the information correct and the audience can’t see them, they can simply read their presentation. You might get all the information correct, but members of your audience will roll their eyes and tune out. Unless something has to be said exactly word for word (for example, you’re quoting something or someone), just use bullet points and rehearse until you know your content.
- This goes double for the words in PowerPoint. Putting a whole bunch of information on a PowerPoint slide is problematic. Then turning around and reading it word for word to your audience simply compounds the pain for everyone. Either keep the bullets short enough that you only use key words, or paraphrase the bullets so you don’t simply parrot what’s on the screen.
- Finish your sentences on a high note. Many presenters do well throughout their paragraph or thought but as they reach the end trail off because they don’t know quite how to finish, or they’re already thinking about moving to the next slide. As a result, the audience hears your voice trail off, which sounds less than confident and certainly not engaging. Imagine finishing your sentence locked eye-toeye with your audience, and don’t worry about switching slides until you need to switch slides.
- Make declarative sentences. One common challenge for new presenters and those unsure of themselves no matter how long they’ve been at it is making statements that sound like questions. Their voice trails up at the end as if seeking reassurance from the audience. Often they end those sentences with “right?” or “OK?” You know your material. Make your statement and keep your voice as firm and confident at the end of your sentence or thought as at the beginning.
Controlling the Dreaded Ums
- Pause. Just pause. Human beings fear pauses in conversation. People might sound like they don’t know what they’re saying, or someone might jump in and interrupt them. The fact is that time is relative (Einstein once said that a second with your hand on a hot stove feels like an hour, and an hour with a pretty girl feels like a second— and he should know about relativity). Pauses feel much longer to the speaker than they do to the audience. When you’ve said what you have to say, stop talking, visualize the first word of the next sentence, and start cleanly with that word.
- Don’t move the mouse and speak at the same time. Despite what it says on your résumé, you don’t multitask very well. Moving the mouse during a demo, say, advancing the slides on your web presentation, and focusing on what you’re saying is very difficult. Pause; click; resume.
- Break your script or notes into small chunks. One of the most common reasons even good speakers sometimes have to fill dead air is that they lose their place in their notes and have to look for their next point. If you have a script, don’t write it out in big paragraphs. You’ll eventually lose your place and have to hunt through it to find where you left off. Visually break it into bullet points and have lots of white space on your page so you can easily find the information you need.
- Take a break by letting others speak. If you speak for a long time without feedback or a break, your brain will demand time out. Make your meeting or presentation more conversational than presentation style if possible. You can do this in several different ways:
- Allow participants to participate vocally (unmute individual phones so people can ask questions or comment if your platform allows this).
- Call on other presentation participants who are subject matter experts to give people another voice to hear and back up your own credibility on a topic (“Joanne, you were at that meeting. What did you think?”).
- Set up your presentation as an interview or a series of interviews, like having your own radio talk show. This not only presents a great way to build your own credibility by bringing experts to your audience, but people perk up whenever they hear a change in speakers. It also frees you from doing all the work, which isn’t a bad thing either.
- Practice with the tool so you get comfortable. Being aware of what you’re doing as a presenter is impossible if your brain is in a panic about which button to push and whether your audience can see your presentation properly. By getting comfortable with the presentation platform, you free up the mental bandwidth to concentrate on your content.
Interact With Your Audience to Get That “Live presentation” Feeling
This book has consistently shown you that while presenting online doesn’t give you the same adrenaline rush (which is what you call it if you like it; you call it “stage fright” if you don’t) as speaking in front of a roomful of human beings, accomplishing your objectives is still possible.
With a little practice, you can become one of a depressingly small group of people: effective, engaging web presenters.
Most web presenters don’t accomplish this for a simple reason: Either they don’t know what’s possible (you no longer have that excuse) or, in the heat of actually presenting, they focus so intently on delivering the information that they completely forget about the audience.
The easiest way to create interaction is to know how to get feedback using whichever platform you use, and then build interaction into your presentation so that you can’t possibly forget it.
Consider the following ways to build live audience feedback into your presentation:
- You can’t forget it if it’s built into your slide deck. If you plan to ask the audience a question, create a slide in your deck to cue yourself and the audience. Write the question out, and then let people know how you want them to answer it, whether by chat, chiming in vocally, or using the “raise hand” button.
- Make sure you have your slides printed out beside you with cues, and track yourself as you go. Experienced presenters tend to ignore the script or facilitator’s guide once they’ve learned a program. I find it helpful to have the printed “Notes” outline with me. On each page that requires interaction, I include a simple note like “Check in here,” if I’m checking for buy-in or that people are paying attention.
- If your platform has an attendance meter, use it for its intended purpose. Some of the more robust platforms, especially those built for training purposes (for example, GoToTraining, some WebEx versions, and Adobe Connect), have a meter on the leader’s toolbar that measures attention. This basically means that the server can tell if someone has opened another window on his or her computer and is running your presentation in the background. Think of this as the online version of looking at your audience members and seeing them all typing on their BlackBerrys instead of listening to you. Nine times out of 10 this means they’re checking email. If you notice attention dropping, take time to answer questions or ask for participants’ input via chat. This tool is designed to give guidance to the presenter, not punish the audience. Try not to call attention to the fact that people are not paying attention—it seems a bit dictatorial, and they will know you’re spying on them.
- Play fair with your audience: Don’t spring interaction on people halfway through. If you want your audience to be participative and engaged, you can’t lull them to sleep and then bring them back—at least not very effectively. Use the planning tools and formats discussed in this book to engage them early and often. Set the expectation of their participation, and asking them for input won’t catch them by surprise.
- Give very clear directions so they don’t freak out. If you’ve ever been in a meeting or training session where the leader gives a whole bunch of directions and then has to repeat them multiple times, you know this feeling. Now multiply it by the effect of using unfamiliar or uncomfortable technology, and you can’t see the panicky look on audience members’ faces. When you give the audience instructions, do it one step at a time, and don’t leave folks behind. Reinforce the instructions with a written PowerPoint slide if that helps. Here’s an example of how to call for written feedback using chat:
“OK, I want you to use the chat feature to answer this question for me: ‘What’s the most difficult part of managing a remote team?’ Does everyone know where the chat feature is? OK, type your answer now, and we’ll see what you come up with.”
Something That Will Help
The hardest part about improving your presentation skills is being objective about what the audience sees and hears. Improvement requires constant feedback, practice, and more feedback to reinforce your strengths as a presenter and identify areas in need of improvement.
Take every opportunity to get feedback on your online presentations. If no one is around, record your webinars and online presentations. You can always delete them later, but you’ll have a chance to see and hear everything the audience does. Consider this the equivalent of videotaping your presentations—every bit as painful and invaluable.
Have a partner or someone you trust use the verbal and vocal skills checklist provided in Worksheet 7.1 to give you the good behavioral feedback you need to improve.
Wrap-Up
Face it: Virtual presentations are a different animal than you’ve dealt with before. Simple things that happen naturally in a face-to-face setting—like seeing the faces of audience members and sending or receiving nonverbal signals—happen in an unusual way online. Don’t be too frustrated if your years of experience haven’t prepared you for this: Never before in human history have professionals had to present virtually. You are entering uncharted waters.
A great virtual presentation does more than simply send information over the wire from one person to another. When you present effectively, you elevate simple data transfer to true communication.
For experienced presenters, you’ll be out of your comfort zone at first, but eventually you’ll become comfortable enough for your instincts to take over, and you’ll find that presenting online is very similar to what you already know. If you don’t enjoy presenting, at least know that you will become competent if you do it often enough, just as with any skill.
Cut yourself some slack, breathe, and give yourself a chance to continually improve. With practice, you will become every bit as confident and successful presenting online as at the front of the room—maybe more so, because you can wear your bunny slippers and sit in your comfiest chair if you want to. A relaxed, confident delivery will get you that much closer to your objectives.
The trick is to
- make what the audience sees appear smooth and professional 7
- make what the audience hears engaging and effective
- interact with the audience to get that “live presentation” feeling.
WORKSHEET 7.1
Verbal and Vocal Skills Checklist
This checklist has many purposes. You can ask trusted team members for feedback during rehearsal, or you can have someone monitor you during the actual presentation itself. Perhaps more important, if you record your web presentations and webinars, you can experience the presentation as your audience does.
Whether for a boss, a co-worker, a trusted audience member, or yourself, the key here is to offer specific, behavioral feedback. Each section includes room for written comments. If a real example was not good, explain why not. Perhaps it addressed an issue your audience couldn’t relate to, or maybe it was too technical. If at some point you sounded distracted and the ums and ers showed up, remember exactly where. If you can identify what happened, you can fix it next time.
And there will be a next time.
| Vocal Skills | |||
| What You Heard | Needs Improvement | Meets Expectations | Excellent |
| Uses real examples | |||
| Success stories are clear and concise | |||
| Doesn’t use jargon or acronyms | |||
| Avoids repetitive or “comfort” words | |||
| Uses participant names | |||
| Uses appropriate language | |||
| Vocal Skills | |||
| What You Heard | Needs Improvement | Meets Expectations | Excellent |
| Speaks at a clear volume | |||
| Voice sounds energetic and interesting | |||
| Speed is not too fast | |||
| Pauses are frequent and comfortable | |||
| Doesn’t obviously read to the audience | |||
| Finishes sentences on a positive note | |||
| Doesn’t use ums or fillers | |||
| Interaction | |||
| What You Heard | Needs Improvement | Meets Expectations | Excellent |
| Instructions are clear and easy to follow | |||
| There were no dead spots where the audience felt disengaged | |||
| The activities or questions made sense to the audience members | |||
| Presenter sounded confident and interested in the audience | |||
| Working with the chat and other technology appeared seamless to the audience | |||
NOTES
|