
CHAPTER 2
I Don’t Know How to Program
Do you have to know how to program to make use of the projects presented in this book? No. Will you enjoy the projects more if you understand a little bit about programming? Probably, yes. The purpose of this chapter is not to teach you how to program. There are plenty of books available to do that. (As mentioned in Chapter 1, Dr. Purdum’s Beginning C for Arduino is written for those who have no prior programming experience. Simon Monk’s Programming Arduino is also a popular introductory programming text.) Rather, the goal is to get you to think a little bit like a programmer so you can at least follow what the code is doing. That appreciation alone may be enough for you to start tinkering with μCs and their associated code yourself.
When we hear hams express their concerns about programming, we think about our own experiences when we first started to learn Morse code.
I Don’t Need No Stinkin’ CW!
Jack remembers well getting ready for his General Class license exam. He had been a Novice for almost a full year and was sick and tired of Morse code. Like most Novice class operators, he couldn’t wait to get on AM or maybe even that new SSB stuff … someday. Still, way back in 1954, you had to pass a code exam of 13 words per minute … a blistering pace of 65 characters a minute! Jack’s friend, Charlie McEwen, and he studied for the exam together and were pretty confident about the theory and regulations part of the exam. The code part … not so much.
They took the bus from their hometown of Medina into Cleveland about 30 miles away. They left the bus, climbed the stairs into the federal building, and found the exam room. It was probably 50-ft square with six or seven rows of dark wood tables and chairs to match. One wall held tall windows that reached for very high ceilings while the other walls were painted government green and decorated with some bad photos of public figures of the day. At the front of the room was a blackboard and just in front of that a small table with a square box sitting on it with an AC line cord running from it into the wall. It had to have been the room used to design the Bates Motel and felt just as friendly.
In a few moments, a man came in and told us we would be taking the receiving part of the code exam first. It required that we copy at least 1 minute of perfect code out of the 5 minutes that were to be sent at 13 words per minute. If we passed the receiving test, then we would take the sending part and, passing that, the written part of the exam. Jack was sweating bullets and Charlie didn’t look much better. The examiner then asked if there were any questions. There were none.
Then, out of nowhere, Morse code erupted from the little square box, passing Jack’s ears with unrecognized speed before crashing into the back walls only to ricochet off the side walls just in time to collide with the next letter being sent from the little square box. The room had the acoustics of a waste can. Jack spent the first 30 seconds of that exam trying to hear something other than his own heart pounding in his ears. At the end of 5 minutes, he handed his paper in and took a seat, still trying to get his pulse rate below 1000. In a relatively short period of time, Jack was told he had passed the receiving exam and could take the sending part next. The sending part was a snap and, upon hearing he passed it, Jack told himself: “I will never use Morse code again!”
Really?
Here we are five decades later actually enjoying CW again. Indeed, QRP and CW have given amateur radio a new breath of life for many of us. But why?
We think the hang-up with Morse code was based on fear of the unknown. As a Novice, Jack never pushed himself hard enough to get comfortable with code at 20 wpm, which is what everyone was telling us we needed to be able to copy to have enough margin for error to pass the code exam. Jack simply lacked the confidence to try.
Like CW, Like Programming
After talking with a lot of hams about using μC, we hear the same story: “I don’t know how to program μCs so I don’t use them.” When you first thought about getting your ticket, did you know Morse code? Could you draw a schematic of a Colpitts Oscillator? Many of us couldn’t. But we learned enough to get our tickets, and that was the goal. No, we were not EEs at the time, but we learned enough electronics to reach the goal we sought … our General Class ticket.
Just like we said we never wanted to hear another dit or a dah all those years ago, many of you say you don’t want to learn how to program, and that’s fine. However, even though you may not want to command a cruise ship by yourself, the trip might still be more enjoyable if you know what you’re looking at during the journey. And that’s what you’ll learn in this chapter … an appreciation for what the program code is doing. And trust us … programming and the power it conveys can be very addictive!
The Five Program Steps
No matter how complex a program might be, it can be distilled to essentially five steps. Knowing the Five Program Steps serves multiple purposes. First, you’ve probably been in a situation where you’ve been assigned a project, but you just don’t know where to start. When it comes to software, thinking about the Five Program Steps is perhaps the first step you should take toward a solution. Also, once you understand the Five Program Steps, it gives you an organized way to examine someone else’s code … like ours. It also gives you a broad perspective on how to start designing your own programs, should you decide to give programming a try.
Step 1. Initialization
The purpose of the Initialization Step is to establish the environment in which the program is to run. If you’ve ever run a Windows program like Word or Excel, you know that the File menu keeps track of the last four or five files you’ve used. Finding those files and adding them to the File menu before you see the first screen displayed would be part of the Initialization Step. Other programs might be concerned with opening database connections, activating printer ports, turning on your rig so it can warm up, plus a host of other “pre-operating” tasks. Generally, then, the Initialization Step creates the operating environment for the program and it all takes place before the user sees anything change due to the program running.
Step 2. Input
If you think about it, every computer program takes data in one form, crunches on it in some way, and outputs a new set of data. The Input Step concerns itself with getting the data into the program. The source of the data could be a keyboard or keypad, a fiber optic connection, a database, a voltmeter, a CW keyer, an antenna signal … whatever. The point is that data in some form is introduced into the program.
Also note that getting data into a program is an imperfect process. People do hit the wrong keys, connections can break down, there can be voltage spikes, plus a host of other things that can possibly go wrong. For that reason, the data presented in the Input Step is often validated for potential errors before it gets passed along to the next step.
Step 3. Processing
As we mentioned earlier, data are presented to the program in one form, reworked, or “crunched,” in some manner, and then presented in a different form. The “crunch” step is the Processing Step that is used to transform the data from its input form to its final form. Often, the Processing Step involves applying some formula, or algorithm, to the data that manipulates the input data mathematically. However, that is not the only way processing can take place. For example, you may have two vats of chemicals that have sensors attached to them and when their contents reach certain temperatures, the two vats are combined together in a mixing process. The precise way in which the data inputs are combined is determined by the underlying methodology required to produce the desired result. You will also hear this methodology, or process, referred to as the algorithm. An algorithm is nothing more than a detailed, step-by-step, description of how the data are transformed from its initial state to its final state.
Generally, therefore, the Processing Step means taking the data from Step 2 and combining it to change the data into a desired new form.
Step 4. Output
Once the data have been processed into whatever new form is desired, that new data is output in some way. In many cases, this means displaying the output on a monitor, an LED or LCD display, perhaps on a printer, or even using a WiFi link to send the output somewhere else. The output can also be digital signals that are used to close switches, solenoids, relays, or other electronic devices. Outputting the results can also mean writing the data to a database or SD card for later use in some subsequent process, or as part of a script that will be run as a batch process at some predetermined time later in the day. The point is that the Output Step represents the desired state of the program’s input data, assuming no errors occurred along the way. The Output Step represents a “solution” to your programming problem.
Step 5. Termination
Well-behaved software should “clean up after itself.” What this means is that, if the Initialization Step opened a database connection, the Termination Step should make sure the connection is closed and its associated resources reclaimed. Memory leaks, dangling file handles, and the like are common examples of programs that didn’t clean up after themselves.
If your program maintains a list of files that were last used, like Word or Excel does, the Termination Step should ensure that the file list is updated before the program ends. In a real sense, the Termination Step often “undoes” whatever was done in the Initialization Step. You will see that most μC programs are an exception to the rule in that they are really not written to terminate themselves. We’ll have more to say about that later in this chapter.
Arduino Programming Essentials
All Arduino programs have certain elements present in them. First, almost all of them are written in the C programming language. C is a simple, yet robust, language that has been around since the 1970s. It has relatively few keywords; words that have special meaning in the language. C has no intrinsic I/O commands like many other languages have.
However, don’t be misled. The genius behind C was that its inventors made the I/O external to the language itself, and instead placed the I/O functionality into what is called the C Standard Library. The great thing about C is that, if you don’t like the way a certain piece of I/O functionality works, you are free to write your own. As you read more programs, you’ll start to gain an appreciation for what this means, since it allows you to handle “those special cases” exactly the way you want to, not the way someone else forces you to.
Actually the Arduino IDE uses the C++ compiler from the Open Source group, which fully supports C++ and all that its Object Oriented Programming (OOP) paradigm brings to the table. Still, for the most part, the Arduino programs, or sketches as they are called, are usually written in plain old C. If you need help understanding a program, the first place to look would be a book on C, and probably not C++. C++ is a significantly more complex language than C. Indeed, someone once wrote that C gives you the power to shoot yourself in the foot, while C++ lets you blow your whole leg off.
Let’s just stick with C for now.
The Blink Program
In Chapter 1, you loaded and ran a program that is distributed with the Arduino IDE called Blink. Listing 2-1 presents the source code for the Blink sketch. Let’s examine this simple program line by line.
Comments in C
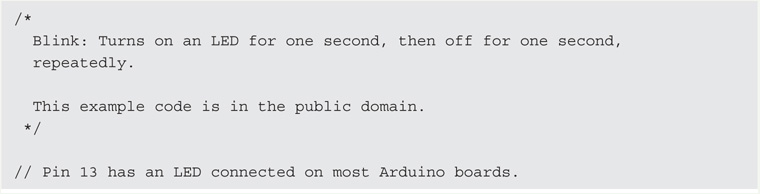
The first thing that you see in the sketch is a slash-asterisk (/*) pair of characters. Several lines farther down, you find an asterisk-slash (*/) pair of characters. These two character pairs mark the start (/*) and end (*/) of a multiline program comment. That is, the comment can span as many lines as it needs as long as those lines fall within the boundary formed by the comment pair. Program comments are notes written by the programmer to anyone who may read the program’s source code with the goal of helping the reader understand what the code is doing. Everything between the two comment character pair is ignored by the compiler. In other words, long wordy comments have absolutely no impact on the execution or performance of the program. The programmer put them there for information only. In this example, the multiline comment simply explains what the Blink program does.

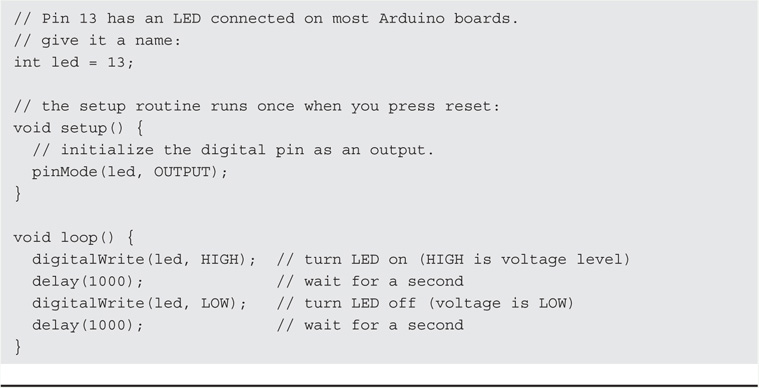
LISTING 2-1 The Blink sketch.
After the multiline comment you see the following two lines:
// Pin 13 has an LED connected on most Arduino boards.
// give it a name:
These two lines are examples of single-line comments. Single-line comments begin with two slash characters (//) at the start of the comment and end at the end of the same line. No special closing comment characters are needed. These two single-line comments could just as well have been written using the multiline comment characters.
When to Comment
When Jack was teaching computer programming classes, he saw both extremes of commenting. Students submitted programs that had source code lines that looked like:
k = k + 1; // Take the original value of k and add 1 to it
Really? If the reader can fog a mirror they should be able to figure what the code statement does without the comment. At the other extreme, we’ve also seen code like:
sol = math.sin(w) + 2.0 * ladder – myFunction(nodding == FULL?10:5);
and no comment in sight … anywhere. If either programmer worked for us, they both would have been fired. Why?
First, commenting every line of code is almost never necessary. Indeed, such commenting actually makes it harder to read the code. Second, complex code like the second statement above should probably never be written that way in the first place. Because there is a fairly high chance that statement ultimately needs to be debugged, we would write it as:

Writing the code as a series of smaller steps makes it easier to test and debug the complex expressions. If there is some serious performance hit by breaking the statement into smaller parts, perhaps because the expression is buried in a tight loop, keep the statements apart until the code is fully debugged and then combine it into its complex form … and test again.
We usually place multiline comments at the start of a function to explain what the purpose of the function is, what data (if any) need to be passed with the call, and what value (if any) is returned from the function call.
So … when to comment and when not to comment? It’s a personal decision, but we think that, if it takes you more than 10 or 15 seconds to figure out what a statement is doing, it likely will benefit from a comment. Otherwise, the comment is probably a waste of time.
Data Definitions
Returning back to the Blink program, the next line in the program’s source code is:
int led = 13;
This line is a C statement that defines an integer data type and assigns the variable name led to it. It also initializes the value of the variable to 13. Because each integer variable requires two bytes of memory for storage, this statement sets aside two bytes of memory and tags it with the name led. Having done that, the compiler then assigns the integer value 13 into those two bytes of memory. Part of the compiler’s job is to keep track of where each variable is stored in memory so its value can be recalled when needed.
Do NOT fall into the trap of using the words define and declare to mean the same thing. They do not have the same meaning. Most programmers are extremely sloppy when using these words. In its simplest terms, a data definition creates an attribute list (e.g., a description of the variable, such as: “an integer variable named led”) that describes the data item but also allocates memory for that variable. A data declaration, on the other hand, also creates an attribute list for a variable but does not allocate storage for it. Because no memory is allocated with a data declaration, there is no memory location set aside where the variable can store data. There are good reasons for this distinction, but we aren’t ready to discuss them yet. (If you’re interested, a more complete explanation can be found at: “Computer Programming and Precise Terminology,” Information Week, July, 2008. Also reprinted in Dr. Dobbs Journal, July 2008; http://www.drdobbs.com/cpp/computer-programming-and-precise-termino/208808373.)
Where’s the main() Function?
A lot of people use the Arduino μCs because they know that the Arduino IDE uses C as its basis. However, people familiar with C, C++, or Java are a little confused because an Arduino program has no main() function in it. If you have ever used C, C++, or Java you know that all programs must have a main() function, as that is the starting point for program execution. What happened to main() in Arduino sketches?
The main() function is actually still there, but it is hidden from direct view. If you look in your directory where you installed the Arduino IDE, you should be able to track a path similar to:
C:Arduino1.0.5hardwarearduinocoresarduino
In that last arduino subdirectory you will find a number of header files (files ending in “.h”) and source code files (ending in .cpp, for C-Plus-Plus, or C++ files or .c for ordinary C source code files). The header files contain a lot of information that the compiler uses to set the environment for compiling a program and the source code files are used in conjunction with your own Arduino “sketch” files. (As mentioned earlier, program source code files that you write within the Arduino IDE are called sketches and have a secondary file extension of *.ino.) The fact that the Arduino directory is filled with both *.c and *.cpp files tells us that we are free to mix C and C++ files in our programs.
If you look closely in the arduino directory, you can see a file named main.cpp. The source code for main.cpp is presented in Listing 2-2.

LISTING 2-2 The main.cpp file.
The source code in main.cpp is pretty simple. Within the main.cpp file is the definition for the main() function. The main() function begins with a call to the init() method, which is used to establish some compiler settings. (Hmmm … sounds like the Step 1 Initialization Step from our Five Program Steps.) As you probably know, init() is called a function in C. Functions in C are small pieces of code that are designed to perform one specific task. Next is a #ifdef preprocessor directive that messes around with the USB connection device, if one is present. (Not all Arduino boards have USB devices.) Next a function named setup() is called one time, followed by a for loop that repeatedly calls a function named loop(). Under certain circumstances, the code may also call a function named serialEventRun().
Normally, a programming for loop has three expressions:

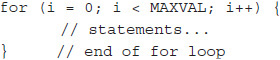
In the for loop above, the first expression initializes a variable named i to 0, the second expression checks to see if the value of i is less than (the ‘<’ character) whatever MAXVAL is. If i is less than MAXVAL, the statements between the opening and closing braces (the ‘{’ and ‘}’) are executed. Once those statements are executed, the i is incremented (expression3, or i++) and then expression2 (i < MAXVAL) is evaluated again. This for loop keeps executing until i has been incremented to a value that equals or exceeds MAXVAL, at which time the for loop ends.
In Listing 2-2, the for loop omits all three expressions. Because the three expressions are missing, there are no expressions present that can be tested to terminate the for loop. This creates an infinite loop: a loop that never ends. Stated differently, it means that the loop() function in Listing 2-2 is called forever or until power is removed from the μC or the system fails in some way. (It is also possible that the serialEventRun() function call could end the program.)
Distilled to its simplest form, therefore, all Arduino programs do have a main(), albeit it’s tucked away from view a little bit. The primary purpose of main() is to: 1) establish the basic environment for compiling a program (i.e., the function call to init()), 2) process any special stuff that you want your program to do once via the single call to setup(), and 3) keep calling loop() until the cows come home. Therefore, it might be useful for us to look at the setup() and loop() functions in a little more detail.
The setup() Function
Referring back to our Blink program in Listing 2-1, after the definition of the variable named led, you find the following four lines:

The actual task a function performs is determined by the statements contained within the body of the function. A function body begins with the opening curly brace following its name ({) and ends with the closing curly brace at the bottom of the function (}). In our example, the setup() function body has only two lines in it: 1) a comment line, and 2) a call to another C function named pinMode(). It appears from the name of the function that pinMode() is designed to use the variable led in some way to affect the pin’s mode and sets it to OUTPUT. If you look up the library documentation for pinMode() you would find that it is used to set a specific Arduino pin (led, or pin 13 in this case) to a specific mode, OUTPUT in this case. As you might guess, pin 13 is tied to the Arduino’s onboard LED.
So what does the word void in front of setup() mean? In C, functions have the ability to send a value back to whatever section of code invoked the function. For example, you might write a function that passes in the number of yards of cotton cloth are available on one or more bolts of cloth and your function returns the number of shirts that many bolts can produce. In that example, you might invoke the function like:
shirts = BoltsToShirts(boltsAvailable);
The variable shirts is probably an integer data type that was defined earlier in the program. When the BoltsToShirts() function finishes its task, shirts holds the number of shirts that can be produced with the bolts of cloth available. The reason is because the programmer probably designed the BoltsToShirts() function to return an integer value that is the number of shirts that boltsAvailable yards of cloth can produce. In programming, integer values cannot have a decimal, or fractional, component. Integers are always whole numbers. In this example, most people have no use for a “fraction of a shirt,” so the programmer made shirts an integer data type.
However, not all functions need to return a value. If no value is returned from the function, the word void appears before the function name, as it does for setup(). The word that appears before the function name is called a function type specifier, and it indicates the type of data being returned from the function. Since we see void in front of setup(), we know nothing useful is returned from the function call to setup().
The setup() Function is Special
Every Arduino program has a setup() function that is called from the (hidden) main() function. Indeed, setup() is the first function that every Arduino program sketch calls directly. In terms of the Five Program Steps, setup() is usually Step 1, the Initialization Step. As we said earlier, Step 1 sets the environment in which your program runs. In our simple Blink program, the only change to the default environment we need to make is to set pin 13 to be an OUTPUT pin. Once we do that, Step 1 for this program is done.
In other programs where you want to monitor values being produced by your program, you will likely use the Serial.print() function to pass information back to your PC via the serial monitor. To do that, your program and the serial monitor must have the communication’s rates set to the same baud rate. Therefore, it is common to see Serial.begin(9600) as a program statement in setup(). As our programs get more complex, most of the functions also become more complex. Still, the basic ideas remain the same.
The loop() Function
The remainder of the Blink program is fairly short:
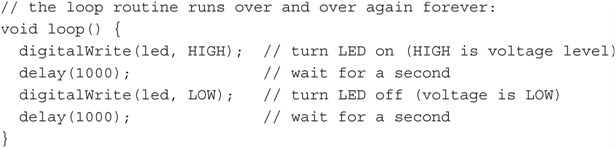
The function named loop() (also called from within the hidden main() function) is preceded with the word void. As mentioned earlier, a void function type specifier means that nothing useful is returned from the function call to loop(). Every program written using the Arduino IDE must have a loop() function. The statement body of the loop() function is executed “forever.” That is, after the setup() function is executed once, the loop() function is endlessly called as the program executes. Normally, the loop() function continues to execute until: 1) power is removed from the board running the program, 2) you upload a new μC program to replace the current program, or 3) the board fails because of some malfunction. As we mentioned earlier, the loop() function normally executes forever, which creates an infinite loop; a loop that never ends.
Within the loop() function, the first statement is:
digitalWrite(led, HIGH);
The words HIGH and LOW are defined for the Arduino environment and you can think of them as representing turning the led pin on (HIGH) or off (LOW). In this program, the digitalWrite() function is serving as Step 2 of the program by providing the input values (e.g., led and HIGH) to be used by the digitalWrite() function. Once those inputs are given to digitalWrite(), the function can process those inputs (Step 3) and proceed to turn on the LED (Step 4) and keep it on long enough for us to observe by calling the delay(1000) function. Because the delay() function is passed a value representing milliseconds, the call to delay(1000) keeps the LED illuminated for 1 second. If the delay() call was not made, the LED wouldn’t be on long enough to observe its change in state from LOW to HIGH.
After 1 second has passed, the call:
digitalWrite(led, LOW);
is made. This means the program is repeating Step 2 and supplying a new set of inputs to digitalWrite(), which turns the LED off (Step 3). Once again, the call to delay(1000) allows us to observe that the LED is now off and remains so for 1 second.
Because of the way the loop() function is implemented in the Arduino IDE, once the last statement in the loop() function (e.g., the second delay(1000) call) is executed, the program jumps back up to the first digitalWrite(led, HIGH) at the first statement in the loop() function and the entire process repeats itself. Indeed, this is why the function is called loop() … the statements within the loop() function repeat themselves forever, or until power is lost or there is a malfunction.
I Thought There Were Five Program Steps?
Wait a minute? Didn’t we tell you that there were Five Program Steps? What happened to Step 5, Termination? Well, that’s kinda what makes μC programs different from most other applications. Unlike a word processing program where you write your letter, save it, and you’re done and you shut the word processor down, most μC applications are designed to run “forever.” You might, for example, write a μC program that monitors several hundred fire sensors in a building. Every few seconds each of the sensors is visited and checked to see if a fire is present or not. If not, the code proceeds to check the next sensor in the list. The code continues to do this sensor checking ad infinitum until there is a fire or there is some kind of power or system failure. After all, how useful would the fire sensor system be if we shut it down when everyone left at 5PM, only to start it back up when they started to return to work at 8AM?
Therefore, most μC programs concentrate on the first four program steps, perhaps even hoping never to reach the Termination Step.
Modifying the Blink Sketch
Let’s make a few minor changes to the Blink program and observe the impact those changes have on the behavior of the program. Listing 2-3 shows the modified program.
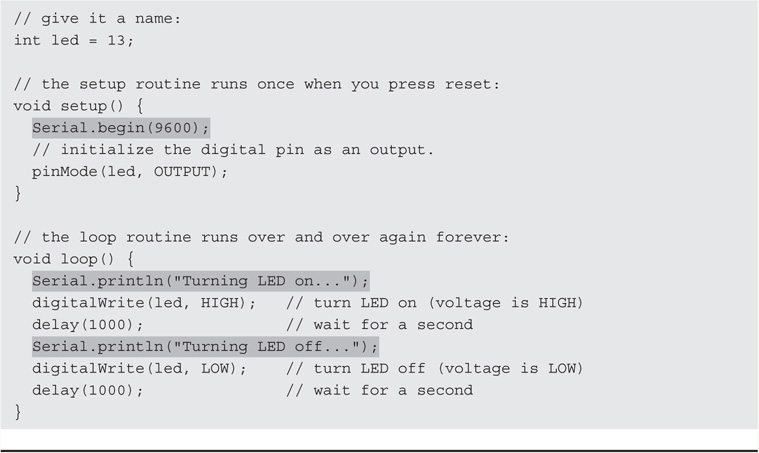
LISTING 2-3 A modified Blink program.
The program is exactly as it was before, except for the three highlighted lines. The first line appears in the setup() function, so it is part of the Initialization Step. Without getting too complicated, one of the Arduino Libraries available to you is called the Serial library and it has a number of functions associated with it that you can use in your programs. (You can find details about the library in the Arduino Reference section of the web site: http://arduino.cc/en/Reference/Serial.)
Actually, the Serial library is a C++ class that you have access to in your programs. One of the functions (also called methods in OOP jargon) that is part of the Serial class is begin(). The purpose of the Serial class’s begin() function is to set the baud rate for communication between your Arduino program and your PC. Figure 2-1 shows how to load the Arduino Serial Monitor using the Tools → Serial Monitor menu sequence. Note that the serial monitor does not become available for use until after a sketch has been uploaded to your Arduino board. (You can see the monitor’s menu option, but clicking the option does nothing until after the new program has been uploaded and starts to execute.)
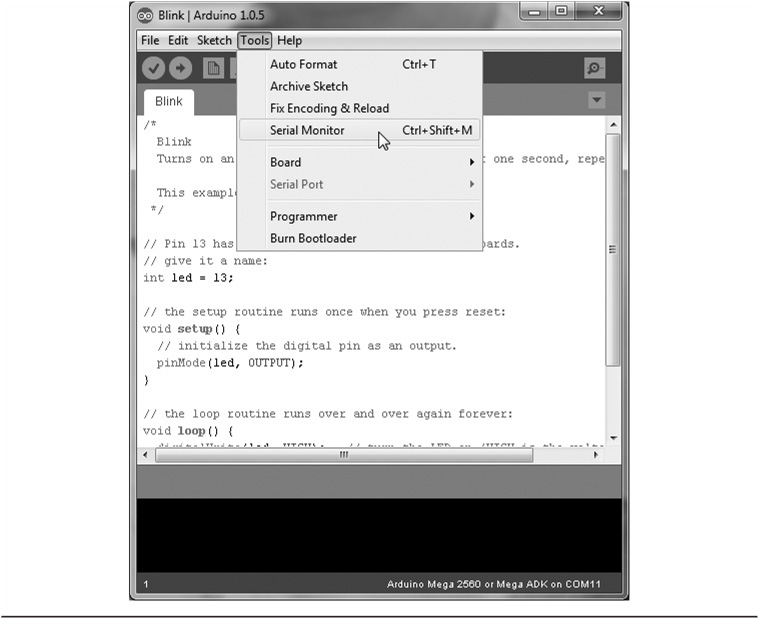
FIGURE 2-1 Loading the Arduino serial monitor.
When you select the Serial Monitor, you should see something similar to Figure 2-2 appear on your PC display. The Serial Monitor does allow you to both send and receive data. The top textbox seen in Figure 2-2 is used when you want to type in data to be sent to the Arduino sketch that is running at the time. You would type in the data and click the Send button. The Monitor program then uses the serial data link (your USB cable) to transfer the data in the serial monitor textbox from your PC to the Arduino program. Our program doesn’t need to send any data, so we ignore sending data to the Arduino for the time being.
In the lower right corner of Figure 2-2 you can see a drop down list box with 9600 baud in it. This is the default baud rate for the Serial Monitor. Therefore, the monitor program is expecting the data from the Arduino program to be arriving over the serial link at a rate of 9600 baud. The statement in setup() says:
Serial.begin(9600);
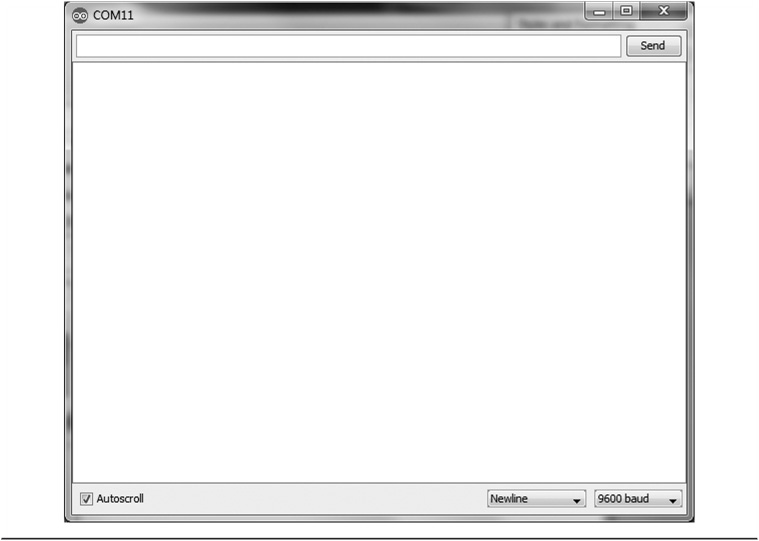
FIGURE 2-2 The Arduino serial monitor.
which means our Arduino program is going to be pumping out the serial data at 9600 baud while the Serial Monitor running on your PC has its 9600 baud earphones on, so the Arduino and the PC can communicate with each other.
What if you don’t match the two baud rates? If this happens, you will see small wisps of bluish-white smoke starting to drift up from … Naw … just kidding! What likely happens is that you will see a bunch of gibberish appear on the Serial Monitor. When that happens, it’s almost always a sign that the baud rates for the Monitor and your program are not matched. The quickest fix is to change the value in the drop down list box value of the Serial Monitor program and restart the Arduino program. (Arguably, the proper fix is to pick the desired baud rate and make sure the program uses that rate. After all, some programs may be time-sensitive and you need the highest baud rate available. Regardless of the rate, if you change the rate in the program, you must recompile and upload the new program version. The Arduino board family has a small reset button on the board that you can press to restart the program.)
With the Serial Monitor’s Autoscroll box checked as it is in Figure 2-2, the program displays the data without pause. The “Newline” dropdown box gives you several options for sensing when a complete line of data has been sent. Because we used the method named Serial.println() (note the “ln” at the end of the word print), the method is saying to print the information and then send a newline character so the next set of data appears on its own new line. If you had used Serial.print() instead, all of the output would appear on one, very, very, long line.
After making the baud rate change and setting the COM port correctly, the output from the new program should look similar to that shown in Figure 2-3.

FIGURE 2-3 Output from the modified Blink sketch.
If you uncheck the Autoscroll feature on the Serial Monitor, it fills up with one page of output, but then vertical scroll bars would appear on the right side of the monitor as the program continued to generate more and more lines of output.
If you feel like experimenting … and you should … try modifying the loop() function to the following:

Before you compile and run the program, ask yourself what the output should look like. Having done that, compile and run the program. The output is shown in Figure 2-4.
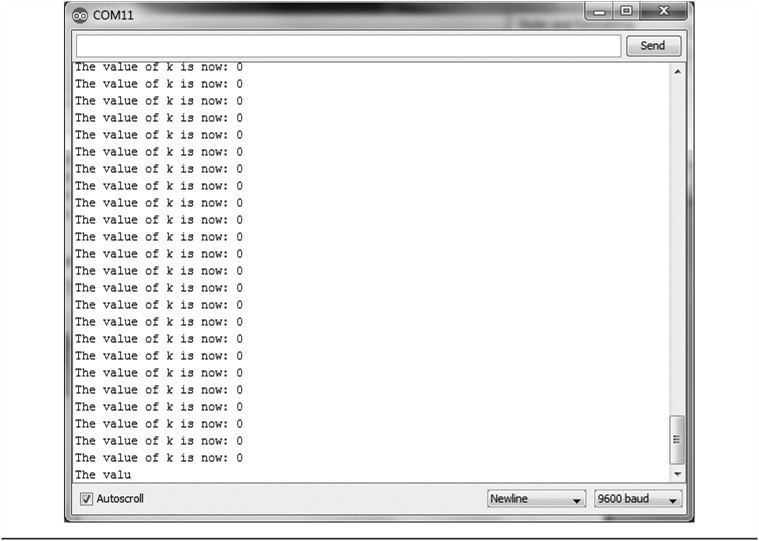
FIGURE 2-4 Displaying an integer value.
If you are like most students, you expected k to be incremented by 1 on each pass through the loop, so it would read:
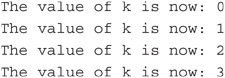
and so on. However, the value of k is always 0 (see Figure 2-4). The reason it does not work the way most people might expect is because the code redefines and initializes k to 0 on each pass through the loop. Therefore, k never has a chance to display a value other than 0.
Let’s make one small change to our program and see what happens. Move the definition of variable k outside the loop() function and just before it, as shown below:
Now compile and run the program. The output should look like that in Figure 2-5.
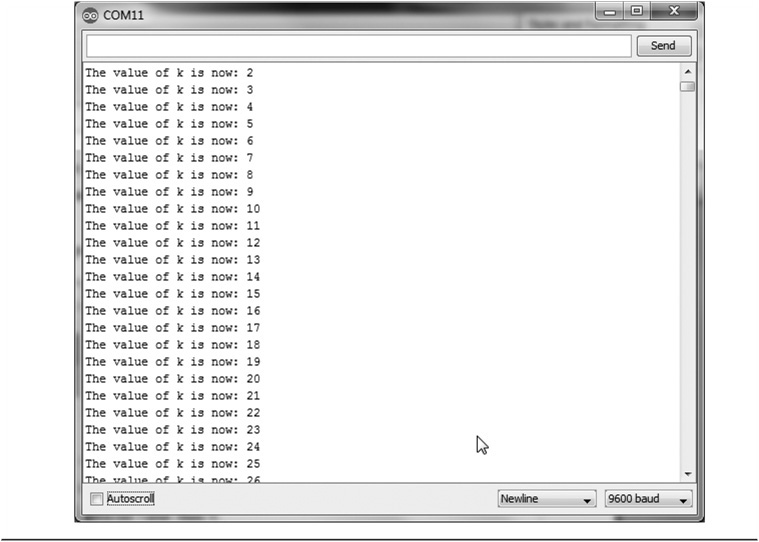
FIGURE 2-5 Moving the definition of k outside the loop() Function.
Now the output looks more like we expected it to look in the first place. So what’s the moral of the story? Simply stated, it does make a difference where you place the definitions of your data. Because loop() is designed to repeat itself forever, placing the definition of k and initializing it to 0 within loop() means its value won’t change in the print statements. Placing the definition of k outside the loop() function means it is not reinitialized on each pass. Like the setup() function, statements outside of loop() are only executed once.
CAUTION: There may be times when you want to cut-and-paste code from an article you are reading in your word processor into the Arduino IDE. Usually, this works just fine. However, double quotation marks sometimes do not translate properly when moved into the Arduino IDE. Often this translation problem manifests itself as an error message stating: “Stray ‘(’ in program.” If you see this error message, try retyping the line with the double quotation marks in it from within the Arduino IDE. Chances are, the error message will disappear.
Saving Memory
One of the factors that you likely considered when deciding which μC to purchase was the amount of Flash memory available. It is in Flash memory where your program resides and is nonvolatile. That is, the contents of Flash memory remain even when power is removed.
The SRAM memory is volatile memory that is used for temporary storage while the program is running. For example, if you call a function using an int as a parameter to the function call, each function call pushes a specific amount of data into SRAM over and above the memory taken for the parameter data. When the function finishes, the SRAM is reclaimed. However, if you call function3() from within function2() from within function1(), all that overhead for each function call starts to add up. Functions that call themselves (i.e., a recursive function call) can really play havoc with SRAM memory space. SRAM, therefore, is a scarce commodity that you want to conserve. If your program mysteriously dies while executing, check to see how much SRAM you have available. (A short program is presented later in this chapter that you can use to help monitor the SRAM memory space left.)
Finally, EEPROM memory is nonvolatile memory that retains whatever data you place there even when power is removed from the board. One issue with EEPROM memory, however, is that it has a finite number of times that it can be written to before it gets flaky. EEPROM is usually pretty stable for the first 100,000 writes.
With the different types of memory available to you, what should you do when you run out of memory? First, you should try to determine which type of memory is giving you issues. When you compile a program, the Arduino IDE gives you the amount of Flash memory you are using and what’s still available for use as program memory. If your program is impinging on that limit, start looking for changes that reduce your program size. If you have lots of Flash memory available but still have unexpected program crashes or other issues, SRAM may be the problem. Quite often, running out of SRAM causes spectacular program failures while you can see that there is plenty of Flash memory left. If your code uses recursive function calls … don’t. Recursive function calls are very likely to fail. Finally, if you are doing reads and writes to EEPROM, try commenting out those statements and replace them with temporary SRAM definitions and see if the problem goes away. If so, you could be running out of EEPROM memory or it isn’t taking writes reliably any longer.
What follows are a few ideas of how to save some memory if the need arises.
Remove Unused Variables
While this seems so obvious, it’s easy to overlook a variable that remains unused in a program. While the compiler does a very good job of removing unused variables, it may not catch all of them depending upon the context in which they are used. If for no other reason, you should remove unused variables simply because they add clutter to your code.
Use a Different Data Type
If you are using an int data type to store a logic true or false condition, you’re wasting memory. An int data type uses two bytes of memory while a boolean data type only uses one byte. Likewise, how many times have we seen something like this:
int bodyTemperatures[200];
It seems unlikely that someone’s body temperature is going to vary between plus or minus 32,000 degrees. Using the byte data type:
byte bodyTemperatures[200];
immediately saves you 200 bytes of memory. Also, if your data require recording the temperature as 98.6 and you really need the decimal faction, the definition:
float bodyTemperatures[200];
is probably still wasteful simply because the array takes 800 bytes of memory. Instead, store each temperature as a three digit int data type and divide by 10 when you need to use it. Therefore, 98.6 gets stored in an int as 986, but used as 986/10. Saving just two bytes for a large array of data can add up quickly.
If you really get in a crunch storing boolean data, you could store each value as a bit in an 8-bit byte and use the bitwise operators to extract the data. This can get a little complex and may use more code to extract the data than is saved. You may have to experiment to see if it’s worthwhile.
Avoid Using the String Class
Try this experiment: Start the Arduino IDE, load the Blink sketch, and add the following as the first line in the loop() function:
String message = “This is a message to display”;
and compile the program. The Blink program size with this statement added is 2560 bytes on a Duemillanove. Now, change that line to:
char message[] = “This is a message to display”;
and recompile the program. The program now occupies 1084 bytes, or a savings of 1476 bytes of Flash memory. Why such a large difference? The reason is because, any time you use the keyword String in your program, you cause the compiler to bring in the C++ String class. Although the String class has some nifty features, you may not need them and the resulting program bloat may be unnecessary.
The F() Macro
Suppose you have the following statement in your program code:
Serial.println(‘Don’t forget to activate all of the external sensors.”);
The message contained within the double quotation marks in the statement is called a string literal. A string literal is a sequence of text characters that does not change as the program executes. These string literals are imbedded in your program’s memory space and, hence, do use up Flash memory. The problem is that the compiler sees these string literals and copies them into SRAM just before the program starts executing! In other words, the same string literal is duplicated in Flash and SRAM memory! With the message above, you just wasted 53 bytes of precious SRAM.
However, if you change the statement to:
Serial.println(F(“Don’t forget to activate all of the external sensors.”));
note that the string literal is contained within the parentheses of the F() macro. Without going into the mechanics of how this works, the end result is that the F() macro prevents the compiler from copying the string literal to SRAM.
If you think you are running low on SRAM, look for string literals and see if using the F() macro saves the day.
There are other memory-saving techniques that you can use, but a good number of them are pretty advanced and may work for one program but not the next. For example, the HardwareSerial.ccp source file defines a 64-byte buffer that is used in serial communications. If your program is running on the ragged edge and doesn’t need high-speed communications, you can reduce the size of the buffer. However, you may forget about this change a few months later when you are using high-speed communications and can’t figure out why the code isn’t performing as expected. (Also, while it may look like a single buffer is being changed, actually multiple buffer sizes are affected.)
The freeRam() Function
The freeRam() function is available on the Arduino web site, but it’s so short, you can just copy it from here:

Because the amount of SRAM available ebbs and flows and the program executes, you should inject the freeRam() function at whatever points you think are necessary. A typical use might be:
Serial.print(F(“SRAM available = ”));
Serial.println(freeRam());
While not a perfect tool, at least freeRam() can give you some idea of what’s happening to your SRAM as your program executes.
If you need additional ways to save some memory and those presented here don’t solve the problem, Google: “Saving memory in Arduino.” We got over 2 million hits. Chances are at least one of those hits can save you a few more bytes of memory someplace.
Conclusion
As you read through the rest of this book, think about the Five Program Steps and try to figure out for yourself where those steps are in the code. It will help you understand what the program is doing. You might also load some of the other example programs that come with the Arduino IDE and try to figure out what they do. (You can find these programs using the File → Examples menu sequence.) Try to modify them, too. (You won’t be able to save your changes under the original program name because they are marked “Read-Only.”) This is a great way to get a feel for what programming is all about without actually having to “learn” programming in a formal manner. Still, our guess is that, once you get started with programming, you’ll discover just how much enjoyment can be derived from it and you’ll want to learn more about programming on your own. Be sure to spend some time with the Arduino library reference pages. You already have hundreds of prewritten functions waiting to do work for you. You should spend a little time looking at them so you don’t inadvertently reinvent the wheel.