After you create a BIRT data source, you create a data set to specify what data to retrieve from the data source. This chapter discusses the different types of data sets that you create using the graphical tools in BIRT Report Designer: SQL SELECT Query, SQL Stored Procedure Query, Flat File, and XML. Though specific tasks for defining a data set vary depending on the data source type that you are using, the general steps are:
Defining the name and type of the data set.
Describing what data to retrieve:
For JDBC data sources that use a SQL SELECT query or stored procedure, you define the query or procedure.
For data sources that use files or URLs, such as XML or flat file data sources, you provide a URL or file location and map the data into a relational structure of tables and columns.
Defining any computed fields that you want to use in the data set.
Defining filters to limit the data that the data set returns to the report.
Defining parameters to specify, at run time, the data to retrieve from the data source.
To create a data set, you must have an existing data source. This section uses a SQL SELECT query to illustrate how to create a data set using a JDBC data source. Specific instructions for creating the various types of data sets appear later in this chapter. Basic data set creation, modification, and deletion operations are the same. For example, you rename or delete a data set in the same way, regardless of the data set type.
How to create a data set
This procedure uses a JDBC data source as an example.
Choose Data Explorer.
Create a data source, or choose an existing data source.
Right-click Data Sets, and choose New Data Set from the context menu.
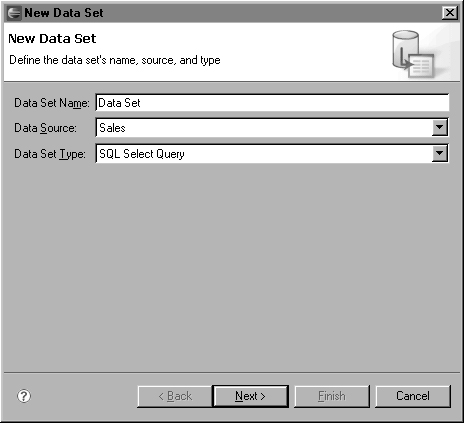
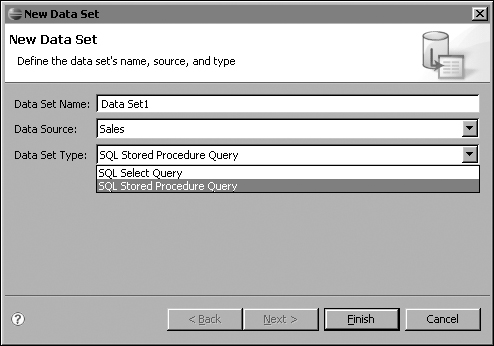
On New Data Set, specify the properties of the data set:
In Data Set Name, specify a name for the data set. The data set name must be unique in the report design.
In Data Source, use the drop-down list to choose a data source to use for this data set.
In Data Set Type, select a data set type. Figure 7-1 shows an example of the definition of a SQL Select Query data set.
Choose Next.
On Query, specify the data to retrieve from the data source. Depending on the type of data set that you create—SQL Select Query, or SQL Stored Procedure Query—BIRT Report Designer displays different query syntax in the text area. Figure 7-2 shows the syntax that you see when you select the SQL Select Query data set type.
When you finish defining the query, choose Finish to save the data set. Edit Data Set, shown in Figure 7-3, displays the columns you specified in the query, and provides options for editing the data set.


You typically change the data source a data set uses when you want to change the data source from a test system to a production system. You can change the data source only if the original and new data sources are of the same type. For example, you cannot change from a JDBC data source to an XML data source.
While BIRT Report Designer lets you change to any data source of the same type, it makes sense to change only to a data source that contains the same types of data organized in the same structure, because the data set contains instructions to retrieve a particular set of data that is stored in a particular structure.
How to change the data source for a data set
In Data Explorer, right-click the data set, and choose Edit. On Edit Data Set, choose Data Source, and choose a different data source from the drop-down list, as shown in Figure 7-4, then choose OK.

Delete a data set if your report no longer uses the data set. If you try to delete a data set that a report uses, a warning message appears. If you delete a data set that provides data to a report element that is being displayed, and you do not delete the data from the report layout, errors appear in the report preview.
You can delete a data set by using the Delete key or by right-clicking the data set and choosing Delete from the context menu. You can undo the deletion if you use the Undo feature (Ctrl+Z) immediately after you delete the data set.
BIRT uses data based on a relational model. A relational model organizes data in a two-dimensional table consisting of rows and columns. A JDBC data source provides data in exactly this way. For other data sources, such as XML and flat files, you define a mapping so the data can be used in a relational structure of tables, rows, and columns. This section explains how to obtain data from JDBC, flat file, and XML data sources.
Typically, a JDBC data set accesses data using a SQL query. A SQL query is a SQL SELECT statement that specifies what data to retrieve from a database or other JDBC data source. Because there are many books about SQL, this section does no more than to discuss how to write a basic SQL SELECT statement and how to combine data from multiple tables.
SQL is a query language you use to retrieve data from a database. It describes the data that you want to retrieve, but it does not specify how to retrieve the data. You do not have to know how the data is saved or stored. You simply need to know the names of the tables and columns that are used and understand the relationships among the tables.
A SQL query consists of one or more statements. The first statement of a SQL query is the SELECT statement that specifies which columns you want to retrieve from the database. The SELECT statement contains two required clauses: SELECT and FROM. The SELECT clause lists the columns that you want to retrieve. The FROM clause specifies the table from which you want to get the selected columns of data. Here is an example of a SQL statement that selects the firstname and lastname columns from a table called customers:
   SELECT customers.firstname, customers.lastname
     FROM customers
A SQL SELECT query can also include other statements that limit what data a query returns. You use the WHERE clause to specify criteria that results must meet and use ORDER BY to sort results. Here is an example of the same SQL statement, using the WHERE and ORDER BY clauses:
   SELECT customers.firstname, customers.lastname
     FROM customers
     WHERE customers.lastname = 'CHANG'
ORDER BY customers.lastname, customers.firstnameTypically, you have to select data from two or more tables to get complete data for your report. This operation is called a join. You join tables in a database through a common column called a key. For example, suppose you want to get the orders for every customer. The database, however, stores customer information in a Customers table, and order information in an Orders table, as shown in Figure 7-5. Both tables contain a column called CustomerID. You can join the customers and the orders table using the CustomerID column.

To get order information for every customer, you can use the following SELECT statement:
   SELECT Customers.CustomerName, Orders.Amount
   FROM Customers, Orders
   WHERE Customers.CustomerID = Orders.CustomerID
The WHERE clause in this example specifies that the query returns rows where the CustomerID in both tables match. Figure 7-6 shows the results that the SELECT statement returns.
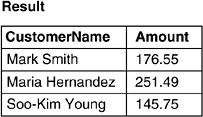
Alternatively, you can use the JOIN keyword to select data from the two tables. The rest of this section describes the different types of joins you can use, and the results that each join returns. The following SELECT statement uses INNER JOIN and returns the same results shown in Figure 7-6:
   SELECT Customers.CustomerName, Orders.Amount
   FROM Customers
   INNER JOIN Orders
   ON Customers.CustomerID = Orders.CustomerID
The INNER JOIN clause returns all rows from both tables where there is a match. If there are rows in the Customers table that do not match rows in the Orders table, those rows are not listed. In the example, Patrick Mason is not listed in the result set because this customer does not have a matching order.
To obtain all the customer names, whether or not a customer has an order, use the LEFT JOIN clause:
   SELECT Customers.CustomerName, Orders.Amount
   FROM Customers
   LEFT JOIN Orders
   ON Customers.CustomerID = Orders.CustomerID
LEFT JOIN returns all rows from the first (left) table, even if there are no matches in the second (right) table. Figure 7-7 shows the results of the SELECT statement with the LEFT JOIN clause. Here, Patrick Mason is listed in the result set even though he does not have an order, because the record is in the first table.
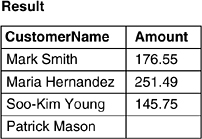
Conversely, if you want to get all rows from the second table (the Orders table in our example), even if there are no matches in the first table (the Customers table), use RIGHT JOIN. In our example, all the rows in the second table match rows in the first table, so the result is the same as in Figure 7-7. If, however, the Orders table had contained rows that did not have matches in the Customers table, those rows would also have been returned.
Note that in all the examples, the SELECT statements specify the columns being joined: Customers.CustomerID and Orders.CustomerID. You must specify the columns to join. If you do not, the result is what is commonly referred to as a cartesian join. In a cartesian join, all rows in the first table are joined with all rows in the second table. If the first table has 1000 rows and the second table has 10,000 rows, the cartesian join returns 10,000,000 rows, a result you rarely want.
The inner, left, and right joins are the most common types of joins. For more information about these joins and others that your database supports, see the database manufacturer’s documentation.
How to create a SQL query for a JDBC data set
In Edit Data Set, choose Query. By default, Available Items displays all schemas in the data source. You can use the filter options to specify schemas or objects to display.
To see the tables in a schema, expand the schema, as shown in Figure 7-8.
If you want to see only views in the JDBC data source, in Type, select View, and choose Apply Filter. If you want to see all tables, views, and stored procedures, select All, and choose Apply Filter.
If the data source has a large number of objects, you can limit the number of object names that are retrieved by typing one or more letters in the Filter field and choosing Apply Filter. Available Items displays the objects that have names that begin with the same letter or letters that you typed. You also can use SQL filter characters for the database that you are using. For example, on some databases, an underscore (_) matches any single character, and the percent sign (%) matches any sequence of characters.
If the database supports schemas, a Schema drop-down list is available. Select a schema to display only objects from that schema.
To display the columns in a table or view, click the plus sign (+) beside a table or view name. Click the plus sign next to a stored procedure to see its input and output parameters.
In the text area, type a SQL statement that indicates what data to retrieve from the JDBC data source. You can also drag tables, views, and columns from Available Items to the text area to insert their names in the SQL statement at the insertion point, as shown in Figure 7-9.
For some databases, if a table or column name contains spaces or SQL reserved words, you must enclose the name in quotation marks (" "). If you drag and drop tables and columns, and those items need to be enclosed in double quotation marks, select the Use identifier quoting option. When this option is selected, the data set editor inserts the quotation marks around a table or column name when you drop it in the text area.
Choose OK to save the data set.


BIRT Report Designer also supports using a stored procedure to create a data set. Support for stored procedures, however, is limited in important ways. BIRT uses only one result set that is returned by a stored procedure. If your stored procedure returns multiple result sets, only the first result set that it returns is accessible to the BIRT report.
BIRT relies on the capabilities of the underlying JDBC driver in its support for stored procedures. For more robust support, a JDBC driver must fully implement the JDBC interfaces that are related to stored procedures, including those that provide its metadata. The jTDS project on SourceForge.net, for example, provides a pure Java (type 4) JDBC 3.0 driver for Microsoft SQL Server that does support stored procedures.
Unlike SQL queries, stored procedures can have output parameters, so BIRT Report Designer supports previewing output parameters that a stored procedure generates to confirm that the procedure is working as expected.
How to specify a stored procedure for a JDBC data set
Create a new data set on a data source that contains a stored procedure.
Specify the properties of the data set:
In Data Set Name, specify a name for the data set.
In Data Source, use the drop-down list to choose a data source to use for this data set.
In Data Set Type, select SQL Stored Procedure Query, as shown in Figure 7-10.
Choose Next. Query displays a template stored procedure, as shown in Figure 7-11.
In Available Items, navigate to the stored procedure. Select the stored procedure, and drag it to the text area. The stored procedure name appears at the insertion point. In the text area, type the required information to execute the stored procedure. For example, you should include any arguments that are passed to the stored procedure.
To type the stored procedure, enclose the call statement in left and right braces, for example:
   {call getTable('ClassicModels.Customers')}
   {call getClientOrders('103')}
If you type the stored procedure without the braces, BIRT treats the statement as a regular RDBMS call, so execution is dependent on the RDBMS of your data source.
Choose Finish to save the data set. Edit Data Set displays the columns returned by the stored procedure, and provides options for editing the data set.

After you create a flat file data source, you create a flat file data set that uses the data source. You cannot use SQL to define what data to select from the file. Rather, you indicate which fields in the file act as columns. In this way, you define a relational structure, the table, rows, and columns, that BIRT can use.
How to create a data set to access data from a text file
Create a flat file data set on a flat file data source. Specify the following properties in New Data Set:
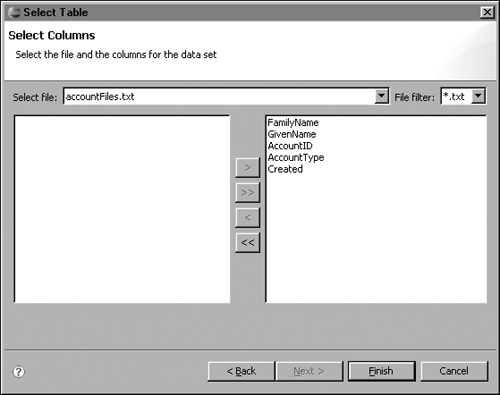
On Select Columns, in File filter, select the file-name extension that the text file uses.
In Select file, select a text file from the drop-down list. The left pane displays the columns that are available in the selected file.
In the left pane, below Select file, select the columns to retrieve for the data set, and move them to the right pane. You can select columns in a few ways:
 Select a column, then choose Select.
 Press Shift while you click to select multiple columns, then choose Select.
Choose Select All to include all columns. Figure 7-12 illustrates a text file in which all columns are selected.
Choose Finish to save the data set. Edit Data Set displays the columns you selected, and provides options for editing the data set.
After you create an XML data source, you can create an XML data set that uses the data source. BIRT uses XPath expressions to define paths to XML elements and attributes that act as tables and columns. In this way, you can map a relational structure that BIRT can use to retrieve the data. A single XML data source can be used to make any number of data sets, but a single XML data set can include only one table definition, and can return only one result set.
BIRT uses an XPath implementation that uses Document Object Model (DOM), which means that the available memory of your system limits the size of the XML document that you can use. You should test your XML documents to ensure that they will work as needed. To use large XML documents, you must implement an XPath implementation that uses Simple API for XML (SAX).
To define a table and columns in an XML document, you use a wizard to select XML elements and attributes, and BIRT creates the corresponding XPath expressions. You can also manually write or edit XPath expressions. This section defines the most common ways to write an XPath expression to use an element or attribute as a table or column in an XML data set. This section is not a substitute for formal XPath user documentation. Examples in this section refer to sample XML data that appear at the end of the section.
The most important syntax rules to consider when you create XPath expressions to define tables and columns are:
Any path that starts with a forward slash (/) is an absolute path.
The XPath expression that defines the table mapping must be an absolute path, for example:
/library/book
A path is considered relative to the table level that is defined when the XML data set was created, unless it begins with a forward slash.
You can only use XPath expressions that locate elements along parent-child axes. For example, the following path is not acceptable:
book/library
The following path is acceptable:
/library/book
For attribute paths you can use a single forward slash or left and right brackets. For example, the following paths are equivalent:
   title/@lang
   title[@lang]
To define an element’s attribute as a column, use either of the following syntax forms:
   author/@name
   author[@name]
To define a table-level attribute as a column, use either of the following syntax forms:
   /@category
   [@category]
To filter data rows, you can use either of the following predicate expression syntaxes:
Single-position predicates in the abbreviated form. The following example selects the first author listed:
author[1]
Single-equality conditions based on an attribute value. For example, you can select an element by using the value of an attribute of the element. In this example, only books that are in English are selected:
title[@lang='eng']
XPath functions are not supported.
The examples in the instructions in this section use the following XML data:
<?xml version="1.0"?>
<library>
   <book category="COOKING">
     <title lang="es">The Spanish Cook Book</title>
     <author name="Miguel Ortiz" country="es"/>
     <year>2005</year>
   </book>
   <book category="CHILDREN">
     <title lang="en">Everyone is Super Special</title>
     <author name="Sally Bush" country="us"/>
     <year>2005</year>
   </book>
   <audio format="CD" category="MUSIC">
     <title lang="en">We All Sing Perty</title>
     <artist name="Mary Rogers" country="us"/>
     <year>2005</year>
   </audio>
   <audio format="CD" category="MUSIC">
     <title lang="en">The Bluest Blues</title>
     <artist name="Barry Sadley" country="us"/>
     <year>2005</year>
   </audio>
  </library>
How to create a data set to access data from an XML file
Create an XML data set on an XML data source. Specify the following properties in New Data Set:
On XML Data Set, specify the XML source in one of the following ways:
In the text box, type the path to the XML data, or choose Browse to navigate to and select an XML file.
To use the file specified in the data source definition, select Use the XML file defined in data source.
When you finish, choose Next.
Define the table mapping:
In XML Structure, navigate to the element in the XML data that represents the table level of your data, and select the element. Choose the right arrow. The XPath expression appears.
Select the XPath expression that defines the path to the record-level element in your XML data, as shown in Figure 7-13, then choose OK.
Choose Next.
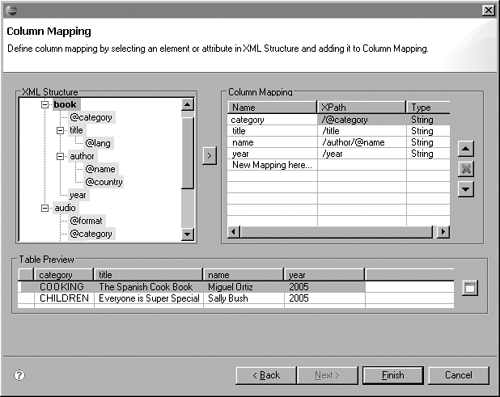
Define the column mapping:
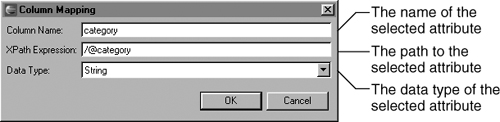
In XML structure, navigate to and select the element or attribute in the XML data that represents a column, then choose the right arrow. Column Mapping displays the default column mapping properties for the element or attribute you selected. Figure 7-14 shows an example of the default column mapping for an attribute named category.
On Column Mapping, you can edit the column mapping properties. Choose OK. The column is displayed and can be edited.
To directly edit a path, select the XPath field, and edit the path.
To remove a column, select the column, and choose the red x to delete the mapping.
In Table Preview, choose the Preview button to see a sample of your data. See Figure 7-15 for an example.
Repeat the preceding steps for every column that you want to add. Figure 7-15 shows an example of column mappings in an XML data set.
Choose Finish to save the XML data set. Edit Data Set displays the columns you mapped, and provides options for editing the data set.

In Output Columns, you optionally can add an alias or display name for each column. BIRT Report Designer uses the display name in Data Explorer and for the column headings in a table. For example, you can give a column that is named $$CN01 a display name of Customer Name to make the column easier to identify in Data Explorer and more user-friendly in the column heading of a table.
Use an alias if you want to use a shorter or more recognizable name when you refer to the column in code. For example, you can give a column named $$CN01 an alias of custName so that you can write row["custName"] instead of row["$$CN01]. If you do not specify a display name for the column, BIRT Report Designer displays the alias in Data Explorer and for the column headings in a table.
How to view and change output columns
To verify the list of columns selected for retrieval, choose Output Columns from the left pane of Edit Data Set. Output Columns displays the names of the columns, as shown in Figure 7-16.
In Display Name, for a column that you want to change, type the name of the column to be displayed as the default column heading in the report, then choose OK.

You can use Preview Results to verify that the data set returns the expected data. Figure 7-17 shows an example of a result set returned by a JDBC data set. Preview Results shows up to 500 data rows that are returned by the query or data definition in the data set. If you expect to preview data frequently, or if you are working with large or complex data sets, you can configure the data set cache, so you can work more efficiently.

How to change the number of rows that appear in Preview Results
A data set can contain computed data as well as data that is returned from a data source. Computed data displays the result of an expression, typically involving one or more columns from a data source. For example, if each row that is returned from the data source contains a price and a quantity, you can create a computed field that calculates the total amount paid, using the following expression:
row["pricequote"] * row["quantity"]
You also can concatenate values from multiple fields, using the + operator, or calculate values using JavaScript functions. The expression builder provides a list of operators and functions that you can use to build expressions.
You can also define a computed field in the report layout. Defining computed fields in the data set is, however, the preferred approach. Defining the computed field in the data set separates business logic from the presentation of the data. Defining the computed field in the data set also enables you to verify the results of the calculation in the Preview Results page of Edit Data Set. You can determine whether the expression for the computed field is correct before you work on the report layout and how to display the computed field. Figure 7-18 shows an example computed field, Total_cost.

How to add a computed field to a data set
In Edit Data Set, choose Computed Columns, then specify a computed field:
In Column Name, select the first empty row, and type the name of the computed field.
In Data Type, select a data type for the computed column.
In Expression, specify the expression to calculate the desired value. You can either type the expression or use the expression builder to construct the expression. To use the expression builder, complete the following steps:
 Choose the ellipsis (...) button to open the expression builder. In Category, select Available Data sets, then select your data set.
In the top pane, type an expression. You can also double-click an item to add it to the expression at the insertion point. Figure 7-19 shows how to create an expression for a computed column.
Choose OK. Computed Columns displays the computed field and expression that you created.
To see all the columns that are specified in the data set, choose Output Columns.
Choose Preview Results to confirm that the computed field returns the correct data.
Choose OK.BIRT Report Designer saves the data set.

The capability to join data sets is a useful and easy way to combine data from two data sources. You can, for example, combine data from two XML files, or combine data from a text file with data from a database table. Before you can join data sets, you must, of course, create the individual data sets. For example, to combine data from an XML file with data from a text file, you must first create the XML data set and the text file data set.
Joining data sets is similar to joining tables in a database, described earlier in “Combining data from multiple tables,” but with two limitations:
You can join only two data sets. Within a database, you can join more than two tables.
You can create only three types of joins: inner, left outer, and right outer.
Like the database joins, you must specify a column on which to join the two data sets. The three types of joins you can use to join data sets yield the same results as the similarly-named database joins. The following list summarizes the function of each join type:
Inner join returns all rows from both data sets if there is a match.
Left outer join returns all rows from the first data set, even if there are no matches in the second data set.
Right outer join returns all rows from the second data set, even if there are no matches in the first data set.
Joining two data sets creates a BIRT object called a joint data set. Just as you can with a regular data set, you can add computed columns and filters to a joint data set, and preview the results it returns. Once you understand well the concepts of joining data sets, you can be creative about combining data from more than two sources, assuming the data from the various sources relate in some way.
While each joint data set can join only two data sets, you can use a joint data set as one or both of those data sets. For example, you can create joint data set A and joint data set B, then join both of them. Doing so, in effect, combines data from four data sets. Figure 7-20 illustrates this concept.

As Figure 7-20 shows, each data set can return data from different types of sources. You could also use joint data sets to join multiple tables in a single database. For performance reasons, however, this technique is not recommended. Where possible, you should always join multiple tables through the SELECT statement, as described earlier in this chapter. You should create joint data sets only to:
Combine data from disparate data sources.
Combine data from non-relational data sources, such as XML files or text files.
How to join data sets
In Data Explorer, right-click Data Sets, and choose New Joint Data Set.
On the left of New Data Set, click the arrow button, and from the drop-down list, choose the first data set for the joint data set. The columns of the first data set appear.
On the right of New Data Set, choose the second data set for the joint data set. The columns of the second data set appear.
Select the columns to join. Select one column from the first data set, and one column from the second data set. Typically, you select the columns that are common to both data sets. BIRT Report Designer does not prevent you from selecting two unrelated columns as long as both columns have the same data type. Doing so, however, typically does not provide the results you want. Figure 7-21 shows an example of a joint data set definition.
Select a join type, then choose Finish.
On Edit Data Set, choose Preview Results to see the rows returned by the joint data set.

Depending on the type of the data source, you may have additional options that you can set when you define the data set. Specifically, you can create a dynamic query that accepts input from a user when the report runs. You can also set a query time-out setting and define data set cache preferences to improve the efficiency of your work as you develop a report.
Even if you do not know how to program in Java or JavaScript, you can define a dynamic query that accepts input from a user when the report runs.
How to define a dynamic query
On the Query page of a data set, define a SQL query, such as:
SELECT CUSTOMERNAME FROM CUSTOMERS
Create a table in the report layout that uses this data set.
Create a report parameter, such as a String parameter called “passName”.
In Edit Data Set, choose Property Binding, and define the query text to use the report parameter that you created:
   "SELECT CustomerName From CUSTOMERS WHERE CustomerName LIKE '"
      + params["passName"] + "'"
Choose OK.
While you create a report, you frequently preview results to confirm that the report is working as expected. If you are working with a large or complex data source, you can spend a considerable amount of time waiting for data to appear. You can use the BIRT Report Designer cache to store some or all of a data set to reduce the time to display the data preview. BIRT Report Designer uses the system’s temporary directory to store the cache.
BIRT Report Designer invalidates the data set cache whenever you change the data set name, query definition, data set definition, or data source. BIRT Report Designer refreshes the cache the first time that you preview the report after you make any of these changes.
BIRT Report Designer uses data set cache preferences when you design a report.These preferences are not used when a report runs after it is deployed.
How to set cache preferences
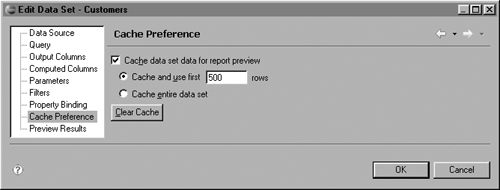
In Edit Data Set, choose Cache Preference. Cache Preference displays the data set caching options.
Choose Cache data set data for report preview. BIRT Report Designer enables the cache options.
Specify the size limit of the data set cache. Figure 7-22 shows a sample configuration.
To cache a portion of the data set, select Cache and use first, then type the number of rows to cache in the rows box.
To cache the entire result set, select Cache entire data set.
To clear the cache, choose Clear Cache. After you choose Clear Cache, BIRT Report Designer displays a message that states that the cache has been cleared.
Choose OK.