When you insert label and text elements in a report, you typically type the text that you want to display. Use literal, or static, text if a report will always be viewed in one language or locale. If, however, a report will be translated into multiple languages, BIRT Report Designer enables you to use resource keys rather than static text. The resource keys are translated, or localized, in resource files.
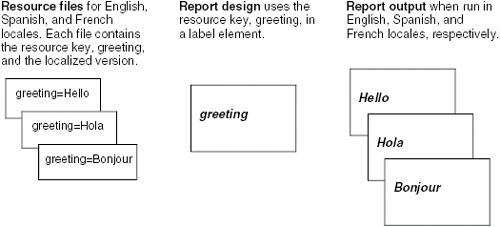
If you are not familiar with resource keys or resource files, think of resource keys as variables and resource files as text files in which the variables are set to their values. If a report needs to appear in four languages, you create four resource files to define text values for each language. When a report runs, BIRT uses the machine’s current locale, the resource keys, and the resource files to find the appropriate text value to display. Figure 24-1 shows the functions of resource files and resource keys in a localized report.
You can specify resource keys for these items:
Static text in label, text, and chart elements. For example, you can localize report titles, column headings, chart titles, and other static labels. You cannot localize text values that come from a data set.
Report parameters.
The localization process for BIRT reports is similar to the localization process for Java applications. This section provides an overview of the entire process. Steps that you perform using BIRT Report Designer are described in more detail in later sections. The basic steps are as follows:
Create the default resource file. The resource file is a text file with a .properties file-name extension. In this file, you define all the resource keys in key=value format:
   hello=Hello
   thanks=Thank you
If you know the text strings that you want to localize, you can create the resource file in an external text editor and define the keys before you build your report. Alternatively, you can create the resource file in BIRT Report Designer and define keys as you add label and text elements to the report.
If you create the default resource file in an external text editor, place the file in the resource folder. If you create the resource file in BIRT Report Designer, the file is created in the resource folder. The location of the resource folder is specified in the Preferences page, which you access by choosing Windows→Preferences from the main menu, then choosing the Report Design Resource item.
For each report parameter, label, text, or chart element that you want to localize, indicate which resource key to use.
When you finish defining the keys in the default resource file, create a resource file for each language that the report will support. The file name must include the language code and, if necessary, the region code. The file name must be in the following format:
  <filename>_<ISO 639 language code>_
     <ISO 3166 region code>.properties
For example, MyResources_en_US.properties is for U.S. English, and MyResources_en_UK.properties is for British English. For a list of supported language and region codes, see the Java reference documentation at the following URL:
In the localized resource files, use the same set of keys that are defined in the default resource file, and set their values to the translated strings. A quick way to create the keys is to make a copy of the default resource file then, edit the values. Unless you are multilingual, this task is typically done by a team of translators.
The following examples show resource keys and values that could appear in two localized versions of the same information:
  MyResources_fr.properties:

     hello=Bonjour
     thanks=Merci

  MyResources_es.properties:

     hello=Hola
     thanks=Gracias
Use the native2ascii command to convert the localized resource files to a format that the Java platform can use. The command requires an input file name and an output file name, so copy the resource file to a temporary file, then use the correct file name as the output file name.
The following example converts a Japanese resource file:
  copy MyResource_ja.properties temp.properties
  native2ascii -encoding SJIS temp.properties
     MyResource_ja.properties
For more information about native2ascii and the list of supported encoding character sets, see the Java reference documentation at the following URL:
Place all the localized resource files in the resource folder. When a report runs, BIRT uses the appropriate resource file to find the localized text values to display. If BIRT cannot find a resource file for a specific locale, it uses the default resource file.
You can add as many resource files as you need to the resource folder. Different reports in a project can use different resource files. However, you can assign only one resource file to a report. You assign a resource file to a report by completing one of the following tasks:
Select a resource file that currently resides in the resource folder.
Create a new resource file in BIRT Report Designer, then assign it to the report.
If you select an existing file, you can assign the keys that are defined in that file to report parameters, label, text, or chart elements. If you create a new resource file, it contains no keys. You define the keys as you add report parameters, label, or text elements to the report.
How to assign a resource file to a report
In the layout editor, select the report by clicking in an empty area on the report page.
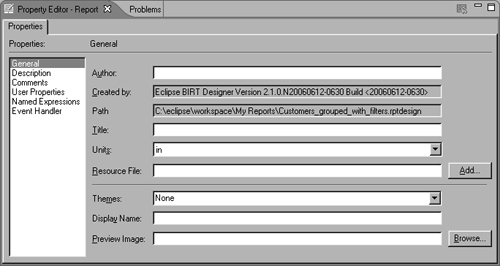
In the property editor, choose General properties. The property editor displays the general properties for the report, as shown in Figure 24-2.
Choose Add, next to the Resource File field.
On Browse Resource Files, indicate which resource file to use by completing one of the following tasks:
To use a resource file that currently exists in the resource folder, select the resource file displayed under the resource folder.
To create a new resource file using BIRT Report Designer, in New File Name, type a name for the new resource file, such as SalesReportResources.properties. You must type the .properties file-name extension.
Choose OK.
The name of the resource file appears in Resource File on the general properties page. The report uses the selected resource file. You can, at any time, specify a different resource file to use. You can also specify no resource file by deleting the file name from the Resource File on the general properties page for the report.
After you assign a resource file to a report, you can localize the text in label and text elements by assigning a resource key to each label or text element. You can assign a resource key that you defined earlier, or you can define a new resource key, then assign it to the label or text element.
How to assign an existing resource key to a label or text element
In the layout editor, select the label or text element that you want to localize.
In the property editor, choose Localization.
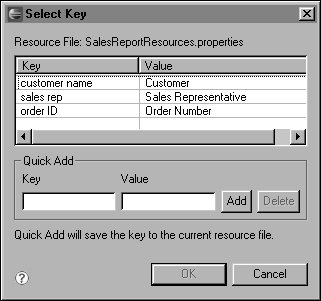
 Choose the ellipsis (...) button that is next to the Text key field. This button is enabled only if you have already assigned a resource file to the report. Select Key displays the current list of keys and values that are defined in the resource file that the report uses, as shown in Figure 24-3.
Select the key to assign to the label or text element, then choose OK. In the layout editor, the label or text element displays the value that corresponds to the key.
How to define a new resource key
Select the label or text element that you want to localize.
In the property editor, choose Localization.
- Choose the ellipsis (...) button that is next to the Text key field. This button is enabled only if you have already assigned a resource file to the report. Select Key displays the list of keys and values that are defined in the resource file that the report uses.
If the key you want to assign is not in the list, add a new key:
In Quick Add, provide a key and value, then choose Add. The key is added to the resource file and appears in the list of keys.
To assign the key to the label or text element, select the key from the list, then choose OK. In the layout editor, the label or text element displays the value that corresponds to the key.
If you change your mind about localizing a label or text element, you can remove the resource key and use static text instead.
How to remove a resource key from a label or text element
Select the label or text element.
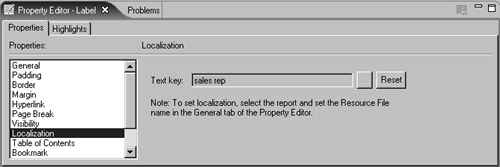
In the property editor, choose Localization. The property editor displays localization information for the selected element, as shown in Figure 24-4.
Choose Reset. The label or text element displays either nothing or the default static text, if you specified any default text when you inserted the element.
After you assign a resource file to your report, you can localize static text in a chart, such as the chart title and axis titles, by assigning a resource key to the chart text.
How to assign a resource key to chart text
In the layout editor, double-click the chart element to open the chart builder, then choose Format Chart.
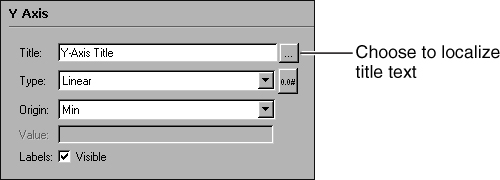
Navigate to the section for the chart part that you want to localize. For example, to localize the chart title, navigate to the Chart Area section. To localize the y-axis title, navigate to the Y-Axis section. Figure 24-5 shows the portion of the chart builder that you use to work with the y-axis.
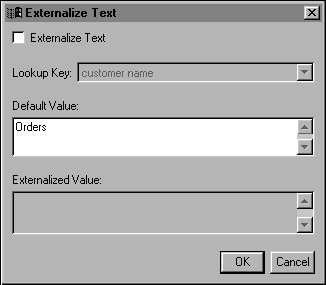
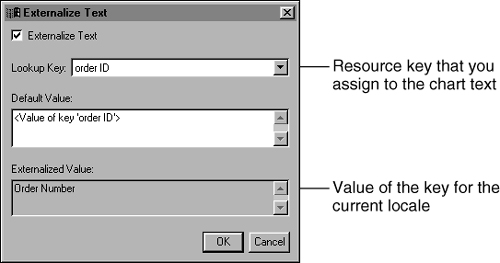
- Choose the ellipsis (...) button that is next to the field to localize. Externalize Text appears, as shown in Figure 24-6.
Assign a resource key to the chart text:
Select Externalize Text. The list of resource keys is enabled in the drop-down list that is next to Lookup Key.
From the drop-down list, select a key to assign to the chart text. The value that corresponds to the key that you selected appears in Externalized Value, as shown in Figure 24-7.
If the key and value pair that you want to use for the chart text is not available, you can edit the resource file to add a new key. Information about this task appears later in this chapter.
Choose OK.
The title field in Edit Chart shows the title’s display value in read-only format. To use a different resource key, choose the ellipsis (...) button to open the Externalize Text editor, and select a different key from the list.
Choose Finish to close the chart builder and return to the layout editor. In the report design, the chart text displays the value that corresponds to the key that you selected.
If you change your mind about localizing text in a chart, you can remove the resource key and use static text instead.
How to remove a resource key from chart text
Navigate to the Format Chart section for the chart part that you want to change.
 Choose the ellipsis (...) button that is next to the field that you want to change.
Externalize Text displays the resource key that is assigned to the chart part, as shown in Figure 24-8.
Deselect Externalize Text.
In Default Value, type the static text to display for the chart part, then choose OK. The title field in the chart builder shows the title’s new display value.
Choose OK to return to the layout editor. In the report design, the chart displays the static text that you typed.

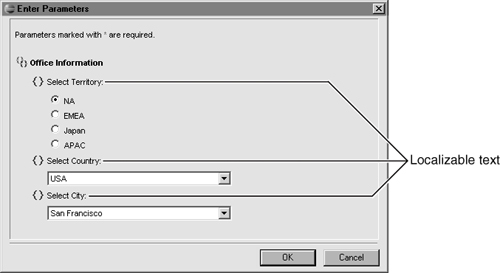
You assign a resource key to a report parameter to localize the text that prompts report users to supply a value for the report parameter. Figure 24-9 shows the dialog box, Enter Parameters, that displays report parameters to the report user. You can localize only the name of a report parameter. In Enter Parameters, the report parameter name appears next to the curly braces symbol,{ }.
How to assign a resource key to a report parameter
These instructions assume you have already created the report parameters.
In Data Explorer, under Report Parameters, select the report parameter that you want to localize.
In the property editor, choose Localization.
Choose the ellipsis (...) button that is next to the Text key field. This button is enabled only if you have already assigned a resource file to the report. Select Key displays the current list of keys and values that are defined in the resource file that the report uses.
Perform one of the following steps:
Select an existing key to assign to the report parameter.
Under Quick Add, create a new key, choose Add, then select the key from the list.
Choose OK.
You often need to change the values of keys or add new keys as you design your report. You can accomplish these tasks through the localization properties page of the property editor for a label or text element, but it is easier to edit the resource file directly.
When you edit the values of keys, the values in the report are updated automatically. If, however, you change a key name or delete a key, report text that uses that key will not display a value, because BIRT cannot find the key. It is best to limit your edits to adding new keys or editing the values of the existing keys.
Be aware, too, that when you edit a resource file after it has been translated into locale-specific resource files, those locale-specific resource files must be updated also. Otherwise, the report will not display the text that you intended when it runs in other locales. For this reason, you should create localized resource files only after you have finalized the default resource file and finished creating and testing the report.
How to edit a resource file
Choose File→Open File, navigate to the resource folder, then double-click the resource (.properties) file. The file that opens in the report editor displays the list of keys and their values, as shown in Figure 24-10.

Edit the file as needed, then save and close it.
When you have completed all the localization tasks, preview the report in all the locales that it supports to verify that the localized text appears properly. BIRT Report Designer provides an easy way for you to preview a report in any locale without changing your machine’s locale. You can test the report in a different locale by setting the locale option in BIRT’s preview preferences.
How to preview a report in a different locale
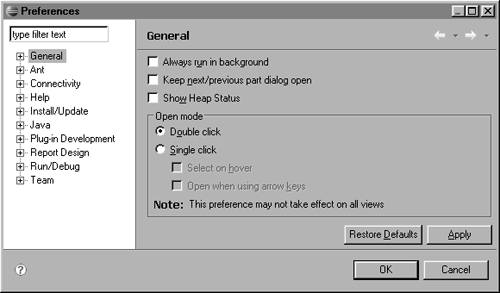
Choose Window Preferences. Figure 24-11 shows Preferences as it appears in BIRT Report Designer. If you are using BIRT RCP Report Designer, Preferences displays only BIRT options.
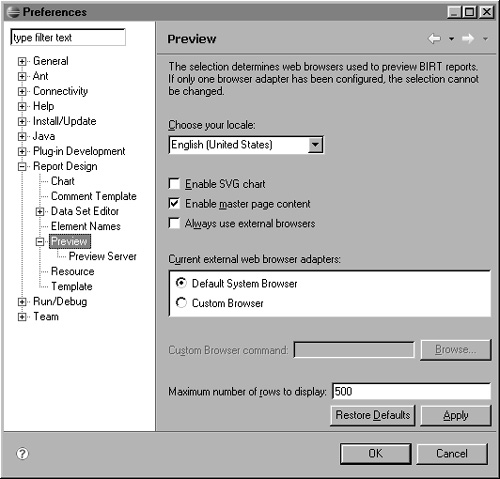
On the left side of the dialog, expand Report Design, then choose Preview. The preview properties appear, as shown in Figure 24-12.
Under Choose your locale, select a locale in which to preview your reports, then choose OK. The locale that you select applies only to previewed reports. It does not change the locale that your machine uses, nor does it change the localized text that appears in the report design.
Preview the report. The localized text appears in the language for the locale that you selected.
To preview your report in another language, repeat the previous steps to select a new locale.