Enterprise report data is frequently stored in a variety of systems and in disparate formats. BIRT Report Designer provides wizards to set up access to the following types of data sources:
JDBC data sources
The most common way to access a data source is to use the JDBC protocol. BIRT reports use SQL queries and stored procedures to access these data sources.
Text files
BIRT reports use text files as data sources. These text files are typically created by business systems and applications that create logs.
XML data
BIRT reports use XML data, either as a stream or a document.
Many examples included as part of the BIRT download use the sample database, Classic Models. That database is included in the default installation as an embedded Derby database so you can work with the examples.
This chapter discusses how to use BIRT’s interactive wizards to create a data source. These wizards also support creating data sources that require scripting or programming. This chapter does not discuss data sources, such as scripted data sources that use JavaScript or custom data drivers that use the Open Data Access (ODA) framework. You can find more information about using ODA on the Eclipse web site in the Data Tools project at the following URL:
http://www.eclipse.org/datatools/project_connectivity/
To access data for a BIRT report, you use a BIRT data source. A BIRT data source is an object that contains connection parameters. Before you actually begin to create a data source or multiple sources for your first reports, you need to consider the issue of project and resource organization. If you plan to use only a few data sources and create only a few report designs, you might not need to consider longer term issues. BIRT Report Designer is an enterprise-class application; therefore, it provides options that you can use to manage a large number of data sources in multiple projects. If you do plan to re-use a data source in multiple report projects, you can create that data source in a library and reuse that data source from the library. The advantage of this approach is that updates to the BIRT data source in the library are subsequently available to all reports that use the library.
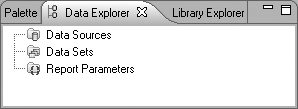
When you create a report design, you use the data explorer, as shown in Figure 6-1, to create and manage BIRT data sources. BIRT Report Designer supports using as many data sources as necessary for the report design. The data sources can be of different types. For example, you can use data from an RDBMS database and data from a flat file repository in the same report design.
By default, BIRT Report Designer provides unique names for BIRT data sources, such as Data Source, Data Source1, and so on. If you prefer, you can provide a descriptive name for each of these data sources. If you do not provide a descriptive name, you may later have to open the BIRT data source and view its definition to remember what data it provides to the report.
How to create a BIRT data source
Open or create a report design, then choose Data Explorer.
If you are using the default application window layout, Data Explorer is on the left, next to Palette, as shown in Figure 6-2. If Data Explorer is not visible, choose Window→Show View→Data Explorer.
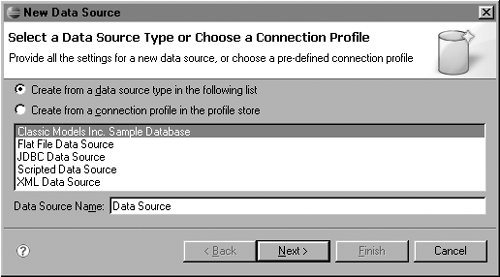
Right-click Data Sources, then choose New Data Source. New Data Source—Select a Data Source type appears, as shown in Figure 6-3.
Specify the type and name of the data source.
Specific instructions for this step vary depending on the type of data source that you create. Subsequent sections in this chapter describe how to create the different types of BIRT data sources.
How to modify an existing BIRT data source
You can rename a BIRT data source or modify its connection properties. To rename a BIRT data source, right-click the data source in the data explorer and choose Rename from the context menu. The name that you use must be unique in the report design.
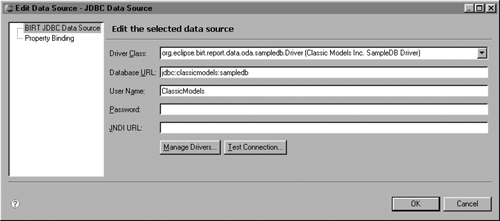
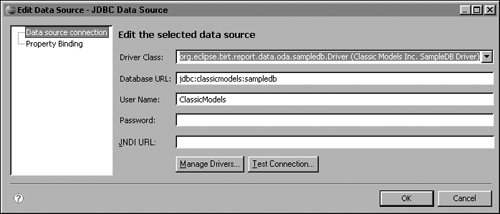
The connection properties for a JDBC data source include the driver name, URL, user name, password, and JNDI URL. To modify the connection properties of a JDBC data source, complete the following procedure:
Choose Data Explorer.
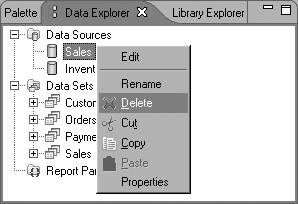
Expand Data Sources, then right-click the data source that you wish to modify. Choose Edit from the context menu, as shown in Figure 6-4.
Figure 6-5 shows Edit Data Source for a JDBC data source. The options in Edit Data Source vary depending on the type of data source that you are editing.
Modify the connection information for the data source, then choose OK.
How to delete a BIRT Report Designer data source
Use the following procedure to delete any type of data source.
In the data explorer, right-click the data source, and choose Delete from the context menu, as shown in Figure 6-6.
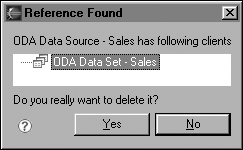
If any data sets use that data source, BIRT Report Designer displays a list of the data sets in Reference Found, as shown in Figure 6-7.
Choose Yes if you want to delete the BIRT data source.
BIRT Report Designer removes the data source from the report design. If a data set uses the deleted data source, the data explorer prepends a symbol to the name of that data set to indicate that it is unusable. In Figure 6-8, the Sales data set is marked as unusable.
You can access data from any database or other data source that uses a JDBC driver. Most relational databases, such as Oracle, SQL Server, or MySQL, use JDBC drivers. To access data from a database or other JDBC data source, you perform sequentially the tasks in the following sections.
You must ensure that the computer has access to the database or other JDBC data source. In addition, you must provide the following information:
The driver class
You can select from a list of detected drivers or specify a different class.
The database URL to use to connect to the data source
The user name, password, and JNDI URL if the data source requires this information
When you create a JDBC data source, you select the driver class and provide a URL. If necessary, you provide a user name, password, and JNDI URL. If you have the appropriate driver, the driver class appears in the Driver Class drop-down list.
You can also design your report so that the report user supplies connection information when the report runs. For example, you can require report users to provide a user name and password when they run the report.
How to specify the connection information for a database or other JDBC data source
Create a data source.
Specify the type and name of the data source:
In the list of data source types, select JDBC Data Source.
In Data Source Name, type a name for the BIRT Report Designer data source. The name must be unique in the current report design. Figure 6-9 shows a default data source name.
Choose Next.
New JDBC Data Source Profile shows connection information options, as shown in Figure 6-10.
Specify the connection information for the JDBC data source:
In Driver Class, choose a driver class from the drop-down list. If you do not see the driver class that you want to use, add a driver as described later in this chapter.
In Database URL, type the database URL, using the syntax that the driver requires. Typically, BIRT Report Designer displays the necessary syntax in Database URL. For a Sun JDBC/ODBC bridge, the syntax is:
jdbc:odbc:<data source name>
where <data source name> is the name of your data source. For example, the following URL identifies the sales database:
jdbc:odbc:sales
In User Name, type the user name to use when connecting to the JDBC data source. This field can be left blank if your data source does not require a user name.
In Password, type the password to use when connecting to the JDBC data source. This field can be left blank if your data source does not require a password.
In JNDI URL, type a JNDI URL. This field can be left blank if your data source does not require a JNDI URL.
To ensure that the connection information is correct, choose Test Connection.
If Test Connection returns an error, repeat the preceding steps to correct the error. Then, test the connection again.
Choose Finish.
The new BIRT data source appears under Data Sources in the data explorer.
BIRT supports JDBC 3.0 drivers. You can get these drivers from a data source vendor or third-party web site. BIRT Report Designer includes the Apache Derby JDBC driver and the Sun JDBC-ODBC bridge driver as part of a default installation. Use the bridge driver for prototype-development purposes only. We do not recommend using the bridge driver with ODBC data sources that do not have a JDBC driver because it is not a production quality driver. Instead, we recommend using a native JDBC driver whenever possible.
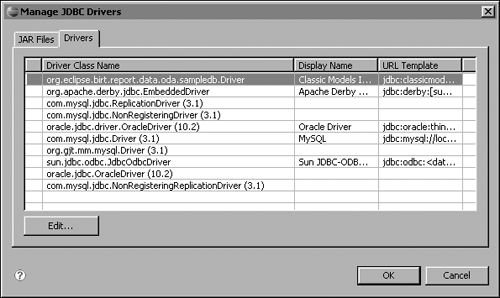
To indicate which drivers are available for use, the JDBC driver manager displays symbols next to the file names in the driver list. An x indicates that a driver is no longer available in the JDBC directory. An asterisk (*) indicates that a file does not exist in the specified location. A plus sign (+) indicates that a file has been restored. For example, in Figure 6-11, the driver manager indicates that the first driver is unavailable.
To install other JDBC drivers, use the JDBC driver manager. This tool supports the installation of JAR files that contain JDBC drivers. The selected JAR file is copied to the following directory:
   eclipseplugins
      org.eclipse.birt.report.data.oda.jdbc_2.1.0.N20060628-1351
      drivers
How to add a JDBC driver
If you have an existing JDBC data source, you can add JDBC drivers by editing the data source.
In BIRT Report Designer, open an existing report design.
Choose Data Explorer.
Right-click an existing JDBC data source, then choose Edit from the context menu. Edit Data Source appears, as shown in Figure 6-12.
Choose Manage Drivers. The JDBC driver manager appears, as shown in Figure 6-13.
To add the JAR files for the additional driver, choose Add, then navigate to the directory that contains the driver class file. Select the driver JAR file and choose Open.
The driver manager appears, showing the new driver class. BIRT Report Designer copies the JAR file to the Eclipse JDBC directory.
Choose Drivers to see the Drivers page, as shown in Figure 6-14.
Specify the properties for a driver:
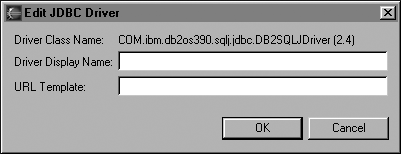
Select the new driver, then choose Edit. Edit JDBC Driver appears, as shown in Figure 6-15.
Specify settings for the JDBC driver:
In Driver Display Name, type a name that appears in the Display Name column in the driver manager.
In URL Template, type the syntax suggestion that appears for this driver in Database URL on New Data Source.
Choose OK. The driver manager displays the new display name and URL template syntax suggestion.
Choose OK. New Data Source—New Data Source appears.
To delete a JDBC driver use the JDBC driver manager. If the JAR file contains more than one driver, the driver manager deletes all drivers that are in the JAR file. If you unintentionally delete a driver, you can use the restore feature to restore the driver.
How to delete all JDBC drivers that are in a JAR file
Right-click an existing JDBC data source, then choose Edit from the context menu. Edit Data Source appears.
Choose Manage Drivers to open the driver manager.
Select the JAR file that contains the driver, then choose Delete.
BIRT Report Designer removes the JAR file and any drivers that it contains.
BIRT Report Designer does not delete the JAR file from the operating system.
You can use the JDBC driver manager to restore a driver that was accidentally deleted. When you restore the driver, the JDBC driver manager copies the driver file from a specified location to the JDBC driver folder in your Eclipse installation.
In the data explorer, right-click a JDBC data source, then choose Edit from the context menu. Edit Data Source appears.
In Edit Data Source, choose Manage Drivers to open the driver manager.
Select the driver to restore, then choose Restore. BIRT Report Designer restores the driver from the original location to the Eclipse JDBC driver directory and replaces the asterisk (*) next to the file name with a plus sign (+), as shown in Figure 6-16.
BIRT provides a driver that can access data from a text file that contains comma-separated column names and values. To access data from a text file, you perform the tasks in the following sections.
To use a text file, you must
Know the file name and location
Know what character set the file uses
Confirm that the computer that created the report design has access to the text file
A text file that you use for report data must follow these rules:
The first line of the text file must contain the names of the columns, separated by commas.
Optionally, you can use the second line of the file to specify the data types of the columns. See Table 6-1 for a list of supported data types. The remaining lines in the file must contain values for the columns, separated by commas. If you use the second line to specify data types, list the data types in the same order as the columns, and separate them with commas.
Each line must contain the same number of fields.
The file cannot include empty lines between records.
Each record must occupy a separate line, delimited by a line break, such as CRLF or LF. The last record in the file can either include or omit an ending line break.
Data in a field can be surrounded by more than one set of quotation marks. Quotation marks are required only if the data contains one or more commas within a field.
A field can enclose single quotation marks and commas with double quotation marks, such as:
"He said, 'Yes, I do.'"
If a field without content has zero or more spaces, the field is treated as NULL and evaluated as NULL in comparison operations.
The file name and extension can be any name that is valid for your operating system. You do not have to use TXT or CSV as the file extension.
The following example shows a valid sample text file. The text file has two lines of metadata and three lines of data:
   FamilyName,GivenName,AccountID,AccountType,Created
   STRING,STRING,INT,STRING,TIME
   "Smith","Mark",254378,"Monthly",01/31/2003 09:59:59 AM
   "Johnson","Carol",255879,"Monthly",09/30/2004 03:59:59 PM
   "Pitt","Joseph",255932,,10/01/2005 10:32:04 AM
Table 6-1 lists and provides information about the abbreviations that you use for the data types.
Table 6-1. Supported data types in flat files
Abbreviation | Data type | Examples |
|---|---|---|
BIGDECIMAL | java.sql.Types.NUMERIC | |
DATE | java.sql.Types.DATE | YYYY-MM-DD or MM/DD/YYYY Examples: 2003-01-31 01/31/2003 |
DOUBLE | java.sql.Types.DOUBLE | |
INT | java.sql.Types.INTEGER | |
STRING | java.sql.Types.VARCHAR | |
TIME | java.sql.Types.TIME | hh:mm:ss and all DATE format strings such as “YYYY-MM-DD” Examples: 2003-12-31 12:59:59 A 01/31/2003 12:59:59 pm |
TIMESTAMP | java.sql.Types.TIMESTAMP | YYYY-MM-DD hh:mm:ss.nnnnnn |
To access a text file, you create a flat file data source and specify its property values, such as the file location and the character set that the file uses. When you create a flat file data source, you select a directory that contains the text file to use. After you create the data source, you can change the file location by editing the data source.
How to specify the connection information for accessing a text file
Create a data source.
Specify the type and name of the data source:
In Data sources, select Flat File Data Source.
In Data Source Name, type a name for the data source. This name must be unique in the current report design.
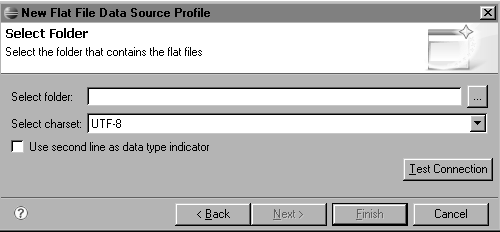
Choose Next. New Flat File Data Source Profile—Select Folder appears, as shown in Figure 6-17.
Specify the connection information for the text file:
 In Select folder, type the location of the folder, or choose the ellipsis (...) button to navigate to and select the folder.
In Select charset, select the character set that the text files in this folder use.
If the second line of the text file specifies the column data types, select Use second line as data type indicator. This setting applies to all data sets that use this data source. Create separate data sources for files that do and do not use the second line to specify the column data type.
Choose Finish to display the new data source in the data explorer.
BIRT provides a driver to access data structured as XML. To access data from an XML data source, you perform the tasks in the following sections.
The XML data that a report accesses must well-formed. To be well-formed, it must conform to the XML 1.0, third edition specification. You can find more information about this specification at the following URL:
The XML data can be a file, a URL, or a java.io.InputStream. An input stream only works in an embedded application, and you must pass the stream as an AppContext to the Engine API.
You must know the name and location of the XML data. Ensure that your computer has access to the data and that the report developer and report user have the appropriate permissions. BIRT supports good XML usage practices by allowing you to use an XML schema to validate your XML files. A schema is not required unless you want to view the file schema while you design reports.
To access XML data, you create an XML data source and specify its property values, such as the XML file location.
How to specify the connection information for accessing an XML file
Create a data source.
On New Data Source, in Data sources, select XML Data Source.
In Data Source Name, type a name for the data source. The name must be unique in the current report design.
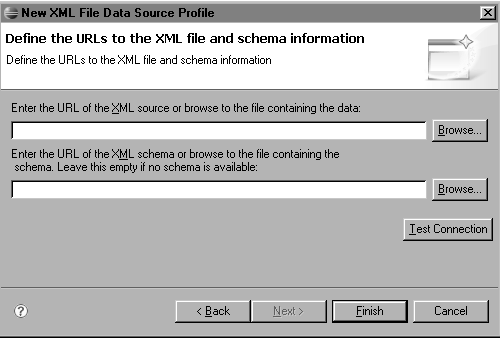
Choose Next to display the XML Data Source page, as shown in Figure 6-18.
To specify the location of the XML data, type the location of the file in Enter the URL of the XML source, or choose the browse button to navigate to and select the file.
If you have an XML schema file, provide the URL. Type the location of the schema file, or choose the browse button to navigate to and select the file. A schema is not required.
Choose Finish. The new data source appears under Data Sources in the data explorer.
When you create a report design, you can use static information to create a BIRT data source and data set. For example, you can provide a user name and password that the report uses to access a database. The database uses whatever roles and privileges are assigned to the hard-coded report user.
If you want to change the report user when the report runs, you must configure your report to enable run-time definition of data source properties. A typical example is allowing a report user to provide his credentials when the report runs. When a user provides a user name and password, the database authentication system determines the correct objects to use to generate the report. To enable this functionality, you create report parameters for the user name and password, then you associate the user name and password data source properties with the report parameters.
How to enable users to provide connection information when a report runs
Open or create a report design.
In the data explorer, right-click Report Parameters, then choose New Parameter. New Parameter appears, as shown in Figure 6-19.
Specify the following basic attributes:
In Name, type a name for the report parameter. For example, the following text specifies a user name parameter:
username_param
In Prompt text, specify a word or sentence to prompt the report user to provide a parameter value.
In Data type, choose a type.
Choose OK. The parameter appears under Report Parameters in the data explorer.
Repeat steps 2 and 3 to create an additional report parameter, such as:
password_param
In the data explorer, right-click an existing data source, and choose Edit.
In Edit Data Source, choose Property Binding. In Property Binding, the data source properties appear.
Specify the report parameters that a report user must provide to access the data source:
To specify a User Name, choose the ellipsis (...) button at the right.
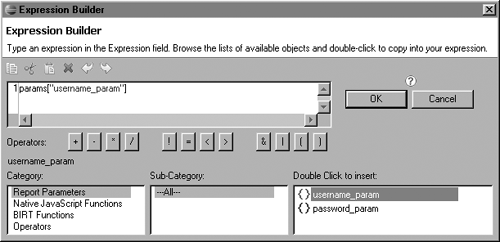
In Expression Builder, associate a report parameter with a connection property:
Under Category, choose Report parameters. All appears under Sub-Category.
Choose All. Under Double Click to insert, BIRT Report Designer displays the report parameters that you created.
Double-click the report parameter that you want to bind to the data source property. The report parameter appears in the expression builder’s work area. For example, Figure 6-20 shows a parameter, username_param, in the expression builder’s work area.
Choose OK. The expression builder closes. The report parameter appears in the User Name field.
To specify an additional report parameter, repeat steps 1 and 2, for example to bind the report parameter, password_param.
In Edit Data Source, choose OK. Preview your report to confirm that the user is prompted for a user name and password.
BIRT Report Designer displays information about data source connection problems in several different places. Error reports can appear in the previewer, the problems view, the error log view, and as pop-up messages. Generally, BIRT Report Designer displays JDBC connection-related problems in pop-up error messages. If the connection information is syntactically correct, but the data source is not available, you see a pop-up message and entries in the error log view.
If a problem is an improperly defined data set, errors appear in the problem view. You cannot manually delete items from the problem view. They display until you resolve the problem or delete the object that is creating the problem.
If you have problems connecting to a data source from BIRT Report Designer, try connecting using a data source manufacturer or third-party tool to confirm that the connection string works as expected. This troubleshooting exercise can help you determine whether to focus your troubleshooting on a driver or on the parameters that you have provided.
If you make changes to your connection parameters and BIRT Report Designer behaves as though it is still using the original values for the parameters, you must restart Eclipse using the -clean option. What has happened is that Eclipse is using cached information that contains the previous values. To clear the cache, the only option is to exit Eclipse and restart using the -clean option.


