Chapter 7
Type in Motion
Using the After Effects Type Engine
On the Spot
Text plays an important role in television graphics whether it’s communicating important statistics or the score of the basketball game. Clear, readable text gets the job done. As viewers get more sophisticated, they expect their screen graphics to evolve as well. When used properly, dynamic text engages the viewer and can capture and hold their attention.
Looking to put your text into motion? Then it’s time to switch over to After Effects. If you’re new to AE or on a deadline, there are nearly 300 Animation Presets to get you started. When you’re ready to dig in, there’s a wealth of tools that can generate powerful results. Let’s get started on the path to better text animation.

Input - Avoid Spelling Errors

The first step to animating text is getting the text in. Since you probably didn’t study secretarial or data entry skills… why make things hard, just copy and paste!
- Open up the script or storyboard, and then select the text. If using a word processor, run the spell-check first.
- Press Cmd+C (Ctrl+C) to Copy the text.
- Switch to After Effects and create a new Text Layer by pressing Cmd+T (Ctrl+T).
- Click to make the text insertion point active.
- Press Cmd+V (Ctrl+V) to paste the text in.
Morphing Letters or Shapes
Need to do a simple “morph” on an object (and no we don’t mean at the level of T2). Well you can use Adobe Illustrator and After Effects, it involves using pasted paths.

- Paste the first shape using the method described in the tip Input – Illustrator Paths.
- Add a keyframe for the Mask Shape property and leave it highlighted.
- Move your playhead indicator to the point in time you want the morph to finish.
- Press Cmd+V (Ctrl+V) to paste the shape.
- RAM preview the comp… chances are the morph is jagged.
- Select your two keyframes and choose Window>Smart Mask Interpolation.
- Set your keyframe rate to match your comp settings… for best results also check the Keyframe Fields option.
- Click Apply then RAM Preview the results.
Input - Illustrator Paths
Sometimes you’ll want to bring text (or simple shapes) over from Adobe Illustrator. These can be pasted inside of After Effects and animated via keyframing the mask shape. But the process is a little tricky.
- In Adobe Illustrator, press Cmd+K (Ctrl+K) and check the following preferences:
Switch to the File Handling & Clipboard Preferences.
Choose to Copy as AICB (no transparency support).
Check the Preserve Paths option.
- Create Text or a Simple Shape.
- For text you need to create outlines. Select the text object then choose Type>Create Outlines or press Cmd+Shift+O (Ctrl+Shift+O).
- Copy the paths to your clipboard by pressing Cmd+C (Ctrl+C).
- Switch to After Effects.
- Create a New Solid by pressing Cmd+Y (Ctrl+Y). Specify color and size, and then click OK.
- Paste the paths into your new solid layer by pressing Cmd+V (Ctrl+V).
- To view the paths (which are handled as masks), select the Solid Layer and press MM to reveal the masks and their properties.
- Keyframe the Mask Shape to create dynamic character animation.

Input - Photoshop Type
We love Photoshop as much as the next designer (okay... we may love it too much). Photoshop has awesome controls for everything, especially text. Except designing text in Photoshop was not such a good idea if you intended to animate the text, as it came in as all one piece and rasterized (not a good idea if you intend to scale and move it around). But fortunately Adobe caught on and fixed this in After Effects 6.5.
- Build your text inside Photoshop using all of the Paragraph and Character formatting controls you need. However, stay away from layer styles, as you'll better off adding those in AE for animated text layers.
- Import your PSD file as a composition.
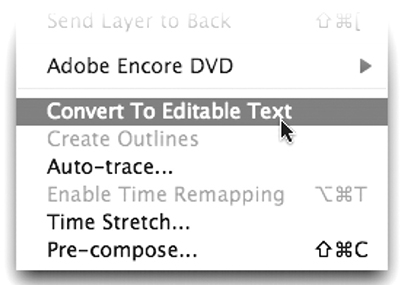
- Select the text layer(s) and choose Layer>Convert to Editable Text.
- Begin to animate.
Input - Illustrator Layers - Part I

How many times have you typeset a bunch of text in Adobe Illustrator, only to have it import as one big blob? (It’s okay… it’s happened to us). The key is to split your text into (non-nested) layers.
To import each line as a layer:
- Open your Layers Palette in Illustrator.
- Locate the layer that contains your text.
- Twirl it down to see the nested layers.
- From the Layers Palette submenu (the triangle on the side) choose Release to Layers Sequence (to put one on each layer) or Release to Layers Build.
- Drag the layers out of the set so they are independent (and not indented).
- Rename layers so they are easier to identify, and then save your document.
- Switch to After Effects.
- Import as a Composition.
Input - Illustrator Layers - Part II
If you want to do very complex animations, it can help to have each letter split out to its own layer. To import each letter as a layer, you'll need to do a little extra prep work:

- Select all Text elements and convert them to Outlines by choosing Type>Create Outlines or pressing Cmd+Shift+O (Ctrl+Shift+O).
- Open your Layers palette in Illustrator.
- Locate the layer that contains all of your text.
- Twirl it down to see the nested layers.
- From the Layers palette submenu (the triangle on the side) choose Release to Layers Sequence (to put one on each layer) or Release to Layers Build (to perform an additive build).
- Drag the layers out of the set so they are independent (they’ll no longer be indented).
- Rename layers so they are easier to identify, and then Save your document.
- Switch to After Effects.
- Import as a Composition.
Flicker Fix
Interlaced displays (and rendering) are great for smoothing out fast-moving objects… but they are brutal on thin text. If you plan to animate text, you’ll need to make sure to avoid thin serifs or lines that shimmer on screen. Here are a few options to try.

- Go Bold - If the font has a Bold, Heavy, or Black version, try it. Chances are that will solve your problem.
- Faux Bold - While it's less desirable (typographically speaking), the Faux Bold option will thicken your font a bit. You enable it at the bottom of the Character Palette.
- Feathered Edges - You can also add a soft-feathered edge to your text. Experiment with a drop shadow effect set to the same color as your text. Set the Distance to 0 (zero) and adjust the Softness setting to taste.
- Sans Serif - Some fonts are better suited for the screen than others. Try using a Sans Serif font (without the curvy hooks), which may be better suited to your needs.
- Motion Blur - Try enabling Motion Blur. Remember to turn it on globally for the comp (the M icon at the top of your timeline) and locally for the text layer (the M checkbox).
- Directional Blur - Try adding an adjustment layer (Layer>New>Adjustment Layer) and applying a Direction Blur Effect (Effect>Blur & Sharpen>Directional Blur). Leave the angle at 0 (zero) and set the Blur Length to a low value. RAM Preview and adjust.
IMPORTANT: You can only judge interlace flicker when previewing a Full-Size Comp at Full Quality that you have sent out to an interlaced television display. Be sure to use After Effect’s Video Preview ability to view your comp on a video display.
Loosen Up

If you plan to animate text character-by-character, the text needs a little breathing room. Be sure to set the tracking to a higher value for best results.
- Select the text layer.
- Call up the Character Palette.
- Adjust the tracking numbers between 10-50 for best results.
Discover Text Animation Via Presets
Looking to wrap your head around After Effects powerful text animation tools? Then be sure to check out the animation presets that began shipping with After Effects 6.5. You'll find nearly 300 built-in animation presets that show off what AE can do. Be sure to check out the sample movies by choosing Help>Text Preset Gallery. When you find one you want... it's simple to put the animation into action.

- The text layer must be a live After Effects editable text layer. Highlight the desired layer.
- Call up the Effects & Presets window.
- Twirl down the Animation Presets Folder.
- Pick a category and an animation.
- Double-click to apply the preset to a highlighted layer, or drag-and-drop.
- The animation will begin near your current time indicator.
Getting More Animations

Just because After Effects comes with presets doesn’t mean the effects are “canned.” There are several ways to modify them.
- Combine text presets to create new combos.
- Twirl down and access the Animator controls. Pay particular attention to the Selector controls.
- Twirl down the advanced tab and change the Randomize Order command to On. You should also try changing the Shape of the Animator (there are six choices).
Looking For a Better Time

Not happy with the timing of the animation presets you’ve chosen? Don’t worry about it… it’s a quick fix!
- Select the text layer you need to modify.
- Press U to see all of the User added keyframes.
- Most animations will have two or four keyframes. Set the first keyframes where you want the animation to start and the last keyframes where the animation should end.
Note: You may also want to take advantage of keyframe interpolation to create smooth transitions between animation states.
What's the Point (or Paragraph)?

Depending on your needs, you’re going to have to choose between Point Text (independent lines of text) or Paragraph Text (text within a bounding box that you can choose alignment and justification for).
- Point Text: Just click and type.
- Paragraph Text: Click and drag a bounding box first. Then you can click within and type.
But what if you change your mind? Don't worry... it's not a problem!
- With the selection tool, select the text layer. (Note, you can't convert a text layer that is in editing mode).
- With the text tool selected, context-click inside the Comp window.
- Choose Convert To Paragraph Text or Convert To Point Text. NOTE: Make sure all characters are visible in a paragraph box before converting. When converting from paragraph text to point text, a hard return is added at the end of each line
- For Paragraph Text, click within the new text layer and resize the handles of the bounding box.
Decisions...Decisions

Trying to pick the right font? Here are some quick tips to make trying new fonts easier.
- Have a highlighted line of text? Then it's hard to see color and changes due to the inverse effect caused by the selection. Choose View>Hide Layer Controls or press Cmd+Shift+H (Ctrl+Shift+H) to disable this reversal.
- What's my name again? Call up the Character palette and click in the font name field. You can use the: Dp and Down arrows to select fonts.
- If you know what font you want, just type its name in the Name field of the Character palette.
Feet and Inches
Want to be a typography snob (or at least fit in with the Art Director)? Take a look at that key next to the enter or return button. That's the feet and inches mark. If you need true quotes or apostrophes, it takes a little more work. Adobe calls these 'smart quotes' and you need to know where to find them.

- Call Up your Character palette.
- Choose Use Smart Quotes from the Character palette sub-menu (the triangle icon).
- Use the Feet and Inches key, After Effects will substitute Quote marks, Single Quotes, and Apostrophes as needed.
Gain Your Composure
Want better looking paragraph text, but don’t have a lot of time? Then let Adobe do all the work. By using the built-in composers, After Effects can analyze lines of text and make adjustments in spacing to optimize a pleasant arrangement on the page. This will result in less weird spaces and avoid hyphenation.
- Single-line Composer: This standard approach composes text one line at a time. This is best if you want manual control over how lines break. This method will try to compress, rather than expand text to make the best fit.
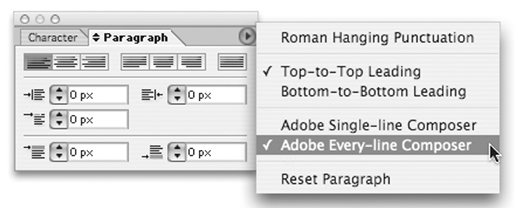
- Every-line Composer: After Effects identifies possible breakpoints, and then evaluates them to produce the best results.
To choose a Composer, select it from the Paragraph palette submenu.
D.I.Y. Animations
So you’ve tried the presets, maybe even tweaked a few… and now you feel ready to make your own text animations. While there are a lot of controls to be concerned about… a little bit of knowledge combined with a sense of adventure can get you through.
- Select the text you want to animate in the Timeline window or choose specific letters in the Comp window.
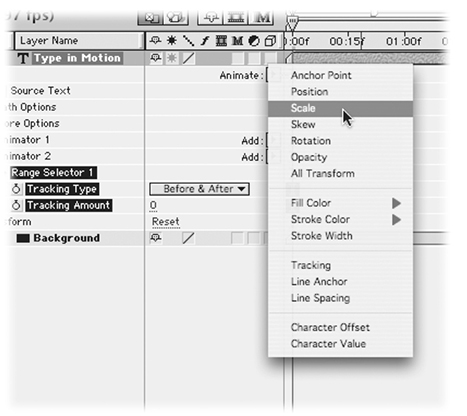
- Choose Animation>Animate Text and select a property from the submenu. You can also use the Animate pop-up menu, located in the Timeline window.
- In the Timeline window, adjust the property values to taste. We suggest changing one at a time and previewing your results when you are first starting out. Don’t forget about using keyframes.
- Contract or expand the Range selector. Use keyframes for Start or End of the Range Selector. You can also animate the Offset property to move the Selector ‘through’ your animation.
- Further refine the selection and animation by using the Advanced options.
Keep Your Place

When you add an animator group, it gets the incredibly descriptive name of Animator. While factually correct, it doesn’t go a long way in the style or function department.
- Select the Animator in your Timeline window.
- Press Return (Enter) to make the name active.
- Type a new name in that is more descriptive of the animator.
- Press Return (Enter) to apply the name.
Save Your Place

Looking to keep your new animators for future usage? It’s an easy process. First create your animation as previously described.
- Select your animator in the Timeline window.
- Choose Animation>Save Animation Preset.
- Store the animation preset in an easy-to-find location, generally this will be in your After Effects preset folder.
Lose Your Place

If you've animated a text layer, and it just didn't work out, then you better get a fresh start. As easy as it was to add an animator, you can clear them out as well.
- Select the text layer in the Timeline window.
- Choose Animation>Remove All Text Animators.
If you want to get rid of a single animator, then select it in the Timeline window and press delete.
Always Kern
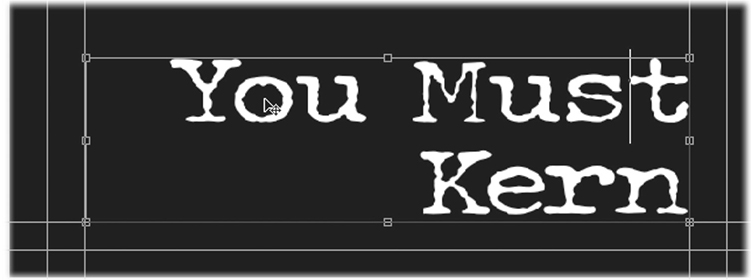
We’ve never met a font that we didn’t want to kern. Getting the spacing right in your text is an important (and often overlooked) step. The goal is to achieve an optical balance to the text, such that if you were to ‘pour water’ over the text, it would flow evenly between the characters. Always take the time to kern; it will raise the professionalism of your graphics.
- Click between two characters that you want to kern.
- Hold down the Option (Alt) key.
- Press the left arrow key to tighten the kerning or the right arrow to loosen the kern.
- Release the option key and continue to move through the text with your arrow keys. Repeat the option (alt) + arrow key combination as needed.
What Can Be Animated?

Animators can be used to achieve a lot of different results. Understanding the list of options is the first step to getting results. Many of the animators achieve results identical to other layer properties, however there are plenty that are unique.
- Position – The position of the characters can be moved in combination with the range selector.
- Skew – How much the letters slant. The Skew Axis specifies the axis along which the character skews.
- Fill Color – You can use RGB, Hue, Saturation, Brightness, and Opacity to modify the colors of the text.
- Stroke Color – Similar to the Fill Color modifications.
- Stroke Width.
- Tracking – The space between all characters in the text.
- Line Anchor – This is to specify the alignment when tracking. A value of 0% is a left alignment, 100% is right alignment, and 50% will track from the center.
- Line Spacing – The space between lines.
- Character Offset – This will roll the characters forward to the following or proceeding letter or number. This is useful for decoding text or performing odometer type effects.
- Character Value – Allows for the replacement of letters with the selected character.
- Character Range - When using Character Offset or Character Value property, you can limit it with a range. You can opt to Preserve Case & Digits to keep characters in their respective groups.
When Good Presets Go Bad
Have you ever picked a text preset just to have nothing happen? You double-check the sample movie… but nothing you do seems to make the Animation Preset work. It pisses the heck out of us too, but we’ve finally found some answers. What’s going on?
The text animation presets were created in an NTSC DV 720x480 comp. There were also built using the Myriad Pro font set to a point size of 72. Differences in comp and point size may mean you have to make changes. Not a big deal… things are easy to fix.

Try these techniques individually or in combination until you get the expected results.
Solution 1: Enable Motion Blur
Many of the presets use blurring to create their motion effects.
- Ensure Motion Blur is turned on for the Composition by clicking the M at the top of your Timeline.
- Check the Motion Blur switch next to the type layer.
Solution 2: Make the Text colors match

Check the sample movies and look at the text animation sample movie. You should set the stroke and fill to match what you see in the movie. Many of the animation presets rely on the stroke setting to work, and if you don’t have a stroke at all… many presets won’t work at all.
Solution 3: Adjust the text animator's position values
If the text disappears unexpectedly, you need to adjust the text animator’s position values in the Timeline or Composition window. Twirl down the text layer for more precise control.
Solution 4: Retype it
If the characters change dramatically, just type your text in again. You’ll also want to check your settings in the Character and Paragraph palettes.
Random Is Good
Animator groups include a default Range selector. This specifies which characters or section of a text layer will be affected. One of the easiest ways to modify an animation is to randomize it. This will ensure different, but cohesive results when reusing an animation preset throughout your show.

- Select your text layer.
- Click on the Add Menu and choose Add>Selector>Range.
- Twirl down the Range Selector then Advanced.
- Change the several different properties to see results… pay attention to the following in particular:
- Randomize Order – This will randomize the order in which the property is applied to the characters specified by the Range selector.
- Random Seed – This affects the method used to calculate the random order. If reusing an animation, change the Random Seed number to get a different result.
- Shape – This will affect the shape used to select characters between Start and End of the range. The shape affects how the selector moves between. Choosing different options will result in gentle, but significant changes. You can specify Square, Ramp Up, Ramp Down, Triangle, Round, and Smooth.
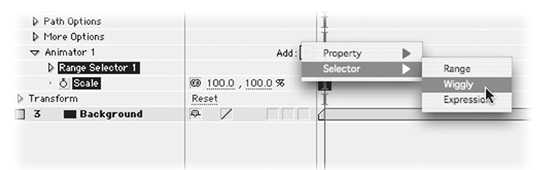
Wiggle It
You also can use Wiggly selectors to create selections that “wiggle.” This will generate variety in what animates and how it animates.
- Mode – How selectors combine together with the other selectors above it. This is most similar to how multiple masks combine to achieve complex results.
- Max and Min Amount – How much variation is allowed.
- Wiggles/Second – The amount of wiggles or cycles per second.
- Correlation - How much the variations are correlated to each other. With a setting of 0%, characters wiggle independently, with 100% they wiggle in unison.
- Temporal and Spatial Phase - You can choose to modify wiggles by time (temporal) or per character (spatial).
- Lock Dimensions - Choose to scale dimensions equally in all directions or independently. This is most useful for properties such as scale.
Need More Fonts?

Looking for some affordable (or even free) fonts? Here are a few of our favorite websites to get more fonts. Check them out for several free and affordable new type faces that are well suited for broadcast graphics.