Chapter 13
OTS Workshop
Creating Over The Shoulder Graphics Faster
On the Spot
It's one of the most important elements in a newscast. It reinforces, explains, or somehow drives the message your news anchor is trying to communicate (or sometimes just fills a "hole" when no video is ready) The over-the-shoulder (OTS) graphic is standard stuff for just about every TV newscast.
In this chapter we'll cover how to make a fully customizable, easily changed OTS graphic for your newscast. Along the way we'll outline how these concepts also apply to lower-third elements as well.

Step Up to the Template

News production is a quick business. You've got deadlines, so you need to implement the quickest and most efficient process possible for making OTS graphics. Building a template to work with allows you (and other producers) to avoid reinventing the wheel, while also ensuring the show's continuity isn't compromised.
To make a template:
- Sketch or envision a design that will work with your newscast. Be sure to follow any font, color, or style guide standards for your environment.
- Create a new document using the preset size for your particular NLE or tape format.
- Design the OTS graphic template using as many layers as needed. Avoid flattening or merging elements when possible. Use of layer masks or clipping masks will allow for a flexible design that is easy to change.
- Define the alpha channel, often this won't change from one OTS to another. If using Photoshop CS2, be sure to check out the Create Alpha Channel from Visible Layers action which can be found in the new Video Actions preset.
- Save the template as a PSD for further editing, preferably to a network drive. At the Finder or Desktop Level, lock the file so future versions have to be saved with a new name. This will preserve your template for future projects.
With the template on a network drive, multiple producers can access the document, quickly use the Save As command to save a copy of it before making changes, and proceed.
Examining an Example, Part 1
Create an example by following these steps. When we’re done, we’ll have a working OTS graphic template.
- Create a new document by selecting File>New.
- Choose the NTSC D1 720 x 486 (with guides) preset. Make sure the Color Mode is set to RGB and click OK.
- Your new document opens with action and title safe guides.
- With the Rounded Rectangle tool, drag from where the title safe guides meet in an upper corner to just under halfway down the image and just under halfway across the image. (Imagine your anchor sitting in the image and draw where you think the OTS image should be.)
- Cmd+click (Ctrl+click) the shape layer to select it.
- Switch to the Channels Palette and click Save Selection as Channel.
- Click the visibility indicator on the new alpha channel.
- Save the file in a format that preserves alpha channels and that your NLE will read.

You’ve just create a very basic OTS template. The rounded rectangle shape represents the image that will appear over your anchor’s shoulder. Since there is an alpha channel defining transparency around everything except this shape (where you see color overlay), this shape represents is the only place images will show through. Everything else will be masked.
Examining an Example, Part 2
Now that we've got a simple template, let's prep it. For this example, let's assume you have a frame grab from the story you're making the OTS for.
- Open the template and your frame grab. If you haven't done so already, be sure to run the De-Interlace filter on your frame grab (Filter>Video>De-Interlace...) Otherwise, the interlacing will be a problem when you scale the image.
- Using the Move tool, drag the frame grab into the template.
- If it’s not on, turn the alpha channel’s visibility on by switching to the Channels Palette and clicking its visibility icon.
- Click the frame grab layer to activate it.
- Press Cmd+T (Ctrl+T) to transform the image. Holding down Shift+Option (Shift+Alt) will allow you to scale the image towards the center while constraining proportions.
- Resize so that the portion of the image you want to see over the anchor's shoulder is not obstructed by the color overlay.
- Press Return (Enter) to accept the transformation
Now your image will appear over the anchor's shoulder. Remember, anything under the alpha channel (represented by the color overlay), will not show through. You don't need to erase or mask it in any other way. The alpha channel will take care of it.
If you're the kind of person who likes to see what it's going to look like while still in Photoshop, use a Clipping Mask.
- Place the frame grab immediately above the shape layer.
- Choose Layer>Create Clipping Mask (or Group with Previous depending on your version) to mask the image to your shape.

Working Outside the Box
Now that you’ve got a frame grab in the OTS template, you’ll probably want to add some text. A one or two word “slug” is common for OTS graphics. For this example, assume we want the text to be just underneath the box. Because it will sit under the alpha channel, we will have to adjust that to make sure it will be visible.
- With the Type tool, type a one or two-word slug under the image, just outside the box.
- Use the Move tool to position it in an appropriate place.
- Load the type as a selection by Cmd+clicking (Ctrl+clicking) the type layer.
- Switch to the Channels palette.
- Click the alpha channel.
- Press Delete (Backspace) to remove the alpha channel from the selected area over the text
Keep in mind that we only had to delete the alpha channel because we put the text outside the shape where the alpha would mask it. Using this template method you can save multi-layered files for reuse or further editing.

Sticky Notes

Want to put some comments into your template? Then use the Notes Tool (N). Once selected, you can click inside of your document to add comments for the next designer (or yourself before coffee).
Consider Being Considerate

So far our template has been very simple. We have not added any image compositing or layer effects, but you can imagine how we could easily end up with several layers. The whole idea of using a template is to keep things orderly (for continuity) and simple, so it only makes sense to rename layers out of consideration for whomever might need to use that same file a few months later... you never know; it might be you!
- To rename a layer, double click its name in the Layers palette and type a new name.
- Use descriptive names so users can identify layers at a glance (remember, the idea is to make this quick and easy)!
To organize really complex documents, consider putting similar elements into layer groups (or sets). )
- Under CS2, select multiple layers by Cmd+Clicking, Ctrl+Clicking. In earlier versions, click the link icon in the layers palette.
- Press Cmd+G (Ctrl+G) in CS2. Otherwise select New Group from Layers (or New Set From Linked) from the Layers Palette sub menu.
Left...No Right

For flexibility during the live show, you will need to send your graphic in so it is able to be keyed over the left and right shoulder. Does this mean twice as much work? Nope.
- Turn off the visibility for all layers (including the background) that should not be in the final graphic.
- Choose Select>All or press Cmd+A (Ctrl+A).
- Copy all layers to your clipboard by choosing Edit>Copy Merged or pressing Shift+Cmd+C (Shift+Ctrl+C)
- Paste a copy into your document.
- Using guides (or Smart Guides in CS2) align the image with its counterpart.
The Awesome (Gradient) Editor

Gradients make for excellent background graphic elements. Photoshop’s Gradient Editor allows you to browse the available gradient presets.
- Select the Gradient tool (G) from the toolbox.
- Several settings become available in the Options bar.
- Click on the preview of the gradient in the Option bar to open the Gradient Editor.
- The Editor opens and displays available presets. You can open more gradient presets by selecting one of the categories at the bottom of the sub menu.
Gradient Screen Graphics
Some news programs use a different kind of OTS graphic. This style of graphic runs from the top of the screen down to the bottom, gradually fading out over the anchor. This type of graphic employs a gradient alpha channel.
- Open a background image.
- In the Channels Palette, click the Create New Channel button.
- A new alpha channel is created, masking the image fully by default.
- Select the visibility indicator of the RGB track in the Channels Palette, then select the alpha channel.
- Using the Gradient tool and the default colors of black to white, draw a straight line where you want the background to fade out. Make sure to drag from the inside of the image toward the outside. Hold Shift while dragging to keep the gradient perfectly straight.
- The color overlay changes, revealing your new gradient alpha channel.
- Save the file in a format that preserves alpha channels (such as PICT or TARGA) and that your NLE, still store, or CG will read.

But Wait, There's More!
The top half of the Gradient Editor deals with presets. The bottom half displays the current gradient and allows you to adjust it and save it to create your own custom gradients. Here’s how it works.
- The gradient is flanked with boxed arrows called Stops.
- Stops on top of the gradient represent opacity. To change their value, click on the stop. The Opacity setting become active, allowing you to change it.
- Once you alter an Opacity Stop, a small diamond appears representing the midpoint. This changes the interpolation of the gradient’s opacity.
- The boxed arrows under the gradient are Color Stops. To change the color of the gradient, click a stop and change the color in the Color setting or double click the stop to bring up a color palette.
- Click between two color stops to add an additional color.
- Click along the top of the gradient to add a new Opacity Stop and below it to create a new Color Stop.
- Click and drag a stop to move it. Click and choose Delete get rid of a stop (or drag it up or down). The gradient updates to show you what a fill will look like.
- For a different look, switch the Gradient Type to Noise and experiment by limiting modifying the Color Model. Click the Randomize button for new options.
- Enter a new name and choose New to save your custom gradient.
- It appears in the Presets window.

Live Layers

Need to make quick changes to your OTS frame or gradients? Then try using Fill Layers instead of your Gradient and Paint Bucket Tools.
- Create an active selection by either loading a layer or using a selection tool.
- Choose Layer>New Fill Layer> Gradient or Solid Color
- In the dialog box, you'll have a standard color picker or gradient editor...edit to taste.
- Click OK.
- When you need to make a last minute change (or the producer gets picky) just double-click the layer's thumbnail to invoke the editor. This is a VERY fast way to make little tweaks as you won't need to keep loading gradients or swatches and making new selections.
Detach those Masks
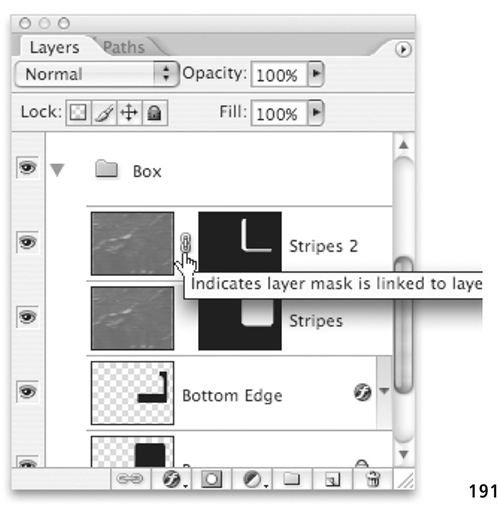
Using Layer Masks in your design? In the case of templates, it much more useful if the mask stays put, but the fill can be moved.
- If you click on the chain icon between the layer and mask thumbnails, they are no longer linked.
- Now you can select either the fill or the matte by clicking on their thumbnails (you'll see a small border around the icon).
- Using the move tool, you can nudge things into place.
Put the Concept to Work
You can apply something similar to the OTS method we used to create lower thirds for your programs. Lower thirds are commonly used as backdrops for titles, used to identify people in interviews, for example. When a reporter comes on screen, a lower third pops (or fades) up so the viewer can see the reporter’s name, commonly along with a program or network logo.
Lower thirds can simply be background images with alpha channels set to mask parts of the image. Creating one is easy.
- Open a background image in Photoshop.
- In the Channels Palette, click the Create New Channel button.
- A new alpha is created, masking the image fully by default.
- Select the visibility indicator of the RGB track in the Channels Palette, then select the alpha channel.
- Using a selection tool, create a selection that includes the area where you’d like the lower third to appear in the image. It can be as simple or as complex as you like.
- Using the Brush tool, paint these selected areas white.
- The color overlay disappears where you paint white, which indicates that pixels in that part of the image will be visible.
- Use the Type tool to create text identifying your reporter, etc.

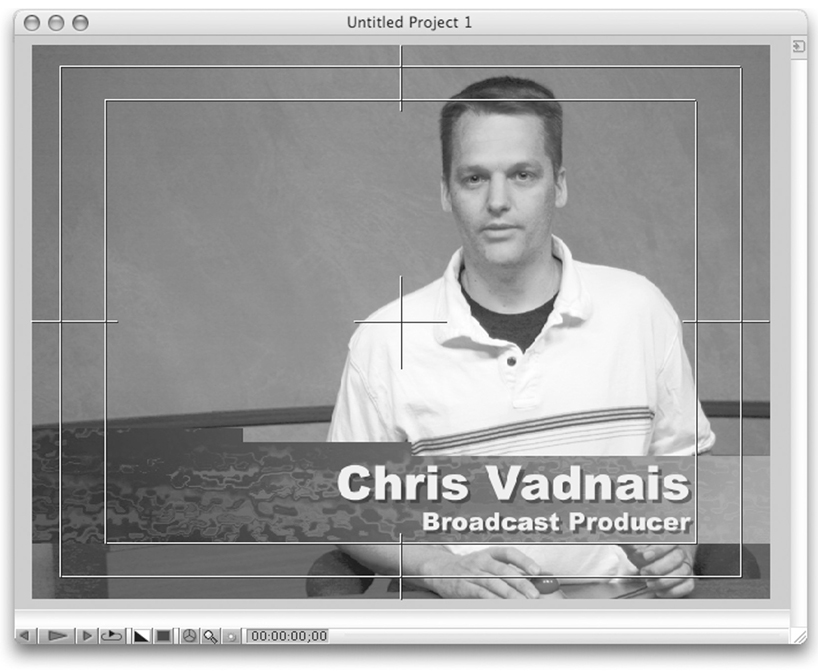
Distinguishing Speakers
Lower thirds often include two lines of text, one for the name of the person speaking and one for his or her title (although we've seen an out-of-control producer try to use four lines once). You can include a separation line between them, a simple but effective way to distinguish the two bits of information.
- Add two lines of text to your lower third: one for the person’s name and one for their title. Generally, the person’s name is set in a larger font (as well as an alternate style or face) since it’s often shorter than his or her title.
- Using the Rectangle or Rounder Rectangle tool, draw a thin box between the top and bottom lines of text.
- Alternately, use the Rectangular Marquee tool to draw the line and fill it with a solid color or gradient.
- Finally, you can add your station or program’s logo to the lower third to complete the effect.