
Chapter 10
Making Deadlines
Using Automation and Scripts to Speed up Your Workflow
On the Spot
If you work on broadcasting, you are used to deadlines. Deadlines for air, deadlines for satellite, deadlines for deadlines for that matter. Being creative takes time, but the whole reason behind computers was so we could drive those flying cars, have robots serve us, and work those 15 hour work weeks (we're still waiting, too). So although those dreams of a Utopian future have not come to pass, it is possible to do more in less time.
In Photoshop, you have several powerful tools that can boost your automation abilities, from scripts to actions, Photoshop is well-suited for cranking through a large pile of "to-do's" and converting them to "dones." Even After Effects offers some powerful timesavers to get the job done. This chapter will speed you up significantly, and we invite you to radically change the way you work.

Creating Actions

Photoshop has a macro tool called Actions (Window>Actions). This tool allows you to record steps that you frequently go through when working in Photoshop. This powerful feature will save you hours and hours of time if you get into the habit of using it. Simply put, it can record any series of steps from creating new documents, applying a series of filters, resizing images, to saving files and converting image formats. Here is a quick step-by-step guide to creating an action.
- Create a new action set by clicking Create new set at the bottom of the Action palette. (All actions must be contained within a set.)
- Create a new action by clicking Create new action at the bottom of the Action palette. When the new action is created, you can specify which set it will be assigned to as well as a color for the action and also assign it to an F key.
- You are now in record mode. Nearly everything your do in Photoshop now will be recorded to the action.
- When you have run through the steps that you want to record, simply click the Stop button at the bottom of the Action palette.
You now have an action that will quickly run through and repeat those steps on other images.

Geeks Love Buttons
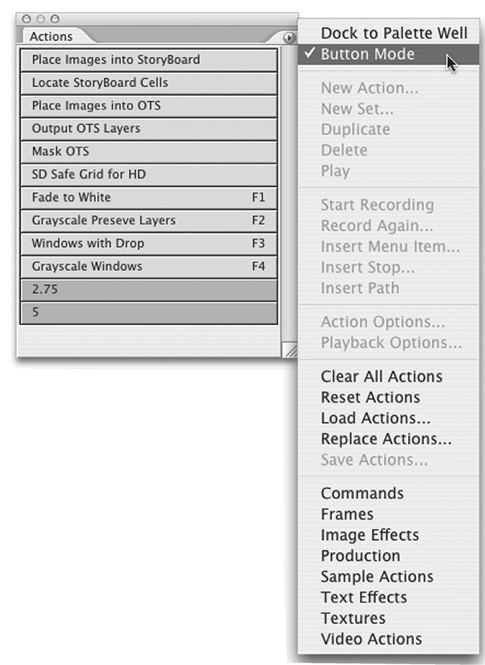
Once you have built a set of custom actions, you can view them as buttons. These buttons will be colored based on the color assigned to each action. Under the Action palette menu, select Button Mode. This makes for a much more visually friendly way to view and access your actions. There are few drawbacks to viewing your actions as buttons.
- All actions in all action sets are displayed as buttons with no visual separators from one set to another.
- There is no way to edit the actions in button mode. Although, this is also a benefit in that you don’t run the risk of messing up the steps in an action.
Once in button mode, if you need to make a change to an action or action set, you use the same steps to get out of button mode.
Just Do It!

Certain functions in Photoshop such as saving files, creating new images, and resizing images have dialogs that pop up when you do them. Actions give you the ability to run the action with or with out dialogs appearing. Turning on dialogs is handy if you know that you always want to feather a selection at a certain point in the action, but you want to change the value each time. However, in many instances you want to apply the same settings to the same functions each time. In this case, you just want the action to run with the settings that were applied when the action was created. You can enable and disable the dialogs by clicking the toggle dialog on/off button to the left of each action. You can toggle this on or off globally for an entire action or turn it on or off for each individual step that has a potential dialog associated with it.
Oops, I Forgot My F Key!

Don’t worry, no need to call a locksmith. All of the settings for an action, including the F key that it is assigned to, can be accessed by double clicking on the action in the Action palette. You can go back at any time and change the action’s color or the F key assignment. However, you cannot change the set that it lives in from this option once the action has been created. To move an action to another set, you need to drag it from one set to another in the Action palette.
My Action Isn't Recording Everything
As you start to get deeper into actions, you may notice that certain menu items don’t record as a step in an action. If the function doesn’t alter the image itself, it will not be recorded to the action. To add these functions to an action, select Insert Menu Item from the Action palette menu. This will display a prompt that will ask you to choose a menu item. Once you select that menu item and click OK, that function will be recorded as a step in your action. Examples would be:
- Showing or hiding rulers
- Showing or hiding palettes
- Zooming in or out on the image

Set Up Your Preferences with Actions

One great power tip is that if you like your preference set up differently for the different types of work you do in Photoshop, you can record your preferences set one way as an action, and another set of preferences in another action. This allows you to quickly change from one preference setup to another without ever opening up your preferences dialog. Simply create a new action, open the preferences dialog and set up your preferences. When you commit to the preferences setting, those settings are saved in the action.
Editing and Saving Actions

Once your actions are created, you may need to make changes to them. Here are a few ways you can edit your actions.
- Change the order of the steps by dragging one step in front of or behind another step.
- Delete a step by dragging it to the Action palette trash can.
- Modify the settings of a step that has a dialog associated with it by double-clicking on that step. Change the values, click OK and the new settings are saved for that step.
- To record more steps in an action, click on the step that you want to start recording after, click the record button, and keep on going. All the things you do are recorded into the action at that location until you click stop.
- You can save your actions, only as part of an action set. Simply select the set that you want to save and choose Save Actions from the Action palette menu. You can also load actions that you have saved from this menu.
That's Cool, But I Need to Fix 1,000 Images!

So you have the killer action that you created that works magic on your images, but you have more images to run it on than you want to think about opening in Photoshop. No problem.
- Select File>Automate>Batch.
- Choose the action set that contains your action.
- Choose your action.
- Pick the source folder you want the action to run on.
- Choose the destination where you want the images saved to.
- Set the other parameters that apply to your particular use.
Photoshop will now run through the folder and batch apply the action to all of the images within your source folder and save them to your destination folder.
Is Photoshop Leaking? I Have a Droplet

Actually, this is a rhetorical question, because software can't leak. But droplets are an extension of Photoshop that are worth mentioning. Droplets are small applications that are created from an action. The steps of an action are embedded into the droplet. Once the droplet is created, an icon is created for it, and when files or folders are dropped on the icon, it will launch the files or contained files in Photoshop and perform the actions on them.
One benefit of droplets, is that once the droplet is created, the action that it was created from does not need to be installed in Photoshop for the action to run. This is handy if you have people in your art department that you want to process images with an action, but you don’t want to risk having them mess up your action. Just pass them a droplet. Droplets are created by choosing File>Automate>Create Droplet.
You're Approved!

If you enjoy the power of the web as much as we do, then why not get client approval for your designs via a web page? Under the File>Automate menu you will find the Web Photo Gallery option. This option will generate a full-blown image approval web site.
- Choose your image source folder.
- Choose your destination folder.
- Pick your template.
Photoshop now creates a full web site that can be uploaded to your web server. Your client can see all of the images that you need approval on, and they can even make comments and have them mailed to you via the feedback options. When you are on a deadline and you just need to get images in your clients hands fast, there is no faster way to get crucial feedback.
Making After Effects Render Settings

When working in After Effects, one of the most time-consuming repetitive tasks is setting up your Render settings each time you want to render a movie. To make this process less painful, you can create templates of your render settings for different types of render that you do. If you frequently render test movies at a lower resolution or with effects turned off and also render full resolution movies for your NLE with specific field orders, you can create a Render Settings Template for each of these settings. Under Edit>Templates>Render Setttings, you will find a dialog that allows you to create multiple render settings, and assign a default setting that will come up each time you initiate a render.
Managing After Effects Output Modules

If you are a design house working for a variety of clients, chances are they are all not editing on the same NLE. Each NLE uses a different codec, requires different audio settings, and there may be times that you need an alpha channel and times that you don't. If this is you, then creating Output Module Templates is a must. You can create an output module setting for each of your clients, their systems, and variations that will render audio, include an alpha channel, or other file output variations. This feature is found under Edit>Templates>Output Module. You can also specify the default module that will be assigned when a render is initiated.
Rendering Takes Long Enough, So Just Do It Once!
Rendering is the most time-consuming task in any compositing application. Once a frame is rendered, saving in a certain format is fast and easy. After Effects is intuitive in this way, by allowing you to apply multiple output modules to each render setting that you have in your render queue. Once you have added a comp to the Render Queue and specified your render settings, you can add as many output modules as you need. One for your web site, one for your NLE, and one for a CD-ROM. With the Render Queue window open and an output module selected, choose Composition>Add Output Module. This allows you to render once, and output to as many different files as you want at one time. The main consideration here is that the field order is determined by the render settings, so if you want to render a file for your Avid and Final Cut Pro at the same time, you will need to render twice because you not only have different codecs (which can be handled by multiple output modules), but the field order is different for each system. This is controlled by the render settings and you can only apply one render setting to each render.

That Depends...
One of the main drawbacks from the actions in Photoshop is that they are not conditional. This means that they do the same thing no matter what. There are some circumstances where you may want to perform one task when you have a horizontal image, and a different task when you have a vertical image.
If you are working with one image at a time, you could simply create 2 different actions and apply the correct one. But when you need to batch a large number of files at once, this solution will not work.
This is where scripting in Photoshop comes in. Photoshop is a very scriptable application, and allows you to write conditional scripts that get information from Photoshop about your images, and let you do different tasks based on what you get back. Scripting can be a very complicated process, so we won’t go into details here, but you do need to know that it exists. You can script Photoshop via:
- AppleScript
- JavaScript
- VisualBasic
There are sample scripts and documentation available in the Scripting Guide folder in Photoshop’s application folder.

Script Events Manager
New to Photoshop CS is the Script Events Manager. This new feature allows you to run an action or a script automatically when other tasks are performed in Photoshop such as printing, saving, or creating a new document. There are a handful of pre-installed scripts that can assist you in a video environment. Since all of your artwork as video designers needs to be in an RGB color mode, you can use the Script Events Manager to convert any image that is not RGB to RGB when it is opened in Photoshop.

- Open Script Events Manager (File>Scripts>Script Events Manager).
- Choose Open Document for your Photoshop event.
- Select the "Warn If RGB.jsx" script.
- Click the Add button to add the event to the manager.
Now, every time you open a new document that is not RGB, a dialog will be displayed asking you if you want the image converted to RGB and saved. With a simple edit to the script (Photoshop Application Folder>Presets>Scripts> Event Scripts Only) you can disable the save routine and just have the image converted. You can add multiple events and create your own actions and scripts to be performed. This is not only a time saver, but allows Photoshop to watch out for you and catch oversights that you may miss.
Changes Are Inevitable
When deadlines either make or break you, you want to make sure that you can make changes to your documents as quickly and simply as possible. Here are a few quick tips to help you make necessary changes to documents with as little pain as possible.
- Never rasterize your layers. Text layers, shape layer, and any other vector elements should remain as vector elements, and not ratsterized.
- If you must rasterize a layer to apply a filter to it, create a copy of it first so you can get back your original text if you need it.
- Organize your layers with layer groups, color coding, and smart objects so you can easily find things that need changing. Your layer organization usually makes sense the day you create the image, but 3 weeks later it looks like a mess. The more organized it is, the faster you will be able to find what you are looking for.
- Always use layer styles and adjustment layers to modify your layers. These are editable and easily changed.
- If you find yourself using the same layer styles over and over, save them as presets in the Layer Styles palette.
- Create favorites of the effects that you regularly use in After Effects so that you can quickly recall them.
- When your client asks you to make changes, duplicate the file they want changed and name it myfile_v2. They may decide that they liked the original better, and want to keep each revision as its own file so you can quickly get back.

Third Party Automation

There are a number of resources available to you that provide tools that will speed up your design process. Here are just a few.
- Tools for Television -They offer a number of actions, add-ons, and techniques that will save you hours of time when working in Photoshop for a video project. (http://www.toolsfortelevision.com)
- Adobe Studio - A web site full of actions, plug-ins, tutorials, and tons of other resources to make you work better and faster in Photoshop. (http://studio.adobe.com)
- Just try google.com. There are literally hundreds of people sharing actions, scripts and other Photoshop related tools. Search the web and you may find that someone has already done the dirty work for you. Don't try to reinvent the wheel, if someone has done it, take advantage of the time savings and use the resources that are available to you.
I Want My Actions in the Action Menu!

You will notice that when you select the menu in the Actions palette, at the bottom of the menu there is a list of preinstalled actions sets provided by Adobe. If you don't use them and would like your action sets to appear in the menu for quick access, follow these 3 simple steps.
- Quit Photoshop if you have it running.
- Place your actions in the Presets>Photoshop Actions folder inside the Photoshop application folder.
- Restart Photoshop and your actions will be listed at the bottom of the menu. Now you can quick load the appropriate sets without having to find them on your hard drive.
Even Faster Than Favorites

Did you know that in After Effects you not only can save favorite settings for your effects, but you can also copy and paste effects from one clip to another.
- You can copy them by selecting effects either from the Effect Controls window, or by selecting and copying them right from the timeline.
- Once you have it copied, select a different layer in your comp and paste it.
- You can also select more than one effect at a time and copy and paste it.
Quick and simple, but what a time saver!
Just Plain Work Smart

The best way to meet your deadlines is to work smart. If you find that the keyboard shortcuts in Photoshop are not logical to the way you work, or you find that there are keyboard shortcuts for things that you never use, and none for the things that you do all the time, then you need to customize your own set of shortcuts.
- Open the shortcuts editor under Edit>Keyboard Shortcuts.
- Here you have access to all of the functions and menus in Photoshop.
- Find the functions that you want to assign or change the keyboard shortcut of, and select it.
- Once the item is selected, simple press the series of keys that you want to assign the function to. If there is a conflict Photoshop will alert you and help you fix it.
With your keyboard shortcuts arranged in a way that makes sense to your workflow, you will find that the less you go to the mouse, the faster you will work.