Chapter 12
Logos & Motion
Designing Still and Animated Logos for Video
On the Spot
These days just about every station—heck, just about every program—puts a semi-transparent logo bug in a corner of the screen. It’s really no wonder. Photoshop makes this easy enough for anyone to do. And while a nice static bug can be effective, you may want to kick things into a higher gear and actually animate a logo.
Even though a logo may start static, it's not hard to add some life. Prep some layers, give them clear names, and bring them into After Effects for a little motion perhaps. Whatever the method, you’ll likely be putting a client’s brand on the screen quite often. In this chapter we’ll take a look at some easy ways to do that.

Starting Points

Work with a vector logo if possible. Its mathematically defined points allow it to be scaled infinitely without distortion. Pixel based bitmap images look terrible when scaled too high. Photoshop will create and edit vector shapes with some limitations, but even a tiny vector logo can be rescaled to large sizes without losing quality using the Open command’s Rasterize options dialog. Even better, if using File>Place under CS2, you’ll retain the vector data for future transformations.
"Worst Logo Format... Ever"
It’s happened to all of us… we need a logo, but the only format anyone can find is the logo created (or embedded) inside of Microsoft Word. The trick is to size the logo inside of Word, then send it out.

- Open the Microsoft Word document.
- Copy the logo to your clipboard.
- Create a New document.
- Paste the logo.
- Click on the logo. The Word Art formatting palette should appear.
- Click on the format WordArt button to access scale controls. You should be able to enlarge the logo to the required size. Be sure to click the lock aspect ratio check box. For best results scale it 200% or 400%.
- Copy the item to your clipboard. Word works at 300 dpi, so this should provide plenty of pixels to work with.
- Create a new document in Photoshop. The new document will automatically be sized to the clipboard's contents.
- Paste, save, and start working.
Logos and Fonts

If you need to open a vector logo, be prepared for some problems with your fonts. If the logo designer left the type “live” you’re going to need to have the font loaded. Sounds like no big deal, until you realize that some fonts are expensive and others proprietary. The solution, if possible, is to ask the logo designer to convert the type to outlines, and re-save as an EPS or Adobe Illustrator file.
Take the Edge Off
Nothing looks lower-budget than a shapely logo (other than rectangular or square) with a rectangular box of white around it. This “throwaway” border is easy to remove with an alpha channel, and it makes a world of difference. Smaller market stations put graphics with these edges on-air all the time, and it’s a shame because fixing it is so simple.

- Open the image in Photoshop.
- Select the ‘throwaway’ edges or borders (hold Shift to make multiple selections).
- Invert the selection (Select>Inverse).
- In the Channels Palette click Save Selection as Channel. You can use a Levels adjustment (and a slight blur if needed) to refine the alpha channel.
- Save in a format that preserves alpha channels.
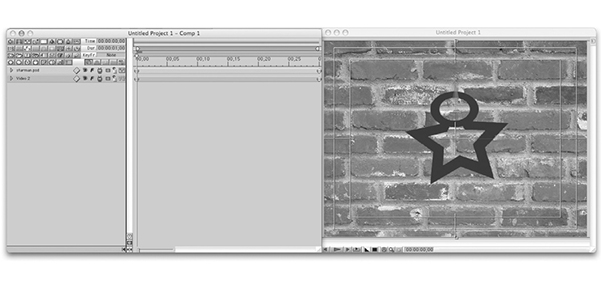
It's Black and White

Got a solid black logo on a solid white background? It’s easy to get it off the background.
- Convert the logo to grayscale.
- Switch to the Channels palette and duplicate the gray channel.
- Select the new channel and invert it by pressing Cmd+I (Ctrl+I).
- Load the new channel by Cmd+Clicking (Ctrl+Clicking) on its icon.
- Disable the new channel.
- Switch back to the Layers palette. Make sure the logo is on a floating layer. If it is a locked or background layer, you’ll have to double-click and give it a name.
- Click on the layer’s thumbnail and click on the Apply Layer Mask icon.
Dissolve It All
Seeing through your logo? When you place a logo over a background image or video and add a fade to black to both tracks, the logo dissolves along with the background. While they may fade at the exact same rate, the logo appears to fade faster, showing the background behind it. To avoid this, you have two options:

- You can mix the video down with the logo to a prerendered track. Then add the fade to black or dissolve to the video / logo composite track. This way you’ll get a clean dissolve on the entire screen.
- Place a black solid, slug, or video clip above the track and dissolve up to a higher track.
Your NLE is the Boss
Some NLEs and compositing programs now support Photoshop’s native transparency in PSD files. Programs like Sony Digital Picture’s Vegas, Apple Final Cut Pro, Avid NLEs, Boris RED, and After Effects will read transparency without the need for alpha channels and even correctly interpret Layer Effects like bevels and drop shadows (as long as you import without layers.) Experiment to see how your application interprets PSD files.
We Need an Interpreter!

If it can't read your alpha channel, After Effects will prompt you for interpretation. You can tell it whether you have a straight or premultiplied alpha, to guess as to which it is (it's often correct), or even to invert or ignore the channel.
If you want to change your mind, you can reopen the Interpret dialog by contextual-clicking the item in the Project window and selecting Interpret Footage. By the way, Photoshop files are premultiplied with white if you saved them over a transparency grid; otherwise they are premultiplied with whatever color you stored in the background layer (such as black).
Composite a Composition

Import a multi-layered logo into After Effects as Footage and you’ll get a single layer. To maximize your animation capability, import it as a Composition.
- Choose File>Import>File.
- Navigate to your multi-layered document and select it.
- In the Import As box, select Composition. If you choose cropped layers, the anchor points will be at the center of each object. Be aware though that some older filters will be clipped by the bounding box.
Make that Logo Dance
Need to get your logo elements synchronized with music? Wouldn’t it be nice to see your beats? This is our favorite way to sync keyframes to your audio track. If you can tap your finger to the music, you can achieve better keyframing.
- Add a Solid Layer to Hold your Keyframes by Pressing Cmd+Y (Ctrl+Y). Leave this layer selected.
- Set your preview area for the segment of audio you’d like to keyframe.
- Be certain the Audio button is highlighted in the Time Controls Window.
- Start the RAM preview.
- To add a Layer Marker, press the Multiply symbol (*) on the numeric keypad. Continue to tape out each audio event you’d like to sync tap.
- When the Preview is finished, all of the Layer Markers will appear.
- To move between markers use the J and K keys to move left or right respectively.

Legalese

When working with a scanned logo, you may often notice that its legal symbol becomes illegible. You may choose to insert these special characters using the Key Caps on a Mac or the Character Map on a PC. The following keyboard shortcuts are also available on a Mac:
- ™ (Option+2)
- © (Option+G)
- ® (Option+R)
It All Turns Out in the End

Need to animate a logo? (Hey you’re in the right chapter!) Here’s a simple technique we call slingshot.
- Go to the end of your imported layers in After Effects, or choose a point where everything should “settle down.”
- View all of the properties you plan to animate. You can press A for Anchor Point, S for Scale, P for Position, R for Rotation, or T for Opacity. Add the shift key to the letter to stack multiple properties.
- It is a good idea to add the end keyframes first before moving layers. This way, all of the elements will return into proper registration. Turn on the stop watches for each property as needed. You can click on the first stop watch and just drag straight down while keeping the mouse button held down.
- Grab and move the individual pieces. When you RAM Preview, you’ll see everything returns to the right place and remains in perfect registration.
Prepping an Al for Animation
Logos animate much better when you’ve got them split into pieces. If you’re using Adobe Illustrator, an Illustrator or vector EPS file can be easily split into layers. These layers can then be saved out into a layered Photoshop file, which can be tweaked in Photoshop and easily imported into After Effects. Alternately you can import a layered vector file directly into After Effects. Once there, you can animate and render. See? That’s only six degrees of separation. Let’s try it out.

- Open a vector logo in Adobe Illustrator.
- Call up the layer’s palette and flip down the twirl-down menu. You should see every item in the logo listed separately.
- It is necessary to consolidate items a bit to make them more manageable. Press A to activate the Direct Selection tool. Lasso around items that you’d like to keep together and choose Object>Group or press Cmd+G (Ctrl+G).
- Go to the palette’s submenu and choose Release to Layers (Sequence). This will put each group on a new layer.
- If you would like to name a layer, double-click on its name. You can also drag the layers to change their stacking order. For predictable results, it is a good idea to “un-nest” the layers by dragging them out of the layer set.
- Choose File>Export; then name the file and select Photoshop (.psd) as the format.
- Specify resolution, and choose to write layers. Do not change the color model during export. It may affect the on-screen appearance (especially with gradients and transparency). Allow Photoshop to do your color conversions instead.
- Open up the file in Photoshop. All your layers should be intact. Feel free to filter or process the image with layer styles (if you use styles, be sure to flatten them by merging the stylized layer with an empty layer).
- Import into your editing or compositing application.
Gentle Moves
Instead of slamming on the brakes with your moves… try a gentler stopping technique. Select your keyframes and try a little bit of ease:
- Click on the keyframe you’d like to apply ease to.
- Choose Animation>Keyframe Assistant> and choose one of the following:
- Easy Ease – Gently move both into and out of the keyframe
- Easy Ease In – Slowly move into the keyframe, coming to a gradual stop.
- Easy Ease Out – Apply inertia to the movement out from the keyframe.

Looking for a shortcut? Here's three!
| • | Easy Ease | F9 |
| • | Easy Ease In | Shift+F9 |
| . | Easy Ease Out | Cmd+Shift+F9 (Ctrl+Shift+F9) |
Sound Keys: For Serious Audio Work

Animated logos are frequently tied to sound. If you are looking for an easy way to get your logo elements synced (such as the words pulsing to the kickdrum) you should take a close look at Trapcode’s Sound Keys. While the interface may seem intimidating at first, you’ll quickly discover that is allows you to generate keyframes based on specific audio frequencies, This is useful when you want to use the bass to trigger one animation, and the midtones to affect another property. Full details and plenty of documentation can be found at www.trapcode.com.
3D Assistants for Exploding Layers
The lite version of 3D assistants from Digital Anarchy comes on your AE install disc. We can use these to create animated logos in a jiffy. Using the Cubic Distribution assistants you can have a bunch of layers start off in random directions, then move into place.
- Import your logo as a layered composition.
- Promote all of the layers to 3D by clicking on the cube-shaped icon.
- Add keyframes towards the end of your comp for position, rotation, anchor point, scale, orientation and opacity (yes.. we call this “idiot keyframing”... better safe then sorry).
- Move your current time indicator to the front of the composition.
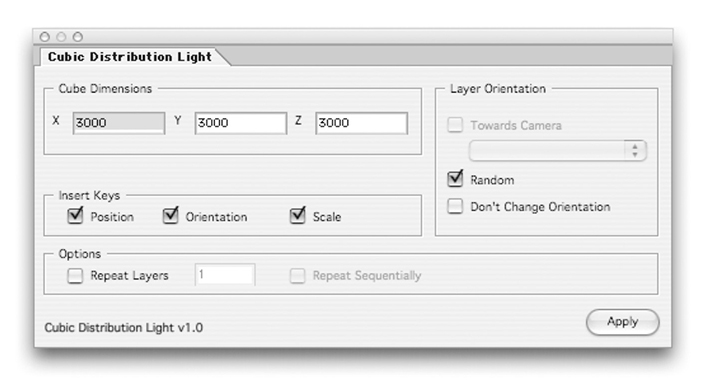
- Select all 3D layers and choose Window>Cubic Distribution Lite.
- Set the Cube Dimensions to 3000 pixels by 3000 pixels by 3000 pixels. Before you click apply, though… Select ‘Random’ under the Layer Orientation options and turn on Set Keys for Position and Orientation. You’ll want the Cubic Distribution assistant to set keyframes for all the layers so that they animate when their position and rotation change.
- Now… click Apply. The layers are thrown apart in 3D space.
- Click RAM Preview to see the movement. Modify keyframes to taste.
Ray to the Rescue
Need a simple logo animation that looks good and takes very little time (okay we admit… that’s dumb even for a rhetorical question). Starting with AE 6.5, you’ll find the Cycore Effects bundled on the install disk (you have to manually run the installer). One of the coolest effects in the bunch is the CC Light Wipe.
- Split your logo into separate elements.
- To each piece, choose Effect>Transition>CC Light Wipe. You may want to stagger the start times.
- Set keyframes for transition complete. You will want to go from 100% to 0% to reveal the logo. You may want to click the Reverse Transition box.
- Modify the Center points to taste.
- Check the Color from Source Box for most realistic results, or pick a wipe color and adjust the Intensity to taste.
- Adjust the shape to be Round, Square, or Doors.
- If the bounding box is chopping the effect at the edges, then click the Continuously Rasterize box.
- RAM Preview the results, adjust the keyframe locations in the Timeline to stagger the effect.
- When rendering, choose a straight alpha for the cleanest key in your editing or keying application.
