
Chapter 8
Understanding Common Techniques for Data Query Optimization and Testing
This chapter covers Objective 2.4 (Explain common techniques for data manipulation and query optimization) of the CompTIA Data+ exam and includes the following topics:
 Query optimization
- Execution plan
- Parametrization
- Indexing
- Temporary table in the query set
- Subset of records
For more information on the official CompTIA Data+ exam topics, see the Introduction.
This chapter covers query optimization and testing. It provides details related to query optimization, parametrization, indexing, temporary tables in a query set, subsets of records, and execution plans.
Query Optimization
A computer has computing resources such as a central processing unit (CPU), memory, disk space (storage), an arithmetic logical unit (ALU), optionally a graphics processing unit (GPU), and many more hardware components. When SQL queries are executed against databases, they take up CPU, memory, and other resources. Depending on the complexity of queries, some might take much longer than others to yield results. Performance of queries can be improved in multiple ways—two basic ones being improving or optimizing hardware performance and/or optimizing queries. This chapter is dedicated to query optimization.
Query optimization is an activity that is conducted by a query optimizer in a DBMS to select the best available strategy for executing the query. In other words, query optimization provides a way to get maximum performance for results generated by queries in the minimum amount of time.
Note
Every SQL database—including Microsoft SQL Server, MySQL, Oracle, and other SQL databases—has its own query optimizer.
A query optimizer can leverage a number of methods for optimizing queries. One of the ways a query optimizer works is by leveraging the cost of executing a query.
So, how do you really go about optimizing queries? Well, there are a number of ways; however, they all involve database performance tuning, which is usually the full-time job of database administrators (DBAs). Consider that large databases might have a lot of data that requires tuning; this tuning leads to optimization of queries and much faster results than can be obtained compared to an untuned database. One of the key things to understand is the execution plan. A query execution plan or an execution plan is a logical outlay of the resources allocated as well as the operations performed when a query is being executed. The execution plan outlines the logical steps executed in a query. (You will learn more about query execution plans in the next section.)
At a high level, you need to know the following when considering query optimization and database tuning:
 Wildcard searches take far more time than more precise searches, and this impacts performance. In many cases, using filters may be a much more appropriate way to manage searches by reducing data set to be searched. For example, this:
SELECT * FROM OrgEmployeesis going to be far less optimized than this:
SELECT EmpFirstName, Location, FROM Employees- Indexing (covered later in this chapter) is highly recommended, and having the right indexes in place is an important part of making queries efficient.
- A cache should be sized correctly so that it is large enough to hold recurrently accessed data but not so large that it overworks physical memory (random accessible memory or RAM).
- Each table added to a query increases the complexity of the query and the time required to traverse the tables. Consider keeping table joins to a minimum where possible.
- It is best to leverage correlated subqueries only when you have to. These queries are used for row-by-row processing, and the inner query is run for each row of the outer query that is executed. For example, consider the following query:
SELECT EMPLastName, Location
 FROM employees Emp
 WHERE package >
    (SELECT AVG(package)
       FROM employees
         WHERE department =
            Emp.department);
In this case, the inner query is driven by the outer query and is executed each time the outer query is executed.
These tweaks can help queries perform better and yield faster outcomes, which is what the users want.
Execution Plans
Everything in life needs a plan. It is often said that “failing to plan is planning to fail.” An execution plan works behind the scenes to ensure that a query gets all the right resources and is being executed correctly; the plan outlines the steps for the query execution from start until output.
This section shows examples using MySQL Workbench for database creation and query execution. The database used is Azure Database for MySQL Flexible Server.
Note
You can also work with execution plans in various flavors of SQL software as each piece of SQL software has its own execution plan display/visualization.
In the case of MySQL, the EXPLAIN statement gives insights into how MySQL executes statements; that is, the EXPLAIN keyword outlines the query execution plan. It works with the following SQL statements:
- INSERT
- SELECT
- DELETE
- REPLACE
- UPDATE
Figure 8.1 shows a query run in MySQL Workbench against the sample database available at https://github.com/Azure-Samples/mysql-database-samples/blob/main/mysqltutorial.org/mysql-classicmodesl.sql.

Figure 8.1 MySQL SELECT Statement Output
Now you can select Query > Explain Current Statement, as shown in Figure 8.2.

Figure 8.2 MySQL EXPLAIN Statement Output
MySQL Workbench gives you the query execution plan, including the query cost, as shown in Figure 8.3.

Figure 8.3 Query Execution Plan Visual Output
Figure 8.4 shows the details of the query execution plan.
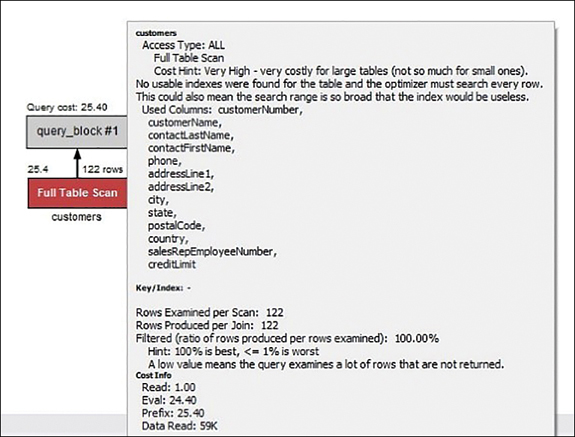
Figure 8.4 Query Execution Plan Details
As you can see, an execution plan provides details that can be very helpful for optimizing queries.
ExamAlert
The query execution plan is an important aspect for optimizing queries and for query performance tuning. Ensure that you understand this concept well before you take the CompTIA Data+ exam.
Parametrization
A parametrized query enables you to use placeholders for parameters, where the parameter values are supplied at execution time. Why have parametrized queries at all? Well, there are a few benefits to using these queries:
- Instead of always using a static input to queries, you can provide inputs at runtime, hence offering flexibility. Essentially, parametrized queries can be used with dynamic data where the values are not known until a statement is executed.
- Parametrized SQL queries can be prepared ahead of time and then reused for similar applications. This means you don’t have to create distinct queries for each use case.
- These queries can be used for improving the performance of a database as you can select specific variables.
- As these queries enable the use of runtime inputs, they can be useful for thwarting SQL injection attacks, which may use static inputs.
Note
Parametrized queries are also sometimes known as prepared statements.
Next, let’s look at an example of a parametrized query, using the database available at https://github.com/Azure-Samples/mysql-database-samples/blob/main/mysqltutorial.org/mysql-classicmodesl.sql.
This is the original (non-parametrized) query:
SELECT * FROM customersFigure 8.5 shows the output of this query.

Figure 8.5 Output of a Non-parametrized Query
Now you can use the following parametrized query:
PREPARE stmt FROM 'SELECT * from customers WHERE customerName = ?';

SET @A = 'La Rochelle Gifts';

EXECUTE stmt using @A;
Figure 8.6 shows the output of this query.
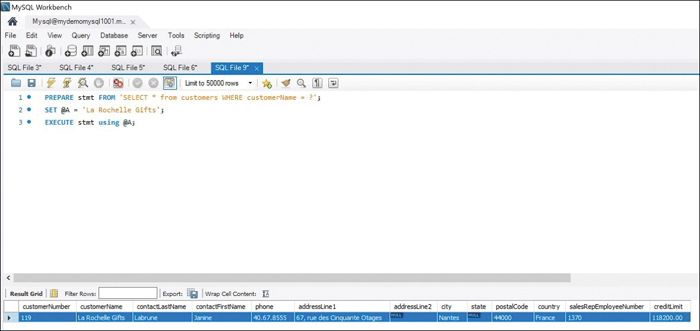
Figure 8.6 Output of a Parametrized Query
What is happening in this scenario? A value is being passed to the query, and the query uses that value to process the output. As shown in Figure 8.5, every column and every row in the table are returned. In comparison, as shown in Figure 8.6, for the row where the value matches the value sent in @A, every column is shown in the query output.
Note
With Microsoft SQL Server, the query optimizer works in the background to parameterize the query plan such that any static values contained in the query are substituted with parameters. In this way, the parametrized query plan, which is stored in the query plan cache, optimizes the next execution of the same query for different values.
Indexing
When you want to find information about a certain topic in a book, what’s the easiest way to find it? You could just flip the pages, but it’s usually much faster to use the table of contents or the index to pinpoint the page that contains the information you want. Similarly, with databases and queries, to get optimized output when you execute a query, indexes help locate the information quickly, thus improving the user experience.
Note
Index selection is one of the most important and commonly used mechanisms for query optimization. When you leverage the right indexes, the SQL server can improve performance tremendously.
So, how do indexes work? Well, quite simply, indexes help speed up the execution of queries by rapidly finding records and delivering all the columns requested by a query without executing a full table scan. It is helpful to prepare a comprehensive indexing plan that outlines the indexes required for each table, presents the sequence in which the indexes should be created, and outlines the columns to be selected for indexing. Figure 8.7 shows the indexes for the sample database.

Figure 8.7 Indexes in a MySQL Sample Database
In this case, you can see that the index type is BTREE, which stands for B-tree (or balanced tree).
As illustrated in Figure 8.8, a B-tree is formed of nodes, with the tree starting at a root, which has no parent node. Every other node in the tree has one parent node and may or may not have child nodes. A node that does not have any child nodes is called a leaf node.

Figure 8.8 B-tree Structure
Indexes can be classified into two major types:
- Clustered index: This type of index sorts the way records in the table are physically stored. In other words, a clustered index essentially physically orders the rows of the table. Thus, the clustered index contains all of the columns of a row(s). Clustered indexes are stored as trees, and the actual data is stored in the leaf nodes. This helps speed up query processing when a lookup is performed on the index. There can be one clustered index per table that is a primary or clustering index.
- Non-clustered index: This type of index collects data in one place and records in another place, creating a pointer to the data. In other words, the data in a non-clustered index is structured in a logical manner. In a non-clustered index, the rows can be stored physically in a different order than the columns. This means that the leaf nodes of a non-clustered index do not contain the actual data but contain pointers to the data. A heap is a collection of unordered rows of data. A table can contain multiple non-clustered indexes.
So you know that creating indexes helps improve the efficiency of read operations by reducing the amount of data that a query needs to process. Are indexes used automatically, or do you need to define an index when running a query? Well, when you execute a query, the query optimizer generates an execution plan—and this execution plan should contain the index or indexes.
Note
One of the key reasons you need to look at execution plans is to determine which columns from what tables should be indexed to optimize performance.
So, when indexes are created, what are some of the things to look for? Generally, you need to consider the following aspects:
- Certain indexes may not get used at all. Figure 8.9 shows a performance report from MySQL Workbench that shows the indexes that haven’t been used.
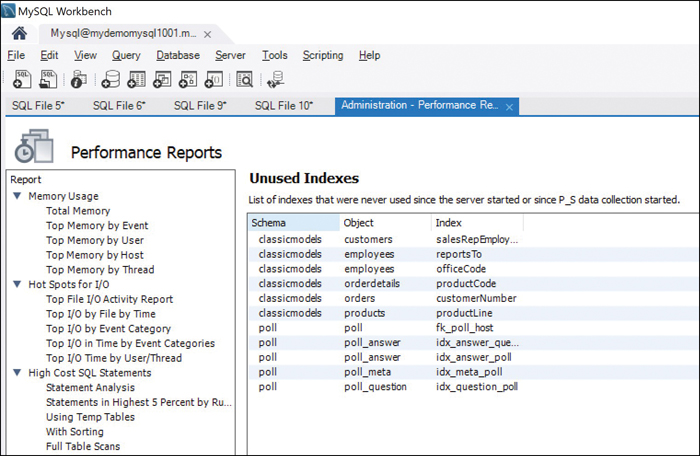
Figure 8.9 Unused Indexes in MySQL Workbench
- As indexes are created around attributes, some indexes might undergo a lot of updates as the attributes undergo changes.
- Outside of primary key columns (which are indexed by default), it is recommended to index the columns that are used in the WHERE clauses of SELECT statements. This also applies to foreign keys to speed up JOIN operations.
- Once a new index has been created, you should review the execution plan to ensure that it is leading to a positive change and evaluate the real application performance.
You can explicitly create indexes when it makes sense to do so. In MySQL, you can create an index as follows:
CREATE [UNIQUE|FULLTEXT|SPATIAL] INDEX index_name USING [BTREE | HASH
| RTREE] ON table_name (column_name [(length)] [ASC | DESC])
In this case, you execute a query like this:
CREATE UNIQUE INDEX cu_number USING BTREE ON customers(customerNumber)Figure 8.10 shows the outcome of this query.
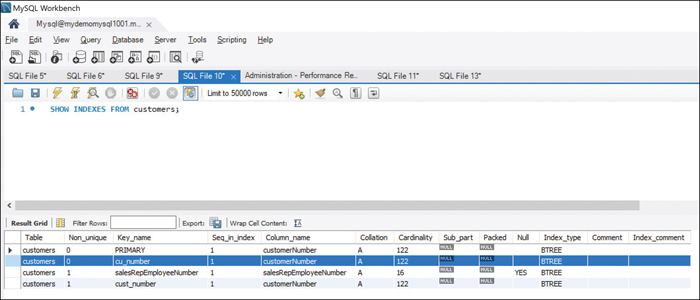
Figure 8.10 Creating a New Unique Index
As you can see, the other index created— cust_number—is not unique and therefore has the Non_unique option set to 1. The statement used for that index is:
CREATE INDEX cust_number ON customers(customerNumber)You can also create an index in Microsoft SQL by using the following statement:
CREATE UNIQUE INDEX index_name ON table_name (column_name1,
column_name2, ...);
Temporary Table in a Query Set
At times, you may need to create temporary space for items being moved from one place to another or when sorting out stuff in a database. In SQL, temporary tables are very similar to placeholders and offer workspaces for the transitional results you get when processing data.
To see how temporary tables work, let’s consider an example. In this example, you are going to create a temporary table called allcustomers that is based on an original table customers.
Here’s the MySQL statement you need to use to create the temporary table:
CREATE TEMPORARY TABLE allcustomers SELECT * FROM customersNow, let’s compare the results of two queries:
select * from customersand:
select * from allcustomersFigure 8.11 shows the results of the first query.
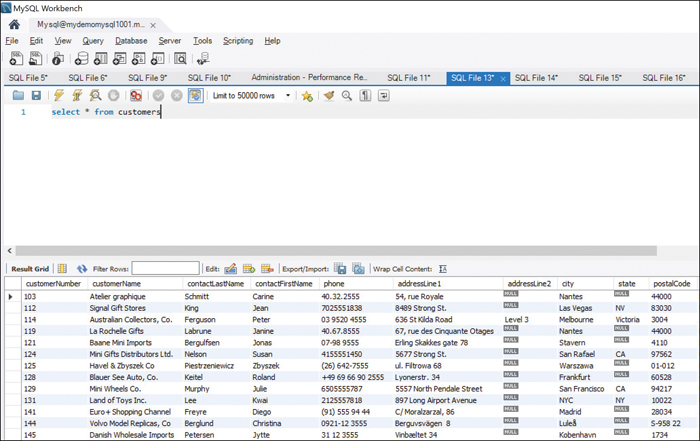
Figure 8.11 Results of the Query select * from customers
Figure 8.12 shows the results of the second query.

Figure 8.12 Results of the Query select * from allcustomers
Now, let’s look at all the tables in the database by leveraging the following command:
show tablesFigure 8.13 shows the output of this command.
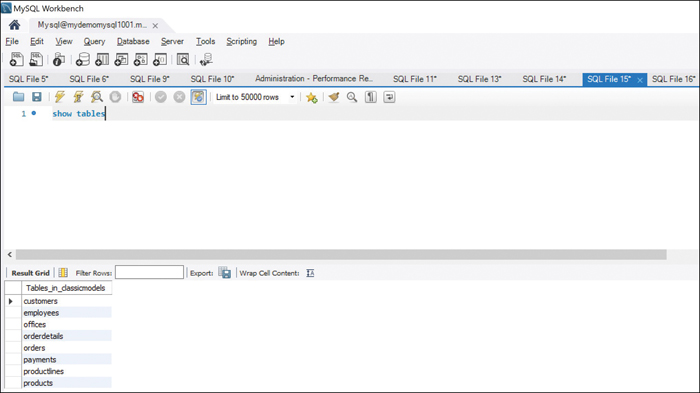
Figure 8.13 Results of the show tables Command
As you can see, the customers table shows up, but the temporary table you created (allcustomers) doesn’t.
Remember that temporary tables enable you to keep temporary data; in addition, you can reuse these tables several times in a particular session. Like other SQL applications, MySQL deletes temporary tables automatically when the current session is closed or the database connection is terminated.
Note
If you want to delete a temporary table, you can use the DROP TABLE command.
Consider the following points about temporary tables:
- Temporary tables allow create, read, update, and delete (CRUD) operations as well as some other operations, just as the actual tables do.
- Temporary tables are very valuable when you transform big datasets. You can create stored procedures to run against temporary tables for faster outcomes.
- You can insert only the data that is useful for your session so that any unnecessary data does not slow down the query response.
- Temporary tables’ stores can hold results of individual queries and reports for repeated use.
There are two types of temporary tables that you can create in Microsoft SQL:
- Global: When you want others to collaborate and perform CRUD and other SQL transactions in the same temporary table, you should use global SQL temporary tables. With these, the result set is visible to all other sessions, and anyone can insert, modify, or retrieve values.
The following is an example of a global temporary table:
CREATE TABLE ##CUSTOMERS ( CustomerID INT PRIMARY KEY, Customer_last_name VARCHAR(50) NOT NULL, Customer_first_name VARCHAR(50) NOT NULL, ); - Local: Local temporary tables are only available for the local session in which they were created, and no one from outside that session can access them.
The following is an example of a local temporary table:
CREATE TABLE #CUSTOMERS
( CustomerID INT PRIMARY KEY,
  Customer_last_name VARCHAR(50) NOT NULL,
  Customer_first_name VARCHAR(50) NOT NULL,
);
Notice that for a global temporary table you used ## in front of the table name whereas for a local temporary table you used # in front of the table name.
Subsets of Records
A subset is essentially a smaller set of data from a larger database or data warehouse that you can use to focus on only the relevant information. Database subsetting involves creating referentially intact portions of records from larger datasets into a separate database. For example, say that you are working with a database that has hundreds of records on customers from around the globe. If you are interested only in the customers in Europe, you can work with only the subset of data that pertains to the customers based in Europe.
Figure 8.14 illustrates the idea of data subsetting.
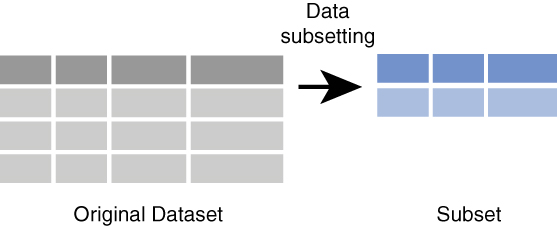
Figure 8.14 Data Subsetting Overview
Note
Recall from Chapter 1, “Understanding Databases and Data Warehouses,” that a data mart represents a subset of the data stored in a data warehouse. A data warehouse can have multiple data marts, with each data mart aligned to a department or business unit.
There are several reasons you might want to work with subsets of data or records:
- Working with non-production data: You always want to separate production data from non-production, or development, data—and subsets can be really useful for allowing developers to work with data that contains all the necessary links between tables (that is, data that is referentially intact). Using subsets of data allows for parallel testing and deployment of applications (which is an important part of DevOps).
- Reducing the data footprint: Working with millions of records—as data engineers and data scientists do—is not easy. Creating subsets of only relevant datasets allows data engineers and data scientists to explore meaningful data. For database administrators, it leads to faster query times and higher performance.
- Working with sensitive information: Your organization might have a dataset that contains sensitive information such as personally identifiable information (PII) or personal health information (PHI), and you probably do not want to give everyone access to all the data. In such a case, you can provide subsets of relevant data to particular departments. (For more on PII and PHI, see Chapter 15, “Data Governance Concepts: Ensuring a Baseline.”)
- Ensuring data compliance: Given that there are mandatory compliance requirements such as the General Data Protection Regulation (GDPR) for European nationals (see Chapter 15), you may want to give access to only necessary information. You can do so with subsetting.
- Dealing with aging data: As data ages, it might not be relevant for the purposes for which you are trying to leverage it. For example, you may want to remove a certain portion of your data based on criteria such as being older than 5 years. In such a case, you can create a subset of relevant data with age less than 5 years and work with it.
- Avoiding larger storage costs: Working with copies of a portion of a database rather than the whole database reduces the storage requirements.
As you can see, there are a few really good reasons to leverage data subsetting, including improving performance, allowing parallel tasks at lower infrastructure costs, and taking advantage of abstraction. Moreover, subsetting gives developers and data engineers freedom to do their tests against subsets of data rather than whole databases. Data subsetting is an important aspect that leads to effective data quality management.
How exactly do you perform data subsetting? Well, two of the most famous methods are data sharding and data partitioning. Both allow you to break up data into smaller, more manageable slices, improving the performance of reads.
ExamAlert
Data sharding/partitioning is very commonly used and questions pertinent to the same are likely to be included on the CompTIA Data+ exam.
Data sharding, which is very common in scalable databases, allows shards (that is, logical slices of data) to be stored on multiple compute nodes. In contrast, data partitioning allows you to share shards on one compute node. Data sharding allows you to store new logical slices of data, called shards, across multiple nodes to achieve horizontal scalability and improved performance. When creating shards, you are essentially creating schema replicas and dividing the data stored in each shard based on a shard key.
Sharding is done horizontally, and partitioning is done vertically, as shown in Figure 8.15.
Sharding and partitioning of data both enable you to create data subsets. In the example shown in Figure 8.15, partitioning allows you to focus on CustomerID and customer details as well as product relationships, and sharding allows you to segregate customers by number of products.
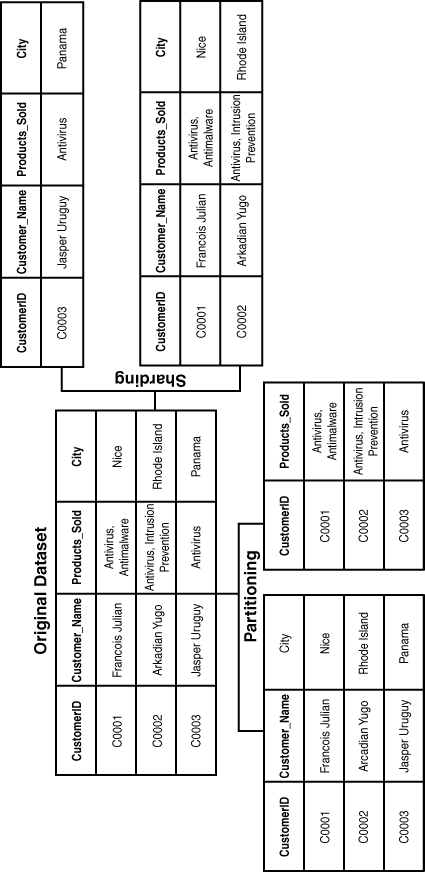
Figure 8.15 Data Sharding and Partitioning
What Next?
If you want more practice on this chapter’s exam objective before you move on, remember that you can access all of the Cram Quiz questions on the Pearson Test Prep software online. You can also create a custom exam by objective with the Online Practice Test. Note any objective you struggle with and go to that objective’s material in this chapter.