
![]()
Introduction to Power Query
I have a quick question for you: Which of the following activities takes up the majority of analysts’ time when building dashboards?
- Gathering user requirements
- Writing formulas and building pivot tables
- Creating and formatting charts
- Presenting the reports to the boss/CEO and winning accolades
For me, the answer is none of the above. That’s because most of my time is spent on collecting and cleaning data. Everything else—writing formulas, coding VBA, creating charts, presenting the dashboard—would be a breeze if I had all the data cleaned and in one place.
Microsoft Power Query for Excel, a new add-in from Microsoft, is part of the Microsoft Power BI family of tools. It is designed to mitigate this exact pain. Using Power Query, you can quickly collect data from multiple databases (or files), combine them, clean them, transform them, and bring the final set to Excel workbooks (or leave them in a workbook data model so that you can use the data in Power Pivot and elsewhere.)
![]() Note For information about the Microsoft Power BI tool set, visit http://bit.ly/1KQJp9v. The Power BI service site is at https://powerbi.microsoft.com/.
Note For information about the Microsoft Power BI tool set, visit http://bit.ly/1KQJp9v. The Power BI service site is at https://powerbi.microsoft.com/.
It is a new technology, and there is so much more you can do with it. In this book, my goal is to show you at a high level how Power Query can help you. For a more detailed explanation of individual Power Query features, as well as use cases and solutions, I recommend reading Power Query for Power BI and Excel by Chris Webb (Apress, 2014).
POWER QUERY AVAILABILITY AND COMPATIBILITY
Availability: Power Query can be downloaded from Microsoft:
www.microsoft.com/en-us/download/details.aspx?id=39379.
Compatibility: It is compatible with Excel 2013 and newer.
Can colleagues and my boss open workbooks I create with Power Query? In general, yes. Think of Power Query as a SQL engine (with a friendly interface and a lot more power) built into Excel. It is an add-in. It allows you to bring, transform, combine, clean, and load data to your Excel workbook. So technically, others can open the files you created using Power Query, even if they do not have Power Query on their Excel.
What Is Power Query, and How Can It Help You?
As mentioned in the introduction section, Power Query is an add-in designed to help you in various stages of data collection and cleanup. Power Query offers the following key functionality.
Bringing Data to Excel
Power Query supports various data sources and lets you connect to them to bring necessary data to your workbooks. There is one key difference, though. In regular Excel, when you establish a data connection (from Data tab ![]() Get External Data tools), your data will be immediately placed in an Excel worksheet. With Power Query, the connections bring data to a staging area (called the Power Query window) so that you can perform the additional steps necessary to clean or transform the data as per your needs.
Get External Data tools), your data will be immediately placed in an Excel worksheet. With Power Query, the connections bring data to a staging area (called the Power Query window) so that you can perform the additional steps necessary to clean or transform the data as per your needs.
Transforming Data
That brings me to the next important feature of Power Query. When you bring external data into Excel, you usually want to perform a few operations on it before consuming the data. For example, you may want to remove all the duplicate records, sort the data, remove a few extraneous columns, merge data from two different sources, and so on. All of these steps are time-consuming if done manually or through formulas or even VBA. Power Query introduces various common transformations as simple rules that you can apply to the data connection. This way, once the connection is established, Power Query does these steps for you and gives you clean, analysis-ready data.
Loading Data to Where You Want It
Once Power Query has the data in the shape you want, you can load it either to an Excel spreadsheet or to a data model directly (refer to Chapter 21 for more information about the Excel data model). So if your analysis is done using regular formulas or VBA, you can load Power Query data to a spreadsheet table. On the other hand, if your analysis is based on pivot tables or PowerPivot (more on this in Chapter 24), you can load the data to the data model and let the corresponding Excel features pick it up.
In this chapter, you will understand all these three important aspects of Power Query in the context of five real-world problems.
Five Data Problems and How Power Query Can Solve Them
To keep this chapter simple and relevant, let’s tackle five common data problems you’ll encounter and how Power Query can quickly solve them.
Although Power Query can do so much more, I will limit the discussion to these five problems.
Problem 1: Unclean Data
Let’s say you are the manager at Dinky’s Delicious Donuts. Three months ago you launched a customer loyalty program. It involved giving a loyalty card with eight slots on it. Anytime a customer bought a donut, you punched the card. After seven punches, the customer got a free punch (not in the face, just on the card) plus a free donut and coffee. It was a great success. Customers loved getting free donuts and felt loved.
Now, you want to repeat the loyalty program next month. So, you want to e-mail the customers who participated in the earlier round and invite them to the store. Unfortunately, you went low-tech with the implementation of the loyalty program in the first round. So, you have no computerized record of customer names and e-mail addresses. You just have physical copies of the loyalty cards on which customers scribbled their names and e-mail addresses.
So, you take the stack of these cards to Jason, the cashier, and ask him to type the information into a spreadsheet. Jason loves Candy Crush Saga, coffee, and gossip. He hates typing. He is the kind of person who types with just two fingers, not ten. So, it takes him a while, but the spreadsheet is eventually ready. It has names in Column A and e-mail addresses in Column B (see Figure 23-1).

Figure 23-1. Customer data for Dinky’s Delicious Donuts
After quickly eyeballing the data, you identify many issues.
- Names have inconsistent spaces in the front and middle.
- There is an occasional period at the end of names.
- Some e-mail addresses end with .comm, clearly a typo.
Clearly Jason was using less than two fingers to type this data. For the purposes of this example, let’s assume there are no other mistakes in the data.
Although you can clean this data with good old Excel formulas, let’s use Power Query because that is what this chapter is all about.
Loading the Data in to Power Query
I am assuming you have already installed Power Query. If not, just download the add-in, install it, and enable it if needed. For detailed instructions, check out the Power Query web site here:
www.microsoft.com/en-us/download/details.aspx?id=39379
Loading the data into Power Query is as simple as sipping a foaming, steaming, delicious latte.
- Convert the data in to a table if not already done.
- Select any cell inside the table.
- Go to the Power Query tab and choose the From Table option (see Figure 23-2).

Figure 23-2. Adding Excel table data to Power Query
The Power Query window will open, as shown in Figure 23-3, and your data will be loaded there.

Figure 23-3. The data loaded into the Power Query window
That is all—your data is now ready to be scrubbed, sliced, diced, prepared, and marinated by Power Query so that you can later cook and present it any way you want.
Think of the Power Query window as a VBA window. You can access all the cleaning and transformation capabilities of Power Query from this window. A detailed explanation of this window is outside the scope of this book. So, I suggest you to explore the Power Query window on your own. Let’s focus on the task at hand. Let’s get cleaning.
Removing Extra Spaces from the Name Column
Let’s start with the extra spaces in the Name column. First you’ll eliminate the leading spaces and then the spaces between the first and last names.
Removing the Leading Spaces
The first step in removing all the extra spaces from this column is to eliminate the ones before the names.
Click the Name column header. This will select the entire Name column. Then go to the Transform tab and select Format ![]() Trim, as shown in Figure 23-4.
Trim, as shown in Figure 23-4.

Figure 23-4. Trimming column contents to remove extra spaces in Power Query
At the end of this step, the Name column looks like Figure 23-5.

Figure 23-5. Name column after applying trim transformation. As you can notice, there are extra spaces between parts of the names
As you can see, while the spaces at the beginning are gone, the spaces between the first and last names are not trimmed.
So, let’s perform two more transformations on this column. Note that you should perform these transformations in this order only.
- Replace three spaces with a single space.
- Replace two spaces with a single space.
Replacing the Spaces Between the Names
As just mentioned, you will first replace all instances of three spaces with one space and then each case of two spaces with one space.
Follow these steps to replace three spaces with one:
- While keeping the Name column selected, go to the Transform tab and click Replace Values in the Any Column group. This opens the Replace Values dialog box shown in Figure 23-6.

Figure 23-6. Replacing three spaces with a single space using the Replace dialog of Power Query
- Now type three spaces in the Value To Find field.
- Next, type a single space in the Value To Replace field.
- Click OK.
Follow the same steps to replace two spaces with one, but type two spaces in the Value To Find field instead of three.
These steps should clean up the Name column.
Removing the Extra Periods
Some of the names have a period (.) at the end. To remove them, use the same steps that you used to replace multiple spaces with a single one. In step 2, type a period in the Value To Find field and then leave the Replace With field blank.
Fixing the E-mail Addresses
Fixing the e-mail addresses is simpler than the Name column. Follow these steps:
- Select the Email column.
- Click Replace Values on the Transform tab.
- Replace .comm with .com, as shown in Figure 23-7.

Figure 23-7. Cleaning up the e-mail address column using the Replace dialog
- Click OK.
That is all. Your data is clean.
Bringing the Data Back to Excel
Once all the cleanup tasks are done, go to the Home tab and click Close & Load in the Query group (see Figure 23-8). This will load all the cleaned data as a new table to your Excel workbook, as in Figure 23-9.

Figure 23-8. Loading clean data into Excel

Figure 23-9. Clean data loaded into Excel as a table
At first glance, this approach might seem like a long-winded path to get what you want. But that is misleading. If you observe closely, you defined a set of rules to clean this data. This means any time you add new data or change the original data, Power Query will gladly (and automatically) apply the transformations on this new set of data and update your workbook, with just a click of a button. That button is the Refresh option on Excel’s Data tab.
Problem 2: Partial Data Sets
Let’s stay with the Dinky’s Delicious Donuts example for a while. While looking at the cleaned customer data, you suddenly remembered that some customers have mentioned their phone number on the reverse side of the loyalty card. And you forgot to capture this data.
So, you go back to Jason and ask him to record all phone numbers in the same spreadsheet. By this time, Jason has realized that his true calling is not in Excel, so he is reluctant to type anything into Excel. You reach a compromise: Jason will type this phone number data into a text file using Notepad.
Quickly Jason produces all the data in a text file like the one shown in Figure 23-10.

Figure 23-10. Customer phone number data captured in a text file
Fortunately, there are no mistakes in the data this time, but you have a new problem. You need to merge both datasets. One is in Excel; the other is in Notepad. Again, Power Query to the rescue.
Loading the Text File Data into Power Query
First, you need to load the data from the text file.
In your workbook, go to the Power Query File tab, and select From File ![]() From Text to import the text file data (see Figure 23-11).
From Text to import the text file data (see Figure 23-11).

Figure 23-11. Loading text file data into Power Query
Select the text file containing the phone number data and then click OK (see Figure 23-12).

Figure 23-12. Select the file containing text data, loading text data into Power Query
At this stage, all the phone number data in that file is loaded into the Power Query window. It should look like Figure 23-13.

Figure 23-13. Phone number data loaded into Power Query
While all the data is there, you also have a new problem. The column headers are wrong.
No problem. You can click the Use First Row As Headers option in the Home tab’s Transform group. This will clear up the problem for you (see Figure 23-14).

Figure 23-14. Setting up the first row as headers using the Use First Row as Headers option from the Transform area of the Home tab in Power Query
Now that the first row of text file is considered a header, you need to merge the phone number data with name and e-mail address data. But before you do that, you should save your query and load the phone number data into the data model.
Saving and Loading the Query
Using the query properties pane in the Power Query window, give your new query a name. Let’s call it phone numbers. Press Enter to save it.
Now, on the Home tab, select Close & Load ![]() Close & Load To, as in Figure 23-15. This opens the Load To window (see Figure 23-16).
Close & Load To, as in Figure 23-15. This opens the Load To window (see Figure 23-16).

Figure 23-15. Close & Load To button on the Home tab of Power Query
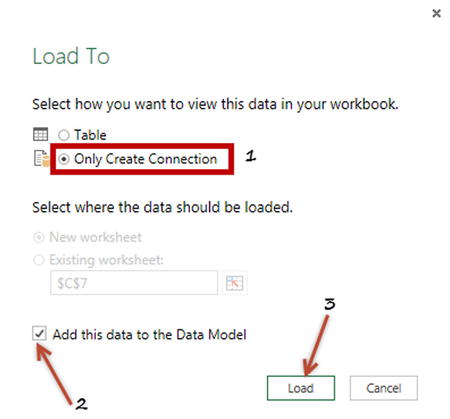
Figure 23-16. Loading data to the data model of Excel using the Close & Load To option
Since you want the phone numbers to be merged to existing data, select the Only Create Connection option and enable “Add this data to the Data Model,” as shown in Figure 23-16. Then click Load. This will load the new phone number data into Excel’s data model but not to the workbook.
Merging Customer and Phone Number Data
Now that you have both customer data (loaded from Excel table) and phone number data (loaded from text file), you now need to merge them to create a consolidated table. Follow these steps to accomplish this task:
- Go to the Power Query ribbon in Excel and click Merge in the Combine group (see Figure 23-17). This will open the Merge window, as shown in Figure 23-18.

Figure 23-17. Merging two queries using the Merge button on the Power Query tab in Excel

Figure 23-18. Merging two queries based on common column
- Select the customers query from the first drop-down.
- Select the phone numbers query from the second drop-down.
- Highlight the customer Name column in both lists.
- Click OK.
This will load the merged data into the Power Query window. You can’t see the merged data yet, although it is there. To expose the phone number data, just click the two-sided arrow button next to the NewColumn header (see Figure 23-19).

Figure 23-19. Expanding the new column, merging two queries
In the dialog box that appears, just select “Phone number” alone because you already have the customer Name column (see Figure 23-20). This will load the phone numbers for all the available customers, as you can see in Figure 23-21.

Figure 23-20. Expanding phone number column

Figure 23-21. Phone number column expanded and showing phone numbers for customers who have the data
You might ask what “null” is doing in the phone number column. Because you don’t have phone number data for all customers, when Power Query tries to merge a customer with their nonexistent phone number, it gets empty as answer. This empty is shown as null in Power Query. These nulls will become blank cells when you load the data into the Excel workbook.
Giving a Proper Name to the Phone Number Column
By default the phone number column would have a name like “NewColumn.Phone number.” This is uncool. Every other column would make fun of this new column. Let’s give it a normal name.
Double-click the column header and type whatever name you fancy. I like the name Phone Number. There is a nice ring to it.
Loading the Merged Data in to Excel
Now that the data is in the shape you want, let’s load it into Excel. To load it in to Excel, follow these steps:
- Click Close & Load on the Power Query Home tab (see Figure 23-22).

Figure 23-22. Click Close & Load to load the data into an Excel workbook
- This will create a new worksheet in your workbook and load the merged data there as an Excel table (as shown in Figure 23-23).

Figure 23-23. Merged data with customer names, e-mail addresses, and phone numbers where available
As you can see in Figure 23-23, when the data is loaded in to Excel, nulls are replaced by blank cells.
Problem 3: Data Consolidation
Let’s again stick with Dinky’s Delicious Donut enterprise problems. Imagine a new scenario. You suddenly remembered that exactly two years ago there was a similar customer loyalty program. At that time, you gathered contact details from a few hundred customers (names, e-mail addresses, and phone numbers). For upcoming marketing efforts, you would like to combine both these lists and create one unified table of customers.
Fortunately, the earlier customer data is in a workbook. You just need to combine this with new data. Again, Power Query to the rescue.
Taking a Look at the Old Data
Let’s imagine that all the old customer data is in a workbook named Chapter23-customers-2012.xlsx. Figure 23-24 shows a snapshot of this data.

Figure 23-24. Customer data from 2012. You want to append this data to the latest customer data
Fortunately, the workbook uses the same columns as the current workbook.
Setting Up a New Connection
First, you need to set up a new connection.
- Go to the workbook that contains all the latest customer data. Navigate to the Power Query tab, and in the Get External Data group, click From File
 From Excel to get the data.
 - Select the workbook using From File From Text as earlier in the chapter. This looks the same as Figure 23-12 in the section “Loading the Text File Data into Power Query.”
- At this stage, Power Query opens the Navigator pane where you have to select the data that needs to be loaded. The Navigator pane (refer to Figure 23-25) shows all tables and worksheets of the Chapter23-customers-2012.xlsx file. Please select the table containing customer data (named customers_2012) and click Load to load this data to data model alone.

Figure 23-25. Using the Navigator pane, select the customers_2012 table and load it into the data model
Appending Data
Once the old customer data is in the data model, you can append it to the new customer data using the Append query feature of Power Query.
- To do this, go to the Power Query tab and click Append in the Combine group (see Figure 23-26).

Figure 23-26. Appending two queries using the Append feature of Power Query
- Select both tables that you want to append, as shown in Figure 23-27.

Figure 23-27. Appending 2012 customer data with the latest data using the Append feature of Power Query
- Click OK.
- This will open the Power Query window (see Figure 23-28). Here you can make any additional changes to the merged data, such as cleaning up a column, removing duplicates, and so on. You need to give this new query a name. Let’s call it All Customer Data.

Figure 23-28. Naming the appended query will make it easy for editing or referring to it later
- Close the Power Query window and load this data to your workbook. Please refer to the section “Loading the Merged Data in to Excel” for instructions on how to load data to Excel. Once you load the data, the Workbook Queries pane will look like Figure 23-29.

Figure 23-29. The data is loaded
WHY CAN’T WE COPY/PASTE THE DATA? WHY BOTHER APPENDING?
Copying and pasting is so 1997. Well, the real reason is, Power Query saves the append configuration for you. This means if, at a later date, the Chapter23-customers-2012.xlsx file changes, then you just need to refresh your query to bring in the new data. While such a scenario may not be realistic for your customer data, it is an everyday occurrence in many companies. Data is dislocated all the time, and you are expected to combine two or more sets of data to generate reports. This is where the Append feature really comes in handy.
So, say good-bye to manic copying and pasting.
Problem 4: Duplicates in Your Data
Now that you have all the data in one place, you are about to embark on your genius marketing plan. But as you look at the list, you realize that there a few duplicates. Some customer e-mail addresses are repeated in the All Customer Data query. Well, again Power Query to the rescue.
You can set up a rule in Power Query to remove all the duplicates from the combined data.
To do this, edit the All Customer Data query (right-click the query and choose Edit, as depicted in Figure 23-30) and use the following steps.

Figure 23-30. To edit a query, right-click the query name and choose Edit. This opens the Power Query window and loads the query there
- Select the Email address column.
- On the Power Query Home tab, click Remove Duplicates in the Reduce Rows group (see Figure 23-31).

Figure 23-31. Removing duplicate customer e-mail addresses using the Remove Duplicates feature from the Home
Reduce Rows area of Power Query - Save and load the query.
And you are done!
WHY CAN’T YOU USE THE REMOVE DUPLICATES BUTTON IN EXCEL?
While the Remove Duplicates button in Excel (on the Data tab) is powerful, it is a manual process. That means any time your data changes, you must remove the duplicates again. This where Power Query shines. You can simply set up a rule in Power Query to remove duplicates from data. Every time your data changes, you just refresh the connection and Power Query will bring clean data to you, almost like a genie, plus you don’t need to rub the magic lamp.
Problem 5: Inconsistent Data Formats
Let’s stay in the Dinky’s Delicious Donut land for some more time. As you are about to thump your chest with pride and satisfaction for the fact that you have cleaned, merged, appended, and removed the duplicates from the data, all before finishing your first cup of coffee in the morning, you notice one little problem. Some of the phone numbers are messed up (see Figure 23-32).

Figure 23-32. The phone numbers are formatted inconsistently. This is because of the formatting differences between the text file data and the customers-2012.xlsx data
It turns out the phone numbers from the text file (problem #2) are in (xxx) xxx-xxxx format, while the phone numbers in customers-2012.xlsx (problem #3) are in plain-old ten-digit number format.
Since the (xxx) xxx-xxxx format doesn’t look like numbers, Power Query imported them as text, while the other set of phone numbers were imported as numbers. Problem!
Well, you can fix this by changing the way Power Query imports data from a text file.
To do this, edit the Merge1 connection:
- Right-click the connection and select Edit (see Figure 23-33).

Figure 23-33. Edit and merge the data query (Merge1) by right-clicking it and choosing the Edit option
- Select the Phone Number column.
- Using the Replace Values option on the Power Query Home tab, replace spaces, commas, and hyphens with nothing.
At this stage, the data looks like Figure 23-34.

Figure 23-34. Reformatted Phone Number column by removing brackets, spaces, and hyphen symbols
- Keep the Phone Number column selected and go to the Transform tab.
- Click Data Type and change it to Whole Number, as shown in Figure 23-35.

Figure 23-35. Changing the data type of a query column using the Transform
Any Column area - Save your query.
- Refresh the All Customer Data query, and there is your uniformly formatted Phone Number column.
WAIT…DID YOU NOTICE WHAT POWER QUERY DID?
You edited the Merge1 query, but when you refreshed your All Customer Data query, you got cleaned phone numbers in that query.
That’s right, when you change one of the intermediate steps in Power Query, the subsequent steps (and queries) will automatically change too.
The Last Word
These examples are just the tip of the Power Query iceberg. It has immense potential when it comes to connecting to various data sources, bringing subsets of data you want, transforming the data, cleaning it up, and loading it to the workbook data model. There are a lot of powerful transformation and cleanup features in Power Query ribbons. All of these are simple to use. Just click and wait for Power Query to go at your data.
But if you want more power, Power Query offers a whole new bunch of formulas so that you can do almost any data-related task with it. This language is called M, and it is a mix of SQL and JavaScript. Don’t panic; although the M language sounds like something James Bond would use to send coded communications to his London HQ, it is almost like plain English. So, with a bit of playing around, you may be able to pick up some M.
For more about Power Query and the M language, please refer to the following books:
- M Is for (Data) Monkey: A Guide to the M Language in Excel Power Query by Miguel Escobar and Ken Puls
- Power Query for Power BI and Excel by Chris Webb
Go ahead and conquer your data problems with Power Query.