Chapter 21. User Interface
Ruby has libraries for attaching programs to the three main types of user interface. The web interface, Ruby’s most popular, is covered in depth in Chapters 15, 16, and (to a lesser extent) 14. This chapter covers the other two interfaces: the terminal or console interface, and the graphical ( GUI) interface. We also cover some unorthodox interfaces (Recipe 21.11).
The terminal interface is is a text-based interface usually
invoked from a command line. It’s used by programs like irb and the Ruby interpreter itself. The
terminal interface is usually seen on Unix systems, but all modern
operating systems support it.
In the classic Unix-style “command-line program,” the user interface
consists of the options used to invoke the program (Recipe 21.3); and the program’s
standard input, output, and error streams (Recipe 21.1; also see Recipe 6.16). The Ruby interpreter
is a good example of this kind of program. You can invoke the ruby program with arguments like -d and --version, but once the interpreter starts, your
options are limited to typing in a Ruby program and executing it.
The advantage of this simple interface is that you can use Unix
shell tools like redirection and pipes to connect these programs to each
other. Instead of manually typing a Ruby program into the interpreter’s
standard input, you can send it a file with the Unix command ruby < file.rb. If you’ve got another program
that generates Ruby code and prints it to standard output, you can pipe
the generated code into the interpreter with generator | ruby.
The disadvantage is that these programs are not very user-friendly.
Libraries like Curses (Recipe
21.5), Readline, and HighLine can add color and sophistication to
your terminal programs. The irb
interactive interpreter uses Readline to offer interactive line editing
instead of the simpler interface offered by the Unix shell (Recipe 21.10).
The graphical user interface is the most common interface in the world. Even a web interface is usually interpreted within a GUI on the client end. However, there’s not much that’s Ruby-specific about GUI programming. All the common GUI libraries (like Tk, GTK, and QT) are written in C, and Ruby’s bindings to them look a lot like the bindings for other dynamic languages such as Perl and Python.
All the GUI libraries work pretty much the same way. You create objects corresponding to GUI elements, or “widgets,” attach chunks of code to them as callbacks (so that something will happen when, for instance, the user clicks a button), and then “pack” them into a frame for display. Because it’s easiest to do the GUI layout work in a tool like Glade, and write only the callbacks in regular Ruby, this chapter contains only a few sample recipes on GUI programming.
21.1.
Resources
HighLine, written by James Edward Gray II and Gregory Brown, is
available as the highline gem. The
Curses and Readline libraries come preinstalled with Ruby (even on
Windows, if you use the one-click installer). If you’re using Windows
and don’t have Curses, you can get the library and the Ruby bindings
from http://www.dave.burt.id.au/ruby/curses.zip.
Ncurses is an improved version of Curses (allowing things like
colored text), and most modern Unix systems have it installed. You can
get Ncurses bindings for Ruby from http://ncurses-ruby.berlios.de/. It’s also available as
the Debian package libncurses-ruby.
The Tk binding for Ruby comes preinstalled with Ruby, assuming you’ve installed Tk itself. Ruby bindings for the most common GUI toolkits have been written:
wxRuby is interesting because it’s cross-platform and uses native widgets on each platform. You can write a Ruby program with wxRuby that runs on Unix, Windows, and Mac OS X, and looks like a native application on all three platforms.
On Mac OS X, all the tools you need to build a Ruby GUI application come with the operating system, including a GUI builder. If you’re using GTK, your life will be easier if you download the Glade GUI builder (http://glade.gnome.org/).
21.2. Getting Input One Line at a Time
Problem
You’re writing an interactive console program, and you want to get line-based input from the user. You present the user with a prompt, and he types some data before hitting enter.
Solution
Instead of reading standard input all at once, read it a line at a time with
gets or readline.
This method populates a data structure with values obtained from user input:
	def confirmation_hearings
	  questions = [['What is your name?', :name],
	               ['How old are you?', :age],
	               ['Why would you like to be Secretary of the Treasury?', :why]]
	  answers = questions.inject({}) do |answers, qv|
	    question, value = qv
	    print question + ' '
	    answers[value] = gets.chomp
	    answers
	  end
	  puts "Okay, you're confirmed!"
	  return answers
	end

	confirmation_hearings
	# What is your name?                                   # <= Leonard Richardson
	# How old are you?                                     # <= 27
	# Why would you like to be Secretary of the Treasury?  # <= Mainly for the money
	# Okay, you're confirmed!
	# => {:age=>"26", :why=>"Mainly for the money", :name=>"Leonard Richardson"}
Discussion
Most console programs take their input from command-line
switches or from a file passed in on standard input. This makes it
easy to programatically combine console programs: you can pipe
cat into grep into last without any of the programs having to
know that they’re connected to each other. But sometimes it’s more
user-friendly to ask for input interactively: in text-based games, or
data entry programs with workflow.
The only difference between this technique and traditional console applications is that you’re writing to standard output before you’re completely done reading from standard input. You can pass an input file into a program like this, and it’ll still work. In this example, a Ruby program containing the questionnaire code seen in the Solution is fed by an input file:
	$ ./confirmation_hearings.rb < answers
	# => What is your name? How old are you? Why would you like to be
	#    Secretary of the Treasury? Okay, you're confirmed!
The program works, but the result looks different—even though the standard output is actually the same. When a human is running the program, the newline created when they hit enter is echoed to the screen, making the second question appear on a separate line from the first. Those newlines don’t get echoed when they’re read from a file.
The HighLine library requires that you install a gem
( highline), but it makes sophisticated
line-oriented input much easier. You can make a single method call to
print a prompt, retrieve the input, and validate it. This code works
the same way as the code above, but it’s shorter, and it makes sure
you enter a reasonable age for the question “How old are you?”
	require 'rubygems'
	require 'highline/import'

	def confirmation_hearings
	  answers = {}
	  answers[:name] = ask('What is your name? ')
	  answers[:age] = ask('How old are you? ', Integer) { |q| q.in = 0..120 }
	  answers[:why] = ask('Why would you like to be Secretary of the Treasury? ')
	  puts "Okay, you're confirmed!"
	  return answers
	end

	confirmation_hearings
	# What is your name?                                  # <= Leonard Richardson
	# How old are you?                                    # <= twenty-seven
	# You must enter a valid Integer.
	# ?                                                   # <= 200
	# Your answer isn't within the expected range (included in 0..120)
	# ?                                                   # <= 27
	# …
See Also
Recipe 21.2, “Getting Input One Character at a Time”
Recipe 21.9, “Reading a Password”
The
examples/basic_usage.rbscript in the HighLine library has many more examples of data validation with HighLineIf you want your program to treat its command-line arguments as filenames and read from the files one line at a time, see Recipe 21.3, “Parsing Command-Line Arguments,” for a shortcut
21.3. Getting Input One Character at a Time
Problem
You’re writing an interactive application or a terminal-based game. You want to read a user’s input from standard input a single character at a time.
Solution
Most Ruby installations on Unix come with the the Curses extension installed. If Curses has the features you want to write the rest of your program, the simplest solution is to use it.
This simple Curses program echoes every key you type to the
top-left corner of the screen. It stops when you hit the escape key
(e).[1]
	#!/usr/bin/ruby -w
	# curses_single_char_input.rb
	require 'curses'
	include Curses

	# Setup: create a curses screen that doesn't echo its input.
	init_screen
	noecho

	# Cleanup: restore the terminal settings when the program is exited or
	# killed.
	trap(0) { echo }

	while (c = getch) != ?e do
	  setpos(0,0)
	  addstr("You typed #{c.chr.inspect}")
	end
If you don’t want Curses to take over your program, you can use
the HighLine library instead (available as the highline gem). It does its best to define a
get_ character method that will work on your
system. The get_ character method itself is private, but you
can access it from within a call to ask:
	require 'rubygems'
	require 'highline/import'

	while (c = ask('') { |q| q.character = true; q.echo = false }) != "e" do
	  print "You typed #{c.inspect}"
	end
Be careful; ask echoes a
newline after every character it receives.[2] That’s why I use a print statement in that example
instead of puts.
Of course, you can avoid this annoyance by hacking the HighLine class to make get_character public:
	class HighLine
	  public :get_character
	end
	input = HighLine.new
	while (c = input.get_
character) != ?e do
	  puts "You typed #{c.chr.inspect}"
	end
Discussion
This is a huge and complicated problem that (fortunately) is completely hidden by Curses and HighLine. Here’s the problem: Unix systems know how to talk to a lot of historic and modern terminals. Each one has a different feature set and a different command language. HighLine (through the Termios library it uses on Unix) and Curses hide this complexity.
Windows doesn’t have to deal with a lot of terminal types, but Windows programs don’t usually read from standard input either (much less one character at a time). To do single- character input on Windows, HighLine makes raw Windows API calls. Here’s some code based on HighLine’s, which you can use on Windows if you don’t want to require HighLine:
	require 'Win32API'

	def getch
	  @getch ||= Win32API.new('crtdll', '_getch', [], 'L')
	  @getch.call
	end

	while (c = getch) != ?e
	  puts "You typed #{c.chr.inspect}"
	end
HighLine also has two definitions f
get_character for Unix; you can copy one of these if you
don’t want to require HighLine. The most reliable implementation is
fairly complicated, and requires the termios gem. But if you need to require the
termios gem, you might as well
require the highline gem as well,
and use HighLine’s implementation as is. So if you want to do
single-character input on Unix without requiring any gems, you’ll need
to rely on the Unix command stty:
	def getch
	  state = `stty -g`
	  begin
	    `stty raw -echo cbreak`
	    $stdin.getc
	  ensure
	    `stty #{state}`
	  end
	end

	while (c = getch) != ?e
	  puts "You typed #{c.chr.inspect}"
	end
All of the HighLine code is in the main highline.rb file; search for “get_character”.
See Also
Recipe 21.5, “Setting Up and Tearing Down a Curses Program”
Recipe 21.8, “Changing Text Color”
21.4. Parsing Command-Line Arguments
Problem
You want to make your Ruby script take command-line arguments, the way most Unix utilities and scripts do.
Solution
If you want to treat your command-line arguments as a simple
list of strings, you can just iterate over the ARGV array.
Here’s a Ruby version of the Unix command cat; it takes a list of files on the command
line, opens each one, and prints its contents to standard
output:
	#!/usr/bin/ruby -w
	# cat.rb

	ARGV.each { |filename| IO.readlines(filename).each { |line| puts line } }
If you want to treat your command-line arguments as a list of
files, and you plan to open each of those files
and iterate over them line by line, you can use ARGF instead of eARGV. The following cat implementation is equivalent to the
first one.[3]
	#!/usr/bin/ruby -w
	# cat_argf.rb

	ARGF.each { |line| puts line }
If you want to treat certain command-line arguments as switches,
or as anything other than a homogenous list of strings, use the
OptionParser class in the optparse library. Don’t write the argument
parsing code yourself; there are too many edge cases to think
about.
Discussion
The OptionParser class can
parse any command-line arguments you’re likely to need, and it
includes a lot of Unix know-how that would take a long time to write
yourself. All you have to do is define the set of arguments your
script accepts, and write code that reacts to the presence of each
argument on the command line. Here, I’ll use OptionParser to write cat2.rb, a second Ruby version of cat that supports a few of the real cat's command-line arguments.
The first phase is turning any command-line arguments into a data structure that I can easily
consult during the actual program. The CatArguments class defined below is a hash
that uses OptionParser to populate
itself from a list of command-line arguments.
For each argument accepted by cat2.rb, I’ve added a code block to be run
as a callback. When OptionParser
sees a particular argument in ARGV,
it runs the corresponding code block, which sets an appropriate value
in the hash:
	#!/usr/bin/ruby
	# cat2.rb
	require 'optparse'

	class CatArguments < Hash
	  def initialize(args)
	    super()
	    self[:show_ends] = ''

	    opts = OptionParser.new do |opts|
	      opts.banner = "Usage: #$0 [options]"
	      opts.on('-E', '--show-ends [STRING]',
	              'display [STRING] at end of each line') do |string|
	        self[:show_ends] = string || '$'
	      end

	      opts.on('-n', '--number', 'number all output lines') do
	        self[:number_lines] = true
	      end

	      opts.on_tail('-h', '--help', 'display this help and exit') do
	        puts opts
	        exit
	      end
	    end

	    opts.parse!(args)
	  end
	end

	arguments = CatArguments.new(ARGV)
At this point in the code, our CatArguments object contains information
about which command-line arguments were passed in. If the user passed
in a command-line switch -E or
--show-ends, then
arguments[:show_ends] contains a string to be shown at the end of each
line.
What’s more, the command-line arguments handled by OptionParser have been stripped from
ARGV. The only things left in
ARGV can be assumed to be the names
of files the user wants to concatenate. This means we can now use the
ARGF shortcut to iterate over those
files line by line. All we need is a little extra code to actually
implement the command-line arguments:
	counter = 0
	eol =
	ARGF.each do |line|
	  line.sub!(/$/,
arguments[:show_ends])
	  print '%6.d ' % (counter += 1) if arguments[:number_lines]
	  print line
	end
Here’s a shell session showing off the robustness that optparse brings to even a simple script. The
help message is automatically generated, multiple combined flags are
handled correctly, nonexistent flags are rejected, and you can disable
flag processing altogether with the -- argument. In general, it works like you
expect a Unix command-line tool to work.
	$ ./cat2.rb --help
	Usage: ./cat2.rb [options]
	    -E, --show-ends [STRING]       display STRING at end of each line
	    -n, --number                   number all output lines
	    -h, --help                     display this help and exit

	$ ./cat2.rb file1 file2
	This is file one.
	Another line in file one.
	This is file two.
	I'm a lot more interesting than file one, I'll tell you that!

	$ ./cat2.rb file1 -E$ -n file2
	     1 This is file one.$
	     2 Another line in file one.$
	     3 This is file two.$
	     4 I'm a lot more interesting than file one, I'll tell you that!$

	$ ./cat2.rb --nosuchargument
	/usr/lib/ruby/1.8/optparse.rb:1445:in `complete': invalid option: --nosuchargument
	(OptionParser::InvalidOption)

	$ ./cat2.rb --show-ends=" STOP" -- --argument-looking-file
	The name of this file STOP
	looks just like an argument STOP
	for some odd reason. STOP
With a little more work, you can make OptionParser validate argument data for
you—parse strings as numbers, restrict option values to values from a
list. The documentation for the OptionParser class has a much more complex
example that shows off these advanced features.
See Also
ri OptionParser
21.5. Testing Whether a Program Is Running Interactively
Problem
You want to see whether there’s another person on the other end of your program, or whether the program has been hooked up to a file or the output of another program.
Solution
STDIN.tty? returns true if
there’s a terminal hooked up to your program’s original standard
input. Since only humans use terminals, this will suffice. This code
works on Unix and Windows:
	#!/usr/bin/ruby -w
	# interactive_or_not.rb
	if STDIN.tty?
	  puts "Let me be the first to welcome my human overlords."
	else
	  puts "How goes the revolution, brother software?"
	end
Running this program in different ways gives different results:
	$ ./interactive_or_not.rb
	Let me be the first to welcome my human overlords.

	$ echo "Some data" | interactive_or_not.rb
	How goes the revolution, brother software?

	$ ./interactive_or_not.rb < input_file
	How goes the revolution, brother software?
Discussion
An interactive application can be more user friendly than one
that runs solely off its command-line arguments and input streams. By
checking STDIN.tty? you can make
your program have an interactive and a noninteractive mode. The
noninteractive mode can be chained together with other programs or
used in shell scripts.
21.6. Setting Up and Tearing Down a Curses Program
Problem
To write a program that uses Curses or Ncurses, you have to write a lot of setup and cleanup code. You’d like to factor that out.
Solution
Here’s a wrapper method that sets up the Curses library and passes the main screen object into a code block:
	require 'curses'

	module Curses
	  def self.program
	    main_screen = init_screen
	    noecho
	    cbreak
	    curs_set(0)
	    main_screen.keypad = true
	    yield main_screen
	  end
	end
Here’s a simple Ruby program that uses the wrapper method to fill up the screen with random placements of a given string:
	Curses.program do |scr|
	  str = ARGV[0] || 'Test'
	  max_x = scr.maxx-str.size+1
	  max_y = scr.maxy
	  100.times do
	    scr.setpos(rand(max_y), rand(max_x))
	    scr.addstr(str)
	  end
	  scr.getch
	end
Discussion
The initialization, which is hidden in Curses.program, does the following
things:
Stops keystrokes from being echoed to the screen (
noecho)Hides the cursor (
curs_set(0))Turns off buffered input so keys can be processed as they’re typed (
cbreak)Makes the keyboard’s arrow keys generate recognizable key events (
keypad=true)
The code is a little different if you’re using the third-party
ncurses binding instead of the
curses library that comes with
Ruby. The main difference is that with ncurses, you must write some of the
cleanup code that the curses library handles automatically. A
wrapper method is also a good place to set up the ncurses color code if you plan to use
colored text (see Recipe
21.8 for more on this).
Here’s an Ncurses.program
method that’s equivalent to Curses.program, except that it performs its
cleanup manually by registering an at_exit block to run just before the
interpreter exits. This wrapper also turns on color and initializes a
few default color pairs. If your terminal has no color support, the
color code will run but it won’t do anything.
	require 'ncurses'

	module Ncurses
	  COLORS = [COLOR_BLACK, COLOR_RED, COLOR_GREEN, COLOR_YELLOW, COLOR_BLUE,
	            COLOR_MAGENTA, COLOR_CYAN, COLOR_WHITE]

	  def self.program
	    stdscr = Ncurses.initscr

	    # Run ncurses
cleanup code when the program exits.
	    at_exit do
	      echo
	      nocbreak
	      curs_set(1)
	      stdscr.keypad(0)
	      endwin
	    end

	    noecho
	    cbreak
	    curs_set(0)
	    stdscr.keypad(1)
	    start_color

	    COLORS[1…COLORS.size].each_with_index do |color, i|
	      init_pair(i+1, color, COLOR_BLACK)
	    end

	    yield stdscr
	  end
	end
Here’s the ncurses equivalent
of the curses program given
earlier:
	Ncurses.program do |scr|
	  str = ARGV[0] || 'Test'
	  max_y, max_x = [], []
	  scr.getmaxyx(max_y, max_x)
	  max_y = max_y[0]
	  max_x = max_x[0] - str.size + 1
	  100.times do
	    scr.mvaddstr(rand(max_y), rand(max_x), str)
	  end
	  scr.getch
	end
See Also
See this chapter’s introduction for information on installing Ncurses
“Writing Programs with NCURSES” is a good general overview of the Ncurses library; it’s written for C programmers, but it’s useful for Rubyists because Ruby’s interfaces to Curses and Ncurses are little more than wrappers (http://dickey.his.com/ncurses/ncurses-intro.html)
21.7. Clearing the Screen
Problem
You’re writing a console application, and you want it to clear the screen.
Solution
Capture the output of the Unix clear command as a string and print it
whenever you want to clear the screen:
	#!/usr/bin/ruby -w
	# clear_console.rb
	clear_code = %x{clear}

	puts 'Press enter to clear the screen.'
	$stdin.gets
	print clear_code
	puts "It's cleared!"
Discussion
The clear command prints an
escape code sequence to standard output, which the Unix terminal
interprets as a clear-screen command. The exact string depends on your
terminal, but it’s probably an ANSI escape sequence, like this:
%x{clear} # => "e[He[2J"Your Ruby script can print this escape code sequence to standard
output, just as the clear command
can, and clear the screen.
On Windows, the command is cls, and you can’t just print its standard
output to clear the screen. Every time you want to clear the screen,
you need to call out to cls with
Kernel#system:
	# clear_console_windows.rb

	puts 'Press enter to clear the screen.'
	$stdin.gets
	system('cls')
	puts "It's cleared!"
If you’ve made your Windows terminal support ANSI (see Recipe 21.8), then you can print the same ANSI escape sequence used on Unix.
The Curses library makes this a lot more straightforward. A
Curses application can clear any of its windows with Curses::Window#clear. Curses::clear will clear the main
window:
	#!/usr/bin/ruby -w
	# curses_clear.rb
	require 'curses'

	Curses.init_
screen
	Curses.setpos(0,0)
	Curses::addstr("Type all you want. 'C' clears the
screen, Escape quits.
")

	begin
	  c = nil
	  begin
	    c = Curses.getch
	  end until c == ?C or c == ?e
	  Curses.clear
	end until c == ?e
But, as always, Curses takes over your whole application, so you might want to just use the escape sequence trick.
21.8. Determining Terminal Size
Problem
Within a terminal-based application, you want to find the size of the terminal: how many rows and columns are available for you to draw on.
Solution
This is easy if you’re using the Curses library. This example
uses the Curses.program wrapper
described in Recipe
21.5:
	Curses.program do |scr|
	  max_y, max_x = scr.maxy, scr.maxx

	  scr.setpos(0, 0)
	  scr.addstr("Your terminal size is #{max_x}x#{max_y}. Press any key to exit.")
	  scr.getch
	end
It’s a little less easy with Ncurses: you have to pass in two arrays to the underlying C libraries, and extract the numbers from the arrays. Again, this example uses the Ncurses wrapper from Recipe 21.5:
	Ncurses.program do |scr|
	  max_y, max_x = [], []
	  scr.getmaxyx(max_y, max_x)
	  max_y, max_x = max_y[0], max_x[0]

	  str = "Your
terminal size is #{max_x}x#{max_y}. Press any key to exit."
	  scr.mvaddstr(0, 0, str)
	  scr.getch
	end
If you’re not using a Curses-style library, it’s not easy at all.
Discussion
If you plan to simulate graphical elements on a textual terminal, subdivide it into virtual windows, or print justified output, you’ll need to know the terminal’s dimensions. For decades, the standard terminal size has been 25 rows by 80 columns, but modern GUIs and high screen resolutions let users create text terminals of almost any size. It’s okay to enforce a minimum terminal size, but it’s a bad idea to assume that the terminal is any specific size.
The terminal size is a very useful piece of information to have, but it’s not an easy one to get. The Curses library was written to solve this kind of problem, but if you’re willing to go into the operating system API, or if you’re on Windows where Curses is not a standard feature, you can find the terminal size without letting a Curses-style library take over your whole application.
On Unix systems (including Mac OS X), you can make an ioctl system call to get the terminal size.
Since you’re calling out to the underlying operating system, you’ll
need to use strange constants and C-like structures to carry the
response:
	TIOCGWINSZ = 0x5413                  # For an Intel processor
	# TIOCGWINSZ = 0x40087468            # For a PowerPC processor

	def terminal_size
	 rows, cols = 25, 80
	  buf = [ 0, 0, 0, 0 ].pack("SSSS")
	  if STDOUT.ioctl(TIOCGWINSZ, buf) >= 0 then
	    rows, cols, row_pixels, col_pixels = buf.unpack("SSSS")[0..1]
	  end
	  return rows, cols
	end

	terminal_size                        # => [21, 80]
Here, the methods pack and
unpack convert between a
four-element array and a string that is modified in-place by the
ioctl call. After the call, the
first two elements of the array contain the number of rows and columns
for the terminal. Note that the first argument to ioctl is architecture-dependent.
The Windows version works the same way, although you must jump through more hoops and the system call returns a much bigger data structure:
	STDOUT_HANDLE = 0xFFFFFFF5
	def terminal_size
	  m_GetStdHandle = Win32API.new('kernel32', 'GetStdHandle', ['L'], 'L')
	  m_GetConsoleScreenBufferInfo = Win32API.new ('kernel32',
	                                               'GetConsoleScreenBufferInfo',
	                                               ['L', 'P'], 'L' )
	  format = 'SSSSSssssSS'
	  buf = ([0] * format.size).pack(format)
	  stdout_handle = m_GetStdHandle.call(STDOUT_HANDLE)

	  m_GetConsoleScreenBufferInfo.call(stdout_handle, buf)
	  (bufx, bufy, curx, cury, wattr,
	   left, top, right, bottom, maxx, maxy) = buf.unpack(format)
	  return bottom - top + 1, right - left + 1
	end
terminal_size                         # => [25, 80]
If all else fails, on Unix systems you can call out to the
stty command:
	def terminal_size
	  %x{stty size}.split.collect { |x| x.to_i }
	end

	terminal_size 	                      # => [21, 80]
See Also
The
ioctlcode is based on code posted to ruby-talk by Paul Brannan (http://blade.nagaokaut.ac.jp/cgi-bin/rcat.rb/ruby/ruby-talk/40350)The Windows code is based on code in the Win32API_Console library, a simple Ruby wrapper around Windows’ console-related API calls (http://rb-w32mod.sourceforge.net/)
Recipe 21.5, “Setting Up and Tearing Down a Curses Program”
21.9. Changing Text Color
Solution
The simplest solution is to use HighLine. It lets you enclose color commands in an ERb template that gets interpreted within HighLine and printed to standard output. Try this colorful bit of code to test the capabilities of your terminal:
	require 'rubygems'
	require 'highline/import'

	say(%{Here's some <%= color('dark red text', RED) %>.})
	say(%{Here's some <%= color('bright red text on a blue background',
	                                RED+BOLD+ON_BLUE) %>.})
	say(%{Here's some <%=
color('blinking bright cyan
text', CYAN+BOLD+BLINK) %>.})
	say(%{Here's some <%= GREEN+UNDERLINE %>underlined dark green text<%=CLEAR%>.})
Some of these features (particularly the blinking and underlining) aren’t supported on all terminals.
Discussion
The HighLine#color method encloses a display
string in special command strings, which start with an escape
character and a left square bracket:
	HighLine.new.color('Hello', HighLine::GREEN)
	# => "e[32mHelloe[0m"
These are ANSI escape sequences. Instead of displaying the string “e[32m”, an ANSI-compatible terminal treats it as a command: in this case, a command to start printing characters in green-on-black. The string “e[0m” tells the terminal to go back to white-on-black.
Most modern Unix terminals support ANSI escape sequences,
including the Mac OS X terminal. You should be able to get green text
in your irb session just by calling
puts "e[32mHelloe[0m" (try it!),
but HighLine makes it easy to get color without having to remember the
ANSI sequences.
Windows terminals don’t support ANSI by default, but you can get it to work by loading ANSI.SYS (see below for a relevant Microsoft support article).
An alternative to HighLine is the Ncurses library.[4] It supports color terminals that use a means other than ANSI, but these days, most color terminals get their color support through ANSI. Since Ncurses is much more complex than HighLine, and not available as a gem, you should only use Ncurses for color if you’re already using it for its other features.
Here’s a rough equivalent of the HighLine program given above.
This program uses the Ncurses::program wrapper described in Recipe 21.5. The wrapper sets
up Ncurses and initializes some default color pairs:
	Ncurses.program do |s|
	  # Define the red-on-blue color pair used in the second string.
	  # All the default color pairs use a black background.
	  Ncurses.init_pair(8, Ncurses::COLOR_RED, Ncurses::COLOR_BLUE)

	  Ncurses::attrset(Ncurses::COLOR_PAIR(1))
	  s.mvaddstr(0,0, "Here's some dark red text.")

	  Ncurses::attrset(Ncurses::COLOR_PAIR(8) | Ncurses::A_BOLD)
	  s.mvaddstr(1,0, "Here's some bright red text on a blue background.")
	  Ncurses::attrset(Ncurses::
COLOR_PAIR(6) | Ncurses::A_BOLD |
	                   Ncurses::A_BLINK)
	  s.mvaddstr(2,0, "Here's some blinking bright cyan
text.")

	  Ncurses::attrset(Ncurses::COLOR_PAIR(2) | Ncurses::A_UNDERLINE)
	  s.mvaddstr(3,0, "Here's some underlined dark green text.")

	  s.getch
	end
An Ncurses program can draw from a palette of color
pairs—combinations of foreground and background colors. Ncurses::program sets up a default palette
of the seven basic ncurses colors
(red, green, yellow, blue, magenta, cyan, and white), each on a black
background. You can change this around if you like, or define
additional color pairs (like the red-on-blue defined in the example).
The following Ncurses program prints out a color chart of all
foreground-background pairs. It makes the text of the chart bold, so
that the text doesn’t become invisible when the background is the same
color.
	Ncurses.program do |s|
	  pair = 0
	  Ncurses::COLORS.each_with_index do |background, i|
	    Ncurses::COLORS.each_with_index do |foreground, j|
	      Ncurses::init_pair(pair, foreground, background) unless pair == 0
	      Ncurses::attrset(Ncurses::COLOR_PAIR(pair) | Ncurses::A_BOLD)
	      s.mvaddstr(i, j*4, "#{foreground},#{background}")
	      pair += 1
	    end
	  end
	  s.getch
	end
You can modify a color pair by combining it with an Ncurses
constant. The most useful constants are Ncurses::A_BOLD, Ncurses::A_BLINK, and
Ncurses::A_UNDERLINE. This works
the same way (and, on an ANSI system, uses the same ANSI codes) as
HighLine’s BOLD, BLINK, and
UNDERLINE constants. The only
difference is that you modify an Ncurses color with the OR operator
(|), and you modify a HighLine
color with the addition operator.
See Also
Recipe 1.3, “Substituting Variables into an Existing String,” has more on ERb
http://en.wikipedia.org/wiki/ANSI_escape_code has technical details on ANSI color codes
The
examples/ansi_colors.rbfile in the HighLine gemYou can get a set of Ncurses bindings for Ruby at http://ncurses-ruby.berlios.de/; it’s also available as the Debian package
libncurses-rubyIf you want something more lightweight than the
highlinegem, try thetermansicolorgem instead: it defines methods for generating the escape sequences for ANSI colors, and nothing else“How to Enable ANSI.SYS in a Command Window” (http://support.microsoft.com/?id=101875)
21.10. Reading a Password
Problem
You want to prompt the user for a password, or otherwise capture input without echoing it to the screen for all to see.
Solution
The ruby-password library makes this easy, but
it’s not available as a Ruby gem. The HighLine library is available as
a gem, and it can do this almost as well. You just have to turn off
the terminal echo feature:
	require 'rubygems'
	require 'highline/import'

	def get_password(prompt='Password: ')
	  ask(prompt) { |q| q.echo = false}
	end

	get_password("What's your password? ")
	# What's your password?
	# => "buddy"
Discussion
In 2000, President Bill Clinton signed into law the Electronic Signatures Bill, which makes electronic signatures as binding as handwritten signatures. He signed the law by hand and then signed it electronically. As he typed the password to his electronic signature, it was was echoed to the screen. Everyone in the world saw that his password was the name of his pet dog, Buddy. Don’t let this happen to you: turn off echoing when gathering passwords.
Turning off echoing altogether is the safest way to gather a
password, but it might make your users think your program has stopped
responding to input. It’s more userfriendly to echo a mask character,
like an asterisk, for every character the user types. You can do this
in HighLine by setting echo to the
mask character instead of false:
	def get_password(prompt='Password: ', mask='*')
	  ask(prompt) { |q| q.echo = mask }
	end

	get_password
	# Password: *****
	# => "buddy"

	get_password('Password: ', false)
	# Password:
	# => "buddy"
See Also
The
ruby-passwordthird-party library also provides ways of generating, encrypting, and test-cracking passwords (http://www.caliban.org/ruby/ruby-password.shtml )
21.11. Allowing Input Editing with Readline
Problem
You want to let your users edit their lines of input as they
write them, the way irb
does.
Solution
Use the readline library.
Instead of reading directly from standard input, pass a prompt
string into Readline.readline. The
user will be able to edit their input using the same shortcut keys you
can use in the irb Ruby interpreter
(assuming their terminal supports those keys).
	#!/usr/bin/ruby -w
	# readline.rb
	require 'readline'
	vegetable = Readline.readline("What's your favorite vegetable?> ")
	puts "#{vegetable.capitalize}? Are you crazy?"
Note that you don’t have to chomp the result of Readline.readline:
	$ ruby readline.rb
	What's your favorite vegetable?> okra
	Okra? Are you crazy?
On Windows, this isn’t necessary because the cmd shell provides any console program with
many of readline’s features. The
example given above will work on both Windows and Unix, but if you’re
writing a Windows-specific program, you don’t need readline:
	# readline_windows.rb
	print "What's your favorite vegetable?> "
	puts gets.chomp.capitalize + "? Are you crazy?"
Discussion
In a Unix program that accepts data from standard input, the user can use their backspace key to correct
typing mistakes, one character at a time. Backspace is a
control character: it’s a real character, just
like “1” and “m” (its Ruby string representation is "�10“), but it’s not usually interpreted as
data. Instead, it’s treated as a command: it erases one character from
the input buffer.
With the backspace key, you can correct errors one character at
a time. But what if you want to insert text into the middle of a line,
or delete the whole thing and start over? That’s where readline comes in. It’s a Ruby interface to
the Readline library used by many Unix programs, and it recognizes
many control characters besides the backspace.
In a readline program, you
can use the left and right arrow keys to move back and forth in the
input string before submitting it. If you’re familiar with the
Readline shortcut keys from Emacs or other Unix programs, you can
perform more sophisticated text editing operations, including cut and paste.
The readline library also
supports command history: that’s the feature of irb that lets you revisit commands you’ve
already typed. To add this feature to your program, pass true as the second argument to Readline.readline. When the user enters a
line, her input will be added to the command history. The next time
your code calls Readline.readline,
the user can hit the up arrow key to recall previous lines of
input.
Here’s a simple Ruby interpreter that has all the
line- editing capabilities of irb, including command history:
	#!/usr/bin/ruby -w
	# mini_irb.rb
	require 'readline'
	line = 0
	loop do
	  eval Readline.readline('%.3d> ' % line, true)
	  line += 1
	end
See Also
Recipe 1.5, “Representing Unprintable Characters”
If your
irbsession doesn’t supportreadlinecommands, make sure you have the latest version of Ruby installed, and try invoking it asirb --readline; this is an especially common problem on Mac OS X
21.12. Making Your Keyboard Lights Blink
Problem
You want to control the three standard keyboard LEDs (num lock, caps lock, and scroll lock) from a Ruby script.
Solution
Use the Blinkenlights library, available as the blinkenlights gem. It works on Windows or
Linux (but not on Mac OS X), and it lets you toggle the lights
individually or in patterns:
	require 'rubygems'
	require 'blinkenlights'

	# Turn individual
lights on or off.
	BlinkenLights.open do |lights|
	  lights.left = true
	  lights.middle = true
	  lights.right = true

	  lights.scr = false
	  lights.cap = false
	  lights.num = false
	end

	# Display a light show.
	BlinkenLights.open do |lights|
	  lights.left_to_right
	  10.times { lights.random }
	  lights.right_to_left
	end
Discussion
The keyboard lights are an often-overlooked user interface. They were originally designed to reflect information about the state of the keyboard itself, but they can be manipulated from the computer to display more interesting things. Each light can continually display one bit of information (such as whether you have new email), or can flash over time to indicate a rate (such as your computer’s use of incoming or outgoing bandwidth).
BlinkenLights works by writing special command codes to the Unix
keyboard device (/dev/tty8 is the
default, but /dev/console should
also work). Usually, you can only write to these devices when running
as root.
On Windows, BlinkenLights works by sending key events that make Windows think you actually hit the corresponding key. This means that if you tell BlinkenLights on Windows to turn on your caps lock light, caps lock itself is also enabled. The state of the light can’t be disconnected from the state of the keyboard.
When you pass a code block into
Blinkenlights.open, BlinkenLights runs the
block and then restores the original state of the lights. This avoids
confusing those users who use their lights to keep track of the state
of their keyboards. If you want your setting of the lights to persist
until they’re changed again, then use the return value of Blinkenlights.open instead of passing in a
code block.
This code will turn on the first two lights to represent the number six in binary. Until they’re changed again, whether through the keyboard or through code, they’ll stay on. Even the end of your program won’t restore the original state of the lights.
	# Display the binary number 6 (that is, 110):
	BlinkenLights.new.set(6)
Here’s a program that converts an alphanumeric message to Morse code and displays it on the keyboard lights:
	#!/usr/bin/ruby -w
	# blink_morse.rb
	require 'rubygems'
	require 'blinkenlights'

	class String

	  # Morse code representations for 0-9 and A-Z.
	  MORSE_TABLE = %w{01111 00111 00011 00001 00000 10000 11000 11100 11110 11111
	                   01 1000 1010 100 0 0010 110 0000 00 0111 101 0100 11
	                   10 111 0110 1101 010 000 1 001 0001 011 1001 1011 1100}

	  def to_morse(dit_time = 0.3)
	    a = "A"[0]
	    zero = "0"[0]
	    words = upcase.gsub(/[^A-Z0-9s]/, "").split
	    BlinkenLights.open do |lights|
	      words.each do |word|
	        word.each_byte do |letter|
	          code = MORSE_TABLE[letter - (letter < a ? zero : a-10)]
	          code.each_byte do |signal|
	            lights.flash(dit_time * (signal == zero ? 1 : 3))
	            sleep(dit_time)          # Space between parts of a letter.
	          end
	          sleep(dit_time * 3)        # Space between letters.
	        end
	        sleep(dit_time * 5)          # Space between words.
	      end
	    end
	  end
	end

	ARGV.shift.to_s.to_morse if $0 == __FILE_ _
See Also
The BlinkenLights homepage at http://blinkenlights.rubyforge.org/; see especially the generated RDoc at http://blinkenlights.rubyforge.org/doc/index.html, which lists the many light patterns defined by the library
The
examplessubdirectory of the installed gem contains sample programs that control the keyboard lights based on your system load or network activityThe name “Blinkenlights” is explained at http://www.catb.org/jargon/html/B/blinkenlights.html
An explanation of Morse code (http://en.wikipedia.org/wiki/Morse_code)
The idea for the
blink_morse.rbprogram comes from Neal Stephenson’s novel Cryptonomicon
21.13. Creating a GUI Application with Tk
Problem
You need to create a program that has a graphical user interface (GUI).
Solution
Use the Tk library. It’s language-independent, cross-platform, and best of all, it comes standard with most Ruby distributions.
With Tk you create GUI elements, or “widgets”, and then bind code blocks to them. When something happens (like the user clicking a widget), Tk runs the appropriate code block.
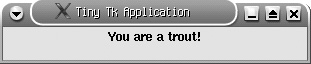
Ruby provides a class for each type of Tk widget. This simple Tk program creates a “root” widget (the application window), and a “label” widget within the window. The program then waits for events (although it can’t respond to any).
	require 'tk'
	root = TkRoot.new { title "Tiny Tk Application" }
	label = TkLabel.new(root) { text "You are a trout!" }
	label.pack
	Tk.mainloop
When run, it looks like Figure 21-1.
Discussion
The simple application above shows most of the basic features of GUI programming in Tk and other modern GUI toolkits. We’ll use the techniques to build a more complex application.
Tk GUI development and layout take a parent/child
approach. Most widgets are children of other widgets: depending on the
widget, this nesting can go arbitrarily deep. The exception to this
rule is the TkRoot widget: it’s always the top-level
widget, and it’s represented as the application window.
Child widgets are “packed” inside their parents so they can be displayed. A system called the geometry manager controls where on the screen the widgets actually show up. The default geometry manager is the “placer” manager, which lets you place widgets in relation to each other.
Tk applications are event-driven, so the final step is to start a main event loop which tells our program to listen for events to be fired on our widgets.
To further illustrate, let’s make a simple stopwatch program to demostrate a realworld use of Tk.
To start, we’ll create four simple methods that will be bound to our widgets. These are the nonGUI core of the program:
	#!/usr/bin/ruby
	# stopwatch.rb
	require 'tk'

	class Stopwatch

	  def start
	    @accumulated = 0 unless @accumulated
	    @elapsed = 0
	    @start = Time.now

	    @mybutton.configure('text' => 'Stop')
	    @mybutton.command { stop }
	    @timer.start
	  end

	  def stop
	    @mybutton.configure('text' => 'Start')
	    @mybutton.command { start }
	    @timer.stop
	    @accumulated += @elapsed
	  end

	  def reset
	    stop
	    @accumulated, @elapsed = 0, 0
	    @mylabel.configure('text' => '00:00:00.0')
	  end

	  def tick
	    @elapsed = Time.now - @start
	    time = @accumulated + @elapsed
	    h = sprintf('%02i', (time.to_i / 3600))
	    m = sprintf('%02i', ((time.to_i % 3600) / 60))
	    s = sprintf('%02i', (time.to_i % 60))
	    mt = sprintf('%1i', ((time - time.to_i)*10).to_i)
	    newtime = "#{h}:#{m}:#{s}:#{mt}"
	    @mylabel.configure('text' => newtime)
	  end
Next, we set up our GUI. This consists of six simple widgets. As
before, the TkRoot is our application window, and
contains all our other widgets:
	  def initialize
	    root =
TkRoot.new { title 'Tk Stopwatch' }
The TkMenuBar corresponds to
the menu bar at the top of the screen in most modern GUI programs.
It’s an easy way to group a set of program features and make them
available across our application. The menu layout of a TkMenuBar is defined by a nested array
containing the menu items, and the code blocks to run when a menu item
is selected:
	    menu_spec = [
	                 [
	                  ['Program'],
	                  ['Start', lambda { start } ],
	                  ['Stop', lambda { stop } ],
	                  ['Exit', lambda { exit } ]
	                 ],
	                 [
	                  ['Reset'], ['Reset Stopwatch', lambda { reset } ]
	                 ]
	                ]

	    @menubar = TkMenubar.new(root, menu_spec, 'tearoff' => false)
	    @menubar.pack('fill'=>'x', 'side'=>'top')
The TkFont is used only as a
configuration option for our TkLabel, which in turn is only used to
display the value of our stopwatch:
	    @myfont = TkFont.new('size' => 16, 'weight' => 'bold')

	    @mylabel = TkLabel.new(root)
	    @mylabel.configure('text' => '00:00:00.0', 'font' => @myfont)
	    @mylabel.pack('padx' => 10, 'pady' => 10)
Apart from the menu bar, the TKButton is the only part of the GUI that
the user can directly manipulate. The code block passed into its
command method is run when the user
clicks the button. Recall how the start and stop methods call this method to modify the
behavior of the button. This makes the button act like the toggle on a
physical stopwatch:
	    @mybutton =
TkButton.new(root)
	    @mybutton.configure('text' => 'Start')
	    @mybutton.command { start }
	    @mybutton.pack('side'=>'left', 'fill' => 'both')
The TkAfter event is an
especially interesting widget because it has no direct visual
representation in our program. Instead, it runs in the background
firing our tick method every
millisecond:
@timer = TkAfter.new(1, -1, proc { tick })Finally, we’ll start up the main Tk event loop. This call loads the GUI and starts listening for events:
	    Tk.mainloop
	  end
	end

	Stopwatch.new
Figure 21-2 shows the final product.

This recipe only scratches the surface of the Tk library, not to mention GUI design in general. The Tk library includes dozens of widgets with lots of options and features. Entire books have been writen about how to use the library. You should refer to the Ruby Tk documentation or other Tk references for complete details.
See Also
If your Ruby distribution doesn’t include Tk, you can obtain the binary or source from http://www.tcl.tk; you may then need to rebuild Ruby from the source distribution once you have the Tk extension; on Debian GNU/Linux, you can just install the
libtk-rubypackageRuby’s Tk documentation is not very complete; fortunately, its Tk binding is similar to Perl’s, so you can get a lot of information from the Perl/Tk documentation; one location for this is http://perlhelp.web.cern.ch/PerlHelp/
Tcl and Tk by Brent B. Welch and Ken Jones with Jeffrey Hobbs (Prentice Hall)
Perl/Tk Pocket Reference by Stephen Lidie (O’Reilly)
The next few recipes (21.13 and 21.15) reproduce the simple GUI application and the stopwatch with the Ruby bindings to various other GUI libraries
21.14. Creating a GUI Application with wxRuby
Problem
You want to write a portable GUI application that looks better than a Tk application.
Solution
Use the wxRuby library, available as a third-party download. It uses native GUI widgets on Windows, Unix, and Mac OS X. It’s got many more features than the Tk library, and even greater complexity.
Here’s a very simple wxRuby application (Figure 21-3):
	#!/usr/bin/ruby -w
	# wxtrout.rb

	require 'wxruby'
	class TroutApp < Wx::App
	  def on_init
	    frame = Wx::Frame.new(nil, -1, 'Tiny wxRuby Application')
	    panel = Wx::StaticText.new(frame, -1, 'You are a trout!',
	                               Wx::Point.new(-1,1), Wx::DEFAULT_SIZE,
	                               Wx::ALIGN_CENTER)
	    frame.show
	  end
	end

	TroutApp.new.main_loop

Discussion
The simple wxRuby application has the same basic structure as
its Tk cousin (see Recipe
21.12). A top-level widget is created (here called a Frame) and a label (StaticText) widget is added to it. The
application then goes into an event loop, listening for and retrieving
events like mouse clicks.
A wxRuby version of the Tk stopwatch program is also similar, although much longer. wxRuby code tends to be more verbose and less idiomatic than Ruby Tk code.
The core methods are nearly unchanged, because they have little to do with the GUI:
	#!/usr/bin/ruby -w
	# wx_stopwatch.rb
	require 'wxruby'

	class StopwatchApp < Wx::App

	  def start
	    @start = Time.now
	    @button.set_label('Stop')
	    @button.refresh
	    @frame.evt_button(@button.get_id) { stop }
	    @timer.start(100) # The timer should tick every 100 milliseconds.
	  end

	  def stop
	    @button.set_label('Start')
	    @button.refresh
	    @frame.evt_button(@button.get_id) { start }
	    @timer.stop
	    @accumulated += @elapsed
	  end

	  def reset
	    stop
	    @accumulated, @elapsed = 0, 0
	    @label.set_label('00:00:00.0')
	    @frame.layout
	  end

	  def tick
	    @elapsed = Time.now - @start
	    time = @accumulated + @elapsed
	    h = sprintf('%02i', (time.to_i / 3600))
	    m = sprintf('%02i', ((time.to_i % 3600) / 60))
	    s = sprintf('%02i', (time.to_i % 60))
	    mt = sprintf('%1i', ((time - time.to_i)*10).to_i)
	    newtime = "#{h}:#{m}:#{s}:#{mt}"
	    @label.set_label(newtime)
	    @frame.layout
	  end
The menu bar takes a lot more code in wxRuby than in Tk. Every
widget in a wxRuby program has a unique ID, which must be passed in
when you register an event handler. I’ve defined a hardcoded ID for
each menu item, so that after I create the “menu item” widget, I can
pass its unique ID into the event-handler registration method,
evt_menu. You can really sense the
underlying C code here:
	  # Constants for the IDs of the menu items.
	  START_MENU = 10
	  STOP_MENU = 11
	  EXIT_MENU = 12
	  RESET_MENU = 13

	  # Constant for the ID of the timer widget, used below.
	  TIMER_ID = 14

	  def on_init
	    @accumulated, @elapsed = 0, 0
	    @frame = Wx::Frame.new(nil, -1, '
wxRuby Stopwatch')

	    menu_bar = Wx::MenuBar.new

	    program_menu = Wx::Menu.new
	    menu_bar.append(program_menu, '&Program')
	    program_menu.append(START_MENU, '&Start', 'Start the stopwatch')
	    @frame.evt_menu(START_MENU) { start }
	    program_menu.append(STOP_MENU, 'S&top', 'Stop the stopwatch')
	    @frame.evt_menu(STOP_MENU) { stop }
	    menu_exit = program_menu.append(EXIT_MENU, "E&xit	Alt-X",
	                                    'Exit the program')
	    @frame.evt_menu(EXIT_MENU) { exit }

	    reset_menu = Wx::Menu.new
	    menu_bar.append(reset_menu, '&Reset')
	    reset_menu.append(RESET_MENU, '&Reset', 'Reset the stopwatch')
	    @frame.evt_menu(RESET_MENU) { reset }
	    @frame.set_menu_bar(menu_bar)
wxRuby uses Sizer
objects to pack widgets into their display areas. The BoxSizer object used below arranges widgets
within the frame vertically, so that the label will be above the
stopwatch button.
	    sizer = Wx::BoxSizer.new(Wx::VERTICAL)

	    @label = Wx::StaticText.new(@frame, -1, '00:00:00.0')
	    font = Wx::FontData.new.get_chosen_font
	    font.set_point_size(16)
	    font.set_weight(Wx::FONTWEIGHT_BOLD)
	    @label.set_font(font)
	    sizer.add(@label, 1, Wx::ALIGN_CENTER)
The button and the timer work more or less like their Tk
equivalents. The call to @frame.set_sizer tells the root widget to
use our vertical BoxSizer when
deciding how to arrange widgets on the screen (Figure 21-4).
	    @button = Wx::Button.new(@frame, -1, 'Start')
	    @frame.evt_button(@button.get_id) { start }
	    sizer.add(@button, 0, Wx::ALIGN_CENTER, 2)

	    @frame.set_sizer(sizer)
	    @frame.show
	    @timer = Wx::Timer.new(@frame, TIMER_ID)
	    @frame.evt_timer(TIMER_ID) { tick }
	  end
	end

	StopwatchApp.new.main_loop
See Also
You need to download (and, on Unix systems, compile) wxRuby as a Ruby extension; you can get it from http://wxruby.rubyforge.org/; the wxRuby developers provide a good installation guide at http://wxruby.rubyforge.org/wiki/wiki.pl?Installation
The wxRuby wiki has a lot of useful information, including a simple tutorial at http://wxruby.rubyforge.org/wiki/wiki.pl?Getting_Started; the wxRuby distribution also comes with many good sample applications in its
samples/directoryThe web site for wxWidgets (the underlying library to which wxRuby is a binding) also has lots of good reference material: http://www.wxwidgets.org/; you just have to be able to translate the C++-style class and method names into Ruby style (for instance,
WxLabel::SetLabelbecomesWx::Label#set_label)
21.15. Creating a GUI Application with Ruby/GTK
Problem
You want to write a GUI application that uses the GTK widget library, perhaps so you can integrate it with the Gnome desktop environment.
Solution
Use the Ruby bindings to Gnome’s GTK widget library, available as a third-party download. Here’s a simple Ruby/GTK application (Figure 21-5).
	#!/usr/bin/ruby -w
	#
gtktrout.rb
	require 'gtk2'

	Gtk.init
	window = Gtk::Window.new 'Tiny Ruby/GTK Application'
	label = Gtk::Label.new 'You are a trout!'
	window.add label
	window.signal_connect('destroy') { Gtk.main_quit }
	window.show_all
	Gtk.main

Discussion
Gnome is one of the two most popular Unix desktop suites. The Ruby-Gnome2 project provides and documents Ruby bindings to Gnome’s vast array of C libraries. You can write Ruby applications that fully integrate with the Gnome desktop, but in this recipe I’m going to focus on the basics of the Gnome GUI library GTK.
Although the details are different, the sample program above is basically the same as it would be with Tk (Recipe 21.12) or the wxRuby library (Recipe 21.13). You create two widgets (a window and a label), attach the label to the window, and tell the GUI library to display the window. As with Tk and wxRuby, the application goes into a display loop, capturing user events like mouse clicks.
The sample program won’t actually respond to any user events, though, so let’s create a Ruby/GTK version of the stopwatch program seen in previous GUI recipes.
The core methods, the ones that actually implement the stopwatch, are basically the same as the corresponding methods in the Tk and wxRuby recipes. Since GTK doesn’t have a timer widget, I’ve implemented a simple timer as a separate thread. The other point of interest is the HTML-like markup that GTK uses to customize the font size and weight of the stopwatch text.
	#!/usr/bin/ruby -w
	# gtk_stopwatch.rb
	require 'gtk2'

	class Stopwatch

	  LABEL_MARKUP = '<span font_desc="16" weight="bold">%s</span>'

	  def start
	    @accumulated ||= 0
	    @elapsed = 0
	    @start = Time.now

	    @mybutton.label = 'Stop'
	    set_button_handler('clicked') { stop }
	    @timer_stopped = false
	    @timer = Thread.new do
	      until @timer_stopped do
	        sleep(0.1)
	        tick unless @timer_stopped
	      end
	    end
	  end

	  def stop
	    @mybutton.label = 'Start'
	    set_button_handler('clicked') { start }
	    @timer_stopped = true
	    @accumulated += @elapsed
	  end

	  def reset
	    stop
	    @accumulated, @elapsed = 0, 0
	    @mylabel.set_markup(LABEL_MARKUP % '00:00:00.0')
	  end

	  def tick
	    @elapsed = Time.now - @start
	    time = @accumulated + @elapsed
	    h = sprintf('%02i', (time.to_i / 3600))
	    m = sprintf('%02i', ((time.to_i % 3600) / 60))
	    s = sprintf('%02i', (time.to_i % 60))
	    mt = sprintf('%1i', ((time - time.to_i)*10).to_i)
	    @mylabel.set_markup(LABEL_MARKUP % "#{h}:#{m}:#{s}:#{mt}")
	  end
Now begins the GUI setup. Ruby uses VBox and HBox objects to pack widgets into the
display area. The stopwatch application will give its main window a
single VBox containing three
widgets arranged from top to bottom: a menu bar, a label (displaying
the stopwatch time), and a button (to start and stop the
stopwatch):
	  def initialize
Gtk.init
	    root = Gtk::Window.new('GTK Stopwatch')

	    accel_group = Gtk::AccelGroup.new
	    root.add_accel_group(accel_group)
	    root.set_border_width 0

	    box = Gtk::VBox.new(false, 0)
	    root.add(box)
The program’s menu bar consists of many nested MenuBar, Menu, and MenuItem objects. Rather than create these
objects ourselves, we define the parameters of our menu bar in a
nested array, and pass it into an ItemFactory object:
	    menu_factory =
Gtk::ItemFactory.new(Gtk::ItemFactory::TYPE_MENU_BAR,
	                                        '<main>', nil)
	    menu_spec = [
	                 ['/_Program'],
	                  ['/Program/_Start', '<Item>', nil, nil, lambda { start } ],
	                  ['/Program/S_top', '<Item>', nil, nil, lambda { stop } ],
	                  ['/Program/_Exit', '<Item>', nil, nil,
	                   lambda { Gtk.main_quit } ],
	                 ['/_Reset'],
	                  ['/Reset/_Reset Stopwatch', '<Item>', nil, nil,
	                   lambda { reset } ]
	                ]
	    menu_factory.create_items(menu_spec)
	    menu_root = menu_factory.get_widget('<main>')
	    box.pack_start(menu_root)
The label and the button are pretty simple: just define them and
pack them into the VBox:
	    @mylabel = Gtk::Label.new
	    @mylabel.set_markup(LABEL_MARKUP % '00:00:00.0')
	    box.pack_start(@mylabel)

	    @mybutton = Gtk::Button.new('Start')
	    set_button_handler('clicked') { start }
	    box.pack_start(@mybutton)

	    root.signal_connect('destroy') { Gtk.main_quit }
	    root.show_all

	    Gtk.main
	  end
I’ve been calling a nonexistent method Stopwatch#set_button_handler whenever I want
to modify the code that runs when the user clicks the button. I close
out the Stopwatch class by defining
that method (Figure
21-6):
	  def set_button_handler(event, &block)
	    @mybutton.signal_handler_disconnect(@mybutton_handler) if @mybutton_handler
	    @mybutton_handler = @mybutton.signal_connect(event, &block)
	  end
	end

	Stopwatch.new
In the Tk recipe, I simply called a button’s command method whenever I needed to change
the code block that runs when the user clicks the button. So why this
set_ button_handler code? Why not
just call signal_connect whenever I
need to change what the button does here? I can’t do that because GTK
lets you associate multiple code blocks with a single event. This
doesn’t usually come up, but it’s a problem here because I’m changing
the function of a button.

If the button is set up to call start when you click it, and you call
signal_ connect('clicked',proc { stop
        }
), then clicking on the button will call start and then call
stop. You’ve added a second code
block to the “clicked” event, when what you want is to replace the old
“clicked” code with the new code. To avoid this problem, set_button_handler removes any old handler
from the button before installing the new handler. The set_button_handler method tracks the
internal ID of the newly installed handler, so that
it can be removed if the user clicks the button
yet again.
See Also
You can download the Ruby bindings to GTK from the project homepage (http://ruby-gnome2.sourceforge.jp/); the GTK homepage itself is at http://www.gtk.org; Debian GNU/Linux users can install the
libgtk2-rubypackageThe Ruby GTK bindings are documented on the Ruby-GNOME2 Wiki at http://ruby-gnome2.sourceforge.jp/hiki.cgi?Ruby%2FGTK; there’s also a tutorial at http://ruby-gnome2.sourceforge.jp/hiki.cgi?tut-gtk
Don’t confuse the Ruby-GNOME2 project with its predecessor, Ruby-GNOME; the documentation for the older project is still online and will mislead you if you go to the wrong web site
21.16. Creating a Mac OS X Application with RubyCocoa
Problem
You want to create a native Mac OS X program with a graphical user interface.
Solution
Use the Mac OS X Cocoa library along with RubyCocoa and the Interface Builder application. RubyCocoa creates real OS X applications and provides a GUI interface for building GUIs, as opposed to other libraries, which make you define the GUI with Ruby code. RubyCocoa is a free download, and the Cocoa development tools are on the Mac OS X installation DVD.
Interface Builder is very powerful: you can create simple applications without writing any code. In fact, it takes longer to explain what to do than to do it. Here’s how to create a simple application with Interface Builder:
Start the Xcode application and create a new project from the File menu. Choose “Cocoa-Ruby Application” from the “New Project” list, hit the Next button, give your project a name and location on disk, and click Finish.
XCode will create a project that looks like Figure 21-7.
The Cocoa-Ruby project template comes with two files:
main.m(an Objective-C file) andrb_main.rb(a RubyCocoa file). For a simple application, this is all the code you need.Open the NIB Files group and doubleclick
MainMenu.nibto open Interface Builder. You get a new application window, into which you can drag and drop GUI widgets, and a menubar labeledMainMenu.nib (English)–MainMenu.You’ll also see a palette window with a selection of GUI objects; a nib document window named
MainMenu.nib (English), containing classes, instances, images and sounds; and an inspector. If the inspector is not open, selectShow Inspectorfrom the Tools menu.

The screenshot in Figure 21-8 shows what we’re going to do to our new application window (seen in the upper left).

Select the new application window and set the application’s title. Type “Tiny RubyCocoa Application” in the inspector’s
Window Titlefield (you need to select the “Attributes” tab to see this field).Add a text label to the application window. Select the Text palette in the palette window. The visible controls are all text fields, with only slight differences between them. We’ll use the control called
System Font
            Text
: drag this control into your application window.Double-click the new text field in the application window and type “You are a trout!”
For completeness, go through the menus in the menubar and change “New Application” to “Tiny RubyCocoaApp” wherever it occurs. Save your nib.
Go back to Xcode. Click the Build and Go button. Your application should now run; it will look like Figure 21-9.

A compiled, doubleclickable version of the application will be
found in your project build folder—usually within the project subfolder.
Discussion
This simple application doesn’t show much about RubyCocoa, but
it gives a glimpse of the power of the Cocoa framework. The NSApplication class gives you a lot of
functionality for free: spellchecking, printing, application hiding,
and so on. Ruby-Cocoa creates an instance of NSApplication, which deals with the run
loop, handling events from the operating system, and more. You could
have created this GUI application entirely in code (it would have
looked something like the Tk example), but in practice, programmers
always use Interface Builder.
For a more realistic example, we’ll need to write some code that interacts with the interface. Like Rails and many other modern frameworks, Cocoa uses a Model-View-Controller pattern.
The view layer consists of the windows and widgets:
NSViewand its subclasses, such asNSTextField. These are built using Interface Builder.The model layer is coded by the programmer, based on
NSObjector a more specialised subclass.The Controller layer can be dealt with in Interface Builder using subclasses of
NSController(these are in the Controllers palette), or in code.
Let’s create a RubyCocoa version of the Stopwatch program seen in
previous GUI recipes like Recipe 21.12. First, we need
to create a new Cocoa-Ruby
Application project in Xcode, and once more open the
MainMenu.nib file in Interface
Builder. Because RubyCocoa makes it easy, we’ll display the time on
the stopwatch two ways: as a digital readout and
as an analog clock face (Figure
21-10).

Create a new Cocoa-Ruby application. Select the new application window and change its title in the inspector to
Timer.Create the clock. From the Text palette we used before, drag a
NSDatePicker(a label that displays a date and time) into the application window. In the inspector, change the style to “Graphical”, date selection to “None”, and time selection to “Hour, Minute, and Second”. TheNSDatePickernow shows up as a clock.Create the digital readout. Drag an
NSTextField(“System Font Text”, as in the previous example) onto the window below the clock. Now drag a date formatter (marked with a small calendar in the palette) onto theNSTextField. The Inspector changes to show a list of possible formats; select%H:%M:%S.Create the stopwatch button. Switch to the button palette and drag a normal, rounded,
NSButtonto the application window. In the Inspector, change the title to “Start” and make sure its type is “Push Button”.Build the menu bar. Change to the menus palette and drag
Submenuobjects onto the “MainMenu” menubar. Double-click them to change their titles (to “Program” and “Reset”), and dragItemobjects onto the menu objects to add items to the menu. As in the stopwatch examples for other GUI libraries, our “Program” menu will contain menu items for “Start” and “Stop”. The “Reset” menu will have a single menu item: “Reset Stopwatch”. Unlike in the other examples, the application menus will contain no menu item for “Exit”. This is because Mac OS X already provides a way to exit any program from the apple menu.Now we have all our interface elements in place. We need a model object to actually do the work. Click on
Classesin theMainMenu.nibwindow, to bring up the class browser (Figure 21-11).
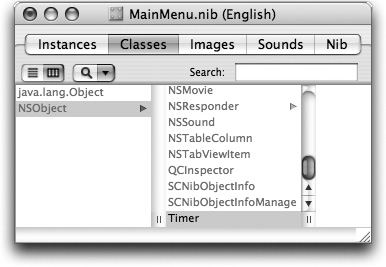
Select NSObject and then
“Subclass NSObject” from the Classes menu. Change the name of the new
class to Timer. This class will
implement the stopwatch code.
We need to tell Interface Builder about the interface to this
class. Start by specifying three methods. In the inspector, with the
new class still selected in the class browser, make sure that the
Attributes-Actions tab is selected and hit the Add button three times.
Name the methods reset:, start:,
and stop:. These are the methods
that will be called from the button and menus.
The model class we are creating also needs to know about some
interface elements; for instance, it needs to know about the time
controls so it can change the displayed time. The model class accesses
Interface Builder widgets through instance variables called
outlets. Switch to the “Attributes-Outlets” tab
and click Add three times. Name the
outlets clock, timeField, and
button.
With the model object declared and all the interface elements in place, we can connect everything together. Recall that Interface Builder deals with instances of objects; we have a
Timerclass that implements the stopwatch functionality, but as of yet we have no instance of the class. Keeping theTimerclass selected in the class browser, choose “Instantiate Timer” from the Classes menu. The window switches to the Instances tab, with a new icon representing the Timer instance.To make a connection between two objects, we drag from the object that needs to know, to the object it needs to know about. First, let’s deal with the actions.
When we click the Start button, we want the
startmethod on ourTimerclass to be called. The button needs to know about thestart: method. Control drag from the Start button to theTimerinstance icon. The Inspector changes to show the methods ofTimer, and automatically selects thestart: method for you (it matches the button label). Click the Connect button to make the connection.Make the same connection from the menu item “Program/Start” to the
Timer, and then from “Program/Stop” to thestop: method. Connect “Reset/Reset Stopwatch” to thereset: method.The controls now know which Ruby methods they trigger. We need to tell our
Timerclass which interface elements are accessible from its outlets (instance variables). Now the connections are made from theTimerclass to the interface controls it needs to know about. Control-drag theTimerinstance to the clock control: the inspector changes to show the outlets tab forTimer. Selectclockand click the Connect button.Connect the
textFieldandbuttonoutlets to the digital time control and the start button. Save the nib file asTimer.rb.
Back in Xcode, we are finally ready to write the Ruby code that actually implements the stopwatch. Choose “New File…” from the File menu, and then select “Ruby-Cocoa NSObject subclass” from the list. The core model object code is very similar to the Tk recipe, with some small differences:
	require 'osx/cocoa'
	include OSX

	ZeroDate = NSDate.dateWithString('2000-01-01 00:00:00 +0000')

	class Timer < NSObject
	    ib_outlets :clock, :timeField, :button

	    def initialize
	        @timer = NSTimer.
	        scheduledTimerWithTimeInterval_target_selector_userInfo_repeats(
	        1.0, self, :tick, nil, true)
	    end
First, we call the ib_outlets
decorator to specify instance variables that are matched up with the
objects specified in Interface Builder.
In the other GUI examples, we displayed a plaintext label and
formatted the time as a string for display. Here, the label has its
own date formatter, so we can tell it to display an NSDate object and have it figure out the
formatting on its own.
NSTimer is a Cocoa class we
can use to tap into the Mac OS X user-event loop and call a method at a certain
interval. We can get submillisecond time intervals from NSTimer, but there’s not much point because
NSDate won’t display fractions of a
second. So we set it up to call the tick method once a second.[5]
Now we define the start
method, triggered when the end user pushes the “Start” button:
	    def start(sender)
	        @running = true
	        @start = NSDate.date
	        @accumulated = 0 unless @accumulated
	        @elapsed = 0.0
	        @button.setTitle('Stop')
	        @button.setAction(:stop)
	    end
One thing to note here: NSTimer hooks into the operating system’s
event loop, which means it can’t be switched off. We define a @running variable so we know to ignore the
timer when we are not running the stopwatch.
The rest of the code is similar to the other GUI examples:
	    def stop(sender)
	        @running = false
	        @accumulated += @elapsed
	        @button.setTitle('Start')
	        @button.setAction(:start)
	    end

	    def reset(sender)
	        stop(nil)
	        @accumulated, @elapsed = 0.0, 0.0
	        @clock.setDateValue(ZeroDate)
	        @timeField.setObjectValue(ZeroDate)
	    end

	    def tick()
	     if @running
	            @elapsed = NSDate.date.timeIntervalSinceDate(@start)
	            d = ZeroDate.addTimeInterval(@elapsed + @accumulated)
	            @clock.setDateValue(d)
	            @timeField.setObjectValue(d)
	         end
	    end
	end
This recipe is pretty long-winded compared to the other GUI recipes, but that’s because it takes more words to explain how to use a GUI application than to explain how a block of Ruby code works. Once you’re familiar with Interface Builder, you can create complex Cocoa applications very quickly.
The combination of Ruby and Cocoa can make you very productive. Cocoa is a very big class library, and the GUI part, called AppKit, is only a part of it. There are classes for speech recognition, Bluetooth, disc recording, HTML rendering (Web-Kit), database (Core Data), graphics, audio, and much more. The disadvantage is that a RubyCocoa program is tied to Mac OS X, unlike Tk or wxRuby, which will work on Windows and Linux as well.
With Apple’s recent change to Intel processors, you’ll want to create “universal binaries” for your application, so that your users can run it natively whether they have a PowerPC or an Intel Mac. The Ruby code doesn’t need to change, because Ruby is an interpreted language; but a RubyCocoa application also contains Objective-C code, which must be compiled separately for each architecture.
To make a universal binary, select the top-most group in the “Groups & Files” list in Xcode (the one with the name of your project). Get Info on this (Command-I), go to the “Build” tab, select “Architectures”, and click the Edit button. Select both the PowerPC and Intel checkboxes, and your packaged application will include compiled code for both architectures.
See Also
While Ruby, Xcode, and Interface Builder come as standard with all Macintoshes, RubyCocoa does not (yet!); there is a standard installer, available from http://rubycocoa.sourceforge.net, which includes both the framework classes and the Xcode project templates
RubyCocoa comes with some documentation and a number of examples; however, once you know how to translate Objective-C messages to RubyCocoa messages, you can reference the huge amount of Cocoa documentation available via Xcode’s Help menu, and a large number of examples: there are also many useful and free add-on libraries and Interface Builder palettes, for instance from The Omni Group
Cocoa Programming for Mac OS X by Aaron Hillegass (Addison-Wesley)
Cocoa Programming by Scott Anguish, Erik M. Buck, and Donald A. Yacktman (Sams)
21.17. Using AppleScript to Get User Input
Problem
On Mac OS X, AppleScript makes it easy to add simple graphical interface elements to programs. You want to use AppleScript from a Ruby program.
Solution
Use the AppleScript library, written by John Butler and
available as the applescript gem.
It lets you talk to AppleScript from Ruby.
Here’s a script that uses the AppleScript class to get input through
AppleScript. It also shows off the AppleScript.say method, which uses Mac OS
X’s text-to-speech capabilities:
	require 'rubygems'
	require 'applescript'

	name = AppleScript.gets("What's your name?")

	AppleScript.puts("Thank you!")

	choice = AppleScript.choose("So which of these is your name?",
	                            ["Leonard", "Mike", "Lucas", name])

	if name == choice
	  AppleScript.say "You are right!"
	  picture = AppleScript.choose_file("Find a picture of yourself")

	  if File.exists?(picture)
	    AppleScript.say "Thanks, I will now post it on Flickr for you."
	    # Exercise for the reader: upload the file to Flickr
	  end
	else
	  AppleScript.say "But you just said your name was #{name}!"
	end
Discussion
The AppleScript library is just a simple wrapper around the
osascript command-line interface to
AppleScript. If you already know AppleScript, you can execute raw
AppleScript code with AppleScript.execute:
	script = 'tell application "Finder" to display dialog "Hello World!" ' +
	         'buttons {"OK"}'
	AppleScript.execute(script)
See Also
The manpage for
osascript, available online at http://developer.apple.com/documentation/Darwin/Reference/ManPages/man1/osascript.1.html
[1] This code will also work in irb, but it’ll look strange because
Curses will be fighting with irb for control of the screen.
[2] This actually happens at the end of HighLine.get_response, which is called
by ask.
[3] It’s actually a little better, because ARGF will iterate over standard input if
there are no files given in ARGV.
[4] Standard Curses doesn’t support color because it was written in the 1980s, when monochrome ruled the world.
[5] If, as in the other GUI recipes, we’d decided to format the time ourselves and display it as a string, we could set a shorter interval and make the fractions of a second whiz by.