
IN THIS CHAPTER
Truly one of the great things about Linux is its flexibility. You are not always forced to abandon your old platform or your favorite applications when you make the move to Linux. With enough hard drive space, you can dual boot Windows on a separate partition and share files across file systems. Tools exist that allow you to run many Windows applications directly in Linux. You can even emulate MacOS Classic without a PowerPC.
This chapter is all about using these tools. Some are built in to your SUSE Linux installation, others are freely available for download, and some commercial products are available to purchase as well.
You will learn about the Wine Windows emulation project and its Crossover Office commercial spinoff. Win4Lin is another commercial product that allows you to run Windows 98 or Windows 2000/XP applications directly in Linux. VMware uses a virtual machine approach to installing and running other operating systems and applications. Basilisk II is the MacOS emulator, and DOSBox recaptures some of the earlier days of personal computing. Finally, you’ll take a peek at a new project that’s been gaining a lot of attention recently, the Xen Virtualization Project.
When you install SUSE Linux on a computer that already has some form of Windows running on it, YaST will offer to run the two operating systems side by side. Linux will then repartition the computer, and the GRUB bootloader adds Windows to its list of boot options.
In this instance, SUSE Linux also creates a /windows directory to make all Windows files accessible to you directly in Linux. Depending on the file systems you are using on either side of your computer, you may not even notice a difference in how a file behaves.
MS-DOS and all versions of Windows up to the introduction of Windows NT ran on the File Allocation Table (FAT) file system. All Linux file systems (ext2, ext3, ReiserFS, XFS, JFS) fully support FAT. That is, you can open files from a FAT formatted volume, edit them, and save them either on the Linux volume or back to the FAT formatted volume. If you edit a Windows file in Linux and save it back to the same directory, you can open that file again in Windows.
The main reason this works so well is that FAT is not a permission-based file system. If you copy a Linux file to a FAT partition, the copy won’t have permissions attached to it, but it will be completely readable in the other OS.
Starting with Windows NT, Microsoft created a proprietary permissions-based file system called NTFS, which is the default file system in Windows 2000, 2003, and XP. The transition to this file system has been good for Windows users because NTFS uses disk space more efficiently than FAT, and having permissions on files and directories is more secure. Because Microsoft has not shared many of the details of the file system, Linux support is somewhat less transparent.
Thus, most files on an NTFS volume are read-only on Linux. You can still open and edit these files in a Linux application, but you cannot save the changes back to the NTFS volume. You can, however, save or copy a Linux file to a FAT-formatted floppy or Zip disk, and then open and save to an NTFS volume.
Note
You can play most multimedia (music and video) files stored on an NTFS partition in Linux. Because there’s no editing/saving going on, the only potential problem lies in support for the format. Linux multimedia player applications such as MPlayer and Helix support some Windows Media features. See Chapter 10, “Sights, Sounds, and Other Fun Things,” for more information.
If you edit a lot of files in both operating systems, you should strongly consider creating a small FAT partition to store your data files.
On the other side of the computer, Windows has no native support for reading any Linux file system. Some shareware applications enable you to view files on the Linux Extended File System (ext2 and ext3), but none of these currently support the SUSE Linux default file system: ReiserFS.
Learn more about Linux file systems in Chapter 18, “Managing Files, Volumes, and Drives.”
Essentially, there are two methods to accomplish the task of running applications across platforms. In the first method, an emulator “translates” an application’s calls to one operating system (such as Windows) to another (Linux). In the second method, an application builds a “virtual machine” that creates a second computer inside your computer. The virtual machine then hosts a file system and operating system just as any physical computer does.
In this section, you will learn about three emulators (Wine, DOSBox, and Basilisk II) and two virtual machines (VMware and Win4Lin).
Nothing’s perfect, and it’s very hard to reach seamless cross-platform computing nirvana. Before looking closely at each of these tools, you should know a few things that may diminish your excitement at this newfound capability.
Whatever tool you run from Linux, you won’t run your existing Windows applications from the Windows side of your computer. You will install a new instance of the application and will probably have to re-create your settings from scratch.
You cannot automatically use the same data (such as your Eudora mail queue) for both the Windows side and the Linux side. In many applications, you can import data from one side to the other, but changes made in one copy will not be reflected in the other copy.
Don’t install an emulator or virtual machine to run an application you don’t have. All these products will let you “run Word on Linux,” but you will need your own copy of Word to install and run. If all you need is a Linux application that will let you open and edit Word documents, use OpenOffice or another of the Linux office suites.
Choosing a name in the fine GNU recursive-acronym tradition, Wine Is Not (an) Emulator, or so it says. Nonetheless, this open source project has been helping Linux users run Windows applications for a long time.
As mentioned in the overview, Wine works by attempting to turn Windows system calls into Linux kernel calls, in part by making the Windows application think it is resting comfortably in a Windows directory.
The Wine environment is targeted for Windows 98, and so applications behave as though they were running under Windows 98.
So far, this is not a problem, but when Microsoft drops support for this operating system, other companies are likely to follow suit. Nonetheless, be careful when buying new applications that you want to run under Wine. Confirm that they will run under Windows 98, and then check the Wine applications database.
Getting Wine going is a two-step process. First, you must install the Wine package from YaST. This makes the Wine commands available, but does not create the environment or install any software.
An easy way to get things underway is to install the WineTools package from http://www.von-thadden.de/Joachim/WineTools. This gives you a simple GUI tool to configure Wine and install a few essential applications. Install this package via YaST or command line.
Note
Depending on your system and version of Wine, you may get a dependency error for xdialog. You can safely ignore this and install anyway.
When you have WineTools installed, go to a shell prompt (as user) and type wt2. The WineTools menu (see Figure 11.1) appears.
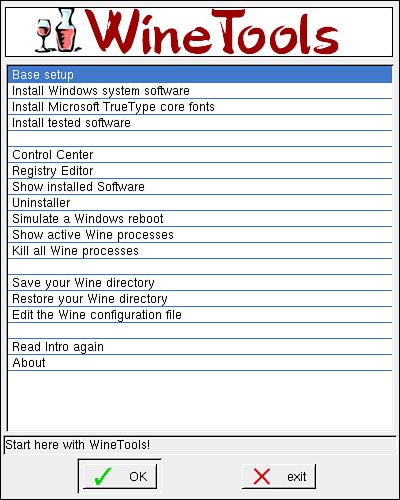
The WineTools menu is organized so that you run each tool in order and have a fully capable basic installation at the end. Begin with the Base Setup, which will create your fake_windows directories and handle the basic Wine configuration (see Figure 11.2).
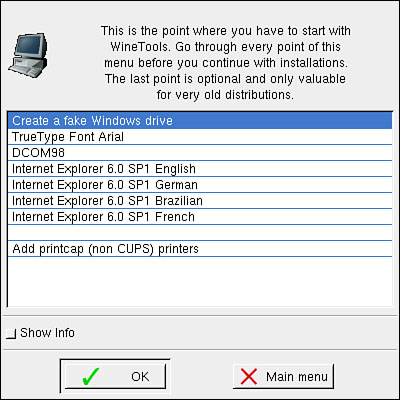
In addition to creating your Wine drive, use this menu to install DCOM98, an essential component for Microsoft Component Object Model (COM) applications, and Internet Explorer. When you’ve worked your way through this menu, click Main Menu to return.
Continue working through the WineTools menus to install Windows system tools and fonts. Then explore the list of tested software for common, downloadable applications. Although broken down into categories, the list is not comprehensive, but it will give you a good start.
When you have Wine up and running, installing new applications is no different from installing any others, as long as you remember to keep it within the Wine framework.
Before installing any new Windows application, consult the Wine Applications database at http://appdb.winehq.org. Search for the application you want to install, or browse through the categories. You’ll learn here what applications have worked for those who have tried; often included are helpful comments on imperfections, problems installing, and the like. Most, if not all, entries include links to the product website. This is especially helpful for downloadable applications.
Armed with information from the database, you can then install your favorite application. To do so, insert your installation CD-ROM. Open a shell and locate the install program with ls.
ls /media/cdrom
If the install program is setup.exe, type the following to launch it in Wine:
wine D:setup.exe &
The installation program should run the same as it would in Windows. It’s probably best to accept the program’s default settings during the installation. You can always experiment later.
Downloading applications in Internet Explorer and installing them is identical to the way you would do this in Windows.
Starting Wine applications can be tricky. Some applications conveniently store an icon in your desktop environment’s Wine menu. Others (QuickTime and Opera, for example) even place an icon on your desktop. More often, however, you are going to be working from the shell.
As indicated in the previous section, you then enter something of a land betwixt and between, including drive-letter references. To run Internet Explorer, for example, you need to type the following:
wine "C:Program FilesInternet ExplorerIEXPLORE.EXE " &
Make sure the quotation marks, the Windows-style backslashes, the spaces, and the capitalization are all exactly as you see it here.
Two other GUI alternatives exist: The Wine package comes with a very rudimentary file manager called Winefile, and locating and launching files is all it’s really good at. Unfortunately, you can’t even change the display so that it shows only executables. However, the free and powerful Windows file manager, PowerDesk 5, works nicely (although somewhat imperfectly) in Wine, as you can see in Figure 11.3.
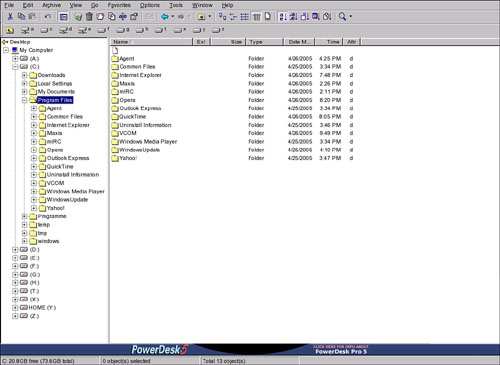
Figure 11.3. You can manage your Wine files easily with this third-party Windows file manager, VCOM PowerDesk 5.
The third option for the GUI inclined is to go to your desktop environment’s Control Panel and associate files with the EXE extension with Wine. You can then use Konqueror or Nautilus to locate and run your Wine applications.
Crossover Office is a commercial spinoff of the Wine Project. Codeweavers is a company founded by several Wine developers that first created the Crossover Plugin, allowing Internet Explorer plug-ins to run in all the major Linux browsers. This project was followed up with the Crossover Office suite.
Crossover Office allows its users to run Microsoft’s flagship products—Office, Internet Explorer, and Visio—along with several other high-profile Windows applications. Early versions of what is now the Novell Linux Desktop (see Appendix A, “Versions of Novell’s SUSE Linux,” for more information about this product) included Crossover Office, although it was dropped from the current version 9.
Win4Lin, formerly Netraverse, is a company that delivers Windows-on-Linux products for three different audiences:
Win4Lin 9x allows you to install and run a Windows 98 or Me virtual machine, along with any application.
Win4Lin Home is a low-cost ($29.95) emulator that uses 64MB of RAM to run its applications.
Win4Lin Pro is a virtual machine for Windows 2000 and XP that pledges to do for these permission-based operating systems what its sister products do for the consumer line of Windows.
You can order and download all three products directly from Win4Lin. All offer a GUI installation program.
After registering and downloading the RPM package from http://www.win4lin.com, open a shell and log in as the SuperUser. Go to the directory you downloaded the package to. Type rpm -ivh Win4LinPro-<version>.i386.rpm. This is one of those times when the shell’s file completion feature comes in handy, so entering the first few letters of the filename and then tabbing should work.
Next, you must confirm that you have a licensed copy of the target operating system (that is, Windows 95, 98, or Me for Win4Lin 9x/Home; Windows 2000 or XP for Win4Lin Pro). Insert your Windows CD into the drive. While still logged in as the SuperUser, type loadwinproCD (for Win4Lin Pro) or loadwin9xCD (for Win4Lin 9x/Home). This program will confirm your license and install the necessary components of the OS to your Linux system. You can load more than one OS using this command, provided you have the right CDs.
The third step in the installation is setting up the client environment. Log off as SuperUser and get back to a user account. Now type installwinpro. Win4Lin will find the version of Windows you installed and throw its configuration files in your Home directory, under /winpro/configuration (you can specify a different directory using the -d switch with this command). It also creates a Windows image file that is the basis for your virtual machine.
After completing the installation, you should back up the image file. Go to the /winpro directory, and type cp GUEST.IMG GUEST.IMG.backup. Do this periodically as well, before installing new software or updating Windows.
Launching Win4Lin is simple enough. From the shell, type win (for 9x) or winpro (for Pro). This will bring up the virtual machine (see Figure 11.4).

Figure 11.4. The Win4Lin Pro environment puts a complete Windows 2000 or XP virtual machine at your disposal.
Use the Winsetup tool to install new software and manage Win4Lin settings.
VMware Workstation 5.0 is another virtual machine (hence the VM) creator that enables you to run a variety of operating systems at the same time. VMware has separate host packages for Linux and Windows and supports clients for all varieties of Windows and several other Linux distributions. The virtual machine is complete, down to its own BIOS.
The chief problem with VMware is its resource hogginess. Even with a powerful machine with a fast processor and lots of memory, it is difficult to multitask with VMware running. The target audience for VMware primarily consists of cross-platform software developers and testers, along with system administrators. Developers can test their products on a single machine running Red Hat, Fedora Core, SUSE Linux, Novell NetWare, or any and all varieties of Windows. The system administrator can run tests to see what effect the latest Windows Service Pack or antivirus upgrade would have on their system.
This section will focus on running a Windows virtual machine on SUSE Linux.
Tip
Download a free 30-day trial of VMware Workstation at http://www.vmware.com/vmwarestore/newstore/wkst_eval_login.jsp.
You have a choice of installation packages for VMware Workstation, either RPM or standard tarball. You can use YaST to install the RPM or extract the tarball as the SuperUser from the shell. Consult the VMware User’s Guide (available from the Documentation section of the VMware website) for instructions.
Regardless of how you do the initial package installation, you then run vmware-config.pl, the Perl script that will help you configure VMware’s host program.
Read the configuration options carefully, but accepting the defaults is okay, too. To ensure that your virtual machines use the same network and Internet access you have with SUSE Linux, use the default Bridged Networking. Vmware-config.pl tells you when it has completed its task and returns the prompt to you. When it’s finished, exit out of your SuperUser shell and return to the plain user prompt.
The next step is running VMware and installing a guest OS. From the shell, type vmware & (or press Alt+F2 in your desktop environment and type vmware) to launch the application. You will be asked for a serial number included in your VMware box or the confirmation email for the downloaded product, and the home screen (see Figure 11.5) will appear.
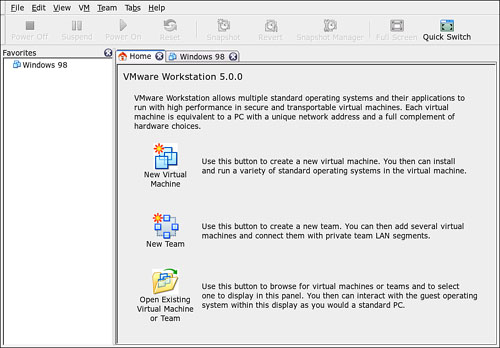
Click the New Virtual Machine button to begin the process of installing the client OS. Identify the OS you want to install, set up your basic configuration, and you’re set.
VMware will add a tab for this virtual machine to the main screen, looking much like Figure 11.6.
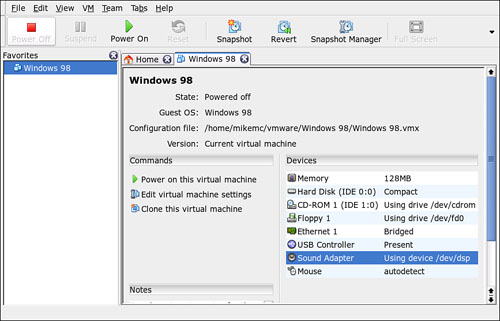
Insert the Windows CD into the drive and click Power Up. A window will open as if you have booted, and Windows will install. The virtual machine will take control of your mouse. When the installation is complete, run Windows Update so you can see what updates are required for your computer’s operating system, software, and hardware.
Then press Ctrl+Alt to release your mouse back to VMware and your Linux system. Finally, click the Snapshot button to back up the new system. Do this periodically; you can use the Revert button to go back to the last Snapshot if something bad happens along the way.
To install a new application in your virtual machine, power up the VM and then insert your CD. In Windows, the CD should autorun and install as per usual. If it doesn’t, run Windows Explorer and locate the installer on the CD.
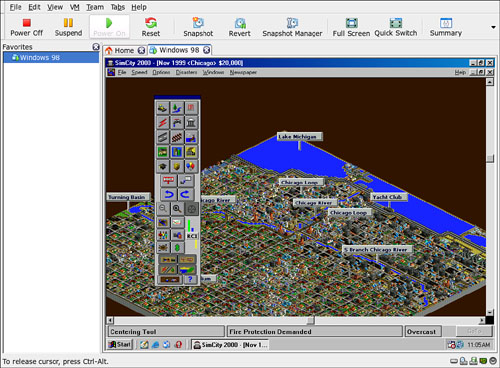
Running applications may not be 100% as responsive in the VM as in a more normal environment, but it’s pretty good. You will be able to discover the same errors in an application that would appear in the standard environment, which makes it good for testing. But games play well, too. See Figure 11.7.
Always remember to shut down your client operating system before exiting VMware.
The Apple Macintosh operating system, and the computers it powers, generates intense loyalty from its many users.
Many applications programmed for the Mac are indeed great. But because the MacOS was never designed to run on Intel PC chips, building an emulator, or even a virtual machine, is a difficult task. Credit Christian Bauer, the creator of Basilisk II, a free GPLed and stable MacOS Classic emulator, with rising to the challenge.
Basilisk II works on Linux, Solaris, FreeBSD, Windows, Amiga, and BeOS and will emulate any 68K version of MacOS up to 8.1 (although a port has been written for OS X). You need a valid ROM image from your Mac to make this work. This ROM image contains several applications, including the Mac Toolbox and QuickDraw, and is otherwise indispensable.
Basilisk II supports various Mac color displays and peripheral drivers. It will also connect to the Internet and your LAN.
But the task is not for the faint of heart. You will need to create Linux-readable Mac floppies to copy the ROM image. You will need to compile Basilisk II from source. You may have to download and install a new copy of the MacOS. Fortunately, you will find an excellent companion for this journey in “Basilisk II for Linux—Getting It Going from Start to Finish,” a tutorial from Marc Hoffman at http://os-emulation.net/basiliskII/system753_tutorial/linux. An active support forum also exists at http://sourceforge.net/forum/forum.php?forum_id=6132.
DOSBox and the venerable dosemu are DOS emulators you can install with YaST. dosemu can run all sorts of DOS programs, and it comes with a GPL version of DOS, called FreeDOS. DOSBox comes with a graphics package, making it particularly suitable for running games. If you are lucky enough to have a spare copy of Windows 3.x, you can install it under dosemu as well. Both applications can be installed by YaST, and DOSBox inserts itself into the KDE System menu.
dosemu is a little harder to run because it must run outside of X Window System the first time. This is done somewhat easily by launching a virtual console by pressing Ctrl+Alt+F1 (or any of the F keys except 7, which belongs to X).
You’ll be asked to log in with your password as User. To launch dosemu, enter the program name dosemu at this shell prompt.
You’ll be asked for a copy of DOS; pressing Enter will install FreeDOS. By default, your Home directory will be your C drive. You’ll then be presented with your C: prompt and can run any default program or install your copy of WordPerfect 5.1.
When you’re done with the Virtual Console, type exit and then press Ctrl+Alt+F7 to return to your X desktop.
Since 2003, researchers at Cambridge University in Britain have been working on a new method of virtualizing operating systems. Their project, called Xen, reached a critical mass of support in early 2005.
Unlike VMware, which builds a complete virtual machine, Xen is a hypervisor, a layer that doesn’t quite go that far. This technology vastly improves the performance of guest operating systems in tests to nearly native performance. This requires each OS kernel to be modified slightly to run on Xen. How SUSE Linux implements this is by using the standard kernel for a standard installation, and putting the Xen virtual machine into /var/tmp/dirinstall, and then using the bootloader application to boot to either the Xen kernel or the standard kernel.
Xen developers have ported several open source kernels, including the 2.4 and 2.6 Linux kernels, NetBSD Unix, FreeBSD Unix, and the Plan9 OS. So you can use Xen today to run several Linux distributions side by side with a copy of FreeBSD to spare. This might be entertaining for some users, but is especially useful to programmers hoping to solve distribution-related problems.
The key question for many users is whether Windows will join the list of supported OSs at some point. License restrictions prevented an early Windows XP port from being released. Intel is expected to release new processors in 2005 that will include a virtualization technology that will help Xen support Windows to some extent. You should not see all the performance you get with directly ported kernels, but the application support on these processors may well exceed Wine’s.
SUSE Linux 9.3 was the first Linux distribution to include a copy of Xen, even integrating it into YaST. Open the YaST Software page and you will see the option for Installation to Directory for Xen. When you select this module, a screen very much like the initial YaST install screen (Figure 11.8) will appear.
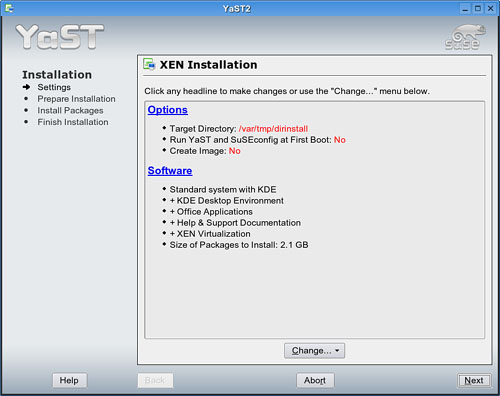
Figure 11.8. Installing SUSE Linux into a Xen directory via YaST is nearly identical to the standard installation. Use this screen to select the software to install, and to configure Xen-specific options.
Caution
Because Xen is relatively new technology, using it is not entirely for the faint of heart. You need to edit your bootloader files manually, and initialize a Xen-specific kernel. Though the risk of losing data is small, it is highly prudent to back up your data before going on this adventure.
Notice that the Target Directory where the Xen installation will go is var/tmp/dirinstall. This directory will host the Xen kernel and the associated virtual machine.
YaST will then check its installation source module for the location of its packages. If you have multiple sources (such as a Downloads directory for new RPMs) listed here, you may choose to disable everything but the standard install location, usually meaning your SUSE Linux CD. By default, YaST installs the Standard System with KDE, but you can install any variation of this by clicking the Change button at the bottom of this screen. When you have made your selections, click Next to begin installing the packages into the target directory.
Before trying to access this installation, however, you must edit (as the SuperUser) your /boot/grub/menu.lst file (after first backing it up). Add this entry at the bottom of the file:
###Add Xen to the bootlist###
title Xen 2.0

kernel (hd1,1)/xen.gz dom0_mem=393216
module (hd1,1)/vmlinuz-2.6.11.4-20a-xen root=/dev/hdb3 ro console=tty0
module (hd1,1)/initrd-2.6.11.4-20a-xen
Make sure that the numbers inside the (hd) parentheses are identical (1,1) to the first Linux entry, as the directory is located on the same physical hard drive. Save and exit from the editor.
SUSE Linux engineers recommend running these commands as the SuperUser in the shell:
To disable TLS support:
mv /lib/tls /lib/tls.disabled
To enable xend service:
chkconfig xend on
To enable xendomains service:
chkconfig xendomains on
Now create /var/tmp/dirinstall/etc/fstab with these values:
/dev/sda1               /                       reiserfs    defaults 1 1
none                    /dev/pts                devpts  gid=5,mode=620 0 0
none                    /dev/shm                tmpfs   defaults 0 0
none                    /proc                   proc    defaults 0 0
none                    /sys                    sysfs   defaults 0 0
Next, initialize the Xen kernel with these commands (this will likely take some time):
chroot /var/tmp/dirinstall/
mkinitrd -s off
The chroot command moves you into the target directory, so your commands from that point on will apply to the Xen installation, not your running system.
When mkinitrd is finished, type passwd to assign a Root password for the Xen installation. Lastly, enter these commands to link /proc/mounts to /etc/mtab:
ln -s /proc/mounts /etc/mtab
echo "mount -t proc proc /proc" >> /etc/rc.d/boot.local
echo "ln -s /proc/mounts /etc/mtab" >>/etc/init.d/boot.local
You should now be ready to reboot your system. When grub loads the bootloader menu, select Xen 2.0 from the list. Log in as Root with your password, and you should be able to add users (including yourself), and otherwise configure your “new” system.
Xen 3.0, expected late in 2005, will add direct support for 64-bit architectures, though the current 32-bit version 2.0.5 appears to work well enough in 64-bit machines.
http://www.winehq.org—The Wine Project headquarters. Be sure to vote for your favorite Windows application to be ported using Wine in the Applications Database section.
http://www.von-thadden.de/Joachim/WineTools—WineTools offers a relatively painless installation of Wine and a number of well-known free applications, including Internet Explorer.
http://www.codeweavers.com—Codeweavers, Inc., the makers of Crossover Office.
http://frankscorner.org—This site helps you get the most out of Wine. It includes FAQs and HOWTOs to get you through most problems.
http://www.vmware.com—VMware Inc., where you can get information and a free 30-day evaluation copy of this virtual machine.
http://www.win4lin.com—Win4Lin, helping people run Windows 98 applications and now Windows 2000/XP applications.
http://dosbox.sourceforge.net—The DOSBox site. Check on support for your DOS game and even find downloadable copies of some ancient games.
http://dosemu.org—The home of
dosemu, the DOS emulator.http://freedos.org—The FreeDOS project. Assorted applications to use in DOSBox or
dosemu.http://www.students.uni-mainz.de/bauec002/B2Main.html—Home of the Basilisk II MacOS emulator.
http://os-emulation.net/basiliskII/system753_tutorial/linux—A tutorial on installing and running Basilisk II on Linux.
http://www.cl.cam.ac.uk/Research/SRG/netos/xen—The Xen virtual machine monitor project home.