
In This Chapter
Even though the dot.com era is now considered history, its legacy, the Internet revolution, still remains and influences organizations to Web-enable their current and future portfolio of business solutions, regardless of complexity, at a dot.com pace. There is no question that today’s applications must reach the desktops of their target audience through a Web browser—the current application delivery medium of choice.
However, to serve a network of enthusiastic Web-based application users efficiently and effectively, organizations have had to culturally and technically shift away from their traditional approaches to software development, for example:
Adopt agile software development methodologies specifically geared toward rapidly capturing business requirements and the incremental development and testing of software components.
Build multilayered (presentation, business, and integration) component-based application architectures using Web-oriented technologies, such as J2EE, and reliable application infrastructures, such as WebLogic Platform.
Design and implement an end-to-end security infrastructure that encompasses every aspect of their Web-enabled business solutions.
Find mechanisms to allow interoperability between business solutions and the aggregation of data/information from multiple repositories.
Investigate techniques to seamlessly embrace emerging Web technology standards for business logic processing and communication, such as Web services.
In an ideal organization, all the preceding efforts would be practiced in a structured and coherent manner across all business landscapes (units). This practice allows business solutions to evolve from inception to implementation, using consistent and interoperable application and security infrastructures—hence the investments in future-proofing the technology infrastructure.
In reality, organizations have been quite successful in Web-enabling their business solutions. However, the adoption of consistent and interoperable application and security infrastructures between business units has not been successful, which is the underlying reason that organizations today face the following technical challenges:
The complexity and costs related to Enterprise Application Integration (EAI) efforts have overshadowed the actual software development efforts and costs.
A comprehensive, flexible, and unified security infrastructure cannot be established, which has the following effects:
Potentially prevents Web applications based on different technologies from leveraging and expanding on existing investments in the security infrastructure.
Hinders interoperability and integration (trust) between secure Web applications that have diverse application security models.
Prevents business units from protecting their security infrastructure investments, as their security policies become recast in synch with changing organizational business processes and policies.
Even though EAI can often be an afterthought in a software development effort, and is nearly always a costly process to implement because it is never an out-of-the-box solution, organizations are slowly meeting the EAI challenges through the following methods:
The custom development or purchase of application adapters and gateways, such as those application vendors develop using J2EE Connector Architecture (J2CA).
An enterprise messaging system, also known as Message-Oriented Middleware (MOM), which supports messaging for applications that span different operating systems and machine architectures. For example, the WebLogic Messaging Bridge, which is part of the WebLogic Server subsystem, enables you to pass messages between the following components:
Any two implementations of WebLogic Java Messaging Service (JMS), including those from separate releases of WebLogic Server
WebLogic JMS implementations that reside in separate WebLogic domains
WebLogic JMS with a third-party JMS product, such as IBM’s MQSeries
WebLogic JMS with a non-JMS third-party messaging product (although you need to obtain a custom adapter from the third-party vendor)
Web services, which provide a distributed computing technology for revealing an application’s business services on the Internet or an intranet using standard XML protocols/formats and open Internet standards, such as Web Services Description Language (WSDL, to describe), Universal Description, Discovery, and Integration (UDDI, to advertise and syndicate), Simple Object Access Protocol (SOAP, to communicate), and Web Services Flow Language (WSFL, to define workflows).
Note
The use of standard XML protocols allows Web services to be platform, language, and vendor independent, and ideal candidates for use in EAI solutions.
However, implementing security for a Web application can never be an afterthought, as in the case of EAI. Every Web application requires some level of security, with the top-tier objectives including:
Everyone is denied access unless specifically allowed access. This requires an authentication scheme, a process by which an entity, such as WebLogic Server, verifies the identity presented through a request, such as by an end user. This process usually requires some form of credential information being passed, such as a password known only to the end user.
The application’s security model must enforce business policies concerning which authenticated requests have access to which application resources. This process is known as authorization.
Auditing who is accessing the Web application and how application resources are being utilized.
The data flow between the client and the Web application must be understood and categorized, with data that’s considered intellectual assets or confidential protected through an encryption mechanism while in transit.
Because every organization is unique in its internal behavior, the reasons behind organizations having arrays of non-interoperable security infrastructures can be endless, as shown in the following examples:
A federated approach is used to develop Web applications, which sometimes carries the weight of a non-unified and legacy perception of how security objectives are implemented. These legacy security perceptions include the following:
All Web applications are unique and, therefore, have unique security objectives that require their own security infrastructures.
Security mechanisms can be home-grown, and integrating with a commercial security vendor is considered too expensive, too complex, and overkill.
A Web application’s security objectives should be derived from its implementation technology capabilities.
Developers should be accountable for implementing security objectives and policies for a Web application.
Security objectives and policies should be managed, enhanced, and evolved only in the context of a Web application.
Purchased vendor-driven Web applications come bundled with proprietary security mechanisms.
Ghost technical and political decision logic is used that only a select few understand—this type of logic is referred to as organizational paranormal activity.
As the demand for sophisticated Web applications increases in organizations—for example, portal solutions that consolidate functionality and content and demand personalization services based on the end user’s identity—organizations must seek to manage all aspects of a user’s online identity in a coherent manner across the enterprise. This concept, known as identity management, embraces the principles of single sign-on, in which an end user is authenticated only once to access an enterprise Web application, instead of requiring a login to each individual enterprise system for which access is required. To reach this security nirvana, organizations must approach Web application security from a systemic point of view. This implies that all areas of an organization’s security requirements and infrastructure must be considered together.
The following sections outline two basic best practices that organizations have successfully used to standardize, evolve, and simplify an identity management system for their Web applications.
All organizations must be aware of the types of IT infrastructures used to support their business solutions. Using techniques such as cataloging organizational infrastructure patterns and developing technology taxonomies, organizations can quickly develop an inventory list of existing IT infrastructures and forecast the types of technologies required to implement future business solutions. Your organization’s technical agility is greatly influenced by how it uses this information to leverage existing technology investments and justify the acquisition of new IT infrastructures.
The most practical and efficient way to manage and evolve a security infrastructure from a systemic perspective is to bring together technology and business advocates from different aspects of an organization who have a passion for enterprise security—the Security Group. The Security Group should be formally recognized in the organization with a charter to standardize, evolve, and simplify over time how a security infrastructure is adopted and used. Tasks related to this charter should include the following:
Quantify the enterprise risk and associated costs of the following factors:
The temporary or permanent loss of data
The theft of data or identity
The disruption of application availability
The cost of preventing illegal data and identity use
The loss of productivity and revenue from the disruption of application availability caused by a breach in security
Develop and refine a corporate security policy. Because no security policy is generically applicable to all enterprises, each enterprise must determine the appropriate amount of risk for the information it disseminates. In practice, it is the business unit’s responsibility to leverage and, at a minimum, be compliant with the corporate security policy.
Review and advocate industry security standards for existing and emerging technologies.
Review the capabilities of security infrastructure products against the organization’s security needs.
Based on knowledge gathered from risk assessment and supporting security policies’ requirements for a Web application, the Security Group should work with business units to promote a flexible and interoperable security infrastructure standard for the organization’s applications (for example, firewalls, network intrusion detection system, antivirus systems, authentication and authorization systems). The proposed infrastructure should accomplish the following:
Be flexible enough to encompass the needs of all current mission-critical Web application technology platforms, while striving to take advantage of new security technologies as they emerge.
Reduce the cost and administrative burden of managing and authenticating user identities that can span multiple business units.
Before the Internet revolution, many applications were developed with the presentation and business logic tightly coupled together, as is the case in the client/server paradigm. This approach caused problems for organizations that wanted to take advantage of implementing Web interfaces for their applications. For this reason, many organizations had to painfully re-create their applications to separate business logic from presentation logic.
Having learned their lessons, organizations today take advantage of J2EE and the concept of abstracting presentation logic from business logic to develop their Web applications. However, only a few organizations have been able to take this concept forward to build abstractions in other areas, such as security.
For Web applications to leverage a common security infrastructure, a level of abstraction for security must be created. This approach avoids the following:
Application developers having to write security-aware code.
Modifying application code to be aligned with new security policies.
Redeploying and certifying an application after security code has been changed.
Administrators being aware of J2EE infrastructure and other supporting technologies related to application deployment, such as XML.
The bottom line is that organizations that have not begun to abstract security code from their application code will have to re-architect their applications to implement the same kind of abstractions for security so that they can leverage the next new wave of security infrastructures.
The following sections introduce the completely redesigned security service-oriented architecture of BEA WebLogic Server 7, which provides a comprehensive, flexible security infrastructure designed to address the security challenges of Web applications. The WebLogic Server security services can be used standalone to secure WebLogic Server applications or with any best-in-breed third-party security management solutions that your organization has standardized on.
WebLogic Server 7 provides a new flexible, extensible, and open security architecture, which has been derived from the following security industry trends and best practices:
There should be a clean and elegant abstraction between security policy and business logic, which makes J2EE application security easier to deploy, manage, maintain, and modify as requirements change.
There should be a simple declarative interface for managing security policies in real time, which makes security administration more efficient.
The security framework delivered through an application infrastructure should enable cooperation with the rest of an organization’s security ecology through a framework that can support a security vendor’s full value proposition, not just a subset.
The security framework delivered through an application infrastructure should provide unified protection for all container resources, for example JSPs, servlets, EJBs, J2CA adapters, Java Database Connectivity (JDBC) connection pools, and JMS destinations.
The security framework delivered through an application infrastructure should comply with all the J2EE 1.3 security requirements, such as Java Authentication and Authorization Service (JAAS) for objects related to authentication and authorization, JSSE for communication using Secure Sockets Layer (SSL) and Transport Layer Security (TLS), and the
SecurityManagerclass for code-level security.
In essence, WebLogic Server promotes having security enforcement performed outside the application by providing essential integration or plug-in points. These plug-in points provide an efficient mechanism to integrate best-of-breed security solutions and a means to replace security system components with the latest technologies.
This security plug-in scheme is based on a set of Security Service Provider Interfaces (SPIs) for plug-in points. The current Security SPIs available for WebLogic Server include Authentication, Authorization, Auditing, Credential Mapping, Role Mapping, and Public Key Infrastructure, which supports the Java-standard keystore for encrypted storage of public and private encryption keys.
Note
Security providers are modules that provide security services to applications hosted on WebLogic Server.
The Security SPI scheme implies that customers have four choices for securing WebLogic Server installations, as follows:
Using the out-of-the-box BEA-supplied security plug-ins.
Using third-party security plug-ins based on the BEA Security SPI interface.
Using the BEA Security SPIs to create customized security plug-ins for WebLogic Server systems.
Adapting existing third-party security technologies so that they are BEA-compliant.
With this new WebLogic Server SPI approach to implementing security, the following is possible:
Security solutions can be mixed and matched to create end-to-end custom security solutions for WebLogic Server–hosted applications, from the mainframe to the Web browser.
Multiple plug-ins for a given security function can be leveraged, and constraints can be set that govern which product or protocol is used in a given situation.
Security plug-ins can be swapped, as required, which enables organizations to
Not be bound to non-evolving vendor security solutions because security infrastructures can change over time to meet organizations’ requirements.
Reduce their total cost of ownership.
Maximize their return on investment in security infrastructure.
Possess substantial technical agility in utilizing their security infrastructures.
The WebLogic Administration Console can be used to provide a unified management interface for administering security rules, security policies, and security providers.
The following section describes how WebLogic Server can be leveraged to provide security to J2EE applications.
WebLogic Server, as illustrated in Figure 26.1, receives inbound requests and directs them to the appropriate J2EE container—Web or EJB. After the container receives a request targeted at an object it contains, it delegates the complete request and its entire context to the security service. The framework returns a yes or no decision on whether to grant the request. This approach takes business logic out of the security equation by providing the same information to the security system that is available to the target object. They each use this information to fulfill their dedicated responsibility:
The container serves as the security policy enforcement point.
The security service serves as the security policy decision point.
The J2EE object executes business logic.
As illustrated in Figure 26.1, a basic security setup of J2EE applications deployed to WebLogic Server 7 can also include the elements described in the following sections.
The demilitarized zone (DMZ, as it’s known in the network community) is a perimeter network used to protect a specific trusted network environment from direct exposure to an untrusted (external network) environment. To define a DMZ, you first must identify the network environment you need to protect and then identify all the entrance points (front and back doors) to that network. In most cases, the entrance point is a Web server connected to the Internet or an untrusted intranet.
A firewall is typically a hardware appliance used for the following:
Instituting a secure access policy for crossing a network’s perimeter. For example, allowing only authorized traffic to pass from an untrusted network environment, such as the Internet, to a DMZ.
Protecting the Web server from malicious attacks, such as Denial of Service (DoS) attacks and widespread outbreaks of increasingly sophisticated and damaging viruses, such as Nimda, Code Red, and Love Bug.
Performing Network Address Translation (NAT), which hides Web server addresses in the DMZ from the Internet. For example, from the Internet the Web server’s address might appear to be 202.123.64.55, but the DMZ network sees the Web server at address 10.9.8.1. Hence, NAT also allows the Web server to differentiate between inbound requests from the Internet and requests from the internal network.
A Web server can be leveraged to serve a J2EE application’s static content. Dynamic content requests to servlets or JSPs are delegated via the Web server’s proxy plug-in to WebLogic Server. Using a Web Proxy server does have its advantages, as you can leverage existing infrastructure and any firewall policies for the Web tier, which prevents direct connections to WebLogic Server.
Connection filters are a type of firewall that WebLogic Server can be configured to use. They can be configured to accept or deny incoming connection requests from a network client based on the origin of the request or the type of connection protocol used. For example, you can ensure that all access to the WebLogic Server application is secure from the Internet by denying any non-SSL connections originating from outside your corporate network.
Lightweight Directory Access Protocol (LDAP) is a standardized protocol, derived from X.500, for building, accessing, and managing a hierarchical database. A hierarchical structure is especially useful for storing identities, access groups, or roles for the purposes of authentication. LDAP was originally created to be a trimmed-down, lower-overhead version of the international X.500 directory protocol standard.
Within the context of a LDAP registry, identities (users) are defined as a Distinguished Name (DN), which is a compound definition composed of the following elements:
Common Name—. Abbreviated as cn, usually consists of the user’s first name and last name.
Organizational Unit—. Abbreviated as ou, often a department name.
Organization—. Abbreviated as o, usually the business owning the Organizational Unit.
Country—. Abbreviated as c.
Each element represents a branch of a tree, with the Common Name being the leaf. For example, Figure 26.2 represents the LDAP structure for the DN composed of cn=Admin, ou=Research, o=Objectmind, and c=US.

For the following reasons, LDAP is an appealing identity management directory choice for organizations wanting to consolidate their user, group, and role information at a corporate level:
The LDAP directory provides a single registry for defining and storing a user community.
Users defined in the LDAP directory can have mappings to identities on multiple platforms. For example, LDAP can be used to unify both Windows and Unix user and group information.
LDAP provides abstraction for users in the enterprise network, which implies that user identities are passed to application servers in the same format, regardless of the platform origin or destination.
LDAP directories can be replicated across multiple servers, supporting load-balancing and high availability efforts.
LDAP uses TCP/IP for communication and can also be configured to run over SSL for secure communications.
LDAP provides a single authentication point for users, which is a modular approach to upgrading security infrastructure.
The following vendors provide LDAP-compliant directory servers:
This section describes the architecture of the WebLogic Security Service. As shown in Figure 26.3, the architecture comprises four major components, which are discussed in the following sections.
The primary function of the WebLogic Security Framework is to provide a simplified application programming interface (API) that security and application developers can use to define security services. The framework comprises interfaces, classes, and exceptions located in the weblogic.security.service package.
The WebLogic Security Framework also acts as an interface between the WebLogic containers (Web and EJB), the Resource Adapter, and the security providers, delegating requests to the appropriate security plug-in through the corresponding SPI.
Security in WebLogic Server is based on a set of Security Service Provider Interfaces (SSPIs) for developing security providers that can be plugged into the WebLogic Security Framework to provide security services to WebLogic applications. Security providers are developed by implementing the appropriate SSPIs from the weblogic.security.spi package to create runtime classes.
The current security SPIs available for WebLogic Server include Authentication, Authorization, Auditing, Credential Mapping, Role Mapping, and Public Key Infrastructure.
The WebLogic Security Framework knows what security providers are installed, when they should be used, and how decisions should be made. However, it is not the decision maker on security; these decisions are brokered to security providers.
The primary role of a security provider database is to store the data the security provider requires to provide a security service, as in these examples:
The Authentication provider requires information about users and groups.
The Authorization provider requires information about security policies.
The Role Mapping provider requires information about security roles.
The Credential Mapping provider requires information about credentials.
Types of security provider databases include a relational database that has been structurally aligned with the requirements of a security provider, a properties file, and an LDAP server.
By default, a complete embedded LDAP server is provided out-of-the-box with WebLogic Server to support the WebLogic Authentication, Authorization, Role Mapping, and Credential Mapping security providers. You can use this WebLogic-embedded LDAP server to do the following:
Access and modify entries in the LDAP server.
Use an LDAP browser to import and export security data into and from the LDAP server.
Read and write access by WebLogic security providers.
A WebLogic LDAP server is created for each WebLogic Server instance in a domain. However, the WebLogic LDAP server associated with the WebLogic Administration Server is considered the master LDAP server. The information stored in this LDAP server is managed by the WebLogic Administration Server via the Administration Console, and then replicated to the other WebLogic LDAP servers associated with the domain’s managed servers. You can configure properties of the master WebLogic LDAP server, such as backup, cache, and replication settings, via the Administration Console as follows:
Ensure that your WebLogic Server is started and you can launch and log in to your Administration Console from a Web browser.
Click your WebLogic domain node in the left pane of the Administration Console.
Click the Security tab in the right pane, and then click the Embedded LDAP tab. As shown in Figure 26.4, you can modify the following attributes of the WebLogic LDAP server:
Credential—. The administration (cn=Admin) password required to connect to the LDAP server—for example, from an LDAP browser. If this password has not been set, the default is set to null, which needs to be changed to connect to the LDAP server.
Backup Hour—. The hour at which to back up the embedded LDAP server data files. This attribute is used with the Backup Minute attribute to determine the time at which the embedded LDAP server data files are backed up. At the specified time, WebLogic Server suspends writes to the embedded LDAP server, backs up the data files into a zip file in the
ldap/backupdirectory, and then resumes writes. The default values for these attributes are 23 (hours) and 5 (minutes), respectively.Backup Copies—. The number of backup copies of the LDAP server data files. This value limits the number of zip files in the
ldap/backupdirectory. The default is 7.Cache Enabled—. Specifies whether a cache is used when a managed server is reading or writing to the master embedded LDAP server running on the administration server.
Cache Size—. The size of the cache (in KB) used with the embedded LDAP server. The default is 32KB.
Cache TTL—. The time-to-live (TTL) of the cache in seconds. The default is 60 seconds.
Refresh Replica At Startup—. Specifies whether a managed server should refresh all replicated data at boot time. This attribute is useful if you have made a large number of changes when the managed server is not active, and you want to download the entire replica instead of having the administration server push each change to the managed server. The default is false.
Master First—. Specifies that connections to the master LDAP server (running on the administration server) should always be made instead of connections to the local replicated embedded LDAP server.

After you have modified your LDAP server’s Credential attributes and rebooted your WebLogic server, you can view the contents of your WebLogic LDAP server by using any LDAP browser, such as Softerra’s LDAP Browser 2.5 (http://www.ldapbrowser.com) or the University of Chicago’s LDAP BrowserEditor (LBE) Java utility, which are freeware.
To use an LDAP browser to navigate the hierarchy of the WebLogic LDAP server, use the following LDAP connection information:
Set the Host field to
localhostor your WebLogic Server’s hostname.Set the Port field to
7001(7002 if SSL is being used).Set the Base DN field to
dc=mydomain(mydomainis the name of your WebLogic domain).Set the User DN field to
cn=Admin.
Figure 26.5 shows the contents of the WebLogic LDAP server using the Softerra LDAP browser.

Because this LDAP server is specifically structured to support the WebLogic security providers only, you cannot add attributes to its structure.
Security providers are basically modules that plug in to the WebLogic Security Framework to provide security services to applications. After receiving a security-related request, the WebLogic Security Framework manages security processing by delegating request processing to a WebLogic, third-party, or custom security service provider through the corresponding SPI. This delegated approach to security enables WebLogic Server to route all information necessary to each kind of service provider so that applications can take full advantage of the available specialized security services.
The following sections describe the types of security providers you can use with WebLogic Server and the WebLogic security providers that are bundled, by default, with WebLogic Server.
WebLogic Server users must be authenticated whenever they request access to a protected WebLogic resource. The objective of Authentication providers is to validate the identity of these connecting users, thus establishing trust with their identities. The typical types of authentication schemes that Authentication providers use include the following:
The WebLogic Authentication provider supports delegated username/password authentication and leverages the embedded WebLogic LDAP server to store associated user and group information.
During a simple authentication process, a user provides a username and password combination to WebLogic Server. This authentication request is then delegated through the WebLogic Security Framework to the PrincipleAuthenticator component of the Authentication provider, which serves as the policy enforcement point for all authentication and identity assertion requests. As illustrated in Figure 26.6, the PrincipleAuthenticator leverages three additional components to authenticate a user’s identity.
A LoginModule, which is based on the JAAS, is responsible for authenticating all username/proof-based authentications (for example, username/password or username/secure-id) and populating a subject with the necessary principals (users and groups).
As illustrated in Figure 26.7,
A principal is an identity assigned to a user or group as a result of authentication.
Subjects are considered containers for all authentication information, including principals.
As part of a successful authentication, principals are signed and stored in a subject for future use via subjects.
Because subjects need to be propagated between one process boundary and the next, when this subject propagation occurs, it is important that the subject’s principals are not tampered with. For example, LoginModules can be executed remotely on behalf of RMI clients, and the client’s application code can retain the authenticated subject between programmatic server invocations.
To provide additional security protection for principals contained in the subject, a PrincipalValidator is used to digitally sign each principal within a subject. Hence, when a caller attempts to access a principal within a subject, the PrincipalValidator is used to verify that the principal has not been altered since it was signed.
The process of identity assertion involves establishing a client’s identity by using client-supplied tokens that can exist outside the request, such as Kerberos, Security Assertion Markup Language (SAML) assertions, Checkpoint’s OPSEC, and Microsoft Passport.
When used in concert with the JAAS LoginModule, an IdentityAsserter provides single sign-on (perimeter-based authentication), in which the IdentityAsserter’s function is to validate and map a token to a username. After this mapping is complete, the LoginModule can be used to convert the username to principals, populate the JAAS subject, and, therefore, tie the identity of the user together.
In the previous version of WebLogic Server, role definitions were contained in J2EE-compliant deployment descriptors and stored in the WebLogic container. Hence, these role definitions were static and required re-editing the deployment descriptors and redeploying the application for new roles to be activated. Therefore, WebLogic administration needed to understand not only J2EE, but also XML to enforce new role definitions for users.
The objective of the Role Mapping provider is to determine the dynamic roles associated with a specific user (a JAAS subject) who has requested access to a protected WebLogic resource in the Web or EJB container. This information is supplied to the Authorization provider, which decides, based on receiving this security role information, whether the user is granted or denied access to the requested resource.
Note
A WebLogic resource is a structured object used to represent an underlying WebLogic Server entity, which can be protected from unauthorized access by using security roles and security policies. Examples of WebLogic resources include administration, application, EJB, JDBC, Java Naming and Directory Interface (JNDI), and Web services resources.
Figure 26.8 illustrates the following mechanics and internals of the Role Mapping provider:

A resource request comes into WebLogic container and issues
getRole()on theRoleManagerwithin the Security Service.The
RoleManagerdelegates the request to the appropriateRoleMapperthat has been installed and configured.The
RoleMapperpulls role information associated with the request from a variety of sources, such as the following:From the associated subject, it can extract the user and group principals formed during the authentication process.
From a role entitlement policy engine, it can review the rules for generating roles for the subject.
Via the
ContextHandler, it can review the context of the request object.
Based on the retrieved information, the
RoleMapperissues a set of roles, if any, that the Authorization provider will use for authorization decisions.
This new approach to role assignment allows the following:
The consumption of all security role information from deployment descriptors into the Security Service, which then makes role information available to the service providers, thus preserving existing efforts in J2EE compliancy.
The management of role definitions and assignments without editing deployment descriptors.
Role assignments to be based on context—for example, real-world conditions of business.
The default WebLogic Role Mapping provider leverages the same security policy engine as the WebLogic Authorization provider and supports the dynamic deployment and undeployment of roles within the WebLogic Security Framework.
The Authorization provider controls interactions between users and WebLogic resources based on the user’s identity (subject). In the previous version of WebLogic Server, all decisions on granting or denying access to container objects were held and made in the WebLogic container (Web or EJB). Access decisions to external container resources, such as JNDI, JMS, and JDBC, were made in other parts of WebLogic Server via access control lists (ACLs) in the respective realm.
Note
ACLs are Java classes that were used to control access to computer resources. Each entry in the ACL contained a set of permissions associated with a particular principal that represented an individual user or a group of users.
In this release of WebLogic Server 7, all resource object authorization decisions are delegated to the security service from the container, which provides a unified role-based authorization scheme for all WebLogic resources.
Figure 26.9 illustrates the following mechanics and internals of the Authorization provider:
Whenever a WebLogic container needs to make an authorization decision, the container delegates the authorization request to the Authorization Manager of the Security Service via
isAccessAllowed().All authorization requests are managed by the Authorization Manager component of the Authorization provider, which serves as a policy enforcement point for all authorization decisions.
The Authorization Manager then calls the
RoleMapperto retrieve what roles are assigned to the caller.This role information is then passed to the Access Decisions. Similar to LoginModules for Authentication providers, an Access Decision is an Authorization provider component used to determine whether a subject is entitled to perform an operation on a WebLogic resource. Similar to a
RoleMapper, an Access Decision can do the following:Look into the subject (who the user is) and what groups the user belongs to.
Look into the initial request via the
ContextHandler.Retrieve rules for making decisions from the authorization policies database.
Given this information, the Access Decision responds with a result of PERMIT, DENY, or ABSTAIN.
If more than one Authorization provider is configured in a security realm, the Adjudication component is then used to resolve any authorization conflicts. An Adjudication provider can also specify what should be done when an answer of ABSTAIN is returned from a single Authorization provider’s Access Decision.
The default security realm for WebLogic Server includes a WebLogic Authorization provider that uses a policy-based authorization engine to return Access Decisions. It also includes a WebLogic Adjudication provider, but because the default security realm has only one Authorization provider, only one Access Decision is produced, so the WebLogic Adjudication provider is not used.
In the WebLogic Server security architecture, an Auditing provider is used to provide auditing services. As illustrated in Figure 26.10, the Auditor is the interface of the WebLogic Security Framework that calls into each Auditing provider (audit channels) and enables audit event recording. For example, the WebLogic Security Framework can call an Auditor before and after security operations (such as authentication or authorization) have been performed.
The decision to audit an event based on specific audit criteria, including audit severity levels, are made by one or more audit channels. All audited events report to one or more configured audit channels. These audit channels can write audit information to output repositories, such as an LDAP back end, a database, or a simple text file.
WebLogic Server comes bundled with a default Auditing provider that administrators can configure to detect and log authentication attempts, access attempts, and other significant security events. Because the WebLogic Security Framework supports simultaneous use of multiple audit channels, integrating more sophisticated auditing schemes with third-party auditing tools is easy.
To provide seamless interoperability, WebLogic applications that interact with external Enterprise Information Systems (EISs) with built-in security systems, such as back-end databases, packaged applications, or legacy mainframe systems, need to associate a WebLogic Server user to the credentials required to access that EIS.
The Credential Mapping provider’s role is to provide these credential mapping services and, therefore, bring new types of credentials into the WebLogic Server environment. These credential maps basically allow JAAS subjects that have already been authenticated to log in to a remote system.
In general, the credential mapping process (shown in Figure 26.11) is initiated as follows:
An application component, such as Resource Adapters, JSP, servlets, or EJBs, makes a call through its container to the Credential Manager of the WebLogic Security Framework. The information passed to the Credential Manager includes the JAAS subject making the request, the WebLogic Server resource identifier, and the type of credentials required to access the external system.
The Credential Manager sends the application component’s request for credentials to a configured Credential Mapping provider that handles the type of credentials requested by the application component.
The Credential Mapping provider consults the legacy system’s database to obtain a set of credentials that match those requested by the application component.
The Credential Mapping provider returns the credentials to the Credential Manager.
The WebLogic Security Framework passes the credentials back to the requesting application component through the resource container.
The application component uses the credentials to access the external system.
A Credential Mapping provider can handle several different types of credentials, such as username/password combinations, Kerberos tickets, and public key certificates, which can be set through the Resource Adapter’s deployment descriptor (the weblogic-ra.xml file) or the Administration Console.
If you decide to specify credential mapping via the weblogic-ra.xml file, the mapping is specified in the <security-principal-map> element, which provides the association between credentials used to log in to the EIS and credentials used to authenticate to WebLogic resources. Listing 26.1 shows a sample credential map between raruser (a WebLogic user) and a ResourceID (an EIS remote user) in the weblogic-ra.xml file.
Example 26.1. A Sample Credential Map
    <security-principal-map>
      <map-entry>
        <initiating-principal>raruser</initiating-principal>
        <resource-principal>
          <resource-username>ResouceID</resource-username>
          <resource-password>ResourcePW</resource-password>
        </resource-principal>
      </map-entry>
    </security-principal-map>

<initiating-principal>raruser</initiating-principal>
        <initiating-principal>javajoe</initiating-principal>
        -<resource-principal>
            <resource-username>scott</resource-username>
            <resource-password>tiger</resource-password>
        </resource-principal>
However, this deployment descriptor technique for creating credential maps is deprecated in this release of WebLogic Server. Instead, you should use the Administration Console to create credential maps, which are persisted to the WebLogic LDAP server. To configure WebLogic Server Resource Adapter to authenticate to an EIS using the Administration Console, follow these steps:
In the left pane of the Administration Console, expand the Connectors node.
Right-click your Resource Adapter and click the CredMaps link. The Cred Maps tab appears, which displays all credential maps defined in the configured Credential Mapper.
Enter a user’s name and password in the remote application.
Click Apply to store the information in the embedded LDAP server.
Right-click your Resource Adapter and click the RoleMaps link.
In the displayed Role Map tab, enter the following:
The WebLogic Server username for the remote user.
The username you defined when creating the credential map.
Click Apply.
The default (active) security realm for WebLogic Server includes a WebLogic Credential Mapping provider that can be used to map a WebLogic user/group to the username-password credentials required to access an EIS. During application deployment, WebLogic Server reads the credential mapping from the weblogic-ra.xml deployment descriptor and populates the default (WebLogic) Credential Mapping provider. At this point, you can manage credential mappings by using the Administration Console. WebLogic Server’s embedded LDAP directory stores the encrypted username-password pair for every valid combination of principal and back-end system. However, credential mapping changes made via the Administration Console do not get persisted to deployment descriptors.
One of the most crucial concerns in any business transaction is the identity of entities in a transaction. As transactions shift from being paper based to electronic messages and documents, confidence in traditional (human) trust factors must also transition to electronic security measures to authenticate and guarantee confidentiality, integrity, and non-repudiation between transactional entities. WebLogic Server implements this electronic trust mechanism through the use of the PKI cryptography technique via SSL.
Note
Cryptography is fundamentally based on keys used to encrypt and decrypt data with a secret private key (symmetric) or public key (asymmetric).
In public key cryptography, a public and private key are created simultaneously for WebLogic Server by using the same algorithm from a Certificate Authority (CA), such as VeriSign. The public key is embedded into a digital certificate with additional information describing the owner of the public key, such as name, street address, and e-mail address. The data embedded in a digital certificate is also digitally signed with the CA’s digital certificate.
Note
A key is typically a variable value applied by using an algorithm on a string of unencrypted text to produce encrypted text or to decrypt encrypted text. The length of the key is a factor in considering how difficult it will be to decrypt text in a message.
Both keys are related so that data encrypted with the public key can be decrypted only by using the corresponding private key. However, it’s not computationally feasible to derive the private key from knowledge of the public key. The private key is carefully protected so that only the owner can decrypt messages. Therefore, the private key is never shared with anyone or sent across the Internet and is supplied only to the requesting party (WebLogic Server). The public key is made publicly available (as part of a digital certificate) in a directory that all connecting entities can access.
After you have obtained private keys, digital certificates, and trusted CAs, you need to store them so that WebLogic Server can use them to authenticate SSL connections. Digital certificates can be stored only in a file in the WebLogic domain directory. However, private keys and trusted certificate authorities can be stored in a file in the WebLogic domain directory or in a keystore.
Note
▸ For a description of how to configure SSL for WebLogic Server, see “Configuring the Network Resources for a WebLogic Domain,” p. 798, in Chapter 24, “Administering and Monitoring Your WebLogic Domain.”
A keystore is a mechanism designed to create and manage private keys and trusted CA certificates (public keys). To locate a keystore and make it available to WebLogic Server, you need a Keystore provider.
The WebLogic Keystore provider uses the JDK-bundled Java Keystore (JKS) provider, which implements the keystore as a file (one per machine) and protects each private key and keystore with an individual unique password.
The following utilities bundled with WebLogic Server can be used to create a keystore and to load private keys and trusted CA certificates into the keystore:
The WebLogic
ImportPrivateKeyutility, which enables you to take private key files and load them into a keystore. This utility creates a keystore if one does not exist.Sun Microsystem’s
keytoolutility, which generates a private key/digital certificate pair and then imports the signed private key into the keystore.
You can create one keystore for both private keys and trusted CA certificates or create two keystores—one for private keys and one for trusted CA certificates. BEA recommends creating two keystores.
By default, WebLogic Server looks for a private key keystore named wlDefaultKeyStore.jks in your WebLogic directory. The keystore for trusted CA certificates can use the demonstration trusted CAs (WL_HOMEserverlibcacerts) or a trusted CA available from Sun’s JDK located at jrelibsecuritycacerts.
Note
The WL_HOMEserverlibcacerts file should be used for demonstration or testing purposes, not in a production environment. This file contains trusted certificate authorities in jrelibsecuritycacerts.
Configuring a WebLogic Keystore provider is an optional step. For example, if private keys and digital certificates are stored in files, you do not need to configure the WebLogic Keystore provider. You can also use a JKS keystore without using a WebLogic Keystore provider by specifying the location in the WebLogic Server startup script.
If you are upgrading from WebLogic Server 6.x to WebLogic Server 7, at startup WebLogic Server 7 runs in Compatibility security with the Realm Adapter provider. The Realm Adapter provider provides backward compatibility with 6.x WebLogic security realms by mapping the realm API (weblogic.security.acl) used in WebLogic Server 6.x to the APIs used in WebLogic Server 7.
WebLogic Server 7 provides security for all its resources in the context of a single active Security Realm, which consists of a set of configured security providers, users, groups, roles, and security policies. By default, WebLogic Server provides two default security realms— myrealm and Compatibility realm. If you are upgrading to WebLogic Server 7 from WebLogic Server 6.x, the Compatibility realm is used to access the existing WebLogic Server 6.x security configuration. Otherwise, myrealm is used as the active security realm. As an administrator, you have the option of creating multiple security domains to protect your WebLogic resources; however, only one active realm can be used to provide server security at any given time.
You can view the realms defined for your WebLogic Server via the Administration Console by selecting the Realms node in the left pane, as shown in Figure 26.12.

As shown in Figure 26.12, in addition to the Security providers discussed earlier in this chapter, a realm also consists of the following configurable resources:
Users—. Entities defined and authenticated in the security realm to access WebLogic resources, such as an application end user, a client application, or even other instances of WebLogic Server. The security realm supports only unique users.
Groups—. Logical sets of users that can be used to represent organizational boundaries; for example, groups can be created for different categories of WebLogic end users, with each category sharing a common set of security privileges. Therefore, groups present an efficient mechanism for managing a large number of users. Users can be defined as individual WebLogic users as well as members of a group. However, the access permissions associated with an individual user override any group access permissions. Groups can also be assigned to other groups (nested groups); however, each defined group must be unique within a security realm.
Roles—. Privileges granted to users or groups based on conditions such as username, group membership, or context of the request. Similar to groups, roles enable you to restrict access to WebLogic resources for several users at once. In WebLogic Server 6.x, security roles applied only to Web and EJB resources. However, in WebLogic Server 7, roles can be scoped as follows:
To a specific WebLogic resource within a single application, such as an EJB method—this is called resource scoped.
To all WebLogic resources deployed within a security realm—this is called globally scoped.
The circumstances under which a security role (global or scoped) is granted to a user or group are known as role conditions.
The relationship between users, groups, and roles is depicted in Figure 26.13, which describes the process flow for protecting a WebLogic resource.
The following are aspects of the process flow shown in Figure 26.13:
A WebLogic Administrator creates users and statically assigns them to one or more groups.
A WebLogic Administrator creates a role statement based on business procedures the WebLogic application must abide by. The role statement includes a role condition that specifies when a group should be granted a security role.
At runtime, the WebLogic Security Service compares groups against the role condition to determine whether they should be dynamically granted a security role. This process is referred to as role mapping.
A WebLogic Administrator creates a policy statement that includes a policy condition specifying when a security role should be granted access to a protected WebLogic resource.
At runtime, the WebLogic Security Service uses current users, their membership in groups, the security roles they are granted, and the WebLogic resource to determine whether the security policy for the requested access is granted. Only users who are members of the group granted the security role can access the WebLogic resource.
The following sections describe the administration tasks related to a WebLogic security realm.
By default, you are provided with a preconfigured security realm named “myrealm” with default users, groups, and roles. WebLogic Security providers are also supplied by default, which is an excellent starting point for becoming familiar with the operation and capabilities of the new WebLogic Security Service.
You can manage the myrealm security realm (or any other realm, for that matter) from the Administration Console by clicking its respective node in the left pane to display the myrealm window (shown in Figure 26.14). This window serves as a central point for managing your security realm through the General, User Lockout, Contents, and Providers tabs.
The General tab enables you to specify whether WebLogic Server reads role and credential information from the weblogic.xml, weblogic-ejb-jar.xml, and weblogic-ra.xml deployment descriptors on application deployment to populate the Authorization and Credential Mapping providers configured for the security realm. After this role and credential information is in the Authorization and Credential Mapping providers, changes made via the Administration Console are not persisted to deployment descriptors. For this reason, before you redeploy a application you need to enable the Ignore Security Data in Deployment Descriptors attribute, or the old data in the weblogic.xml, weblogic-ejb-jar.xml, and weblogic-ra.xml files will overwrite any changes made through the Administration Console.
The User Lockout tab, shown in Figure 26.15, enables you to apply security measures against username and password guessing.
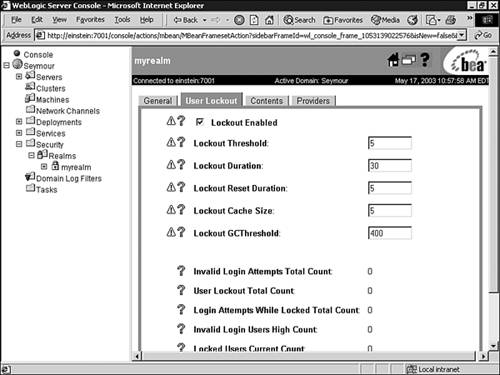
You can use the User Lockout tab to set the following attributes:
Lockout Enabled—. Indicates whether the user lockout mechanism is enabled for a WebLogic server, meaning its operation depends on the attribute values set in the User Lockout tab.
Lockout Threshold—. The maximum number of consecutive invalid login attempts before a user account is locked out. (The default is 5.)
Lockout Duration—. The number of minutes that a user account is locked out. (The default is 30 minutes.)
Lockout Reset Duration—. The number of minutes within which consecutive invalid login attempts cause the user account to be locked out. (The default is 5 minutes.)
Lockout CacheSize—. The number of invalid login records that the server places in a cache. The server creates one record for each invalid login. (The default is 5 records.)
Lockout GCThreshold—. The maximum number of invalid login records WebLogic Server keeps in memory. When this threshold value is reached, WebLogic Server’s garbage collection service purges the records associated with a user who has been locked out.
The User Lockout tab also provides statistics on the number of user lockouts since the last server reboot. If a user account becomes locked, you can unlock the account by following these steps:
Select the Users node under your security realm.
In the displayed Users table, a locked account is identified by the Details link under the Locked column. For example, in Figure 26.16, the user Seymour is identified as being a locked account.
The Contents tab provides shortcut text links to manage users, groups, and roles within your security realm, which is discussed later in this chapter.
The Providers tab, shown in Figure 26.17, provides shortcuts to the tabs used for configuring security providers for the new security realm.

If you configure a new security realm from the Realms node in the Administration Console, you can use the Providers tab as a central point for configuring your security providers. Table 26.1 describes the types of security providers required when creating a new security realm.
Table 26.1. Required Security Providers
Security Provider | Required |
|---|---|
Authentication | Yes |
Principal Validation | Yes |
Identity Assertion | Only if using perimeter security |
Authorization | Yes |
Adjudication | Only if multiple Authorization providers are configured |
Role Mapping | Yes |
Auditing | No |
Credential Mapping | Yes |
Keystore | No |
When configuring a new security realm, the WebLogic Security providers are selected by default.
By default, the WebLogic Authentication provider defines one user during the installation of WebLogic Server. This user serves as the initial system administration user account and is a member of the Administrators group.
To create additional WebLogic users in the Administration Console, follow these steps:
Click the Users node under your realm to display the Select Users window, which lists the users defined in the default Authentication provider.
Click the Configure a New User link.
In the General tab, shown in Figure 26.18, enter values for the following attributes:
Name—. Enter
Seanas the name of the WebLogic user.Description—. Enter a description for the user, such as the job title or role the user performs in the business. This step is optional.
Password—. Enter the password for this user, and enter the password again in the Confirm Password text box.
Click Apply to save your changes.
The new user is added to the list of users in the Select Users window. When creating a WebLogic user, adhere to the following guidelines:
Usernames are case sensitive.
Do not use blank spaces, commas, hyphens, or any character in this comma-separated list:
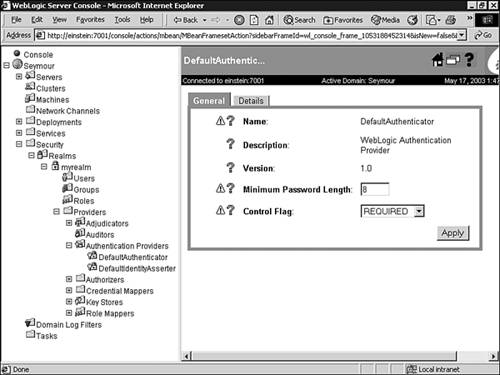
< >,#,|,&,~,?,( ),{ }.The password must meet the minimum password length specified by your Authentication provider. Figure 26.19 shows this setting for the default WebLogic Authentication provider.
In previous releases of WebLogic Server, an anonymous user (an unauthenticated user) was identified as a user called “guest.” To prevent a potential security risk, WebLogic Server 7 no longer provides the guest user as a default user and distinguishes between a guest and an anonymous user by assigning the anonymous user the name <anonymous>.
However, you can still configure WebLogic Server to use the guest user to identify an anonymous connection by following these steps:
By default, the WebLogic Authentication provider defines the following groups:
Administrators—. Users assigned to this group are granted the Admin security role by default.
Deployers—. Users assigned to this group are granted the Deployer security role by default.
Operators—. Users assigned to this group are granted the Operator security role by default.
Monitors—. Users assigned to this group are granted the Monitor security role by default.
Users—. Users assigned to this group include any users who have identified themselves through a login mechanism.
Everyone—. Users assigned to this group include all users, regardless of whether they have logged into WebLogic Server.
To create additional WebLogic groups, use the following steps in the Administration Console:
Click the Groups node under your realm to display the Select Groups window, which lists the groups defined in the default Authentication provider.
Click the Configure a New Group link.
In the displayed General tab, shown in Figure 26.20, enter values for the following attributes:
Click Apply to save your changes.
After you have configured the WebApp group, you can add the user Sean to that group by following these steps in the Administration Console:
Click the Users node under your security realm to display the Select Users window, which lists all the users currently defined in the WebLogic Authentication provider’s database.
Click the hyperlinked name of the Sean user.
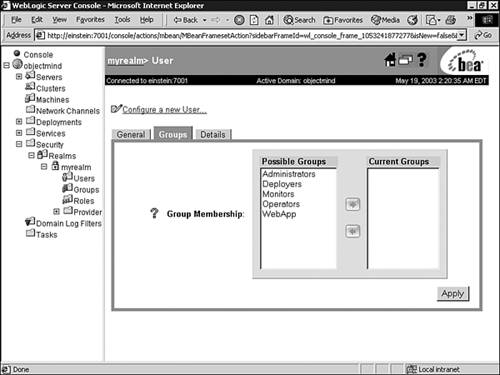
Click the Groups tab. All groups available in the WebLogic Authentication provider’s database appear in the Possible Groups list box, and all groups to which the user belongs appear in the Current Groups list box, as shown in Figure 26.21.
In the Possible Groups list box, click the name of the WebApp group to highlight it, and click the right-arrow button to move the group to the Current Groups list box.
By default, WebLogic Server provides the following global roles to protect administrative and server resources:
Admin—. This role grants the following privileges by default to the Administrators group:
View the server configuration, including the value of encrypted attributes.
Modify the entire server configuration.
Deploy applications, EJBs, startup and shutdown classes, J2EE connectors, and Web service components.
Edit deployment descriptors.
Start, resume, and stop servers.
Deployer—. This role grants the following privileges by default to the Deployers group:
View the server configuration, except for encrypted attributes.
Deploy applications, EJBs, startup and shutdown classes, J2EE connectors, and Web service components.
Edit deployment descriptors.
Operator—. This role grants the following privileges by default to the Operators group:
Monitor—. This role grants the following privilege by default to the Monitors group:
View the server configuration, except for encrypted attributes.
You can view these default roles by selecting the Roles node under your security realm, which displays the Select Roles window.
For each role you create, you need to specify the condition (role condition) under which that security role (global or scoped) is granted to a user or group. These are the role conditions provided with WebLogic Server:
User Name of the Caller—. This creates a condition based on a username. For example, you can create a condition indicating that only the user Sean is granted the EndUserAccess security role.
Caller Is a Member of the Group—. This creates a condition based on a group. For example, you can create a condition indicating that only users in the myWebApp group can be granted the EndUserAccess security role.
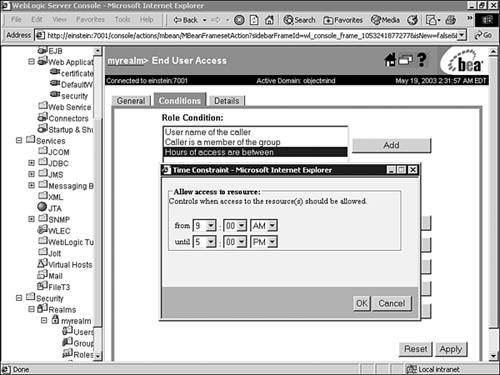
Hours of Access Are Between—. This creates a condition based on a specified time period. For example, you might create a condition indicating that the EndUserAccess security role can be granted to users only during normal working hours.
These role conditions, along with the specific information you supply for the condition (such as an actual username, a group, or start/stop times), are called expressions. The following is an example of an expression:
Caller is a member of the group
WebApp
A role statement is a collection of expressions that define how a security role is dynamically granted. Being able to define multiple expressions for a role statement enables you to create complex business rules to meet your organization’s security requirements. To relate expressions together to form a role statement, you use the following standard operators between these expressions:
andis used to specify that all expressions must be true for the security role to be granted.oris used to specify that at least one of the expressions must be true for the security role to be granted.
The entire role statement must be true for a user or group to be granted the security role.
The following is an example of a role statement:
Caller is a member of the group
WebApp
And Hours of access are between
09:00:00 and 17:00:00
The way you use the WebLogic Server Administration Console to create security roles differs, depending on whether you want to create a global role or a scoped role. You create global roles at the security realm level and scoped roles at the WebLogic resource level.
Note
You must keep track of the scoped roles you create, as there is currently no listing mechanism for previously created scoped roles in the Administration Console. However, you can create global roles and apply those roles to a WebLogic resource for ease of management.
To create a global role named EndUserAccess with the following role statement:
Caller is a member of the group
WebApp
And Hours of access are between
09:00:00 and 17:00:00
follow these steps using the Administration Console:
Click the name of the security realm you are configuring the role for—for example, myrealm.
Click the Roles node to display the Select Roles window listing all roles defined in the default Role Mapping provider.
In the displayed General tab, enter
EndUserAccessas the name for the role you want to create.Click Apply to save your changes.
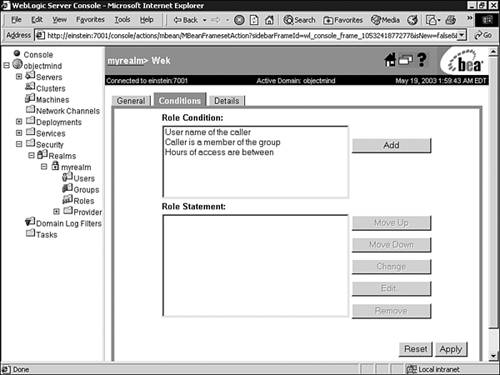
Click the Conditions tab to display the role editor window, as shown in Figure 26.22.
In the Role Condition list box, select the Caller Is a Member of the Group condition and click Add.
In the Groups dialog box, enter
WebAppas the name of the group, and click Add to include the group in the role condition, as shown in Figure 26.23.Click OK to add the expression to the role statement.
In the Role Condition list box, select the Hours of Access Are Between condition, and click Add. In the Time Constraint dialog box, enter the start and end times shown in Figure 26.24.
Click OK to add the expression to the role statement.

The EndUserAccess role is stored in a Role Mapping provider. By default, the Role Mapping provider is configured and the role information is stored in the embedded LDAP server.
Creating a scoped role follows the same procedure as creating a global role, except that it is applied at a WebLogic resource level. The procedures for defining a scoped role for a WebLogic resource differ, depending on the level of the scoped role and the type of resource. For example, to create a scoped role for all Web applications (WARs), use these steps:
Right-click the Web Applications node in the left pane of the Administration Console.
Select the Define Role option, shown in Figure 26.25, to display the Select Roles window listing the scoped roles currently defined for this WebLogic resource.
Click the Configure a New Role link to begin defining the role.

In comparison, to create a scoped role for a specific WAR or a component within a WAR, use these steps:
Right-click the target WAR for which you want to define a scoped role under the Web Applications node in the left pane of the Administration Console.
Select the Define Role option.
Enter a URL pattern in the text box. A URL pattern is a path to a specific component within a WAR. For example, you can use the following:
/*to associate the scoped role with all components (servlets and JSPs) in the Web application./*.jspto all JSPs./<subdirectory>/*to all resources under a named subdirectory.
Click the Define Role button, which displays the scoped roles defined for that URL pattern.
Click the Configure a New Role link to begin defining the role.
Similar procedures can be used for defining a scoped role for all EJB applications (JARs), for a specific EJB JAR, or for an EJB within a JAR.
A security policy is an association you define between a WebLogic resource and one or more users, groups, or security roles. It protects the WebLogic resource against unauthorized access. By default, WebLogic Server secures each WebLogic resource type with a default security policy based on the default global roles and groups. These security policies are inherited by all instances of that WebLogic resource type. For example, server resources are protected by the policies associated with the Admin and Operator roles.
Configuring a policy is similar to creating a scoped role, as a policy is also defined at the WebLogic resource level and composed of conditions, expressions, and policy statements, with the following differences:
When you create a policy, you also have the Caller Is Granted the Role condition, which enables you to create a condition based on a existing role you have defined.
You can apply a policy to the methods and actions of a specific WebLogic resource.
For example, to view the default policy defined for your WebLogic Server instance, right-click your server node in the Administration Console and select the Define Policy option. As shown in Figure 26.26, policy restrictions can be applied to the boot, shutdown, lock, and unlock actions. The policy is also applied to the Admin and Operator roles.
J2EE specifies a component programming model for security that supports both APIs (programmatic security) and declared properties (declarative security). In the declarative security model, deployment descriptors are the primary vehicle for specifying security constraints for Web and EJB applications in a form that’s external to the application and enforced by J2EE containers.
WebLogic Server is fully compliant to support the declarative security model for J2EE Web and EJB applications, allowing security constraints specified in deployment descriptors (web.xml, weblogic.xml, ejb-jar.xml, and weblogic-ejb-jar.xml) to be integrated into its security service. However, this approach does require you to redeploy an application if security changes are made to the deployment descriptors so that they can be reintegrated into the WebLogic Security Service.
To support a unified security management environment for a WebLogic administrator, the new WebLogic Security Service enables you to deploy a J2EE application and ignore any defined security constraints, so you can define the application’s roles and polices visually in the Administration Console. You can ignore security constraints defined in deployment descriptors for applications within the context of a specific security realm by following these steps:
Click the name of the security realm you are setting this option for—for example, myrealm.
In the General tab, select the Ignore Security Data in Deployment Descriptors check box, as shown in Figure 26.7.
Click the Apply button to save your changes.

These roles and policies are then stored in the security database assigned to the active security realm. Alternatively, you can initially load the security constraints for a J2EE application upon deployment into the WebLogic Security Service, and then switch over to managing security roles and policies solely via the Administration Console by enabling the Ignore Security Data in Deployment Descriptors option.
Note
Regardless of the method you choose for managing WebLogic application security, it should be consistent across all your deployed applications.
The following section demonstrates how to implement WebLogic security for a simple Web application by using the Administration Console.
The following sections describe how you can apply security to a simple Web application by using the WebLogic Security Service and leverage the knowledge on WebLogic users, groups, roles, and security policies you have gained earlier in this chapter. Use the steps in these following sections to create, deploy, and apply security constraints to a Web application through WebLogic Server.
Creating the Sample Web Application
The Web application you need to create and deploy to WebLogic Server consists of the following components:
welcome.jsp: Configured as the welcome page for the Web application. The code for this JSP is provided in Listing 26.2.Example 26.2. The
welcome.jsp Component<html> <head> <title>Security Web Application Example</title> </head> <blockquote> <h1> Security Login Example </h1> <% // declare Remote User variable String rmuser = request.getRemoteUser(); %> <% // Display the name of the user if (rmuser != null) { out.println("Welcome " + rmuser); %> <p> Click here to <a href="admin/myWebPage.jsp">Enter</a> the application. <% } else { out.println("You are entering this Web Application for the first time"); %> <p> Click here to <a href="login.jsp">login</a> <% } %> </blockquote> </body> </html>adminmyWebPage.jsp: This page is used to indicate a successful authentication into the Web application, so it is configured with a security constraint. The code for this JSP is provided in Listing 26.3.Example 26.3. The
adminmyWebPage.jspComponent<html> <blockquote> <h1> Security Login Example </h1> <% // declare Remote User variable String rmuser = request.getRemoteUser(); %> <% // Display the name of the user if (rmuser != null) { out.println("You are successfully authenticated " + rmuser); %> <p> Click here to <a href="logout.jsp">Logout</a> <% } %> </blockquote> </body> </html>login.jsp:This page is configured inweb.xmlto be displayed whenever an unauthorized user attempts to access a Web page protected by a security constraint. The code for this JSP is provided in Listing 26.4.Example 26.4. The
login.jspComponent<html> <head> <title>Security Example Login Page</title> </head> <blockquote> <h2>Please enter your Username and Password:</h2> <p> <form method="POST" action="j_security_check"> <table border=1> <tr> <td>Username:</td> <td><input type="text" name="j_username"></td> </tr> <tr> <td>Password:</td> <td><input type="password" name="j_password"></td> </tr> <tr> <td colspan=2 align=right><input type=submit value="Submit"></td> </tr> </table> </form> </blockquote> </body> </html>admin/logout.jsp:This page is displayed when the user logs out of the Web application. The code for this JSP is provided in Listing 26.5.Example 26.5. The
logout.jspComponent<html> <head> <title>Security logout page</title> </head> <blockquote> <h1> Goodbye <%= request.getRemoteUser() %>! </h1> <% weblogic.servlet.security.ServletAuthentication.logout(request); %> <p> You are now logged out. <p> Click here to <a href=<%= """+request.getContextPath()+"""%>>revisit the site</a>. </blockquote> </body> </html>fail_login.html: The error page that is configured inweb.xmlto be displayed after a failed login attempt. The code for this page is provided in Listing 26.6.Example 26.6. The
fail_login.htmlPage<html> <head> <title>Login failed</title> </head> <body bgcolor=#ffffff> <blockquote> <h2>Your username and password could not be authenticated by WebLogic Server.</h2> <p><b> <a href="/security/welcome.jsp">Return to Login Page</a> </b> </blockquote> </body> </html>WEB-INF/web.xml: The deployment descriptor that configures access to theadmindirectory of the Web application. The code for this deployment descriptor is provided in Listing 26.7.Example 26.7. The
web.xmlDeployment Descriptor<!DOCTYPE web-app PUBLIC "-//Sun Microsystems, Inc.//DTD Web Application 2.3 //EN" "http://java.sun.com/dtd/web-app_2_3.dtd"> <web-app> <welcome-file-list> <welcome-file>welcome.jsp</welcome-file> </welcome-file-list> <security-constraint> <web-resource-collection> <web-resource-name>AdminPages</web-resource-name> <description>These pages are only accessible by authorized administrators.</description> <url-pattern>/admin/*</url-pattern> <http-method>GET</http-method> <http-method>POST</http-method> </web-resource-collection> <auth-constraint> <description>These are the roles who have access</description> <role-name>WebApp</role-name> </auth-constraint> <user-data-constraint> <description>This is how the user data must be transmitted</description> <transport-guarantee>NONE</transport-guarantee> </user-data-constraint> </security-constraint> <login-config> <auth-method>FORM</auth-method> <form-login-config> <form-login-page>/login.jsp</form-login-page> <form-error-page>/fail_login.html</form-error-page> </form-login-config> </login-config> <security-role> <description>Web App Role</description> <role-name>WebApp</role-name> </security-role> </web-app>
Create each Web application component, using the code in the preceding listings.
Configure Security Options for Your WebLogic Server and Security Realm
You can control how WebLogic Server performs security on Web and EJB applications by using the
fullyDelegatedAuthorizationcommand argument when your WebLogic Server is started:If the value of
fullyDelegatedAuthorizationis set tofalse, the WebLogic Security Service performs security checks only on Web and EJB applications that have security specified in their associated deployment descriptors. This is the default setting:set JAVA_OPTIONS=... -Dweblogic.security.fullyDelegatedAuthorization=false
If the value of
fullyDelegatedAuthorizationis set totrue, the WebLogic Security Service performs security checks on all Web and EJB applications, even if security settings do not exist in the deployment descriptors.set JAVA_OPTIONS=... -Dweblogic.security.fullyDelegatedAuthorization=true
Note
The
fullyDelegatedAuthorizationargument affects only the WebLogic Server instances in which it is set. In a distributed WebLogic Server environment, you should ensure that thefullyDelegatedAuthorizationflag is set the same way for all your WebLogic servers.If you decide the WebLogic Security Service should always perform security checks on all Web and EJB applications by setting the
fullyDelegatedAuthorizationflag totrue, you also need to specify what the WebLogic Security Service should do when the Web or EJB application is redeployed through the Ignore Security Data in Deployment Descriptors security realm option.For this example, set the
fullyDelegatedAuthorizationtotrue, and enable the Ignore Security Data in Deployment Descriptors option so that you can control security for the Web application in the Administration Console.Deploy the Web Application to Your WebLogic Server
To deploy this Web application, you can use one of the following options:
Create a directory under your
domain/applications(domain is your WebLogic domain directory) directory, and copy the files to their respective target directory locations. Your WebLogic Server, if it is started in development mode, automatically deploys your Web application. This type of deployment is referred to as an exploded directory deployment.Create the appropriate directory structure for this Web application, copy the files into their respective target directory locations, and then archive the application into a WAR file by using the
jarJava utility. Finally, deploy the WAR to WebLogic Server via the Administration Console, using the name “security” to identify the Web application.
Note
You can also use WebLogic Builder to create an archive file and deploy the Web application to WebLogic Server.
Note
▸ For an example of how to deploy a simple Web application, see “Deploying Your First Web Application Using the WebLogic Builder,” p. 371, in Chapter 11,“Working with the WebLogic Server Tools.”
Testing the Web Application with No Security
To ensure that you see the effects of applying security constraints to the deployed Web application, testing the Web application’s operation without any security constraints applied is a good idea. By default, all authenticated users accessing this deployed Web application will be members of the Everyone group, which grants them access to all aspects (URLs) of the application.
To test the default operation of the sample Web application, use these steps:
Start your Web browser and enter the following URL:
http://hostname:port/securityIn this URL, substitute the following information:
hostnameis the IP address or name of the host machine.portis the port number of WebLogic Server.
For example,
http://localhost:7001/securitydisplays the welcome page shown in Figure 26.28.Click the
loginlink to display the Login page, as shown in Figure 26.29, where you enter the username and password associated with a WebLogic user account, such as the Sean user you created earlier.If the login is successful, the welcome page appears, as shown in Figure 26.30, and displays the name of the authenticated user.
Click the
Enterlink to enter the aspect of the Web application (myWebPage.jsp) that you will secure later in this section, as shown in Figure 26.31.If the authentication fails, the failed login page is displayed, as shown in Figure 26.32.
Applying Security Constraints to the Web Application
The security constraint placed on the Web application is as follows:
Only the URL resources of the Web application in the
/admindirectory are secured.All users accessing the secured
/adminURL resources need to be a member of the WebApp group.Access to the secured URL resources is allowed only between 9:00 a.m. and 5:00 p.m.
To implement these security constraints, follow these steps:
Create a group named WebApp.
Create users and assign them to the WebApp group.
Create a global role named EndUserAccess and include the WebApp and time constraints as expressions to the role statement.
Define a security policy for the Web application:
Right-click the Web application named
securityin the Administration Console, and select the Define Policy option.In the displayed General tab, enter
/admin/*as the URL pattern.Click Define Policy.
In the displayed Security Policy editor window, create a policy statement specifying that the caller is granted the EndUserAccess role, as shown in Figure 26.33.
Testing Your Secured Web Application
Now test the operation of your secured Web application, using the following scenarios:
WebLogic users who are members of the WebApp group.
WebLogic users who are not members of the WebApp groups.
Users who are not configured as WebLogic users.
WebLogic users who are members of the WebApp group, but are accessing the Web application outside the time constraint defined in the EndUserAccess role.
Notice that only users who meet the security policy are allowed access to
myWebPage.jsp.


With the introduction of a new security service, WebLogic Server allows security constraints to be completely abstracted from a J2EE application, which makes security easier to install, maintain, and modify as the application’s business requirements change over time. To support this security model, the WebLogic Security Service has shifted away from using ACLs to using a framework that leverages several security providers, with each security provider supporting a specific function related to application security. Also, one or more security plug-ins can be used for a security function.
This chapter has given you a clear, concise description of the new WebLogic Server Security Service and demonstrated how you can manage and leverage the BEA-supplied security plug-ins to implement security for a simple Web application.