
Appendix B. DSLR Workflow Guide
No doubt you’ve heard about the DSLR revolution. In the past few years DSLR cameras that were originally designed for high-end photography (and can still be used that way) have added HD video capability. DSLR cameras are now being widely used because of their large image sensors that are capable of filmic depth of field and low noise. Video creators and filmmakers also love their ability to use interchangeable high-quality photo and cinema-style lenses.

DSLR cameras unfortunately record with highly compressed and sometimes non-edit-friendly edit codecs like H.264, AVCHD, and Photo JPEG. With Adobe Premiere Pro, Adobe saw this revolution happening and thanks to technologies like the Mercury Playback Engine, you can edit natively with DSLR footage directly in Adobe Premiere Pro without having to transcode to another format first.
In this appendix we’ll look at the essential aspects of a DSLR workflow using Adobe Premiere Pro and Adobe Bridge.
Getting Organized with Adobe Bridge
If you’ve ever used any sort of still or graphics workflow in the Adobe Creative Suite, you might have used Adobe Bridge. Although it is mainly positioned as an asset-management application for stills and graphics, Adobe Bridge can also be very useful when it comes to video (particularly DSLR video). Let’s look at a few of the ways you can leverage Adobe Bridge to help you when working with DSLR footage.
Sorting Media with Folders
You can certainly import footage from DSLR cameras directly into Adobe Premiere Pro through the Media Browser (don’t use File > Import) and then create organized bins in Adobe Premiere Pro, but another option is to sort your media from DSLR cameras using Adobe Bridge and then import those organized folders into Adobe Premiere Pro. Let’s look at how you can sort media using Adobe Bridge.
- With a DSLR camera card mounted to your computer, open Adobe Bridge.
- Click the Folders panel, click the computer icon, navigate to your memory card, and open it (FIGURE B.1).
Figure B.1. When you mount a camera memory card, you can access it directly in Adobe Bridge.

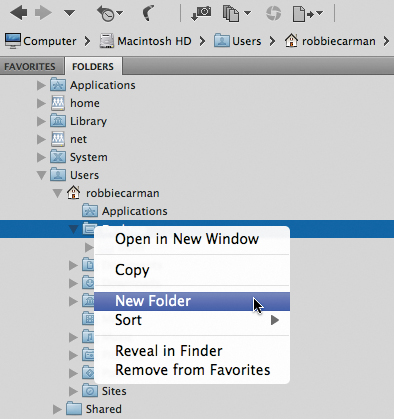
- Using the organizational tree, navigate to reveal the location where you want to store the files from the memory card. Once at that location, right-click on the folder and choose New Folder. The new folder will be created inside of the location you chose (FIGURE B.2).
Figure B.2. In the Folders panel you can navigate the existing folder structure on drives. By right-clicking a folder, you can create a new folder at a location of your choice.
- Naming these folders is up to you, but we typically name them according to the name of the camera, the name of the setup, or something similar. If you accidentally click and switch to the folder, just use the Web browser-style Go Back button to return to your footage folder.
Move or Copy

If you are organizing footage already on a drive, use your modifier keys. Holding down the Option (Alt) key will copy the footage. If you don’t use a modifier key, you will move the footage around on the existing drive (which may be desired). Adobe Bridge’s copy and move features match what you can do at an OS level.
- Drag files from your memory card into the folder that you created. You can then repeat this action for new cards that you mount. Just keep in mind that depending on how much footage is on a card, it can take a few minutes to copy.
Using Adobe Bridge to Batch Rename
You’ve probably noticed that media from your DSLR has names like MVI_2314.mov or something similar. The issue with this naming scheme is that those names aren’t very helpful, and different cameras will vary on how they reset their built-in naming. It’s quite possible to end up with several clips on your drive with identical filenames and no tape name or timecode value.
Create a Renaming Preset
![]()
You might not want to manually set up the renaming rules every time you want to rename clips (you might have different rules depending on what you’re doing). In the Batch Rename dialog in the Presets section, save a preset for each Batch Rename template you want to create.
Adobe Bridge offers a very efficient way to batch rename files, but here is the cool part: You can also maintain the original filename as metadata if you ever need to go back to the original card or backup of the card. Let’s take a look at how batch renaming works using Adobe Bridge.
- Navigate to an organized folder in Adobe Bridge as described in the previous exercise, and then select all the files by pressing Command+A (Ctrl+A).
- Choose Tools > Batch Rename.
- In the New Filenames area (FIGURE B.3) you can essentially add different rules for how the file(s) will be renamed.
Figure B.3. The Batch Rename dialog allows you to quickly batch rename files and keep existing filenames as XMP metadata.
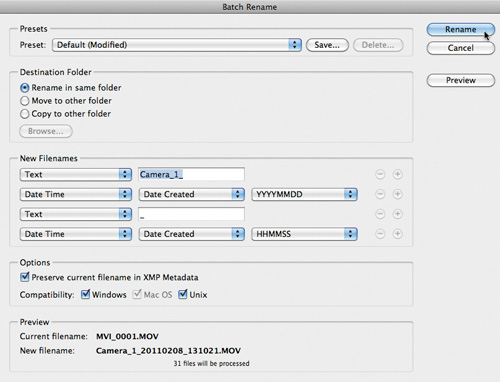
- How should you rename your files? Well that’s up to you, but our settings consist of Text: Camera_Name_; Date Time: Date Created (YYYYMMDD); Text:_ ; Date Time: Date Created (HHMMSS). This results in a filename like Camera_1_20110208_131021.mov (FIGURE B.4). You can see a preview of how the files will be renamed at the bottom of the window.
Figure B.4. Here is how we like to rename DSLR clips. Although this is one suggestion, you can add different rules to rename a clip depending on your workflow.

- In the Options area select the option to “Preserve current filename in XMP Metadata,” and then select one or more of the different OS compatibility options (FIGURE B.5). We believe that it never hurts to select all these options for maximum compatibility.
Figure B.5. By preserving the current filename as XMP metadata if needed, you can access the original file in an archive, for example.

- At the top of the dialog in the Destination Folder section, you can choose where the renamed files will be created. You have the option to have the renamed files remain inside the same folder, move the renamed files to another folder, or copy the renamed files to another folder. By clicking Browse, you can choose where you want to move or copy the renamed files if you choose those options.
Conforming Clips for Slow Motion
Many DSLR cameras are capable of recording multiple frame rates from 24 (23.98) to 60 (59.94) fps. With higher frame rates (like 60 fps), you can certainly use a clip at its native frame rate; however, many use the higher frame rates to conform or interpret the clips for a natural, slow-motion effect. Using Adobe Premiere Pro, achieving this result is easy.
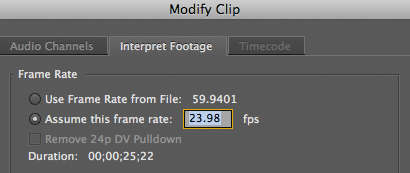
With a 60 fps clip selected in the Project panel, right-click on the file and choose Modify > Interpret Footage. In the Modify Clip dialog (FIGURE B.6) and on the Interpret Footage tab, notice that the first section is called Frame Rate. Select the option “Assume this frame rate” and set it to a value of your choice. Often when shooting 60 fps, we’ll change this value to 23.98, 25, or 29.97 to match our project’s frame rate. Click OK to accept your changes.
Figure B.6. Interpreting footage frame rate allows you to use footage that was shot at a high frame rate to conform it to a slower one to create smooth slow motion.
Now when using the clip, it will play back at 24 (23.98), 25, or 30 (29.97) fps and will have smooth and natural slow motion.
Optimizing Performance for DSLR Projects
By this point you probably know that one of the main strengths of Adobe Premiere Pro is its ability to ingest and edit natively using many different camera formats. In the past couple of years this strength has made its way into working with DSLR video. Both Adobe Premiere Pro 5 and 5.5 support common frame sizes and frame rates with sequence presets tailored to DSLR video (FIGURE B.7).
Figure B.7. Adobe Premiere Pro has a whole category of sequence presets that are designed to work with DSLR video.
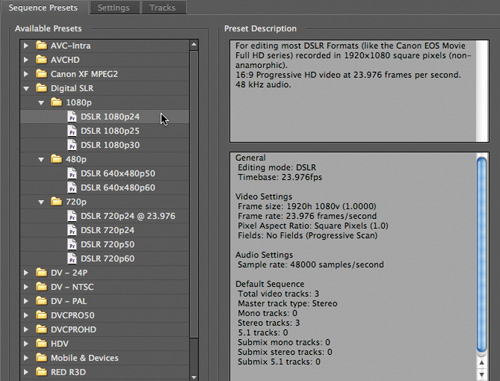
The biggest advantage with all of these presets is that by selecting one of them and then clicking the Settings tab, the editing mode these presets use will be the DSLR editing mode, which allows the sequence to leverage core technologies of Adobe Premiere Pro, like the Mercury Playback Engine.
Syncing Clips
Video-enabled DSLRs are capable of recording beautiful HD video, but when it comes to audio, they’re not particularly strong. For that reason many people choose to use a dual-system recording approach for DSLR productions. This means that video and reference audio is recorded to the DSLR, whereas high-quality audio is recorded to a separate, external digital-audio recorder.
When it comes to postproduction with dual-system projects, you’ll need to sync the video with the high-quality audio. This can be done using a sync point and usually reference audio (lower-quality audio) from the camera.
Adobe Premiere Pro has a couple of features that facilitate syncing clips. There are also third-party applications that allow for syncing of DSLR video and high-quality audio, and these applications directly support Adobe Premiere Pro.
Manually Syncing Clips
After you’ve ingested your DSLR video footage (usually with reference or camera audio) and your high-quality audio from a digital audio recorder either directly into Adobe Premiere Pro or using Adobe Bridge, your next step before editorial can begin is to sync that footage.
Without third-party software, the process of syncing clips is a manual one, but don’t let that scare you. The process is actually pretty straightforward.
- Within Adobe Premiere Pro, choose File > Open, navigate to Chapter Files > Appendix_B_Media > [Version Number], and open the project Appendix_B_dslrsync.prproj.
This project contains two bins. One bin contains a DSLR video clip with reference audio. The other contains matching, high-quality audio recorded on a digital audio recorder. The project also contains one sequence.
- Open the DSLR Video bin, locate the clip called Sync Clip, and open it into the Source Monitor.
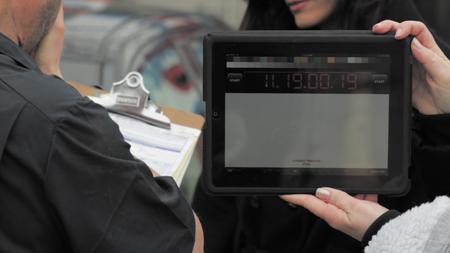
At the head of the clip you’ll notice a slate (actually an electronic slate on an iPad!). Watch this section: After the production information flashes on the slate, you’ll see a countdown and then a two pop. You’ll use the two pop as a sync point, but you need to be exact (FIGURE B.8).
Figure B.8. The two pop on this slate can be used as a sync point to sync the DSLR video with the high-quality audio from a digital audio recorder.
- Click the Output button at the bottom of the Source Monitor and choose Audio Waveform.
What About Using In/Out Points?

In other applications, such as Final Cut Pro, you might have used In/Out points to mark sync points. If you’re comfortable with In/Out points to mark sync points, you can also use that method in Adobe Premiere Pro. This method has the added advantage of getting rid of extraneous audio or video at the head of a clip.
- Scrub through the waveform and position the current-time indicator at the exact start of the two pop, which should be right at 00:00:04:09.
- Choose Marker > Clip Marker > Set Other Numbered. In the dialog that opens enter 1.
Although you can use regular markers, we find numbered markers useful, especially if you have long clips that you’re trying to align with separate high-quality audio recordings.
- In the Audio Recorder bin open the audio clip called Sync Clip_Audio. Repeat steps 3–5, locating the two pop in the audio and marking that point. The two pop in the audio is right around 00:00:14:23 (FIGURE B.9).
Figure B.9. It’s important to locate the exact sync point in your high-quality audio to match the point you’ve chosen in the video/reference audio.

- Edit both the video clip (with its reference audio) and the audio from the digital audio recorder into the open sequence, putting the high-quality audio on the lower audio track.
- With snapping enabled (S), drag the clips by clicking on one of the markers until the markers that you made in the video clip (and reference audio) align with the high-quality audio recording (FIGURE B.10).
Figure B.10. By aligning the clip markers on the clips you want to sync, you can easily align them to be in sync with each other.

- The clips are now in sync. You can test this by disabling the reference audio tracks and checking sync.
- You may have noticed in this instance that you have extra audio before the start and after the end of the video clip. Once in sync, you can trim the audio to match the duration of the video clip.
Sync in One Click
![]()
Instead of dragging to align sync points of a clip, a great feature in Adobe Premiere Pro is the Synchronize command. Simply select the clips you want to sync that are already in a sequence, right-click, and choose Synchronize. In the dialog you can choose how to sync the clips, including using numbered markers, timecode, and the start and end of the clips.
Merging Clips
Now that your clips are in sync, you could edit using the clips like this, but there are a couple of issues with that approach:
• Linking. Right now the reference audio is still linked to the video and the high-quality audio is not linked to the video. So this represents two problems: First, you don’t need the reference audio, and second, if you were to move clips around on the Timeline, you could potentially move footage out of sync.
• Nonunified clip. There isn’t a single clip that contains the video and the high-quality audio in the Project panel.
To address these workflow issues, a new feature in Adobe Premiere Pro 5.5 is a very welcome addition: Merge Clips. The Merge Clips feature allows you to quickly merge your video and high-quality audio using In and Out points, timecode, as well as markers. Let’s take a look at the way this works. Note that if you’re working with Adobe Premiere Pro CS5, this feature will not be available to you.
- With the same project open from the previous exercise, select the video clip (and its linked reference audio), right-click, and choose Unlink. Using the Selection tool with the modifier Option (Alt), you can also temporarily unlink the video and audio, and select only the reference audio. After the reference audio and the video are unlinked, select the reference audio and press Delete to remove the reference audio because you won’t need it. You can also move up your high-quality audio to the first audio track.
- Select the video clip and the high-quality audio. Right-click and choose Merge Clips (FIGURE B.11). You’ll notice that all of the options are grayed out. That’s OK and is normal (these options will only be available if you’re merging from the Project panel). Click OK to merge the clips.
Figure B.11. The Merge Clips dialog allows you to easily merge disparate audio and video together as one new clip and adds the new clip to the Project panel.

- After merging the clips, the Project panel displays a new clip called Sync Clip.mov – Merged (FIGURE B.12).
Figure B.12. After creating a merged clip, the clip will appear in the Project panel with the suffix Merged. This clip contains the DSLR video and the high-quality audio from a digital audio recorder.

- In the Project panel create a new bin called Merged Clips. Drag the newly merged clip into this bin. You may also want to rename merged clips with more descriptive names. From here on you can work with this clip as you do with any other clip.
But I Have a Lot of Clips
If you have lots of footage that you need to sync and merge, you’ll have to do so on an individual basis. This can take some time so plan accordingly. An alternative is to use specialized third-party tools.
Using PluralEyes
As you were working through the previous exercises, you were most likely thinking that there were a lot of steps, so you might just need a bit of magic. Enter Singular Software (www.singularsoftware.com) with its products PluralEyes and DualEyes (discussed next). Both products allow you to quickly sync clips and create newly merged clips. This functionality comes with a cost of $149, but fully functional trials are available to test to see if these applications can work in your situation.
Here’s how PluralEyes works with Adobe Premiere Pro.
- Create a new sequence and edit your DSLR footage (with reference audio) and high-quality audio from your digital audio recorder onto a Timeline. Place all of the video tracks on one track in a row (reference audio will be automatically placed on the corresponding audio track[s]) and the high-quality audio from the digital audio recorder below the reference audio track(s).
Don’t worry about aligning clips or about having a lot of footage; just edit it all onto the Timeline. Do not add any transitions or effects to the clips. After you’ve collected all the footage on the Timeline, save the project.
- Select the sequence with all of the footage on it, and choose File > Export > Final Cut Pro XML.
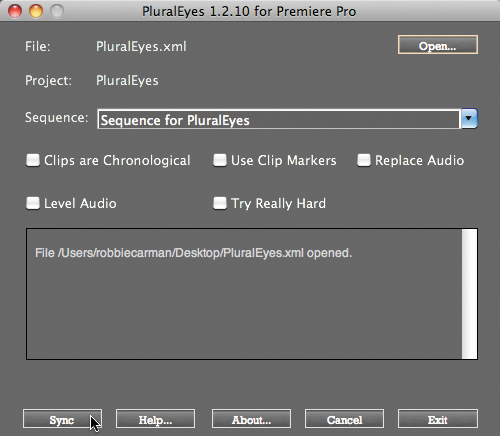
- Launch PluralEyes (it’s a separate application) and open the XML file you exported. Select the sequence you want to sync from the drop-down list in PluralEyes (FIGURE B.13).
Figure B.13. PluralEyes uses a Final Cut Pro XML file from Adobe Premiere Pro to locate and then sync footage.
- From here you can simply choose to sync by clicking the Sync button.
You can also choose from additional sync options if you’re having problems syncing. Additionally, you can replace the audio from the original video footage with that of the high-quality audio and even normalize volumes.
After syncing is complete, PluralEyes creates a new XML file and notifies you as to where that file is.
- Switch back to Adobe Premiere Pro, and choose File > Import to bring that XML file into Adobe Premiere Pro.
A new folder with the synced footage on a sequence appears in the Project panel. The synced sequence has the same name as the original sequence but with the suffix _synced (FIGURE B.14).
Figure B.14. After importing the XML file from PluralEyes back into Adobe Premiere Pro, a new sequence is created. If you open that sequence, it will contain your synced footage.

- Open the synced sequence and notice that your clips have now been synced. If you were syncing multiple groups of clips, one or more markers will be in the Timeline with names like pluraleyes 000, pluraleyes 001, and so on. Each marker indicates the start of a group of synced clips.
- If you didn’t use the Replace Audio option in PluralEyes, you’ll still need to merge the video clip and synced high-quality audio clip as you did in the previous exercise.
Using DualEyes
Although PluralEyes is great (it can even work with multiple angles), DualEyes, also from Singular Software, was created to specifically address the needs of a DSLR video workflow.
In our opinion it’s not an either/or decision between choosing PluralEyes and DualEyes but rather deciding which one works best with your workflow. One important benefit of using DualEyes (unlike PluralEyes) is that it’s not an editing application or platform specific.
Here are the basics of how DualEyes works. Just keep in mind that DualEyes can work in a couple of different ways. The following is the methodology we like and have used.
Go Deeper with DSLR
![]()
Are you interested in the entire DSLR process? Be sure to check out From Still to Motion from Peachpit Press (2010). It covers all aspects of production and post for professional video.
- Launch DualEyes.
- Click and choose to create a new project; save the project to a location of your choosing.
- In the main DualEyes window click the plus button to add your DSLR video (with reference audio) and high-quality audio from your digital audio recorder. Browse and select the files you want to use. You can also drag files into the window.
- Click the Options menu to choose how the program performs (FIGURE B.15), and select the Replace Audio for MOV Files option. If you’re using a Windows machine, this option will say Replace Audio in MOV and AVI Files.
Figure B.15. The Replace Audio option in DualEyes allows you to replace the reference audio from a DSLR shot with the high-quality audio from a digital audio recorder while simultaneously syncing the clips.

This option replaces the reference audio in the clip on disk with the high-quality audio when syncing the clips at the same time. After that processes, when you import the footage into Adobe Premiere Pro, the clips will use the high-quality audio and will act like any other clip. Keep in mind that the synced clips will be placed in the same place as your source files (but with a modified name).