
7. Managing Styles
The two previous chapters have covered CSS and how it works with your Web pages. After you’ve gotten the hang of CSS, though, you’ll find that you’re spending too much time trying to keep track of where your styles are (inline? internal? external?) and in what order they apply to your site. Or maybe it’ll be that you’re testing styles, but don’t want to change your entire site yet.
No matter what your particular issue, Dreamweaver has made it simple and straightforward to manage moving, duplicating, and deleting styles.
Renaming Styles
The names Dreamweaver assigns to styles for you aren’t particularly helpful or meaningful. It’s a good idea to give styles a descriptive name of your own choosing. You may also find you need to rename a style because your site has changed.
To rename a style for a class
1. In the Property Inspector, choose Rename from the Style pop-up menu (Figure 7.1). The Rename Style dialog appears (Figure 7.2).
Figure 7.1. Select Rename from the Style pop-up menu to give a style a new name.

Figure 7.2. Type the new name in the field to rename your style.

or
In the CSS panel, make sure the CSS Styles panel is visible and displaying the rule you want to rename (Figure 7.3). Right-click on the rule name and select “Rename Class” from the contextual menu (Figure 7.4). The Rename Class dialog appears (Figure 7.5).
Figure 7.3. You can also rename styles from the CSS Styles panel.
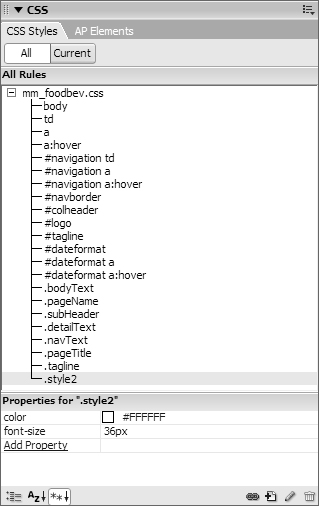
Figure 7.4. In the CSS Styles panel, choose your style, right-click, and select Rename Class.

Figure 7.5. They may have different names, but the Rename Style dialog and the Rename Class dialog do the same thing.

2. If the class you want to rename isn’t already selected, use the pop-up menu to choose it. Type a name in the New name field, and click OK.
3. If the style you chose is used in multiple places or it’s in an external style sheet that can affect multiple pages, you’ll be prompted as to whether you want to make this change everywhere (Figure 7.6). If you want this, click Yes.
Figure 7.6. If you want, Dreamweaver will update the name everywhere in your site after you rename a style.

Deleting Styles
When you delete a style from a style sheet, the formatting of any element using that style immediately changes.
To delete a style
1. Open a document, and in the CSS Styles panel, choose the style name to delete.
2. Click the Delete CSS Rule button in the lower right of the panel ![]() . Note that you don’t have to click OK or accept anything—it just disappears immediately.
. Note that you don’t have to click OK or accept anything—it just disappears immediately.
 Tip
Tip
• Even though you’ve deleted the style, any references to it will still exist in the document. That is, classes and ids aren’t removed from your pages when you delete rules that apply to those classes and ids.
Creating Rules From Inline Styles
Inline styles (first covered back in Chapter 5) are a handy way to test properties to see if using a particular bit of CSS does what you want it to do. However, remember that the main power of CSS is being able to apply it in many places in a document and many documents in a site—and if you’re only applying it to a single tag, you’re missing out on all that power. So while inline styles are great for quick tests, once your CSS has passed the test, it’s time to turn it into a rule.
To create a rule from an inline style
1. In your document, click anywhere within the area where the inline style is applied. In the CSS Styles panel, make sure that you’re in Current mode, and that the Rules pane is visible. You should see a rule called “<inline style>” (Figure 7.7).
Figure 7.7. To turn an inline style into a rule, first find the <inline style> rule in the CSS Styles panel.

2. Right-click on the “<inline style>” rule and choose “Convert to Rule” from the menu (Figure 7.8). The Convert Inline CSS dialog appears (Figure 7.9).
Figure 7.8. To convert the style to a rule, right-click, and choose Convert to Rule.

Figure 7.9. The Convert Inline CSS dialog lets you set all the options for your new rule.

3. The first choice in that dialog is what type of rule you want to end up with (Figure 7.10):
• A new CSS class, where you get to choose the class name.
• A rule that applies to all tags of the given type; that is, if the inline style is applied to a <p> (paragraph) tag, you can apply that style to all paragraphs.
• A new CSS selector, where the default is a rule based on the location of the inline style.
Figure 7.10. For instance, you can make a new class, a new selector, or a new rule that applies to all instances of a certain tag.
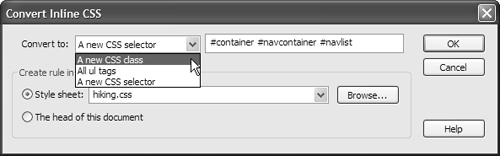
The last two are context-sensitive, so your defaults change depending on your inline style selection.
4. Next, you have a choice of creating the new rule in an external style sheet, or in the head of the current document. Any currently linked external style sheets will be in the pop-up. If you don’t have any external style sheets, put the new rule into the head of the current document. Choose one, click OK, and your new rule will be created.
Tips
• It’s possible for the Rules pane to show more than one style named “<inline style>,” so be careful that you’re choosing the correct one.
• You can’t create a new external style sheet from the Convert Inline CSS dialog. If you want your new rule to be in a new external style sheet, you can either:
• Follow the above steps to create a new internal rule, then follow the steps in “Moving Internal Styles to External,” later in this chapter.
or
• Follow the steps in the next task, “Creating a New External Style Sheet,” and then use the steps in this task to put the new rule into that style sheet.
Creating a New External Style Sheet
Up to now, we’ve covered how to create internal styles, but we also mentioned that internal styles may not always be the right choice. Here’s how to create a new external style sheet, either from scratch or using one of the many sample files that are included in Dreamweaver as a starting point.
To create a new external style sheet based on a sample file
1. From Dreamweaver’s menu, choose File > New. The New Document dialog appears (Figure 7.11).
Figure 7.11. The New Document dialog lets you create many different types of files.

2. If it wasn’t chosen by default, select the category Page from Sample. Under Sample Folder, select CSS Style Sheet to display a long list of style sheets in the center column (Figure 7.12). Choose any of them to see a preview and description in the right column.
Figure 7.12. Dreamweaver comes with plenty of CSS designs for you to use as starting points.

3. If you see a design you like, click Create. A new untitled style sheet document opens that contains the rules defined in the style sheet you selected. Save this file with a name that ends in .css.
To create a new external style sheet from scratch
1. Choose File > New. The New Document dialog appears (Figure 7.11).
2. In the New Document dialog, select Blank Page for the Category, CSS for the page type, and click Create. A new blank style sheet opens in Code view (Figure 7.13). Save this file with a name that ends in .css.
Figure 7.13. A blank CSS document, ready for you to add your rules.

Or
1. With a document open, click the Insert Div Tag button in the Common or Layout tab of the Insert Bar, and the Insert Div Tag dialog displays. Click New CSS Style, and the New CSS Rule dialog opens (Figure 7.14).
Figure 7.14. Use the Insert Div Tag dialog to open the New CSS Rule dialog.

2. Enter any class, tag, id, or pseudo-class selector that you’d like in your new CSS file. Set Define in to “(New Style Sheet File)” and click OK. The Save Style Sheet File As dialog appears (Figure 7.15).
Figure 7.15. If you said you wanted a new style sheet file, here’s where it’s actually created.

3. Choose a file name that ends in .css, and click Save. The CSS Rule Definition dialog appears (Figure 7.16). Add the rules you want (as described in Chapter 5), click OK, and you’ll be back at the Insert Div Tag dialog, with your new style sheet (including any rules you set) open in Code view behind the current document.
Figure 7.16. Now that you’ve created a new style sheet file, you need to add rules to it.

Tip
• If you’ve created a new style sheet using the Insert Div Tag dialog, your new style sheet is automatically attached to your document. If you created the new style sheet any other way, you’ll have to attach it manually. That’s covered in “Attaching a Style Sheet,” later in this chapter.
Moving Internal Styles to External
There are a number of reasons why your pages might have internal styles instead of using an external style sheet: possibly they’re from an older site (when that was more common), or possibly you used internal styles to test your layout. But now your internal style sheet is ready to live on its own, so your styles need to come out of your Web page and into a stand-alone file.
To move styles
1. Open the Web page that contains the style (or styles) you want to move. In the CSS Styles panel, make sure that you’re in All mode. Select the rules that you want to move, right-click, and choose Move CSS Rules from the contextual menu. The Move To External Style Sheet dialog appears (Figure 7.17).
Figure 7.17. To move a rule to an external style sheet, bring up the Move To External Style Sheet dialog.

2. You should be prompted with the correct place to save your file. Come up with a good name (ending in .css) and click Save. Your rules will be moved to the style sheet, and the style sheet will be attached to the current page (if that’s not already the case).
Tips
• When you moved internal styles to external in versions of Dreamweaver prior to CS3, the styles were only copied, not moved. You no longer have to manually attach the style sheet and then delete the styles from the current document, as Dreamweaver does it all for you.
• If your external style sheet already contains any rules with the same name as the rules you’re moving, Dreamweaver displays a dialog like the one in Figure 7.18. You can choose if you want both rules in the style sheet or just the previous version.
Figure 7.18. If you’re moving a rule that might cause a collision, Dreamweaver warns you about the problem.

Attaching a Style Sheet
It doesn’t do you any good to create a style sheet if your Web pages don’t know about it. In order for a Web page to use an external style sheet, that style sheet has to be attached to the Web page.
To attach a style sheet
1. Click the Attach Style Sheet icon at the bottom of the CSS Styles panel ![]() .
.
or
Right-click in the CSS Styles panel and choose Attach Style Sheet (Figure 7.19).
Figure 7.19. There are at least two ways to attach a style sheet from the CSS Styles panel.

or
From the Property Inspector, choose Attach Style Sheet from the Style pop-up menu (Figure 7.1).
2. The Attach External Style Sheet dialog appears (Figure 7.20). Click the Browse button to bring up the Select Style Sheet File dialog (Figure 7.21). Navigate to an existing style sheet, select it, and click OK.
Figure 7.20. Choose which style sheet you want to attach to your Web page, and how you want to attach it.

Figure 7.21. Choose which style sheet file to attach by browsing for it.

3. Back in the Attach External Style Sheet dialog, select Add as Link if it isn’t already chosen, and click OK to attach the style sheet. If your style sheet includes any rules that affect the active document, you’ll see those changes reflected immediately.
Tips
• Take a look at the All Rules pane of the CSS Styles panel. Notice that your style sheet is now included, and all of its properties can be viewed.
• You’re offered a choice of using link or import to attach your style sheet. Each has its advantages: link works in more browsers, for instance, while import allows you to nest style sheets (i.e., you can attach a style sheet using import, and then that style sheet can include an import of another style sheet, and so on).
• You can use both link and import in the same document. That’s a handy way to use two style sheets, where the link attaches a bare-bones style sheet and the import attaches a more complex style sheet that older browsers (such as Netscape 4.x) can’t handle.
• When attaching a style sheet, you’re also offered a choice of Media. Those choices include all, aural, braille, handheld, print, projection, screen, tty, and tv (Figure 7.22). It’s also acceptable to use no media type at all; in that case, the style sheet applies to all media types. And finally, you can also enter in a list of media types (comma-separated) if you want your style sheet to apply to some media types but not others.
Figure 7.22. Media options are set here. For instance, if you want your style sheet to only apply when the page is printed, choose the print media type.

• If you set the media type for your style sheet, you can test it by choosing View > Style Rendering and picking which media type to view. When you do this, though, remember that few browsers offer full support for media types.
Drag-and-Drop Styles
If you’ve found all the methods so far for dealing with style management to be somewhat complicated, then here’s what you’ve been wishing you can do: drag and drop styles.
Moving styles inside a document
As mentioned back in Chapter 5 in the sidebar “External, Internal, and Inline: Look Ma, It’s the Cascade,” where style rules are physically located determines which rules take precedence when there’s a conflict. If you have two rules that conflict inside a document (either a Web page or a style sheet) and you want the one that’s currently being overridden to dominate, all you have to do is drag that rule below the other.
To move a style inside a document
1. Open the Web page or style sheet that contains the style (or styles) you want to move. In the CSS Styles panel, make sure that you’re in All mode, select the rules that you want to move, and drag them to their new location (Figure 7.23). A blue line (a black line on the Mac) appears showing where the rules will be relocated.
Figure 7.23. On a Mac, you can see which style you’re dragging while it’s being dragged.

2. When you’re happy with the new location, release the mouse, and Dreamweaver moves the rules for you.
Moving styles from one document to another
Not only can you move styles inside a document, but you can also move them from document to document—whether the documents are style sheets or Web pages.
To move a style from one document to another
1. Open a Web page that either links to two style sheets, or one that contains the style (or styles) and also links to an external style sheet. In the CSS Styles panel, make sure that you’re in All mode and that both files are displayed (if no external style sheet is displayed, follow the directions in “Attaching a Style Sheet”). Select the rules that you want to move, and drag them to their new location (Figure 7.24). A line appears showing where the rules will be relocated.
Figure 7.24. On either platform, you can drag multiple style rules at one time.

2. When you’re happy with the new location, release the mouse, and Dreamweaver moves the rules for you.
Tips
• If you want to copy a style rule (that is, you want it to end up in both the original document and the target document), hold down the Control (Option) key while dragging the rules.
• If you’re moving a style rule into a document that already contains a rule with that name, you’ll get a warning dialog like the one in Figure 7.18.
