15. Making Life Easier: Using Templates, Libraries, and Snippets
The first thing you do when you begin a site in Dreamweaver is define a site root folder, as discussed in Chapter 2. You tell Dreamweaver where you’re keeping all your site files. Dreamweaver rewards you for sharing the information by making all sorts of cool site-wide tools available to speed up your workflow and make your life easier. In seconds, Dreamweaver’s site management tools can make changes to every file in your local site root folder—changes that would take you much longer done one file at a time.
We’ll cover two of those timesaving whole-site tools, templates and libraries, in this chapter. In addition, you’ll learn how to create timesaving bits of reusable code called snippets. You access templates and Library items from the Assets panel. Snippets have a separate panel.
Before getting into the details, some brief definitions are in order. Templates are like master page designs. They create a uniform page design for a site while allowing certain material on each page to be customized for individual pages. Library items are not full pages, but reusable objects with text, code, images, or other elements that you insert in documents. For example, you can create a navigation bar as a Library item. Updating either a template or a Library item results in the automatic updating of any page in the entire site that is attached to the template or library. Snippets are custom-built code samples that you find useful and save for quick insertion. Changing a snippet doesn’t have any site-wide effects.
Creating a Template
Templates are perfect for many situations. For example, let’s say you have a large site where many different individuals change content and add pages. Using a template provides control over the page layout and design by restricting changes only to certain editable regions on a page. Other areas on the page are locked regions, which can’t be changed by people working on an individual page. Locked regions can only be edited in the original template file. This kind of control guarantees a consistent look and feel for a site, and prevents any accidental changes to locked regions.
When a change is made to a template, every page made from, or attached to, the template is automatically updated throughout the entire site. You can create a template from scratch, but it is simpler to use an existing page as a model for the template, and that’s what we’ll explain here.
Before you save a document as a template, make sure you’ve already included any needed <meta> tags, style sheets, behaviors, or other underlying parameters. These page elements are located in the locked regions of a template. There’s no way to add things like style sheet links to individual pages made from a template—they must exist in the template already.
To create a template from an existing page
1. Open the document you want to turn into a template.
2. Choose File > Save as Template.
or
Choose Make Template from the Templates pop-up menu in the Common tab of the Insert Bar (Figure 15.1).
Figure 15.1. The pop-up menu for the Template icon in the Common tab of the Insert Bar covers the basic commands you’ll need.

The Save As Template dialog appears with the Site pop-up menu set to the current local site (Figure 15.2).
Figure 15.2. Any page can be saved as a template. The name you type in the Save as field will be followed by the file extension .dwt in the Assets list.

3. Enter the requested information in this dialog.
• Existing templates: You don’t enter anything in this field. Dreamweaver lists any existing templates for the site automatically.
• Description: Type a brief description of the template.
• Save as: Type the name of the template.
4. Click Save.
If it doesn’t already exist, Dreamweaver adds a Templates folder to your site files. Your new template will be inside this folder, with the file extension .dwt, indicating that the document is a Dreamweaver template.
 Tips
Tips
• Templates are for local use; they’re never loaded in a browser. The Templates folder and its .dwt files don’t need to be uploaded to the server. Just upload the individual HTML pages made from the template. To make this easier, you can cloak the Templates folder, which prevents Dreamweaver from uploading it to the remote server. See “Cloaking Files,” in Chapter 2, for more information.
• It’s possible to create a template from scratch. Choose File > New and select Blank Template in the New Document window. Or you can start one using the New Template button in the Templates area of the Assets panel.
Adding Editable Regions
Once you’ve saved the .dwt file, you will want to open it and define any regions you want to be editable. Regions on the page that you don’t specifically mark as editable will be locked and can’t be changed by anyone working on pages made from your template—hey, that’s the whole point!
To add an editable region
1. Open the template document.
2. Select the element to make editable, for example <div>, <img>, or <td>, with the Tag Selector in the document window.
or
Select the text to make editable. This choice is most useful when the text is within a div. Selecting the entire div, rather than just the text within it, makes everything about the div editable, including its position. You probably don’t want your users being able to change anything other than the text, so just select that text and it will be the only editable part of the div.
3. Choose Editable Region from the Templates pop-up menu in the Common tab of the Insert Bar (Figure 15.3).
Figure 15.3. Use the pop-up menu for the Template icon in the Common tab of the Insert Bar to designate editable regions in the template.

or
Choose Insert > Template Objects > Editable Region.
The New Editable Region dialog appears (Figure 15.4).
Figure 15.4. A short, descriptive name is best for a template region. Don’t use spaces in the name; instead, use the underscore character, as shown.

4. Type a name for the region.
The editable region will be outlined in green in the document window. A tab at the upper left of the region displays the region name (Figure 15.5).
Figure 15.5. In the document window, the editable region is indicated with a visible tab giving the region name.

6. (Optional) Delete the text that was in the region and replace it with some general instruction regarding the region, for example, “This region is for main content.” If you don’t do this, it’s okay—anyone making a page from the template can replace the text later.
Tips
• You can make an entire table editable, or the table header, a table row, or individual cells within a table. But you can’t put a table column or multiple noncontiguous table cells in a single editable region.
• Don’t use special characters in region names: no ampersands (&), single quote marks (‘), double quote marks (“), or angle brackets (<) and (>).
• Page titles are editable by default on pages that are created from templates.
Removing Editable Regions
If you make a region editable and later decide you want to lock it instead, it’s easy to remove the editable region.
To remove an editable region
1. Click the tab in the upper left of the region to select the region.
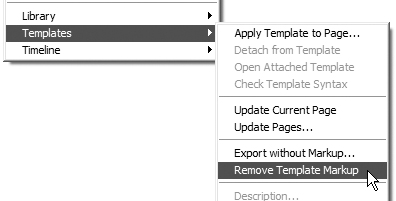
2. Choose Modify > Templates > Remove Template Markup (Figure 15.6).
Figure 15.6. To remove an editable region from a template, choose Remove Template Markup.
3. The region is locked.
Building Pages Based on a Template
Most of the time you will create new pages based on your template. This is the easiest and least confusing way to make templates work for you. It’s also possible to take an existing page, say from an older site that you’re completely redesigning, and apply a template to that page. That method is a bit trickier.
To make a new page from a template
1. Choose File > New.
The New Document dialog appears.
2. Click the Page from Template tab, then click the site you are working on in the Site column.
The existing templates for that site appear in the Template for Site column.
3. Select the template you want from the Template for Site column.
A preview of the template appears in the dialog (Figure 15.7).
Figure 15.7. If you begin a new page from a template with the File > New command, you must choose the site, then the template.

4. Click Create.
A new page, based on the template, appears.
5. Add content to the editable regions and save the new document with an appropriate file name and location in your site.
Tip
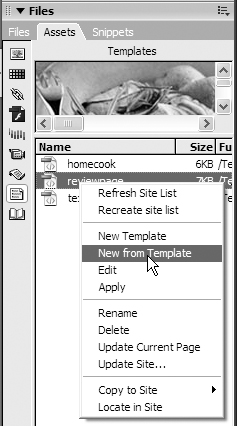
• You can create a new page from a template faster once you get used to working with templates. In the Assets panel, click the Templates category, then right-click the template name and choose New from Template from the shortcut menu (Figure 15.8).
Figure 15.8. Fewer steps are involved in starting a new page from a template if you right-click the template name in the Assets panel.
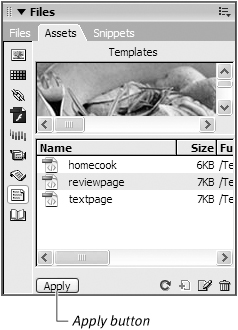
To apply a template to an existing page
1. Open the existing document to which you want to apply the template.
2. In the Assets panel, select the template you want and click the Apply button at the lower left (Figure 15.9).
Figure 15.9. Modify an existing page to fit into a template page by selecting the template and clicking the Apply button.
or
Drag the template from the Assets panel to the document window.
or
Choose Modify > Templates > Apply Template to Page. The Select Template dialog appears. Click a template in the list to choose it.
The Inconsistent Region Names dialog appears (Figure 15.10). This dialog allows you to tell Dreamweaver in which region of the new page it should place the document’s existing content.
Figure 15.10. When retrofitting an existing page to work with a template, you must decide where to put the content. The pop-up menu shows possible regions.
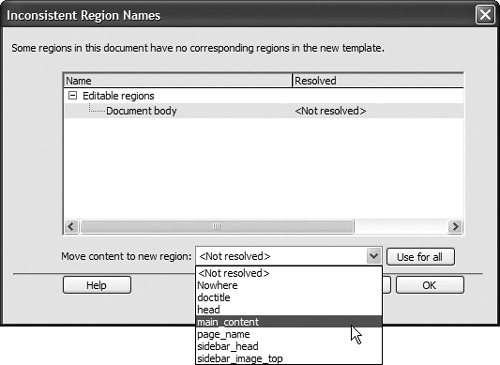
3. In the Inconsistent Region Names dialog, do the following:
• In the scrolling list, select an unresolved region.
• Use the “Move content to new region” pop-up menu to select an editable region for the content.
If you choose Nowhere from the pop-up menu, the content is removed from the document. If you click the “Use for all” button, all the unresolved content is moved to the selected region.
4. Click OK.
5. The resulting document probably needs some cleaning up to work seamlessly with the template. For example, you may need to restyle some text, or move a bit of content manually. After that is completed, save as usual.
Tip
• Dreamweaver expects the Templates folder to be at the top level of your site structure. Don’t move it into a subfolder. If you do, Dreamweaver won’t display the template files in your Assets panel or in the New Document template list.
Modifying a Template
Templates give you tons of control over what can be edited and what can’t. Sure, that’s important. But what happens if you make lots of pages from your template and then something changes? Maybe you need to add a new item to the menu, or you need a new editable region on the page. The answer is that something really cool happens when a Dreamweaver template is modified: Dreamweaver automatically changes all the pages you’ve already made using that template. So you can make changes to just one page (the template) and have those changes automatically ripple through the site.
Normally, you’d start your modification directly in the template file. But you can also start from any document that is attached to the template. You can pick and choose the attached pages to which you want the changes to apply.
To modify a template file
1. In the Assets panel, click the Templates button to display the templates, then double-click the template file you want to edit.
or
In the Assets panel, click the Templates button to display the templates, then highlight the template file and click the Edit button ![]() at the bottom of the panel.
at the bottom of the panel.
The template file opens in the document window.
2. Edit as desired, then choose File > Save, or press Ctrl-S (Cmd-S).
The Update Template Files dialog appears. Each file attached to the template is listed in the dialog (Figure 15.11).
Figure 15.11. Here’s the powerful part of using templates. Dreamweaver offers to update template-based pages when you change a template.

If you click Update, every file attached to the template will update. If you click Don’t Update, none of the files attached to the template will update.
You can’t choose to modify just one page here (it’s all or nothing), but it’s possible to do that elsewhere. See the section below, “To modify an individual template-based page” for details.
3. Click Update.
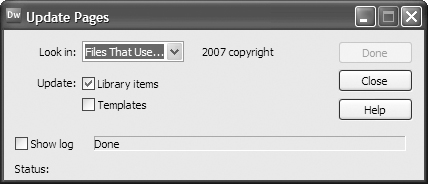
The Update Pages dialog appears (Figure 15.12). Dreamweaver sorts through all the files in your site and makes the updates, showing you the progress in the Update Pages dialog.
Figure 15.12. If you allow Dreamweaver to update template-based pages, it reports the results when it’s finished.

This dialog also allows you to update all the pages in the site to their corresponding templates, or just update files based on a specific template. If you don’t need any additional updates other than the ones Dreamweaver already made, go to Step 7.
4. (Optional) From the “Look in” pop-up menu, choose Entire Site or Files That Use.
The first choice reapplies all the templates in the site to files made from those templates. The second choice, which is what you will want to do most of the time, just updates the pages based on the template you just edited.
When you make a choice from the “Look in” pop-up menu, the inactive Done button becomes active, and its label changes to Start.
5. (Optional) Make sure that the Templates check box is selected.
6. (Optional) Click Start.
When the process is complete, the Start button changes to Done and becomes inactive.
7. Click Close to dismiss the Update Pages dialog.
8. Close the template file.
To modify a template attached to a current document
1. With a document based on a template open, choose Modify > Templates > Open Attached Template.
The template opens in a separate window.
2. Make your modifications as described in the previous section.
When you save the template, you’ll be prompted to update pages attached to that template, including the page you started with.
To modify an individual template-based page
1. Change a template file as described above. In the Update Template Files dialog (Figure 15.11), click Don’t Update.
2. Open a document attached to the same template.
3. Choose Modify > Templates > Update Current Page.
The page updates with the changes you made to the template. No other pages in the site will update.
Tips
• When your template links to a CSS file, all your template-based pages link to it as well. If you change your CSS rules, the pages created from the template automatically reflect those changes in exactly the same way non-template-based pages reflect CSS changes.
• HTML pages changed by the update of a template file need to be uploaded to the server for the change to be visible to your site’s visitors. The easiest way to do this is to synchronize the local and remote sites. See “Synchronizing the Local and Remote Sites” in Chapter 2 for more information.
Creating a Library Item
For someone working alone, the restrictions imposed by using a template may be unnecessary or even annoying. For example, when you use templates, you have to set up the editable and locked regions, and then when you go to modify a page based on the template, you don’t have access to page elements in the locked regions. These restrictions are great if you’re a designer who is giving pages to co-workers to modify, but on sites where you want to exercise total control over editing every page, Library items offer some of the same timesaving abilities to update pages and maintain consistency as templates, but with far fewer restrictions.
Library items aren’t full pages. They’re small bits of text, images, or code that you insert when needed. Good material for a Library item might be a navigation bar, copyright notice, list of links, graphic masthead, or perhaps a search box. If you want to use something frequently, have it display consistently on any page, and update all instances of it at one time, a Library item fits the bill. And Library items are easy to create and use.
To create a Library item
1. Open a document.
2. Select an element in the document <body>. It can be anything you want to reuse: text, tables, forms, navigation bars, images, or other elements.
Choose Modify > Library > Add Object to Library.
or
In the Library category ![]() of the Assets panel, click the New Library item button
of the Assets panel, click the New Library item button ![]() .
.
or
Drag the selection into the Library category of the Assets panel.
4. The item appears in the Library category of the Assets panel (Figure 15.13). Type a name for the item.
Figure 15.13. Type a name for your new Library item here.

In the document window, the item will be highlighted with a color, indicating that it’s a Library item.
Tips
• The color used to highlight a Library item is yellow by default. If desired, you can change this color in Dreamweaver’s Preferences in the Highlighting category.
• If it doesn’t already exist, Dreamweaver creates a Library folder at the top level of your site. Library items are stored in this folder, with the file extension .lbi. The folder is for local use and doesn’t need to be uploaded to the server.
Using a Library Item
All you have to decide is where you want to use your Library items on your pages. The rest is easy.
To insert a Library item
1. Position the insertion point in the document.
2. Drag the Library item from the Library category of the Assets panel into the document.
or
Highlight the Library item and click the Insert button at the lower left of the Assets panel (Figure 15.14).
Figure 15.14. A quick way to insert a Library item into a document is with the Insert button at the lower left of the Assets panel.

The Library item appears in the document.
To delete a Library item
• From a document: select the Library item in the document window and press Backspace (Delete).
• From a site: choose the Library item in the Library category of the Assets panel and press Backspace (Delete). This step cannot be undone.
Tip
• Library items become part of the page’s code and are subject to any CSS rules in style sheets linked to the page. For example, if your Library item contains a paragraph, and you have a CSS rule for the p selector, the inserted item will reflect the rule.
Editing a Library Item
You need to be a bit careful when you edit Library items, because when you change a Library item, Dreamweaver changes all instances of that item throughout all the pages of your site, in any documents that are not currently being edited. This can take some time if you have a large site, and you have to edit the item again to undo a mistake; the Undo command won’t save you in this case. It’s nothing to worry about; just be aware that changes can have far-reaching effects.
To edit a Library item
1. Do one of the following:
Double-click the item in the Library category in the Assets panel.
or
Highlight the item in the Library category in the Assets panel and then click the Edit button ![]() in the lower right of the Assets panel.
in the lower right of the Assets panel.
or
Highlight the item in the document window. The Property Inspector shows information for the Library item (Figure 15.15). Click Open.
Figure 15.15. When you select a Library item in the document window, you can use the Property Inspector to open the Library item.

2. A window much like a document window appears, but it contains only the Library item (Figure 15.16).
Figure 15.16. An open Library item window is rather like a normal document window, except there’s nothing there but the Library item.

3. Edit the item as needed.
4. Choose File > Save, or press Ctrl-S (Cmd-S). The Update Library Items dialog appears (Figure 15.17).
Figure 15.17. The benefit of using Library items comes from the ability to update any instances of the item in your site with one click of the Update button.
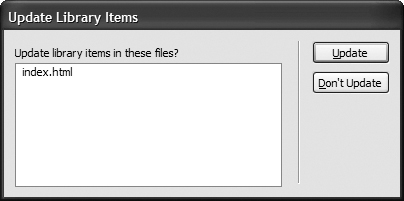
• Update: Updates every instance of the Library item used in your site.
• Don’t Update: No Library items are updated.
See the following section, “To update a Library item only in the current document,” if you want to select individual pages to update.
5. Click Update to have Dreamweaver open the Update Pages dialog, run through all the files containing the Library item, update them, and report “Done” to you in the dialog when it’s finished (Figure 15.18).
Figure 15.18. If you Update Library items, Dreamweaver reports on what it did.
6. Click Close to dismiss the Update Pages dialog.
To update a Library item only in the current document
1. Edit the Library item, then click Don’t Update in the Update Library Items dialog (see the previous section, “To edit a Library item”).
2. Open a document containing the Library item.
3. Choose Modify > Library > Update Current Page. The Library item on this single page updates.
4. Save the document.
To rename a Library item
1. Highlight the name of the Library item in the Library category of the Assets panel. Do one of the following:
Right-click and choose Rename from the shortcut menu.
or
Click the item name, wait a second, and click it again.
The Library item’s name is selected and becomes editable (Figure 15.19).
Figure 15.19. Need a better name for a Library item? You can change the name here.
2. Type the new name for the item.
3. The Update Files dialog appears (Figure 15.20). Click Update to change the name of the Library item on every page where it is in use.
Figure 15.20. When you change a Library item name, Dreamweaver asks you if you want to change all the instances of the item in the site to reflect the new name.

Tips
• Library items can’t contain any head elements, so you don’t have access to the CSS panel when editing a Library item (internal CSS style sheets appear within the <head> tag).
• Library items can’t contain a <body> tag, so you don’t have access to the Page Properties when editing a Library item.
• HTML pages changed by the update of a Library item need to be uploaded to the server for the change to be visible to your site’s visitors.
• If a document is open when a Library item updates, you’ll have to save the document manually. Updates save automatically in a closed document.
Working on Library Items with the Property Inspector
As we mentioned in the previous section, “Editing a Library Item,” the Property Inspector offers some options for working on Library items. The previous section explained how to edit the Library item using the Open button, but there are two as yet unexplained buttons on the Property Inspector, Detach from original and Recreate.
Detaching a Library item doesn’t remove the item from the page. It breaks the connection between the copy of the Library item on the current page and the original source in the site’s Library folder. If you later update the original Library item, the current page’s code won’t be changed by the update.
Sometimes you can have a page that contains the code from a Library item that was removed from the site’s Library folder (or never existed there). For example, let’s say that you copied a page (that contained a Library item) from one of your sites to a different site. The site that now contains the page will not, of course, have a corresponding Library item in its Library folder. You can use the code in the current document to re-create the Library item in the new local site.
To detach the Library item
1. Select a Library item in the document window.
2. On the Property Inspector, click Detach from original (Figure 15.21).
Figure 15.21. The Property Inspector can be used to detach a Library item from the source, or to re-create a Library item that’s lost or missing.

Dreamweaver displays a dialog asking if you’re sure you want to detach the item. Click OK. The link between the item on the page and the original in the Library is broken.
To re-create a missing or deleted Library item
1. Open a document containing code for a Library item that is missing from the Library category of the Assets panel.
2. Highlight the item. The tag selector should display <mm:libitem>.
3. On the Property Inspector, click Recreate. The item is re-created using the name it has on this page. The re-created item appears in the Library category of the Assets panel.
Tips
• If you detach a Library item from a page, the highlighting in the document window that indicated that the element was a Library item disappears along with the broken connection to the Library item source.
• Right-clicking a Library item in the document window reveals a shortcut menu with the same options available on the Property Inspector to Open, Detach, or Recreate.
Using Dreamweaver Snippets
The Snippets panel is used to store useful bits of code, or snippets, that can be inserted anytime, anyplace. In that way snippets are like Library items. But there’s a big difference between snippets and Library items. If you change or update a snippet, there’s no sitewide update to previously inserted versions of the snippet. There’s no connection between the code in an inserted snippet and the original snippet.
Dreamweaver comes with many useful pre-built snippets already loaded and ready to use. You’ll find them in the Snippets panel. If the Snippets panel is not already visible, choose Window > Snippets to bring it forward.
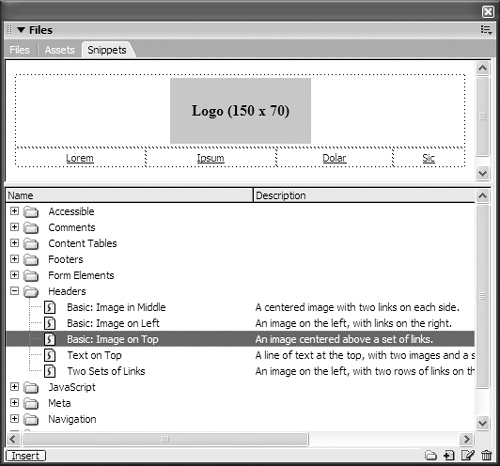
In the Snippets panel (Figure 15.22), the snippets that come with Dreamweaver are nicely organized into folders for you. Inside the folders you find individual snippets. Click an individual snippet to see a preview in the preview pane at the top of the panel. You can also see a description of the highlighted snippet. If you work with a narrow window, as in Figure 15.22, you may have to scroll to the right with the horizontal scrollbar at the bottom of the Snippets panel to see the description. Expand the width of the panel (Figure 15.23) to read the description without scrolling.
Figure 15.22. The Snippets panel comes preloaded with many useful snippets.

Figure 15.23. There’s a brief description of a snippet to the right of its name.
You’ve probably already figured out that any custom snippets you save appear in the Snippets panel, too. Your snippets and Dreamweaver’s snippets are used in the same way. We’ll explain how to save a new snippet first, and then how to use it.
To save a snippet
1. Open a document containing the material you’d like to make into a snippet. Select the snippet (Figure 15.24). Be sure you get all the surrounding material needed by clicking the tag in the tag selector.
Figure 15.24. Select something on a page to save as a snippet.

2. Click the New Snippet icon ![]() in the bottom right of the Snippets panel. The Snippet dialog appears (Figure 15.25). Complete the following fields:
in the bottom right of the Snippets panel. The Snippet dialog appears (Figure 15.25). Complete the following fields:
• Name: Type a name for the new snippet. See the Tip at the end of this section regarding rules for naming snippets.
• Description: Type a description. This is helpful, but optional.
• Snippet type: Click Wrap selection if the snippet is meant to wrap around a selection. Click Insert block if the snippet is meant to be inserted as a block.
If you choose Wrap selection, you will be asked to choose the parts of the snippet to insert before or insert after the wrapped selection.
• Insert code: The code you selected in the document is displayed here. This is an editable field.
• Preview type: Choose either Design or Code.
Figure 15.25. When you save your own snippets, you decide on a name, description, and other basics.

3. Click OK.
4. The snippet appears in the Snippets panel (Figure 15.26). The preview displays in the preview pane.
Figure 15.26. Snippets you save appear in the Snippets panel. You can drag them into existing folders or organize new folders of your own.

To use a snippet
1. Position the insertion point in the document.
2. Highlight the snippet in the Snippets panel and do one of the following:
Click the Insert button at the lower left of the Snippets panel.
or
Double-click the snippet name.
or
Drag the snippet from the Snippets panel onto the document.
3. The snippet appears in the document. Replace any dummy text with correct content (Figure 15.27).
Figure 15.27. When you insert a snippet into a document, the text or other element the snippet contains appears on your page.
Tips
• The snippet preview pane won’t display the snippet with any CSS shown. The snippet must be on a page before CSS rules take effect.
• Delete or modify snippets by highlighting them and using the Edit Snippet or Remove buttons at the lower right of the Snippets panel.
• Organize your snippets by dragging them into preexisting folders or creating new folders of your own naming.
• Don’t use any special characters such as ampersands (&) or angle brackets (< and >) in snippet names.