
18. Managing Your Site
As you’ve seen in the rest of this book, building a site means creating dozens, hundreds, or even thousands of files that must work together to present a dynamic, exciting Web site. Keeping track of and managing all these files, a process called site management, may not be an exciting job, but it is essential.
The problem of site management gets even more complex when, as is extremely common these days, you are just one member of a team that is responsible for building and maintaining the Web site. Imagine, for example, that you have two or three people who could be responsible for making changes to page content. It would be easy for one person to overwrite the changes already made by a coworker on the same page. That’s where Dreamweaver’s collaboration features come in. With Check In/Check Out, members of the team are notified when another person is already working on a particular file on the site.
In this chapter, you will learn how to manage the files and folders that make up your site; work with Dreamweaver’s collaborative tools; and learn different ways to look at and work with your site.
Planning for Site Expansion
When you’re designing a site, you take the time to think about the site navigation so that your site visitors have an easy time finding the information they need. But what about your needs? While you’re building and maintaining a site, it’s just as important for you to plan the folder structure so that you can easily and quickly find items you need to work on. Web sites have a disturbing tendency to grow, so when you set up your site, lay out your folder structure logically, and leave room for expansion in your site structure (Figure 18.1).
Figure 18.1. You should create your site structure with logical sections (shown here as folders) and plan for growth.

For example, if you have different sections of a site (as represented in the site’s navigation), it’s a good idea to create a folder for each section (which will contain all of the pages for the section). Then consider creating an images folder inside each section folder. After all, you will probably have images for each section that are used only in that section of the site. A separate images folder in the root of your site can handle images that are used globally throughout the site.
As your site grows, you can add additional folders for new sections from the site root, or you can add folders inside the existing section folders for new subsections.
 Tips
Tips
• Make sure that you name your files and folders understandably. While you are creating a site, you may remember what the med_sec_hed.html file is used for, but when you come back to the site four months later, you might not have a clue, at least without opening the file and looking at it. Instead, name the file something like media_home.html, and it makes it easier for you to pick up where you left off. This also helps make your site easier for other people to maintain.
• Don’t forget that there are some characters that you can’t use in file and folder names, including space, #, &, @, /, and most other punctuation. Use a hyphen or underscore as substitutes for a space.
• If you create images folders inside section folders, give those images folders descriptive names, too. We like to use the name of the section, followed by an underscore, then images, like so: recipes_images.
Viewing the Site Map
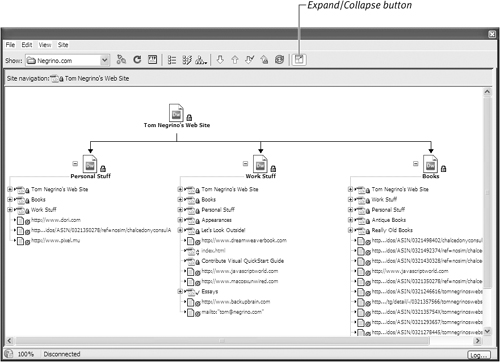
When you need a bird’s eye view of your Web site, Dreamweaver has a visual tool, the Site Map, which helps you see the links and relationships between the files on your site. The Site Map is a different view in the Files panel, and it allows you to see the links between the different files in the site in a tree display, descending from the site’s index page (Figure 18.2). You can switch the Site Map between a purely graphic view of the tree structure, or a view of both the tree and the Files list simultaneously. You can also choose to view a file’s name or its page title (the title that appears in a Web browser).
Figure 18.2. The Site Map shows you the structure of your site in a tree form, with lines and arrows showing links to files, and links from the files listed below each file.
To show and hide the Site Map
1. At the top of the Files panel, click the Expand/Collapse button.
On Windows, the Dreamweaver window will be replaced by the Site Map (Figure 18.2).
On the Mac, the Files panel will appear in a new window, displaying the Site Map (Figure 18.3).
Figure 18.3. On the Mac, the Files panel expands into its own window when you display the Site Map.

2. (Optional) To view the Files list along with the Site Map, choose Map and Files from the Site Map pop-up menu in the toolbar at the top of the window.
The Files list appears next to the Site Map (Figure 18.4).
Figure 18.4. If you prefer, you can show the Files list next to the Site Map.

3. When you’re done with the Site Map, click the Expand/Collapse button again to toggle the window back to the normal Files panel.
Tips
• You must define the home page for a site before you can view the Site Map.
• For the purposes of the Site Map, the home page, which is the starting point for the tree structure, does not have to be the index page of your site. So, for instance, if you have an initial splash page with an animation as the first page of the site that then automatically changes to the main page with content, you can make that main page the starting page for the Site Map. Just select the page you want in the Files panel, right-click, and choose Set as Home Page from the resulting shortcut menu.
To switch between file names and titles
2. On Windows, choose View > Site Map Options > Show Page Titles, or press Ctrl-Shift-T.
or
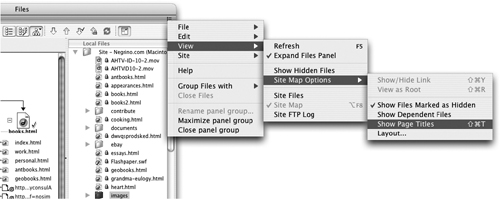
On Mac, from the Options menu at the upper-right corner of the Files window, choose View > Site Map Options > Show Page Titles, or press Cmd-Shift-T (Figure 18.5).
Figure 18.5. On the Mac, use the Options menu at the upper-right corner of the Files window to show page titles.
The file names toggle to titles or vice versa.
To set Site Map preferences
1. To set what displays in the Site Map, choose Site > Manage Sites.
The Manage Sites dialog appears.
2. Click Edit.
The Site Definition dialog appears for the current site.
3. Click the Site Map Layout category from the Category list on the left side of the window.
The Site Map Layout pane appears (Figure 18.6).
Figure 18.6. The Site Map Layout pane of the Site Definition dialog allows you to define the look of the Site Map.
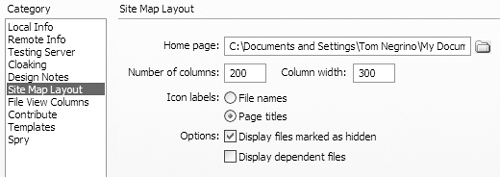
4. Make one or more choices in this dialog:
• Home page allows you to set the home page for the Site Map, though it is easier to select the file you want to use as the home page in the Files panel, as explained in an earlier tip.
• Number of columns sets the number of your site’s pages that display per row in the Site Map.
• Column width specifies how much space, in pixels, are taken up by each column in the Site Map.
• Icon labels allows you to display either the file names or the page titles for the icons in the Site Map.
• Options allows you to display files that you’ve marked as hidden, or display dependent files (that is, files that a page needs to work properly, such as images and external style sheets).
5. When you’re done, click OK at the bottom of the Site Definition dialog.
The Manage Sites dialog reappears.
6. Click Done.
Working with the Site Map
Besides viewing files and their relationships within your site, you can also use the Site Map to rename files, view and change links between files on your site, or create and link to new files.
To rename files in the Site Map
1. Display the Site Map.
2. Click an icon to select it.
The icon highlights.
3. Depending on what is showing (below the icon) click the name of the file or the page title.
The name or title is selected (Figure 18.7).
Figure 18.7. Before you can change the name of a file in the Site Map, you must select it.

4. Type the new name, then press Enter (Return).
To create or change links in the Site Map
1. Display the Site Map.
The Site Map shows the links between files as lines.
2. Click an icon to select it.
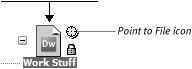
The circular Point to File icon appears next to the file icon (Figure 18.8).
Figure 18.8. Use the Point to File icon to create or change links.
3. Click the Point to File icon, and drag to point to another file icon in the Site Map or Files list (Figure 18.9).
Figure 18.9. Point to the file in the Files panel that you want to link to.

4. Release the mouse button.
Dreamweaver creates the link between the two files.
To create a new file and link it to an existing page
2. Click a page’s icon to select it.
3. Right-click the icon, then choose Link to New File from the resulting shortcut menu.
The Link to New File dialog appears (Figure 18.10).
Figure 18.10. You can use the Link to New File dialog to create a new file and link to it in one step.
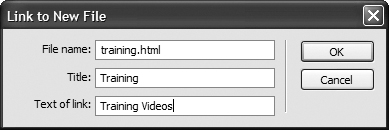
4. Fill out the File name, Title, and Text of link fields.
5. Click OK.
The new page appears in the Site Map, linked to the existing page (Figure 18.11).
Figure 18.11. The new page appears in the Site Map, under the page that you linked to.

Setting Up Check In and Check Out
In Chapter 2, you saw how to copy selected files or folders between the local and remote sites in the Files panel using the Get file or Put file buttons. Get and Put work fine when you are the only person working on a site, but you don’t want to use them when you are working on a site with other members of a team. In that case, you would like to prevent one person from accidentally undoing or overwriting changes made by another member of the team when the page is transferred back to the remote site.
When you are working with other people on a Web site, you will come to rely on Dreamweaver’s ability to keep track of and manage who is working on a file. Known as Check In/Check Out, this feature prevents more than one team member from working on a particular file at a time. The feature also lets all members of the team know who is currently working on what file. Check In/Check Out replaces the use of Get and Put for sites that have Check In/Check Out enabled. When you want to work on a file, you check it out, and when you are done working on the file and want to send it back to the remote server, you check it in.
Dreamweaver shows the status of files in the Files panel. Files that are checked out to you appear with a green checkmark next to them, and files that are checked out by others appear with a red checkmark next to them. Files that are read-only (because they are files that Dreamweaver can’t edit, or because the last time Dreamweaver connected to the remote server and checked their status they were checked out) appear with a padlock icon (Figure 18.12).
Figure 18.12. These files in the Files panel show their checked out status (though you can’t tell the difference between the red and green checkmarks in this figure).

In order to get the Check In/Check Out system to work properly, there are two cardinal rules all members of the Web team must follow:
• All members of the team must enable Check In/Check Out and Design Notes in their site definitions.
• All members of the team must always use Dreamweaver or Contribute (and no other tools, such as an FTP program) to transfer files to and from the remote Web server.
Tips
• If Check In/Check Out is enabled for your site and you use the Get file or Put file button in the Files panel, rather than the Check In or Check Out button, Dreamweaver transfers read-only versions of the file to and from the remote server.
• When any team member checks out a file, Dreamweaver places a small text file on the remote site with the name of the checked out file plus the extension .LCK. Dreamweaver uses this file to store the Check Out name and e-mail address of the person who is using the file. When the file is checked back in, Dreamweaver automatically deletes the .LCK file.
To enable Check In/Check Out for your site
1. Choose Site > Manage Sites.
The Manage Sites dialog appears (Figure 18.13).
Figure 18.13. Begin enabling Check In/Check Out in the Manage Sites dialog.
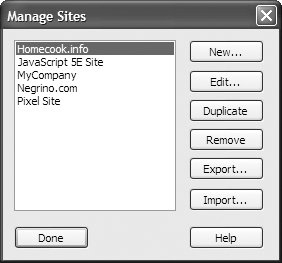
2. In the list of sites, click to select the site for which you want to enable Check In/Check Out and click Edit.
The Site Definition dialog appears, set to the Advanced tab.
3. In the Category list on the left side of the dialog, click the Remote Info category.
The dialog changes to show the Remote Info pane (Figure 18.14).
Figure 18.14. You enable Check In/Check Out in the Remote Info pane of the Site Definition dialog.

4. Select the check box next to “Enable file check in and check out.”
5. Select the check box next to “Check out files when opening.”
6. Enter a check out name.
Because you may be working on a page using different programs or different systems, it’s a good idea to use a name that describes the program and/or system you’re working on. For example, the check out name tom-dw-win indicates “Tom, using Dreamweaver, on Windows.” The check out name tom-ct-mac would indicate “Tom, using Contribute, on Macintosh.”
7. (Optional but recommended) Enter your email address in the Email address text box.
This allows coworkers to easily send you email if they need to communicate with you about the status of a file.
8. Click OK.
The Manage Sites dialog reappears.
9. Click Done.
Checking Files In and Out
When Check In/Check Out is enabled for your site and you use the Check Out button at the top of the Files panel, Dreamweaver checks to see if anyone else is currently working on the file. If someone else has the file checked out, Dreamweaver displays a dialog asking if you want to override that check out (Figure 18.15). In general, it’s a bad idea to do so, because it could lead to exactly the problems with multiple people working on the file that you want to avoid.
Figure 18.15. If someone else has already checked out a file, Dreamweaver lets you know and asks what you want to do.

To check out a file for editing
1. In the Files panel, from the Site pop-up menu, choose the site that contains the file you want to check out (Figure 18.16).
Figure 18.16. You’ll check files in and out with the toolbar in the Files panel.

The site must have Check In/Check Out enabled.
2. Click the Connect to Remote Site button.
Dreamweaver connects to the remote site.
3. Choose the file (or files) you want to check out from the Files panel.
4. Click the Check Out button in the Files panel toolbar.
The Dependent Files dialog appears (Figure 18.17).
Figure 18.17. You can choose whether or not to download dependent files. If they haven’t changed, don’t bother.
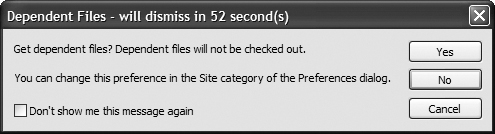
5. If you need to also edit the dependent files, such as images or external style sheets, click Yes. In most cases, however, you will click No.
Dreamweaver transfers the selected files, and puts green checkmarks next to the files in both the Local Files and the Remote Site views in the Files panel.
6. Make the changes you want to the checked out files.
Tip
• If you make a mistake and check out the wrong file, you can revert to the version of the file on the remote server, even if you modified and saved the checked out version on your machine. Just right-click the checked out file in the Files panel, then choose Undo Check Out from the resulting shortcut menu. Dreamweaver removes your check out lock from the remote server, replaces your local copy with the copy from the server, and that local copy of the file becomes read-only.
To check in a file to the remote server
1. In the Files panel, select the checked out file or files.
2. Click the Check In button in the Files panel toolbar.
If the files you’re checking in have not been saved, Dreamweaver prompts you to save them. After you save the files, Dreamweaver removes the green checkmarks from the files in the Files panel.
Tips
• You can have Dreamweaver automatically save unsaved files before checking them in by enabling the “Save files before putting” option in the Site category in Dreamweaver’s Preferences.
• If you save and close a file without checking it in, the copy of the file on the remote site will not be updated. You should always check a file in when you are done working with it.
Using Design Notes
Dreamweaver’s Design Notes are XML files that Dreamweaver places on the site that can be used by Web team members to annotate changes or note when a file was modified and by whom. A Design Note is associated with a file on your site, but it is a separate XML file with different fields that can be read by the Adobe programs (Figure 18.18). Design Note files aren’t visible to your site’s visitors.
Figure 18.18. Design Notes are XML files that Dreamweaver knows how to read.

You can create a Design Note yourself, and Dreamweaver and other programs in Creative Studio 3 can also make automated Design Note entries. For example, when you create an image in Fireworks, then export it to Dreamweaver, Fireworks creates (and places in the Dreamweaver site) a Design Note entry for the exported file, which could be in GIF or JPEG format. The entry records the name of the Fireworks source file (remember, the Fireworks file format is PNG) associated with the exported image in your site. That’s how Dreamweaver and Fireworks know how to integrate the Fireworks source PNG with the exported site image when you go to edit it (refer to Chapter 9 for more information about editing Dreamweaver images with Fireworks).
Dreamweaver stores Design Notes in folders called _notes in each of the site folders that have files with associated notes. These folders don’t appear in the Files panel, but you can see them if you use an FTP program to view your site (Figure 18.19). These notes folders contain one Design Note file for each site file that has a note.
Figure 18.19. Design Notes appear in the special _notes folders Dreamweaver creates in your site, seen here using an FTP program.

To add a Design Note
1. Open the file to which you want to add a Design Note, then choose File > Design Notes.
or
In the Files panel’s Local View, select the file to which you want to add a Design Note, then right-click and choose Design Notes from the resulting shortcut menu.
The Design Notes dialog appears, set to the Basic info tab (Figure 18.20). This tab shows you the file name and the location of the file at the top of the dialog.
Figure 18.20. Use the Design Notes dialog to enter your notes.

2. (Optional) From the Status pop-up menu, choose the status you want to set for the Design Note.
The preset statuses are draft, revision1, revision2, revision3, alpha, beta, final, and needs attention.
3. (Optional) if you want to date stamp your note, click the calendar icon in the dialog.
The current date appears in the Notes field.
4. Type your note about the file.
5. Click OK.
Dreamweaver saves the Design Note, and the Design Notes dialog disappears.
Tips
• Adobe Contribute also uses Design Notes to make note of when a Contribute user has updated a page. But Contribute doesn’t have an interface to make specific notes; it just creates automated notes with the contributor’s username and the page’s modification date. Contribute Design Notes also keep track of rollbacks, which allow Contribute users to revert to previously published versions of pages.
• You must check out the file associated with a Design Note before you can add or modify the Design Note.
To modify a Design Note
1. Open the file that contains a Design Note you wish to modify, then choose File > Design Notes.
or
In the Files panel, select the file whose Design Note you wish to modify, then right-click and choose Design Notes from the resulting shortcut menu.
The Design Notes dialog appears.
2. Make changes to the Status pop-up menu, or enter a new note in the Notes field.
If you click the calendar icon to add a new date stamp, the new note appears at the top of the dialog, and older notes appear below the newest entry, in reverse chronological order.
3. Click OK.
Generating Site Reports
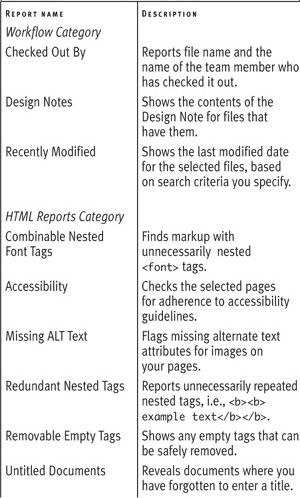
A large part of site management, especially if you are managing a team working on the site, is keeping up with all of the things that are happening to the site. For example, let’s say that you want to know which pages each of your team members is working on at the moment. Dreamweaver allows you to get a report of the checked out pages and who has checked them out. Similarly, you can get reports on many other aspects of your site, listed in Table 18.1. Dreamweaver splits reports into two categories: Workflow, with reports detailing who has worked on the site and when; and HTML Reports, which search through files on your site looking for HTML errors.
Table 18.1. Dreamweaver Reports
Some reports will let you enter parameters for the report that allow you to widen or narrow the criteria used for the report. All the reports, however, allow you to report on just the current document; the entire current local site; just selected files in the site; or files within a selected folder in the site.
To get site reports
The Reports dialog appears (Figure 18.21).
Figure 18.21. Specify the kind of site report you want in the Reports dialog.
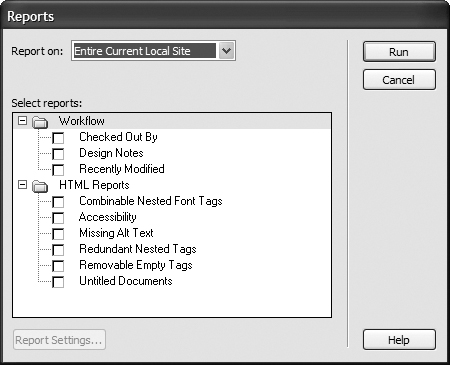
2. From the Report on pop-up menu, choose the scope of the report.
Your choices are Current Document, Entire Current Local Site, Selected Files in Site, or Folder.
3. In the Select reports list, check the report or reports that you want to run.
If the report you have selected allows you to choose report criteria, the Report Settings button becomes active.
4. (Optional) For reports that allow additional settings, click Report Settings, then complete the resulting settings dialog.
Each report that allows additional settings has a different criteria dialog. Figure 18.22 shows, for example, the criteria dialog for the Recently Modified report.
Figure 18.22. The Recently Modified dialog, brought up by the Report Settings button, allows you to specify the scope of the report. Other reports have different Report Settings dialogs.

After you click OK in the settings dialog, you return to the Reports dialog.
5. Click Run.
Dreamweaver runs the report and shows the report output in the Site Reports tab of the Results panel below the Property Inspector (Figure 18.23).
Figure 18.23. The report appears in the Results panel.

Checking for Broken Links
One of the more vexing problems with Web sites are broken links, that is, links that no longer point to valid destinations within your site. Dreamweaver usually does a pretty good job of updating links when you move or rename a page, but you can still end up with broken links if you cut or copy page content from one page to another on your site. Dreamweaver allows you to check all of the links on your site to make sure they are still valid and reports any broken links it finds. You can then easily open the file that contains the broken link to fix it.
To check for and fix broken links throughout your site
1. Choose Site > Check Links Sitewide, or press Ctrl-F8 (Cmd-F8).
Dreamweaver checks all the pages on your site and shows you files with broken links in the Link Checker tab of the Results panel (Figure 18.24).
Figure 18.24. Files with broken links appear in the Results panel.

2. Double-click one of the results.
The file with the broken link opens, with the broken link highlighted (Figure 18.25).
Figure 18.25. To fix the broken link, double-click one of the report results; the file with the broken link opens with the broken link selected.

3. Using the Property Inspector, fix the broken link.
For more information about using the Property Inspector to work with links, see Chapter 8.
4. Repeat steps 2 and 3 until you have eliminated all of the broken links.
Tips
• Dreamweaver only checks for the validity of links to documents within your site. If you have external links on your site (links that point to other sites on the Internet), Dreamweaver does not follow those links and make sure that those sites still exist and are reachable. If you need to validate external links, you need to follow those links manually, in a Web browser.
• You can also check for broken links on just the page you are editing. Choose File > Check Page > Check Links, or press Shift-F8.
Finding External Links and Orphaned Files
You can get two other types of reports from Dreamweaver. The first is a list of links from your site to other sites, called external links, and the other is a report of orphaned files, which are files that have no links pointing to them. In the first case, after Dreamweaver finds the external links, you can (if needed) easily change them. In the case of orphaned files, you should create links to the files from your other Dreamweaver pages.
To find external links and orphaned files
1. Choose Site > Check Links Sitewide, or press Ctrl-F8 (Cmd-F8).
Dreamweaver checks all the pages on your site and shows you files with broken links in the Link Checker tab of the Results panel.
2. From the Show pop-up menu in the Results panel, choose External Links (Figure 18.26).
Figure 18.26. Choose either External Links or Orphaned Files to obtain a report on those items.

or
From the Show pop-up menu in the Results panel, choose Orphaned Files.
Depending on your choice, the results appear in the Results panel.
3. (Optional) If you chose External Links in step 2, the Results panel shows a list of files and the external links that appear on them. Click one of the links to highlight it and make it editable. You can then enter a new destination for the link (Figure 18.27).
Figure 18.27. You can change external links right in the Results panel.

or
(Optional) If you chose Orphaned Files in step 2, the Results panel shows a list of files with no links pointing to them. Double-click a file name to open that file, or open other files in the Files panel to create links to the orphaned file.
Checking Browser Compatibility
In terms of the HTML document type, Dreamweaver creates XHTML 1.0 Transitional files by default, as discussed in Chapter 3. These files are readable and valid for all commonly used modern Web browsers. So you could consider Dreamweaver’s ability to check files for HTML browser support to be somewhat vestigial. But you may find you need to work on older pages that haven’t been retrofitted for current browsers. Dreamweaver allows you to check your pages for errors with targeted browsers. It does this by keeping a database of browser profiles, which details how different browsers render pages. You can also check your pages for accessibility, to make sure that they comply with best practices for readability by screen readers used by people with visual disabilities. You can check the open page for browser and accessibility compatibility. Errors appear in the Results panel.
A similar feature, Check Browser Support, appeared in Dreamweaver 8, but the Dreamweaver CS3 version is much more complete because it checks the CSS for possible rendering bugs, not just the HTML. For each bug that it finds, Dreamweaver provides an estimate of the bug’s severity, and a link to a discussion about the bug on Adobe CSS Advisor, a Web site that offers solutions for fixing CSS bugs. See Chapter 7 for more about the CSS Advisor site.
To define browsers for checking
1. Open any file in your site.
2. From the Check Page pop-up menu at the top of the document window, choose Settings (Figure 18.28).
Figure 18.28. Use the Check Page pop-up menu to make sure your pages appear correctly in different browsers.

The Target Browsers dialog appears (Figure 18.29).
Figure 18.29. Choose the target browsers for your compatibility check.

3. To enable a particular browser, select the check box next to its name. Choose from the pop-up menu next to the name to select the minimum version of that browser you want to check against.
4. Click OK to dismiss the Target Browsers dialog.
To check for browser compatibility
1. From the Check Page pop-up menu at the top of the document window, choose Check Browser Compatibility.
If there are no errors found, a status line appears in the Results pane stating “No issues detected.” Pop a cold one and relax.
2. If errors are found, a list appears in the Results panel (Figure 18.30).
Figure 18.30. Errors in your document appear in the Results panel, along with names of the browsers affected by the errors.

There are three kinds of possible errors reported in the Results panel: errors, warnings, and informational messages. An error indicates a problem in the code that can cause serious visual problems with the page. A warning indicates that the page won’t be displayed exactly correctly in the targeted browser, but the problem isn’t serious. An informational message is used for code that isn’t supported in a particular browser, but has no visual effect.
3. Double-click an error in the Results panel to change the document window to Split view, highlighting the error in Code and Design views.
4. Fix the error in Code view.
To run an accessibility check
1. From the Check Page pop-up menu at the top of the document window, choose Check Accessibility.
Errors, if any, appear in the Results panel (Figure 18.31).
Figure 18.31. Accessibility problems are highlighted in the Results panel.

2. Double-click an error in the Results panel to change the document window to Split view, highlighting the error in Code and Design views.
3. Fix the error in Code view.
Deleting Sites
When you will no longer be working with a site (perhaps because the project has been taken over by another developer), you can delete its site definition. This removes the site from the Manage Sites dialog, and from the Site pop-up menu in the Files panel. Of course, all the settings for the site are also deleted. You should be careful when you delete site definitions, because there’s no way to undo the action.
To delete a site from Dreamweaver
1. Choose Site > Manage Sites.
The Manage Sites dialog appears (Figure 18.32).
Figure 18.32. Begin deleting a site in the Manage Sites dialog.

2. From the list of sites, click the site that you want to delete.
3. Click Remove.
Dreamweaver alerts you that you cannot undo this operation (Figure 18.33).
Figure 18.33. When you try to delete a site, Dreamweaver needs you to confirm your action.
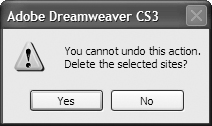
4. Click Yes.
Dreamweaver deletes the selected site.
Tip
• While Dreamweaver is asking if you want to delete the site, the site itself (that is, the files in the local site folder on your hard drive) aren’t touched. The only thing that’s deleted are the site definitions: what Dreamweaver itself knows about your site. And of course, nothing is changed on the remote site.
Exporting and Importing Site Definitions
When you create a local site on your machine, Dreamweaver creates a local site definitions file with all the information about the site’s settings, including information about the server connection, your server password, and any site-specific preferences you may have set in the Site Definition dialog. If you need to move the site from one machine to another, or if you want to add members of your Web team and have them share the same site preferences, you must export the site definition. When you do that, Dreamweaver saves the site definition information as an XML file, with the .ste file extension.
Dreamweaver allows you to export the site definition in one of two ways. You can export it with your server username and password information (this facilitates you moving the site to a different machine), or you can export the site with the site preferences, but without your server login information (this is good for adding coworkers to the site).
You can, of course, also import a site definition file that you had previously exported or one you receive from a colleague.
To export a site definition
1. Choose Site > Manage Sites.
The Manage Sites dialog appears (Figure 18.34).
Figure 18.34. You begin exporting a site definition in the Manage Sites dialog.

2. From the list of sites, click the site you want to export.
3. Click Export.
The Exporting site dialog appears (Figure 18.35).
Figure 18.35. Choose whether or not you want to include your login information in the exported site definition file.
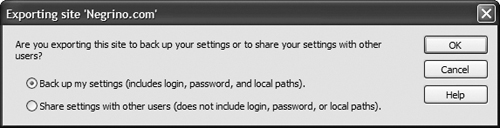
4. Click “Back up my settings (includes login, password, and local paths)” if you plan to move the site to another machine.
or
Click “Share settings with other users (does not include login, password, or local paths)” if you want to create a site definition file that does not include your server login information.
5. Click OK.
The Export Site dialog appears.
6. Navigate to where you want to save the site definition file, make sure that the name Dreamweaver has given the file is okay (by default it gives the file the name of your site and appends the .ste file extension), then click Save.
Dreamweaver saves the site definition file onto your hard disk.
You’ll return to the Manage Sites dialog.
7. Click Done.
To import a site definition
1. Choose Site > Manage Sites.
The Manage Sites dialog appears.
2. Click Import.
The Import Site dialog appears.
3. Navigate to and select the site definition file you want to import.
4. Click Open.
Dreamweaver imports the site definition and adds it to the list of sites in the Manage Sites dialog.
5. Click Done to dismiss the Manage Sites dialog.
Tips
• You can use the ability to export the site definition file as a way to back up your site’s settings, but this is no substitute for a regular and comprehensive backup strategy covering all of the important documents on your hard drive.
• If you happen to work on multiple computers and multiple sites, and each of the computers has a copy of Dreamweaver, you can export your site definitions for all of your sites, then copy them to a USB flash drive. You could then plug in the flash drive on whichever computer you happen to be working on, and you will have your site settings, including your server passwords. Of course, you would need to resynchronize the remote site with a newly created copy that would then become the local site folder on the machine you are working on. See Chapter 2 for more information about synchronizing sites.