2. Starting Your First Site
Dreamweaver is all about building Web sites. Sure, it has all of the tools you need to create great Web pages. But the basic building block is the site, not the page. You need to define a site in Dreamweaver, which will then be the container for all of the files and folders that will make up your Web site.
When you build sites, you start by creating and testing the site on your local machine. Then, when the site is ready, you will send it over the Internet to your Web server, where it will go live for the world to see. Dreamweaver has all the tools you’ll need to create the site, work with its files and folders, and then transfer it to the Web server. That’s what we’ll be covering in this chapter. So let’s get started!
Understanding Local and Remote Sites
Dreamweaver CS3 can do a great job of helping you manage all the files and folders that make up your Web site, but for the best results, you’ll need to use the program’s site management tools to set up and maintain the site. First, you need to understand some of the terminology Dreamweaver uses for sites. You’ll want to build and test your Web site within a single folder on your hard disk, which Dreamweaver calls the local root folder. This folder contains all of the files and folders that make up the site. For example, let’s say that you’re building a company site that has two sections in it, one for product information (called products), and the other for information about the company (called companyinfo). Each of the two sections gets its own folder. These folders are located inside the local root folder (which in this example we’re calling MyCompany). Because each section shares some of the same graphic images, there is also an images folder in the local root folder. The site structure would look something like Figure 2.1. With one exception, each of the Web pages that you build for the site will go into either the products or companyinfo folder. The exception is the main site page (the one that people see when they load your site in their browsers). That’s called the index page, and it usually goes in the local root folder (which is also called the local site).
Figure 2.1. The top folder here is the local root folder, which contains all of the files and folders that make up the Web site.

After you build the pages for your site, you will use Dreamweaver to copy all of the files and folders (usually over the Internet) to the Web server. Dreamweaver replicates the folder structure from your hard disk on the Web server, so the site’s structure and all of the links between the pages are preserved. Dreamweaver refers to the copy of the site on the Web server as the remote site. The remote site should always be a mirror image of your local site, and Dreamweaver has tools that can synchronize the two sites (you’ll learn more about that later in this chapter and in Chapter 18).
 Tips
Tips
• Strictly speaking, you don’t have to create all of your site’s files within the local root folder. But if you do not, Dreamweaver will often put up dialogs complaining that files aren’t in a local site, and you’ll lose access to very useful Dreamweaver features, such as the ability to automatically update all links to a file that has been moved to another location in the site. We strongly recommend that you always build your pages in a local site, and keep all of the elements that make up those pages in the local root folder.
• If you were using Dreamweaver’s ability to work with sites built using a database, you could have a third copy of your site on a testing or staging server.
Creating the Local Site
Because the process of setting up your local and remote sites has many steps, Dreamweaver provides a handy Site Definition dialog that walks you through the process. Once you’re familiar with setting up local and remote sites, the Site Definition dialog provides Basic and Advanced modes. The Basic mode (Figure 2.2) uses many screens, like a Wizard, which is a friendlier way of entering all the needed information. The Advanced mode (Figure 2.3) allows you to enter information on one screen with several categories, and provides more detailed options in each category.
Figure 2.2. The Basic mode of the Site Definition dialog walks you through the information that you need to enter to define a site in a friendly fashion.

Figure 2.3. Once you’ve used Dreamweaver for a while, you’ll be ready to define sites or make changes using the Site Definition dialog’s Advanced mode.

You’ll use the Site Definition dialog to create both the local and remote sites. In this section, however, we’ll just create the local site. See “Defining the Remote Site,” later in this chapter, for instructions on how to tell Dreamweaver about the remote site.
To create the local site
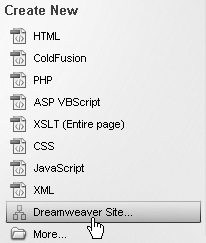
1. In the Dreamweaver Welcome screen, click the Dreamweaver Site link (Figure 2.4).
Figure 2.4. Click the Dreamweaver Site link in the Welcome screen to begin creating your site.
The Site Definition dialog appears, set to the Editing Files screen of the Basic tab.
or
Choose Site > New Site.
The Site Definition dialog appears, set to the Advanced tab.
2. If the dialog is set to the Advanced tab, click the Basic tab, which switches the dialog to show the Editing Files screen. Then, in the field under “What would you like to name your site?”, enter the name.
The site name is only for your reference; it won’t be visible to users of the site.
3. In the field under “What is the HTTP Address (URL) of your site?”, enter the Web address of your site including the leading http:// (Figure 2.5).
Figure 2.5. In the first screen of the Site Definition dialog, enter the name and Web address of your site.

4. Click Next.
The Editing Files, Part 2 screen appears.
5. Dreamweaver asks, “Do you want to work with a server technology such as ColdFusion, ASP.NET, ASP, JSP, or PHP?” Click the button next to “No, I do not want to use a server technology.”
Server technologies such as the ones listed are used for sites that have pages that are generated dynamically, that is, the contents of the page are drawn from a database when the user requests the page. Using server technologies is beyond the scope of this book; instead, we’ll be creating static pages.
The Editing Files, Part 3 screen appears (Figure 2.6).
Figure 2.6. Next, you’ll need to tell Dreamweaver where to put your local site folder.

7. Dreamweaver asks, “How do you want to work with your files during development?” Click the button next to “Edit local copies on my machine, then upload to server when ready (recommended).”
The other choice, “Edit directly on server using local network,” is for specialized situations where your Web server is on the local network, rather than accessible over the Internet.
8. On the same screen, Dreamweaver asks, “Where on your computer do you want to store your files?” Click the folder icon to the right of the text field, which brings up a dialog titled “Choose local root folder for site sitename,” and browse to the folder on your hard disk that contains all of the files for your site.
On Windows, select the folder in the dialog and click Open, then click the Select button.
or
On Macintosh, select the folder in the dialog and click the Choose button.
The dialog closes and you will return to the Site Definition dialog.
9. Click Next.
The Sharing Files screen appears (Figure 2.7).
Figure 2.7. For now, we won’t connect to a remote server, so None is the correct choice.
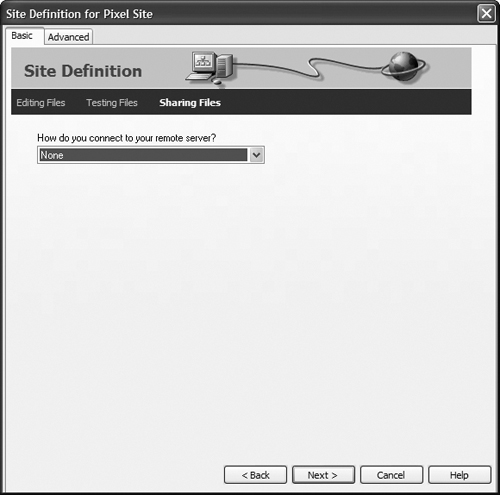
10. From the pop-up menu labeled “How do you connect to your remote server?”, choose None.
In this case, we are only creating the local site. If you want to continue on and define the remote site, go to step 4 in “Defining the Remote Site,” later in this chapter.
11. Click Next.
The Summary screen appears (Figure 2.8).
Figure 2.8. The Summary screen recaps the information you entered.

12. Click Done.
Defining the Remote Site
The remote site lives on your Web server, and it is the destination for the files and folders from the local site on your computer’s hard disk. Dreamweaver can connect to your Web server in several ways. The most common connection, called FTP, is used when your server resides on the Internet or on your company’s intranet. Another way to connect is called SFTP, for Secure FTP. A third way to connect is via a protocol called WebDAV (see the sidebar “What’s FTP, SFTP, and WebDAV?”).
Before you begin creating a connection to the remote site, you need to ask your network administrator for some information about the Web server you’re using. You will need:
• The connection type, which will be FTP, SFTP, or WebDAV
• The FTP, SFTP, or WebDAV address for your server
• The login (sometimes called the username) for the server
• The password associated with the login
• The folder’s path on the server that contains your Web site
Once you gather this information, you’re ready to define the remote site in Dreamweaver. You’ll begin by editing the site definition.
Tip
• Dreamweaver offers two other ways to connect to remote sites, RDS and Microsoft Visual SourceSafe (Windows only), which are used for database-backed sites, and will not be discussed in this book.
To define the remote site with FTP or SFTP
1. Choose Site > Manage Sites.
The Manage Sites dialog appears (Figure 2.9).
Figure 2.9. Begin adding the remote site to your site definition in the Manage Sites dialog.
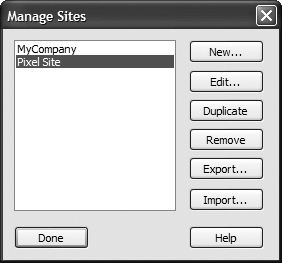
2. Select the site you want, then click Edit.
The Site Definition dialog appears. If you last used this dialog in Basic mode, it will appear still set to that mode. If you last used it in Advanced mode, it will appear that way.
3. If necessary, click the Basic tab, then click the Next button until the Sharing Files screen appears.
4. From the pop-up menu labeled “How do you connect to your remote server?,” choose FTP.
The dialog changes to show fields you need to fill in for the FTP connection type (Figure 2.10). If you will be making an SFTP connection, choose FTP from the pop-up menu, then check the “Use Secure FTP (SFTP)” check box when the dialog changes to show that option.
Figure 2.10. You’ll need to enter the FTP information in the Sharing Files screen. We’ve blurred some private information here.
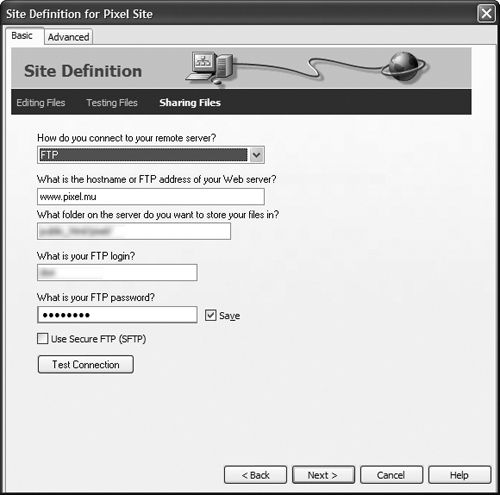
5. In the field labeled “What is the hostname or FTP address of your Web server?” enter the hostname or FTP address of your Web server.
The hostname could be a name like www.peachpit.com or ftp.dori.com. It will usually be the name you would enter into a Web browser, without the http://. It must begin with www or ftp, and cannot be just the domain name, such as dori.com. The name should not contain directories or slashes, such as www.negrino.com/books/. You can also enter a numeric IP address in this field, such as 66.39.104.128.
6. In the next field, enter the name of the folder on the Web site that contains your site’s files and will serve as the root folder for your site.
This folder is also called the host directory, and is usually a path from the FTP folder to the root folder. Depending on your Web hosting company, this path could be named many different things. Typical host directory names are htdocs, public_html, or www/public/docs/. If you’re unsure of the exact name of the host directory, check with your Web hosting company. Sometimes, the FTP host connects to the correct directory automatically, and you can leave the field blank.
7. Enter the FTP login name.
8. Enter the FTP password.
Don’t forget that FTP logins and passwords are case-sensitive on many servers.
9. If you want Dreamweaver to remember the FTP login and password (recommended), make sure the Save check box is selected.
10. Click the Test Connection button to make sure that Dreamweaver can connect successfully to your Web server.
If Dreamweaver reports an error, check the information you entered.
11. Click Next.
The Sharing Files, Part 2 screen appears.
12. Dreamweaver asks, “Do you want to enable checking in and checking out files, to ensure that you and your co-workers cannot edit the same file at the same time?” Click the radio button next to “No, do not enable check-in and check out.”
Check in and check out is a useful feature when you are working on the site with others, because it helps keep different people from accidentally editing a page at the same time. We will explore this feature further in Chapter 18.
13. Click Next.
The Summary screen appears, with the information that you have entered for the local and remote sites.
14. Click Done.
To define the remote site with WebDAV
1. Choose Site > Manage Sites.
The Manage Sites dialog appears.
2. Select the site you want, then click Edit.
The Site Definition dialog appears.
3. If necessary, click the Basic tab, then click the Next button until the Sharing Files screen appears.
4. From the pop-up menu labeled “How do you connect to your remote server?” choose WebDAV.
The dialog changes to show fields you need to fill in for the WebDAV connection type (Figure 2.11).
Figure 2.11. If you connect to your Web server via WebDAV, you’ll need to enter the connection information.

5. Enter the URL of your WebDAV server.
6. Enter the WebDAV login name.
7. Enter the WebDAV password.
If you want Dreamweaver to remember the WebDAV login and password (recommended), make sure the Save check box is selected.
8. Click the Test Connection button to make sure that Dreamweaver can connect successfully to your Web server.
If Dreamweaver reports an error, check the information you entered.
9. Click Next.
The Sharing Files, Part 2 screen appears.
10. Dreamweaver asks, “Do you want to enable checking in and checking out files, to ensure that you and your co-workers cannot edit the same file at the same time?” Click the radio button next to “No, do not enable check-in and check out.”
11. Click Next.
The Summary screen appears, with the information that you have entered for the local and remote sites.
12. Click Done.
Editing Site Definitions
Once you have created your site definitions, you might need to change them. For example, you might want to change the location of the local root folder, or you may change the path on the remote server. You’ll use the Site Definition dialog, but this time we’ll use the Advanced tab to get things done a bit faster.
To change a site definition
1. Choose Site > Manage Sites.
The Manage Sites dialog appears.
2. Select the site you want, then click Edit.
The Site Definition dialog appears.
3. If necessary, click the Advanced tab.
The dialog changes to the Advanced mode (Figure 2.12).
Figure 2.12. It’s faster to edit site definitions in the Advanced tab of the Site Definition dialog.

4. Choose the category on the left side of the dialog for the kind of change you want to make.
The right side of the dialog changes to show the options for the category you chose.
5. Make the changes you need to make.
6. Click OK.
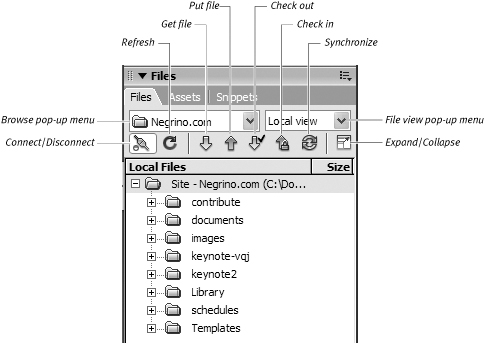
Working with the Files Panel
To work with the files and folders that make up your Web sites, you’ll use the Dreamweaver Files panel. This panel allows you to add and delete files and folders; view and change the local or remote sites; and do other maintenance tasks for your sites.
The Files panel appears at the right side of the Dreamweaver window, docked with other panels. By default, the Files panel is at the bottom of the group of panels. The panel consists of a couple of pop-up menus, a toolbar, and the files area below (Figure 2.13).
Figure 2.13. The Files panel is your command center for working with files in Dreamweaver.
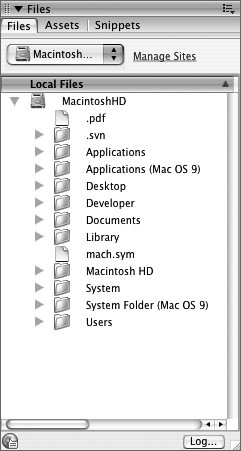
Navigating Disks and Sites
The Browse pop-up menu at the top of the Files panel allows you to browse through your hard disk and easily switch between sites that you have defined. The menu looks a bit different on Windows and Mac, reflecting the differences between the operating systems (Figure 2.14). On both platforms, sites you have defined appear in the menu as folders.
Figure 2.14. The Browse menu in the Files panel reflects the differences in the Windows (left) and Mac (right) operating systems.

To browse your hard disk
1. In the Files panel, choose the disk you want from the Browse pop-up menu.
The disk’s contents appear in the files area (Figure 2.15).
Figure 2.15. If you choose your hard disk from the Browse pop-up menu, you can then navigate to any file or folder on the disk.
2. Navigate to the folder and file that you want.
To switch between defined sites
• In the Files panel, choose the site from the Browse pop-up menu.
Switching Between Local and Remote Views
The File view pop-up menu, next to the Browse pop-up menu, allows you to switch the view in the Files panel between the local and remote sites.
To switch between local and remote views
1. Choose a site you have defined from the Browse pop-up menu.
The site’s local files appear in the files area, and the File view pop-up menu switches to Local view.
2. From the File view pop-up menu, choose Remote view (Figure 2.16).
Figure 2.16. To see the files on the remote site, choose Remote view from the File view pop-up menu.

Dreamweaver connects to the site (you can tell because the Connect/Disconnect button in the Files panel toolbar will highlight), and the remote files appear in the files area.
Tip
• The File view pop-up menu has two other choices: Testing server and Map view. We won’t be discussing Testing server in this book, but you’ll find an explanation of Map view in Chapter 18.
Refreshing Views
When you switch to the local or remote views of a site, Dreamweaver scans the contents of your local or remote site folders and displays the current contents. On occasion, the view you’re looking at in the Files panel may become out of date. For example, if you happen to upload or delete items on the remote site with a program other than Dreamweaver, those changes won’t be shown in the Files panel. Similarly, if you move files into the local root folder by working in the Windows or Mac desktop, you may need to tell Dreamweaver to rescan and refresh its display of the local site.
To refresh the local or remote view
1. Choose the site you want to refresh from the Browse pop-up menu.
2. Choose the view (local or remote) you want from the File view pop-up menu.
3. Click the Refresh button in the Files panel toolbar.
Dreamweaver rescans the site you selected and updates the files area.
Working with Files and Folders
The Files panel is great for organizing all of the files on your site and creating new files and folders. You should do most of your file creation and management in the Files panel, because it can often save you quite a bit of time compared to using another method in Dreamweaver.
For example, you can create a new page by choosing File > New, then choosing the kind of page you want from the New Document dialog, then editing the page. When you save the page, you must navigate to the correct folder in the local site folder, name the page, and then save it. In contrast, to create a new page in a particular folder using the Files panel, you select the folder that you want to contain the page, then choose the New File command as described below.
Tip
• Just because the Dreamweaver files area is reminiscent of the Windows Explorer or Macintosh Finder, don’t be fooled into thinking that it is the same, and that you could do your local file management on your computer’s desktop. Dreamweaver is designed for working with Web pages, and it can do incredibly useful things, like updating the links on a page to work correctly, even if you move the page that contains the links to a different folder on the site.
To create a new file or folder
1. Use the File view pop-up menu to select the local or remote site. You will usually create files or folders in the local site.
2. Right-click a file or folder in the files area.
A shortcut menu appears that gives you many options (Figure 2.17).
Figure 2.17. The shortcut menu in the Files panel is the fastest way to create a new file or new folder.
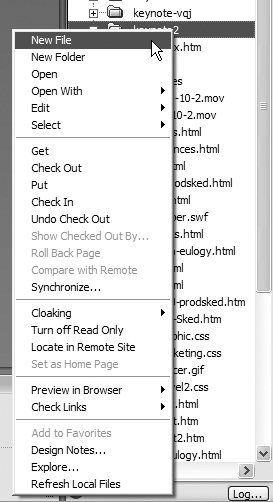
3. From the shortcut menu, choose New File or New Folder.
The new file or folder appears in the files area. If you selected a folder in step 2, the new file or folder will be created inside of the selected folder.
4. The name of the newly created file or folder (“untitled.html” for a file, or “untitled” for a folder) is selected in the Files panel. Type the name you want.
Tip
• You could use the panel options button at the upper-right corner of the Files panel, which gives you a different shortcut menu, but it’s easier to use the right-click shortcut menu.
To move files or folders
1. Select a file or folder in the files area. To move multiple items, Ctrl-click (Cmd-click) to select each of the items you want to move.
2. Drag the selected item(s) to the new location.
The Update Files dialog appears (Figure 2.18).
Figure 2.18. If you move files that are the target of links, Dreamweaver asks to update the pages that link to the file you moved.

3. Click Update.
Dreamweaver updates all of the links in the site that are affected by the move.
To rename files or folders
1. Select a file or folder in the files area.
2. Click the name of the file or folder.
The name becomes highlighted.
3. Type the new name. Don’t forget to add the correct file extension for the file that you’re renaming. For example, most Web pages have the file extension .htm or (preferably) .html.
4. Press Enter (Return).
The Update Files dialog appears.
5. Click Update.
Dreamweaver updates all of the files in the site that are affected by the renamed file.
To edit files or folders
1. Right-click a file or folder in the files area.
2. From the resulting shortcut menu, choose the Edit submenu (Figure 2.19).
Figure 2.19. The Edit submenu in the Files panel shortcut menu gives you several options for working with files or folders.
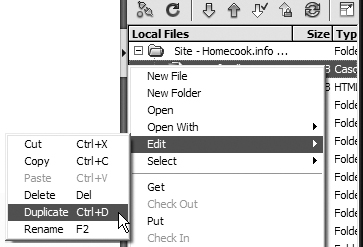
3. Choose one of the items in the Edit menu.
You can Cut, Copy, Paste, Delete, Duplicate, or Rename the file or folder. If a file operation will affect other files, Dreamweaver may display an “Are you sure?” dialog or the Update Files dialog.
Tip
• Note the shortcut keys listed next to each of the items in the Edit menu. As you become more comfortable working with files in Dreamweaver, using the shortcut keys can save you time.
Putting and Getting Files
You can copy selected files or folders (or the entire site) between the local and remote sites using the Files panel. The Dreamweaver term for moving an item from the local to the remote site is called putting the item; moving the item from the remote to local site is getting the item. If a put or get operation will overwrite a file, Dreamweaver warns you. If you select a folder, Dreamweaver moves the folder and all of the items that it contains. So, if you select the local root folder, you can put the entire site up on the remote server in just a couple of clicks. Sometimes, however, you’ll want to use Dreamweaver’s site synchronization feature, rather than put or get individual items. See “Synchronizing the Local and Remote Sites,” later in this chapter.
To put or get a file or folder
1. In the Files panel, choose Local view or Remote view from the File view pop-up menu.
The local or remote view is displayed in the files area.
2. Select the file or folder you want to move.
3. Click the Get file or Put file button in the Files panel toolbar.
4. If any of the files that you’re transferring are open and have unsaved changes, Dreamweaver asks if you want to save the files before they are sent. Click Yes, or if there are multiple files, click Yes to All.
5. Dreamweaver may also display a dialog asking if you want to transfer any dependent files. An example of dependent files would be the graphics on the pages that you are uploading. If the dependent files have already been uploaded to the server, click No; there’s no reason to reupload files that haven’t changed. If you want to transfer dependent files that have changed, click Yes.
Expanding the Files Panel
Normally, the Files panel will only show either the local site or the remote site. But if you would like to compare the list of files and folders on both sites, you can do that by expanding the Files panel. This feature works slightly differently on Windows and on Macintosh. On Windows, expanding the Files panel causes it to grow to take over the entire screen, replacing the rest of the Dreamweaver interface. On Mac, expanding the Files panel opens the panel in a new window that allows you to see the remote site on the left and the local site on the right (Figure 2.20).
Figure 2.20. On the Mac, when you expand the Files panel, it opens in a new window, with the remote site on the left and the local site on the right.

To expand the Files panel
• Click the Expand/Collapse button in the Files panel toolbar.
Tip
• To collapse the Files panel, click the Expand/Collapse button again.
Synchronizing the Local and Remote Sites
Having two copies of a Web site—one on your local machine and the other on a Web server—can potentially lead to trouble. It’s possible, for example, for you to update several pages on your local site, and lose track of just which files you changed. In that case, it might be difficult for you to determine which copy of the site (local or remote) has the latest version of the files. Dreamweaver’s Synchronize command compares the local and remote sites and transfers the newer files in either direction.
To synchronize local and remote sites
1. Click the Synchronize button in the Files panel.
or
Choose Site > Synchronize Sitewide.
The Synchronize Files dialog appears (Figure 2.21).
Figure 2.21. In the Synchronize Files dialog, you’ll need to select the synchronization method you want to use.

2. From the Synchronize pop-up menu, choose the files you want to update.
Your choices are to synchronize all the files in the site, or just files or folders that you selected in the Local view.
3. From the Direction pop-up menu, choose how you would like to copy newer files:
• Put newer files to remote sends newer files from your local site folder to the Web server.
• Get newer files from remote finds newer files on the Web server, and copies them to your local site folder. This option also copies completely new files that are on the Web server (ones, for example, that may have been placed there by a coworker) to your local site folder.
• Get and Put newer files synchronizes files both ways. New files on the local site will be transferred to the remote site and vice versa.
4. (Optional) If you want, turn on the “Delete remote files not on local drive” check box.
This is a good option to choose when you’ve made substantial deletions in the local site (perhaps because you did a big site cleanup). The wording of this option changes depending on what you chose in step 3. If you chose to transfer newer files from the remote site, the wording changes to “Delete local files not on remote server.” If you chose to get and put files, this option becomes inactive.
Dreamweaver connects to the remote site, compares the files you chose to synchronize, and then displays the Synchronize dialog (Figure 2.22). This allows you to preview the changes that will be made on the site. The Action column in the dialog tells you what Dreamweaver proposes to do to each file.
Figure 2.22. You can select actions in the Synchronize dialog that will affect the files as they are synchronized.

6. If desired, select one or more files in the Synchronize dialog and choose one of the action buttons at the bottom of the dialog. You have the following choices:
• Get marks the selected files to be retrieved from the remote site.
• Put marks the selected files to be sent to the remote site.
• Delete marks the selected files for deletion.
• Ignore tells Dreamweaver to ignore the selected files for this synchronization.
• Mark as synchronized tells Dreamweaver to consider the selected files as already synchronized, so no action will be taken.
• Compare opens the local and remote versions of the file so you can compare their differences.
7. Click OK.
Dreamweaver performs the synchronization.
Cloaking Files
Not every folder in your local site needs to be uploaded to the remote site on the Web server. Dreamweaver allows folders to be cloaked, which means that they will be exempt from synchronization. This can save you a lot of time. Imagine that you’re working on a site that contains large movie files. Cloaking the folder that contains the movie files means that while you’re working on other parts of the site, Dreamweaver won’t take the time to scan through the folders when synchronizing, and won’t upload any of the files. When you’re ready to upload the files, uncloak the movies folder and synchronize the local and remote sites.
To cloak a site folder
1. Right-click a folder in the files area.
2. From the resulting shortcut menu, choose the Cloaking submenu, then from the submenu, choose Cloak (Figure 2.23).
Figure 2.23. Choosing Cloak from the Files panel shortcut menu keeps a folder and its contents from being affected during synchronization operations.
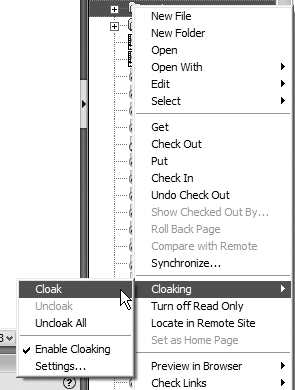
Dreamweaver displays the folder with a slash through it, indicating that it is cloaked.
Tip
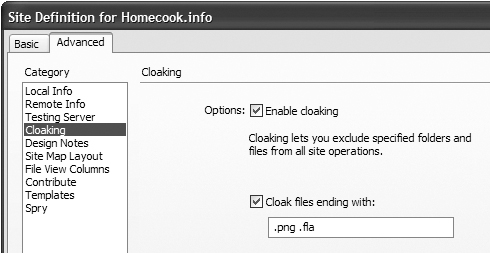
• You can only cloak folders; you can’t cloak individual files. But you can cloak all files of a particular type. Choose Site > Manage Sites, then select the site you’re working on. In the Advanced tab of the Site Definition dialog, choose the Cloaking category. Enable the “Cloak files ending with” check box, then enter the file extensions of the kinds of files you want to cloak (Figure 2.24).
Figure 2.24. The Cloaking category in the Advanced tab of the Site Definition dialog allows you to set particular kinds of files to always be cloaked.
To uncloak a site folder
1. Right-click a cloaked folder in the files area.
2. From the resulting shortcut menu, choose Cloaking > Uncloak or Cloaking > Uncloak All.