8. Working With Links
Links are what make the Web, well, webby—the interconnections between pages and sites are a fundamental part of why the Web is different from print. Without links coming in to your site, no one will ever find it. And without links going out from your site, it’s a dead end. Dreamweaver makes it easy to add links to your site.
There are a number of different kinds of links: some links are internal to a page, some internal to a site, and some links go to another server altogether. This chapter will cover all of these, along with targets, image links, and email links.
Creating Text Links
If you can drag your mouse from here to there, you can create a link inside Dreamweaver. All you have to do is decide what on the page you want to be the link, and where you want that link to point.
Because creating links is such a large part of developing a Web site, there are multiple ways to create links. You can figure out which method works best for you.
To create a text link
1. Select some text on the page to be the link. Figure 8.1 shows that the title “HomeCook.info” has been selected.
Figure 8.1. Drag the Point to File icon, and the arrow will follow to the selected link file.

2. In the Property Inspector, click the Point to File icon ![]() . An arrow appears and that arrow can be dragged into the Files panel. Drag it to the file you want, and release the mouse.
. An arrow appears and that arrow can be dragged into the Files panel. Drag it to the file you want, and release the mouse.
or
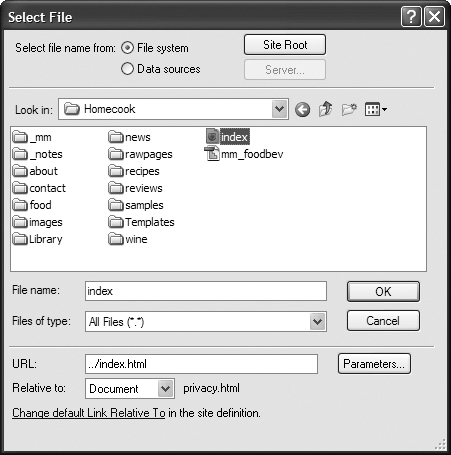
In the Property Inspector, click the Browse for File icon ![]() . The Select File dialog appears (Figure 8.2). Choose the file you want and click OK.
. The Select File dialog appears (Figure 8.2). Choose the file you want and click OK.
Figure 8.2. You can also select a link file from the Select File dialog.
or
In the Property Inspector, click in the Link text field and type the name of the file you want to link to.
or
In the Property Inspector, click the pop-up menu to the right of the Link text field, and choose from the list of recently used links (Figure 8.3).
Figure 8.3. Or use this pop-up menu in the Property Inspector.

or
In the Common tab of the Insert Bar, click the Hyperlink button ![]() . The Hyperlink dialog appears (Figure 8.4). Type the name of the file to link to, or click the Browse For File icon to select a file. Click OK when you’re done.
. The Hyperlink dialog appears (Figure 8.4). Type the name of the file to link to, or click the Browse For File icon to select a file. Click OK when you’re done.
Figure 8.4. Finally, you can type the link file name in the Hyperlink dialog.

 Tip
Tip
• If you want to remove a link, click inside the text you want to de-link, click the <a> in the tag selector, and then clear the Link text field in the Property Inspector.
Changing Link Relative To
It’s awkwardly named, but it’s useful: you can change the Link Relative To (that is, whether the link is document relative or site root relative) for either a single file or for the site as a whole. As mentioned in “The Different Types of Links” sidebar, your links can either be document relative or site root relative, or even a mix of those on each page.
To change the “Link Relative To” for a link
1. In the Property Inspector, click the Browse for File icon ![]() . The Select File dialog appears (Figure 8.2).
. The Select File dialog appears (Figure 8.2).
2. Near the bottom of the dialog, there’s a pop-up menu with the label “Relative to.” From that pop-up, you can switch between Document and Site Root (Figure 8.7), and the URL for the link will change.
Figure 8.7. Use the Select File dialog to make your link site or document relative.

3. Click OK to save your changes.
To change the “Link Relative To” for a site
1. In the Property Inspector, click the Browse for File icon ![]() . The Select File dialog appears (Figure 8.2).
. The Select File dialog appears (Figure 8.2).
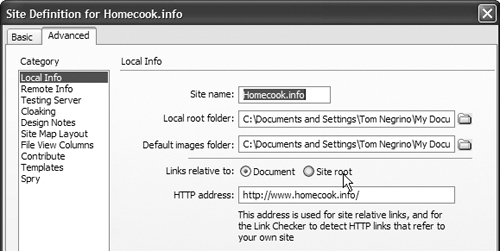
2. Near the bottom of the dialog, there’s a link that says “Change default Link Relative To in the site definition.” If you click the link (the part that’s blue and underlined), you’ll end up at the Advanced tab for the Site Definition for your site, with the Local Info category chosen (Figure 8.8). From here, you can choose either radio button next to “Links relative to,” where the choices are Document or Site root. This changes the link that you’re currently modifying, and the default for future links, but it will not change any other existing links on the page or site.
Figure 8.8. Or you can set the “Links relative to” for the entire site.
3. Click OK to save your changes.
 Tip
Tip
• You can also follow the directions (found in Chapter 2) for editing the site definition. If you click the Advanced tab and choose the Local Info category, you’ll end up in the same place.
Formatting Links
One of the most common uses of CSS is to change the way links are displayed in the browser. Want your links to only be underlined when the cursor is over them? Want the background or text color to change when a visitor clicks? Or maybe you just want something other than your visitor’s default colors? That’s all CSS, and Dreamweaver can handle that. As covered in Chapter 5, you’ll need to know if your site is going to use internal or external styles.
To format links
1. Click the New CSS Rule button at the bottom of the CSS panel ![]() . The New CSS Rule dialog appears.
. The New CSS Rule dialog appears.
2. If you want to set a style that will apply to all links (whatever their state), or to set the default appearance for links, choose “Tag (redefines the look of a specific tag)” for the Selector Type, and for Selector, choose a.
or
For the Selector Type, choose “Advanced (IDs, pseudo-class selectors),” and for Selector, choose any option from the pop-up menu: a:link, a:visited, a:hover, or a:active (Figure 8.9).
Figure 8.9. The New CSS Rule dialog lets you choose which rule you’re going to define.

• a:link is the default state of the link, seen when none of the other states are in use.
• a:visited is how the link will appear after the link has been clicked and the linked page loaded.
• a:hover is how the link will appear while the visitor’s cursor is over the link.
• a:active is how the link will appear while the visitor is clicking that particular link.
3. For Define in, there are at least two options: New Style Sheet File or This document only. If the current document links to any style sheets, their names are included in the pop-up menu. Choose whichever is appropriate for this site, and click OK.
4. If you chose to create a new style sheet, you’ll see the Save Style Sheet File As dialog (Figure 8.10). Choose where to save it and what to name it, and click Save. The CSS Rule Definition dialog appears (Figure 8.11). You can create the specific rules you want for links either here or directly in the CSS panel (Figure 8.12).
Figure 8.10. When you want a new style sheet, you can create that file here.

Figure 8.11. After you create the rule, define its values here.

Figure 8.12. The CSS panel, after various a rules have been defined. New properties can be set from here, also.

 Tips
Tips
• It is important to set styles for your links, otherwise they are likely to display underlined and blue (unvisited) and purple (visited)—but you can’t be sure of that. To have control of the look of your page, set the link styles.
• Figure 8.12 shows some of the most common rules for CSS-formatted links: bold font-weight, and no underline except when the cursor is over the link.
Targeting Links
Sometimes you want a link to go to a new window, or to an existing window other than the one you’re clicking. That’s done by giving the link a target, which is the name of the window in which you want the new page to load.
To give a link a target
1. Follow the steps above to create a link, and then click the <a> in the tag selector.
2. Directly below Link in the Property Inspector is a text field named Target where the target is entered. Alternatively, you can just click the pop-up menu to the right of the field to choose the target.
3. If you’re working on a site without frames, you have four choices: _blank, _parent, _self, and _top (sites with frames are different and are covered in Chapter 12). Choose one from the pop-up, and the target field will show your choice (Figure 8.13).
Figure 8.13. Set a link’s target in the Property Inspector with this pop-up menu.

• blank:Open a new, blank window.
• parent:If the current window was opened by a previous link to a blank target (that is, the current window is a newly opened window), open this link in the previous window. If the current window wasn’t opened that way, what happens depends on the user’s browser—but usually, it just opens in the current window.
• self and top:For non-framed sites, these are both equivalent to not using any target at all.
 Tips
Tips
• To remove a target, just click in the Target text field in the Property Inspector and erase its content.
• The underscore before the name of a target is there to tell the browser that this is a special type of target and not just the name of another window. You’ll learn about named windows in Chapter 12.
Adding Named Anchors
Normally, when a new Web page is displayed, it does so showing the very top of a page. Adding an anchor to a link allows you to choose to display the page starting at a given point on a page. In order to use an anchor, you’ll need to create at least two things: the anchor itself and then the link to that anchor.
To create an anchor
1. Open your document, and click in the spot in the file where you want the named anchor to be.
2. On the Insert Bar, click the Named Anchor button ![]() , and the Named Anchor dialog appears (Figure 8.14).
, and the Named Anchor dialog appears (Figure 8.14).
Figure 8.14. The Named Anchor dialog lets you create a new anchor on your page.
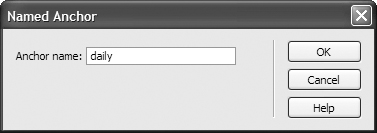
3. Choose a name for the anchor that will be unique for this page. Remember that this anchor is going to be part of a URL, so it can only contain characters that are valid: no spaces, ampersands, question marks, etc.
4. Click OK. In the spot where you created the new anchor, an anchor icon appears (Figure 8.15). If you click that anchor, the tag selector will show the anchor with its name, and the Property Inspector will allow you to modify the name (Figure 8.16).
Figure 8.15. The part of the page shown here has two anchors: the selected one is blue, and the unselected one is yellow.
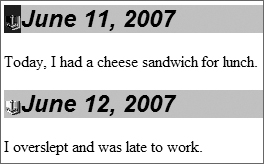
Figure 8.16. The Property Inspector for a named anchor.
![]()
 Tips
Tips
• While you do see that anchor on the page in Dreamweaver, it’s not going to be there when you or anyone else sees the page in a browser—it’s just there for your editing convenience, and it’s one of the few ways in which Dreamweaver isn’t 100% WYSIWYG. Hate seeing them? From the menu bar, choose View > Visual Aids > Invisible Elements to toggle the visibility of these icons on or off.
• There are many ways to delete a named anchor. One way is to click the anchor icon and delete it. Or, in the Property Inspector, clear the Named Anchor Name field.
To link to an anchor on the same page
• Follow the directions from “Creating Text Links” earlier in this chapter, but drag the Point to File icon ![]() to the Named Anchor icon on the page. The selected text is now linked to the new anchor.
to the Named Anchor icon on the page. The selected text is now linked to the new anchor.
 Tip
Tip
• It’s possible that the Point to File icon and the Point to File arrow can end up going to different spots on the page. The one that matters, in this case, is the icon itself, not the tip of the arrow.
To link to an anchor on another page
• If the two files are open in different windows, place the windows such that you can see both the link source and the link destination. Then, follow the directions for linking to an anchor on the same page, but drag the icon to the separate page.
or
If you’re using Dreamweaver’s tabbed interface, you won’t be able to see both the link source and the destination at the same time, so you’ll have to add the anchor part of the link manually. Follow the directions from “Creating Text Links” earlier in this chapter to link to another file, and when that’s complete, click in the Link field in the Property Inspector and add a # followed by the anchor name to the end of the existing link. So if you want to link to the chap07 anchor on the dwvqs.html page, your link would be to dwvqs.html#chap07.
Adding Links to Graphics
Making a graphic a link isn’t all that different from creating a text link. The main difference is that the link and target fields on the Property Inspector are in different areas, so you might not see them at first glance. Additionally, you don’t get the handy pop-up menu on the Link field, so you can’t just reuse one of the links you’ve recently made.
To add a link to a graphic
1. Select the image in the document window.
2. Using the Property Inspector (Figure 8.17), click the Point to File icon ![]() next to the Link field. An arrow appears, and that arrow can be dragged into the Files panel. Drag it to the file you want, and release the mouse.
next to the Link field. An arrow appears, and that arrow can be dragged into the Files panel. Drag it to the file you want, and release the mouse.
Figure 8.17. For images, the Link and Target fields aren’t where you might expect them to be on the Property Inspector.

 Tips
Tips
• As mentioned in “Creating Text Links,” there are many ways to create links. Over time, you’ll find the one that works best for you.
• It’s very common that images in the top-left corner of a Web page link back to a site’s home page; common enough that if you don’t do this, your site’s visitors may be confused. Unless there’s a good reason why you shouldn’t do this for a site, set this up as the default.
• You can make individual parts of an image link to different Web pages. That’s done with image maps, and they’re covered in Chapter 9.
Adding Email Links
If you want your site’s visitors to be able to contact you, you’ll need to add a link that allows people to send you email.
To add an email link
1. Click the spot on the page where you want to add an email link.
2. On the Common tab of the Insert Bar, click the Email Link button ![]() , and the Email Link dialog appears (Figure 8.18).
, and the Email Link dialog appears (Figure 8.18).
Figure 8.18. The Email Link dialog lets you set both the link (the email address) and the text that will be displayed on the Web page.
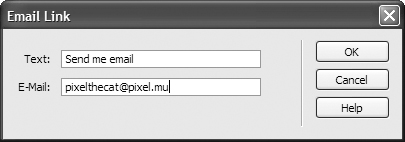
3. Fill in the text field with the text you want to display in the Web browser, and fill in the E-Mail field with the email address. Click OK when you’re done.
 Tips
Tips
• Dreamweaver doesn’t do any kind of error checking to make sure that the email address is in a valid format, so be careful when you’re entering it.
• Putting an email address on a Web site can lead to that address getting all kinds of garbage or spam. There are a variety of ways to protect your email address. The simplest is just to encode it—put it into a format such that the browser can understand it, but a spider sent out by a spammer can’t. To learn more about this, search on Google for “email” + “obfuscator.”


