14. Building Dynamic Pages with Spry
If you spend much time building Web sites, or even just reading about current styles of online design, then you’ve heard of “Web 2.0.” In Dreamweaver CS3, Adobe added a library of the most common “Web 2.0”-ish widgets, to enable Web builders to make their sites look and act like cutting-edge destinations.
This library—also referred to as a framework—is named Spry. Spry is a collection of HTML, CSS, JavaScript, and graphics, the relevant pieces of which are automatically added to your site when you add in any of the Spry elements. No, you don’t need to know anything about CSS or JavaScript to use Spry; in fact, you don’t even need to know much about design to create pages that work well and look good.
What Is Spry?
To use Spry’s full functionality, it helps to know a little bit more about what Spry is and how it works behind the scenes.
A (brief) history of frameworks
When people first started adding JavaScript to pages, they quickly realized that a lot of the work they were doing was the same stuff, over and over and over again. Just about every JavaScripter has their collection of code snippets that they’ve already debugged and now reuse regularly.
In recent years, it’s become common to let JavaScript handle more and more of the user interface (UI) duties. This means that Web sites have become smarter and more flexible, but it’s also been a lot more work for people who write code. Programmers tend to be lazy by nature, and hate to write something when they know someone else has already solved that particular problem. Instead, they go looking for free code offered by others, and in return offer their own snippets. The result is shared libraries of code that can handle most of the usual user interface requirements.
However, programmers also tend to have definite opinions about the “right” way to write code, and the result of that has been the creation of many different frameworks. If you’ve ever heard of libraries such as Dojo, YUI, or Atlas, they’re all the same thing, built by developers who thought that their way of doing things was better than what already existed.
Spry is Adobe’s answer to this same challenge, geared to work with Dreamweaver and to stand on its own. It’s not an application; instead, it’s a collection of code snippets (both CSS and JavaScript) that when added to your pages creates some standard effects.
What’s in Spry
Spry contains three types of components:
• Widgets: These elements let you create a more interactive Web site. There are two main types of widgets: UI widgets (such as the accordion, menu bar, and collapsible panel), and form validation (such as text fields and text areas).
• Effects: Unlike widgets, effects don’t so much interact with the user as just look good on their own. You can use effects to visually highlight transitions or to emphasize elements on your page. Some examples of effects are highlight, shrink, and squish.
• XML data sets: If you want data on your page that’s read from an external file, or you want users to be able to sort displayed information without having to reload the page, or you want to show some detailed information when the user selects various options, then you’re looking at using Spry data sets.
Ajax and more
One of the hot buzzwords of modern day Web design is Ajax. Unfortunately, that term has come to mean different things to different people, to the point where it’s almost a meaningless term.
On the one hand, the guy who invented the name says that it stands for “Asynchronous JavaScript And XML”—meaning that Ajax-enabled pages are those where JavaScript is used to read data off a server, allowing you to update Web pages on the fly without your browser loading an entirely new document.
On the other hand, some people only care that the page is updating, not what technology it’s using to do it. To those people, any time you use CSS to change the content of a page, or to hide or show different areas, it’s Ajax in action.
But no matter what definition you use, if you want to add Ajax to your pages, the Spry framework is what you’ll be adding to your site.
If after working with Spry you decide that you really want to learn more about asynchronous JavaScript, we recommend another book we’ve written, JavaScript & Ajax for the Web, Sixth Edition: Visual QuickStart Guide (Peachpit Press).
Adding Spry Elements
By now, you’ve surely noticed the Spry tab (Figure 14.1) on the Insert Bar. It’s just one of the many places where you can find Spry elements to add to your page.
Figure 14.1. Spry widgets are found on the Spry tab of the Insert Bar

To add a Spry element
• For widgets and data objects: With the Spry tab showing on the Insert Bar, choose where on your page you want to add the element, and then click the desired Spry button.
or
For widgets and data objects: Choose Insert > Spry from the menu bar and then choose which Spry element you want to add from the submenu (Figure 14.2).
Figure 14.2. Spry commands can be found in several locations in the Insert Menu.

or
For form validation widgets: choose Insert > Form from the menu bar and then choose which Spry widget you want to add from the submenu (Figure 14.2).
or
For a UI widgets: choose Insert > Layout Objects from the menu bar and then choose which Spry widget you want to add from the submenu (Figure 14.2).
or
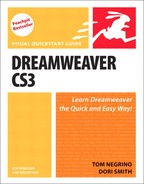
For effects: select the element on the page you want the effect to affect, click the plus button on the Behaviors panel, and choose an action from the Effects submenu (Figure 14.3).
Figure 14.3. Spry effects are considered behaviors, so that’s where they’re found.
 Tips
Tips
• If you’ve added a widget, you’ll see the object on the page outlined with a bright blue border and the name of the widget. If you’ve added an effect, you’ll see it listed in the Behaviors panel.
• Believe it or not, these aren’t all the places where you can find options to add Spry elements in Dreamweaver.
Using the Menu Bar Widget
One of the most common user interface items you’re likely to add to a site is the common menu bar. As mentioned in Chapter 13, you can build complex menu bars in Fireworks—but what if you don’t have Fireworks, or its menus aren’t quite what you want? Spry menu bars are simple, flexible, and powerful.
To add a menu bar widget
1. Decide where you want the menu bar on your page, and click the Spry menu bar button ![]() on the Spry tab of the Insert Bar. The Spry Menu Bar dialog appears (Figure 14.4).
on the Spry tab of the Insert Bar. The Spry Menu Bar dialog appears (Figure 14.4).
Figure 14.4. The Spry menu bar can be horizontal or vertical.

2. Decide if you want a horizontal menu bar (a pull down, where the main menu options go across, and submenu options go down) or a vertical menu bar (a flyout, where the main menu options go down, and submenu options go across). Click OK to accept.
3. The Spry menu bar appears on your page, with default data displayed in the Property Inspector (Figure 14.5).
Figure 14.5. The brand-new Spry menu bar on our page starts off with some default values.

4. To change the name of items in the menu bar, click any item name in the first column of the Property Inspector (Figure 14.6) and change the Text field on the right. Items in the second column are submenus of the selected item in the first column, and items in the third column are submenus of the selected item in the second column. To delete an item, select it, and click the minus button ![]() at the top of the column. To add items, click the plus button
at the top of the column. To add items, click the plus button ![]() at the top of the column, and then change the name from the automatically named default. And to change the order, select an item, then click the up
at the top of the column, and then change the name from the automatically named default. And to change the order, select an item, then click the up ![]() or down
or down ![]() arrow at the top of the column.
arrow at the top of the column.
Figure 14.6. After you’ve created the menu bar you’ll set its values using the Property Inspector.

5. Turn menu options into links by selecting the option and changing the link field to the URL of the desired page (Figure 14.7).
Figure 14.7. The menu bar inside Dreamweaver displays similar to how it will appear in the browser, but not exactly.

6. Click the Turn Styles Off button on the Property Inspector to see how the menu bar appears when CSS isn’t available (Figure 14.8). Click the Turn Styles On button to make the styles reappear.
Figure 14.8. It’s a good idea to always check to see how your Spry elements appear without styling.

7. When you first save the page, or when you view the page in a browser, you’ll see the Copy Dependent Files dialog (Figure 14.9). This lets you know that the required Spry files are being added to your site. They’ll all be in a directory named SpryAssets at the root of your site, and you’ll need to upload that directory and the files it contains to your server so your site works correctly.
Figure 14.9. Every Spry command has associated JavaScript, CSS, and graphics. Dreamweaver warns you that it’s adding them to your site.

8. When you view your site in a browser (Figure 14.10), you’ll see your new flyout (or pull down) menu.
Figure 14.10. And here’s our Web page with its new cool flyout menu.

However, what we see is the menu in Dreamweaver’s default menu style, which isn’t quite what we wanted, so we’ll need to edit the widget’s styles.
To edit a menu bar widget
1. This page is similar to one we used earlier in the book, which means we’ve already got a style sheet defined with our desired appearance. To use it, we need to change the menu bar’s id by changing its name in the Property Inspector, from MenuBar1 to navlist (Figure 14.11).
Figure 14.11. You can modify the way the menu looks by changing the styles, as seen in the CSS Styles panel.

2. As you’ll also see in Figure 14.11, the SpryMenuBarVertical.css file contains the CSS rules for the Spry menu bar. All that’s left is to go through the different rules that apply to navlist, see which ones change the color, and delete them—that lets the navlist colors display the way we designed them.
3. And finally, when we view the page in the browser, we see our new flyout menu just the way we wanted it to appear (Figure 14.12).
Figure 14.12. The new cool flyout menu looks even cooler when its design matches the rest of the site.

Tips
• You can also see the new SpryAssets folder and its files in Figure 14.11. They’re automatically added to your site when you accept the Copy Dependent Files dialog.
• The Turn Styles Off button on the Property Inspector is also useful to verify that you’ve set up all your menus and submenus correctly, as it causes them to display all at once on the page.
• Be sure to always test your pages in a browser, as you won’t be able to see if the navigation works correctly inside Dreamweaver.
• To delete the widget, make sure the entire menu bar is selected, and then press delete.
• When using any Spry widget, be careful to test your pages for accessibility for those users who don’t have JavaScript, those with older browsers, and those with disabilities. Your sites need to work for everyone, not just people with the latest and greatest browsers, and the current version of Spry doesn’t always create widgets that work when (for instance) a visitor to your site sees it on a mobile device.
• In Figure 14.7, you can add a tool tip to any link simply by typing text into the Title field.
Using the Tabbed Panels Widget
Another common user interface element is tabbed panels, which make a Web page look similar to an application. Creating tabbed panels was a time-consuming and difficult process until Spry came along, but not any more.
To add a tabbed panel
1. Decide where you want the tabbed panel on your page, and click the Spry tabbed panel button ![]() on the Spry tab of the Insert Bar. A Spry tabbed panel with defaults and the Tabbed panels Property Inspector display (Figure 14.13).
on the Spry tab of the Insert Bar. A Spry tabbed panel with defaults and the Tabbed panels Property Inspector display (Figure 14.13).
Figure 14.13. Tabbed panels can be a way to show a lot of information in a limited space (although not all at once).

2. To change the default tab names and panel content, simply type over them in the Dreamweaver document. The first tab is shown by default when the page first loads; you can change that by re-setting the Default panel field in the Property Inspector.
3. To delete tabs, select the tab in the Property Inspector and then click the minus button ![]() . To add tabs, click the plus button
. To add tabs, click the plus button ![]() . And to change the display order of the tabs, select a tab, and then click the up
. And to change the display order of the tabs, select a tab, and then click the up ![]() or down
or down ![]() arrow.
arrow.
4. To view a specific panel inside Dreamweaver, hover over the tab until you see an icon of an eye ![]() . Click the eye, and that panel displays (Figure 14.14).
. Click the eye, and that panel displays (Figure 14.14).
Figure 14.14. Inside Dreamweaver, you can see how each tab and panel will appear in the browser window.

5. As always, be sure to test your Spry widget in a browser to see how it actually works (Figure 14.15).
Figure 14.15. And here’s the final version in a browser.

Tips
• As with the menu bar widget, you can use Dreamweaver to modify the CSS that applies to the tabbed panel widget to make it match the rest of your site design. If you want detailed information on a widget’s CSS properties, click the Customize this widget link in the Property Inspector to launch the Adobe Help Viewer.
• Unless you change the applicable CSS, the tabbed panel widget takes up as much room as is available horizontally. There wasn’t much room available in this design, so as Figure 14.15 shows, the tabs wrapped. Dreamweaver makes that happen automatically, but if that’s not what you’re looking for, you may want to try an accordion widget instead, as described next.
Using the Accordion Widget
An accordion widget is a set of panels, where one (and only one) is displayed at a time. It’s a handy way to present several discrete chunks of information in a limited space.
To add an accordion widget
1. Decide where you want the accordion on your page, and click the Spry accordion button ![]() on the Spry tab of the Insert Bar. A Spry accordion widget with defaults and the Accordion Property Inspector display (Figure 14.16).
on the Spry tab of the Insert Bar. A Spry accordion widget with defaults and the Accordion Property Inspector display (Figure 14.16).
Figure 14.16. The accordion widget might be a better match for the type of information that we’re trying to display, so we’ve added one here.

2. To change the default labels and content panels, simply type over them in the Dreamweaver document. The first panel is always shown by default when the page first loads.
3. To delete panels, select the panel in the Property Inspector and then click the minus button ![]() . To add panels, click the plus button
. To add panels, click the plus button ![]() . And to change the display order of the panels, select a panel, then click the up
. And to change the display order of the panels, select a panel, then click the up ![]() or down
or down ![]() arrow.
arrow.
4. To view a specific panel inside Dreamweaver, hover over the label until you see the eye icon ![]() . Click the eye, and that panel displays (Figure 14.17).
. Click the eye, and that panel displays (Figure 14.17).
Figure 14.17. The panels can be set to display or hide inside Dreamweaver.

5. Here’s your new accordion as seen in a browser (Figure 14.18). Simply click the label, and the currently open panel closes and the desired panel opens. In this example, we’ve decreased the height of the accordion panels, as they don’t need to be as tall as the default (shown in Figure 14.17).
Figure 14.18. And here’s the final accordion in the browser.

Tip
• When adding a widget to an existing page, be careful about moving text that’s already on the page into the widget. Widgets can be fragile, and if you don’t drag and drop the text into exactly the right spot, you can end up with a mess. We’ve had better luck just deleting text and re-typing it directly into widgets.
Using the Collapsible Panel Widget
If the accordion widget is almost, but not quite, just what you want, then the collapsible panel widget is probably what you’re looking for. Where the accordion widget allows you to have one—and only one—open panel, the collapsible panel widget lets you have as many or as few open as you and your visitors want.
To add a collapsible panel widget
1. Decide where you want the collapsible panel on your page, and click the Spry collapsible panel button ![]() on the Spry tab of the Insert Bar. A Spry collapsible panel widget with defaults and the Collapsible panel Property Inspector display. Figure 14.19 shows a document with two collapsible panel widgets.
on the Spry tab of the Insert Bar. A Spry collapsible panel widget with defaults and the Collapsible panel Property Inspector display. Figure 14.19 shows a document with two collapsible panel widgets.
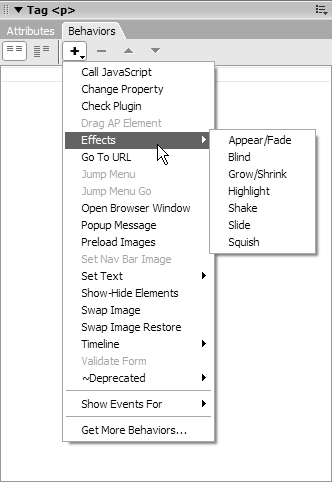
Figure 14.19. Multiple collapsible panels is another UI approach, allowing us to have multiple panels display at one time.

2. You can set each panel to be open or closed when the page loads. Toggle the display by changing the Default state in the Property Inspector from Open to Closed or vice versa.
3. Choose whether or not the panel contents are viewable inside Dreamweaver by toggling the Display value in the Property Inspector from Open to Closed and back again.
or
Hover over the label until you see the eye icon, as seen in Figure 14.20. If the panel is closed, the eye icon is open ![]() . Click it to open the panel. If the panel is open, the eye icon is closed
. Click it to open the panel. If the panel is open, the eye icon is closed ![]() , and clicking it closes the panel.
, and clicking it closes the panel.
Figure 14.20. Again, panels can be seen and hidden inside Dreamweaver without affecting how they will appear in the browser.
4. Change the default labels and content panels by simply typing over their current values in the Dreamweaver document.
5. Finish up by checking the display in the browser. Figure 14.21 shows the panels in their collapsed state, and Figure 14.22 shows them in their open state.
Figure 14.21. Here are the two panels—both closed—in the browser window.

Figure 14.22. Click each label, and each panel opens so you can see all the information at once.

Tip
• The Property Inspector also contains a checkbox to enable (or disable) animation. If it’s on, visitors to your site see a brief animation when they open and close panels. If you think that people might get impatient, turn the animation off.
Validating Forms with Spry
Figure 14.23 should look familiar, as it’s the same form example used earlier in this book. But if you look at Figure 14.24, it’s actually a little different—you can see that Spry has added some smarts to it. The addition of the new error messages tell people filling out the form more about what kind of data they need to enter where.
Figure 14.23. This contact form doesn’t look particularly intelligent.

Figure 14.24. But once a visitor sees the error messages, they have a better idea of what’s required.

To add Spry validation to a text field
1. Select an existing text field and click the Spry validation text field button ![]() on the Spry tab of the Input Bar. The usual blue box appears around the field, and the Spry TextField Property Inspector appears (Figure 14.25).
on the Spry tab of the Input Bar. The usual blue box appears around the field, and the Spry TextField Property Inspector appears (Figure 14.25).
Figure 14.25. Text fields can be set to require some value before the form can be submitted.

2. Using the Property Inspector, you can make your text fields require a wide range of input types. Figure 14.25 shows a text field that requires that something (anything) be in the last name field. That’s done by checking the Required check box, and setting the Min chars field to one.
Figure 14.26 shows the email address field, which is a little more complex. Here, the Type drop-down menu is set to Email Address, which rejects the user’s entry unless it matches the format of an email address.
Figure 14.26. Text fields can also be set to require very particular data before submission is allowed.

The last name field is set to show the field required error, and the email address field is set to show the invalid format error. These are done via the Preview states drop-down menu in the Property Inspector, which lets you see how each possible error message displays inside Dreamweaver. And along with the error messages, the entry field itself has a pink background, showing that the current entry is insufficient.
To add Spry validation to a select field
• Select an existing pop-up menu and click the Spry validation select button ![]() on the Spry tab of the Input Bar. Once again, you’ll see the blue box appear with its associated Property Inspector (Figure 14.27).
on the Spry tab of the Input Bar. Once again, you’ll see the blue box appear with its associated Property Inspector (Figure 14.27).
Figure 14.27. This pop-up menu is now set to require visitors to make a choice.

A pop-up menu can be set to have a required value or to only allow certain selections. You can also preview the various error messages inside Dreamweaver.
To add Spry validation to checkboxes
1. Select where you want your new checkboxes to be placed and click the Spry validation checkbox button ![]() on the Spry tab of the Input Bar. The Input Tag Accessibility Attributes dialog appears, which was covered in Chapter 11. Enter the appropriate data and click OK. Your new check box appears in its standard blue box, and the Property Inspector displays the Spry Checkbox (Figure 14.28).
on the Spry tab of the Input Bar. The Input Tag Accessibility Attributes dialog appears, which was covered in Chapter 11. Enter the appropriate data and click OK. Your new check box appears in its standard blue box, and the Property Inspector displays the Spry Checkbox (Figure 14.28).
Figure 14.28. Checkboxes can be validated individually or in groups.

2. If you want the validation to apply to a group of checkboxes instead of a single checkbox, add them inside the Spry region at this point or drag existing checkboxes into the region.
3. The Property Inspector allows you to require a single checkbox to be set, or to require a certain minimum number of checkboxes to be set. In this example, we want them to click at least one checkbox of the five, so the minimum is set to one and the maximum is five. Figure 14.28 shows the error message that displays when they submit the page without picking any of the checkboxes.
To add Spry validation to a text area
1. Select an existing text area field and click the Spry validation text area button ![]() on the Spry tab of the Input Bar. You’ll see the usual blue box and Property Inspector (Figure 14.29).
on the Spry tab of the Input Bar. You’ll see the usual blue box and Property Inspector (Figure 14.29).
Figure 14.29. Text area boxes can require that at least a certain amount of data be entered, and give a hint to the visitor as to what’s necessary.

2. In the Property Inspector, you can set it so the text area is required, and set it to have a minimum or maximum length. Additionally, you can choose to display a counter of characters filled in or characters remaining, so that users know how close they are to the limit. And finally, the Hint field puts optional text into the field when the form loads, telling the user what type of information you’re requiring them to enter.
3. Figure 14.30 shows how the form appears in the browser when the page first loads. Figure 14.31 is an attempt to validate our bad input, showing the five error messages we’ve received.
Figure 14.30. The form looks straightforward when it’s first loaded in the browser.

Figure 14.31. But this form won’t let us get away with trying to submit it without the required fields.

Tips
• Any field can be set to validate on blur, change, or submit, where the default is submit. Blur refers to when the user exits the field, whether or not they’ve actually changed its value.
• The text area Hint text automatically clears itself when the user enters the field. Hint text also doesn’t count as characters towards the entry requirements/limits.
Adding Spry Effects
You can use Spry to add cool visual effects to elements on your page with behaviors. As shown in Figure 14.3, Spry Effects are found in the Behaviors panel. There are seven Spry effects: Appear/Fade, Blind, Grow/Shrink, Highlight, Shake, Slide, and Squish. You can see them in action at http://labs.adobe.com/technologies/spry/demos/effects/.
If you need a refresher on behaviors, please review Chapter 13. Remember to be careful setting which events trigger behaviors; if you want an effect to take place when an element is clicked, it should happen on the onClick (for instance), not onMouseOut.
Appear/Fade
The Appear/Fade effect makes an element appear or fade away. Figure 14.32 shows the dialog, which allows you to set the element, duration, effect (appear or fade), start and end percentages, and whether you want the effect to be reversible.
Figure 14.32. The Appear/Fade dialog lets you control that effect.

Blind
The Blind up/down effect works like a window blind that hides or shows the element. Figure 14.33 shows the dialog, which lets you choose the element, duration, effect (blind up or down), start and end values, and whether you want the effect to be reversible.
Figure 14.33. The Blind dialog might sound scary, but in reality it makes an element on your page look like it’s a window shade.

Grow/Shrink
The Grow/Shrink effect makes the element larger or smaller. Use the dialog (Figure 14.34), to set the element, duration, effect (grow or shrink), start and end values, whether you want the element to move towards the center of the page or its upper-left corner, and whether you want the effect to be reversible.
Figure 14.34. The Grow/Shrink dialog allows you to make objects on your page get smaller or larger.

Highlight
The Highlight effect changes the background color of the element, causing it to stand out on the page. The Highlight dialog (Figure 14.35) is where you set the element, duration, start and end colors of the highlight, color you want displayed after the effect has completed running, and whether you want the effect to be reversible.
Figure 14.35. The Highlight effect changes the background color for the target element.

Shake
The Shake effect does just what it sounds like—it makes the selected element shimmy in place. As Figure 14.36 shows, all you can set is the target element.
Figure 14.36. The Shake effect does just what it sounds like.

Slide
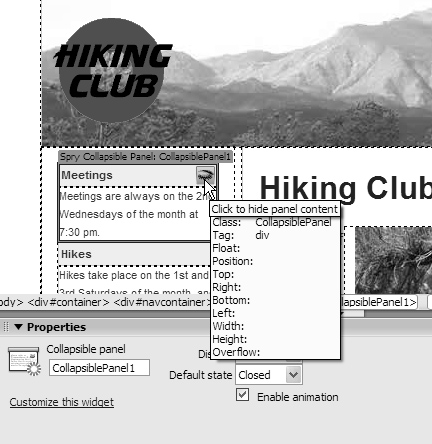
The Slide up/down effect moves the selected element up or down on the page. The Slide dialog allows you to set the target element, duration, effect (slide up or down), beginning and ending values, and whether you want the effect to be reversible (Figure 14.37).
Figure 14.37. Make an element slide up or down your page with the Slide effect.
Squish
The Squish effect makes the selected element disappear into the upper-left corner of the page. The element is set in the Squish dialog, as shown in Figure 14.38.
Figure 14.38. The Squish dialog lets you make elements on your page appear smooshed.

Tips
• Not all effects can be applied to all elements. Play with them to see which behaviors work with particular objects on your page.
• You can combine effects as well; all you have to do is keep adding behaviors to a given element. Be careful, though, to keep from getting too tacky!