
6. Subclassing UIView
In previous chapters, you’ve created several views: a UIButton, a UILabel, etc. But what exactly is a view?
• A view is an instance of a subclass of UIView.
• A view knows how to draw itself on the application’s window.
• A view is arranged within a hierarchy: the window (an instance of UIWindow) is itself a view and the root of the hierarchy. It has subviews (that appear on the window). Those views can also have subviews.
• A view handles touch events.
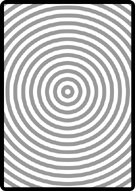
In this chapter, you are going to create your own UIView subclass that fills the screen with concentric circles as shown in Figure 6.1. You will also learn how to add text and enable scrolling and zooming.
Figure 6.1. View that draws concentric circles
Creating a Custom View
In Xcode, create a new Window-based Application. Name it Hypnosister.
To create a new UIView subclass, select New File... from the File menu. On the lefthand side of the next window, select Cocoa Touch Class within the iPhone OS group. Choose the Objective-C class option for the template. In the pop-up menu labeled Subclass of, select UIView. (Figure 6.2)
Figure 6.2. Creating a UIView subclass

Apple frequently (and pointlessly) changes this interface, so your window may look different. If it does, make sure you are finding a template that is a subclass of UIView (not UIViewController). Click the Next button.
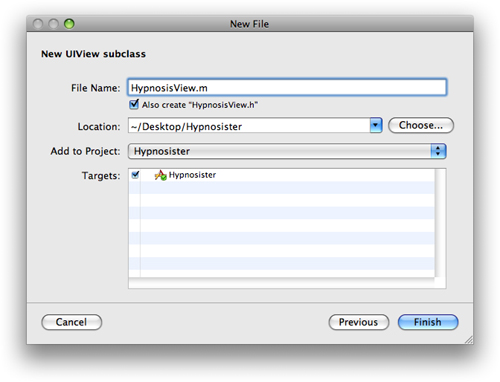
Name this file HypnosisView.m and make sure that Also create “HypnosisView.h” is toggled on, as shown in Figure 6.3. Click the Finish button.
Figure 6.3. Creating a HypnosisView
The HypnosisView.h file will open automatically. Open its counterpart, HypnosisView.m. Locate the drawRect: method in this file.
The drawRect: method
Every UIView subclass implements the method drawRect:. The drawRect: method is where the drawing code for the view goes. For example, a UIButton’s drawRect: method draws a rounded rectangle with a title string in the center.
Each time an instance of UIView is drawn, the system prepares a graphics context specifically for that view. The context is then activated, and the message drawRect: is sent to the instance of UIView that is being drawn. The graphics context’s type is CGContextRef (Core Graphics Context Reference), and it is responsible for aggregating drawing commands and producing an image as a result. This image is the appearance of the view instance. A graphics context also stores its drawing state, which includes things like the current drawing color, coordinate system, and the width of lines.
When drawing a view, you will sometimes use Objective-C to make calls defined in UIKit that implicitly use the active graphics context. Other times, you will get hold of the graphics context explicitly and draw using the C functions of the Core Graphics framework. In this chapter, you will do both.
In HypnosisView.m, change the drawRect: method:

Notice that you are passed a CGRect structure. This is the rectangle that needs to be redrawn, sometimes called a dirty rectangle. Typically, you ignore the dirty rectangle and issue the drawing instructions as though the entire view needed to be redrawn. If, however, your drawing code is particularly intricate, you might be more careful and only redraw the parts in the dirty rectangle to speed up drawing.
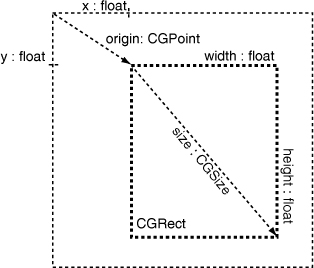
A CGRect structure (Figure 6.4) contains the members origin and size. These two members are also structures. The origin is of type CGPoint and contains two more float members: x and y. The size is of type CGSize and also has two float members: width and height. These three structures are the basic building blocks of Core Graphics routines.
Instantiating a UIView
Recall that there are two ways to create an instance of your view:
• create it in Interface Builder
• create it programmatically with alloc and initWithFrame: and make the new view a subview of the window
In this chapter, you are going to create the view programmatically.
Open HypnosisterAppDelegate.h and add an instance variable for the new view:

In HypnosisterAppDelegate.m, create the new instance and place it on the window:

Notice that you are calling initWithFrame:, the designated initializer for UIView. The view then has a size and position. When it is added to a view hierarchy (addSubview:), its position will be in the coordinate system of its superview (window).
(Retain count trivia: Because you created the view with alloc and added it to the window, the view is being retained by HypnosisterAppDelegate and the window and therefore has a retain count of two. But note that neither HypnosisterAppDelegate nor the window will ever get released or deallocated because they exist the entire time the application is running.)
Build and run your application.
Drawing Text and Shadows
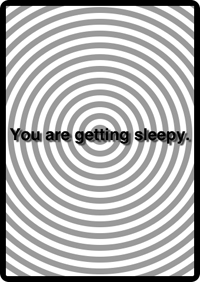
While we are talking about drawing, let’s add some text with a shadow to the view, as shown in Figure 6.5.
Figure 6.5. View that draws text
Open HypnosisView.m and add the following code to the end of your drawRect: method:

Build and run the application. You will see the text with a shadow appear on the view.
Notice that you only call drawing routines inside drawRect:. Outside of a drawRect: method, there is no active CGContextRef, and drawing routines will fail. (In a later chapter, you will manage your own CGContextRef for offscreen drawing. Only then can you draw outside of drawRect:.)
Using UIScrollView
When you want to let the user scroll around your view, you typically make your view the subview of a UIScrollView, as shown in Figure 6.6.

In HypnosisterAppDelegate.m, put your view inside a scroll view and add that scroll view to the window:

Build and run your application. You will be able to push your view up and down, left and right, as shown in Figure 6.7.
Figure 6.7. HypnosisView in UIScrollView

However, zooming doesn’t work. Yet.
Zooming
To add zooming, you need to give the scroll view a delegate. The delegate will tell the scroll view which view needs to be transformed. In HypnosisterAppDelegate.h, declare that HypnosisterAppDelegate conforms to the UIScrollViewDelegate protocol:
@interface HypnosisterAppDelegate : NSObject
<UIApplicationDelegate, UIScrollViewDelegate>
Open HypnosisterAppDelegate.m. In application:didFinishLaunchingWithOptions:, set the delegate and the limits of the zoom:

In that same file, implement the necessary delegate method:

Build and run the application and zoom away!
Hiding the Status Bar
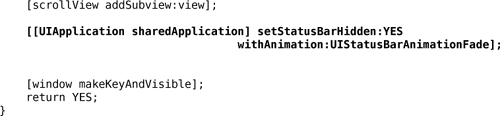
When you’re being hypnotized, you probably don’t want to see the time or your remaining battery charge; these things cause anxiety. So, hide the status bar before you make the window visible. Add a line near the end of application:didFinishLaunchingWithOptions: in HypnosisterAppDelegate.m:
Build and run the application again. The status bar will fade out after the application launches. However, sometimes you may want the status bar to be hidden before your application appears on the screen. To do this, you must add a new key-value pair to the application's info property list. Open Hypnosister-Info.plist.
Figure 6.8. Info property list with hidden status bar

Select the last row in Hypnosister-Info.plist and click the + icon on the righthand side of the window. A new row will appear, and a pop-up menu will open in the Key column. Choose Status bar is initially hidden from this list and hit return. A checkbox will appear in the Value column. Check this box, and then build and run the application again. The status bar will be hidden as soon as you launch the application.
Challenge: Colors
Make the circles appear in assorted colors.
For the More Curious: Retain Cycles
A view hierarchy is made up of many parent-child relationships. When we talk about view hierarchies, we call parents superviews and their children subviews. When a view is added to a view hierarchy, it is retained by its superview, as shown in Figure 6.9.
Figure 6.9. View hierarchy ownership

It is sometimes necessary for a subview to send a message to its superview. Every subview, then, has a pointer back to its superview. The superview property of a UIView is set to its superview when the view is added to a view hierarchy. (When a view is not part of a view hierarchy, superview is nil.)
Superviews are not retained by their subviews. Why not? Well, imagine what would happen if they were. Every time a subview was added to a view (let’s call it BigView), BigView would increment its retain count. For example, if BigView had six subviews, it would have a retain count of seven — one for each subview and one for its superview.
What would happen if BigView’s superview wanted to get rid of BigView? The superview would send BigView the message release. However, BigView would still be retained by each of its subviews and would not be deallocated. As a result, BigView’s subviews would never be sent the message release. BigView and all of its subviews, would be cut off from the rest of the application and exist in their own little cycle of independent objects where no other object could reach them.
We call this problem a retain cycle, and it can arise in any parent-child relationship, not just with view objects. The solution is simple: children should never retain their parents. In fact, a child should never retain its parent’s parent, or its parent’s parent’s parent, and so on. When you adhere to this rule, deallocating a parent object will appropriately release its child objects. If the parent is the only owner of its children, these child objects will be deallocated.
For the More Curious: Redrawing Views
When a UIView instance is sent the message setNeedsDisplay, that view is marked for re-display. View subclasses send themselves the message setNeedsDisplay when their drawable content changes. For example, UITextField will be marked for re-display if it is sent the message setText:. (It has to redraw if the text it displays changes, right?)
When a view is marked for re-display, it is not immediately redrawn; it is simply added to a list of views that need to be updated. Why? Because your application is actually one giant infinite loop called the run loop. The run loop’s job is to check for input (a touch, Core Location updates, data coming in through a network interface, etc.) and then find the appropriate handlers for that event (like an action or delegate method for an object). Those handler methods call other methods, those other methods call more methods, and so on. Views are not redrawn until after your methods have completed and control returns to the run loop, as shown in Figure 6.10.
Figure 6.10. Redrawing views with the run loop
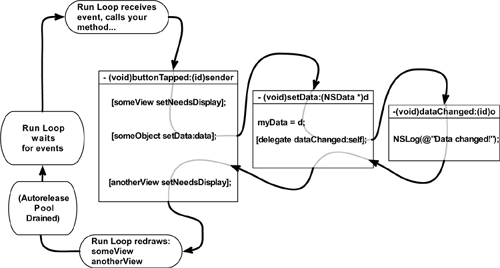
When control returns to the run loop, it says, “Well, a bunch of code was just executed. I’m going to check if any views need to be redrawn.” The run loop prepares the necessary drawing contexts and sends the message drawRect: to all of the views that have been sent setNeedsDisplay in this iteration of the loop. Any subviews of a redrawn view are also redrawn.