
7. View Controllers
View Controllers and XIB Files
In the Quiz application, you had one “screen,” one controller, and one XIB file:
Figure 7.1. Quiz, a single screen application
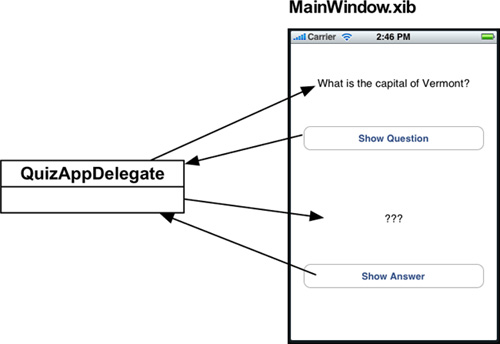
But what about applications with multiple “screens”? Typically, each screen gets its own controller and XIB file. Figure 7.2 shows an example application with two screens and the resulting controllers and XIB files.
Figure 7.2. Example of an application with two screens

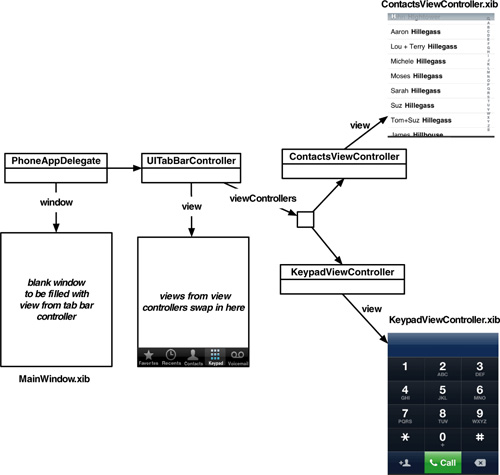
Each controller has a view that gets placed on the window. (The view often has subviews like buttons and labels.) Thus, we call these controllers view controllers. A view controller is a subclass of UIViewController that acts as the controller for its view. And, we typically need an object to take care of the view swapping for us. In the example application below, the swapping is done by a UITabBarController. The object diagram for this application is shown in Figure 7.3.
Figure 7.3. Object diagram for tab bar application
Note that this approach means that when you write an application with seven screens, you will typically write seven subclasses of UIViewController. Therefore, you may have up to eight XIB files (one for the window and one for each view controller).
However, sometimes there are fewer XIB files. When a view controller has just one view, it is usually easier to create a single view programmatically as you did in the last chapter.
Ready to have your mind blown a little? UITabBarController is also a subclass of UIViewController. It is a view controller that swaps in and out other view controllers.
Using View Controllers
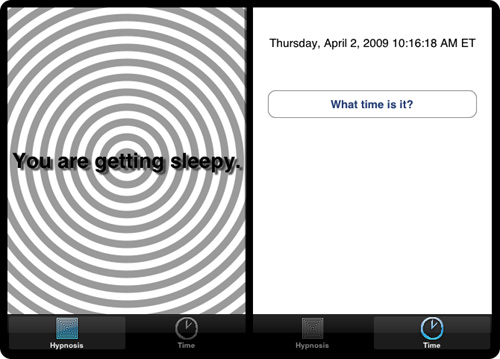
In this chapter, you are going to write an application with two screens. One will display the HypnosisView you created in the last chapter, and the other will let the user get the current time by tapping a button (Figure 7.4). We will swap in the views using a UITabBarController.
In Xcode, create a new Window-based Application project named HypnoTime. (Yes, there is a Tab Bar Application project template, but using that template makes things seem more complicated and magical than they are. Do not use it for this application.)
You will re-use HypnosisView in this application. Use Finder to locate HypnosisView.h and HypnosisView.m and drag them into the Classes group in Xcode (not the Classes directory in the filesystem). When the next sheet appears, check the box labeled Copy items into destination group’s folder and click Add. Also, add the icons Hypno.png and Time.png (available at http://www.bignerdranch.com/solutions/iPhoneProgramming.zip) to the Resources group.
Creating the UITabBarController
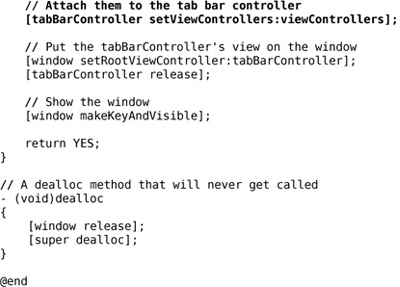
In HypnoTimeAppDelegate.m, create the tab bar controller and set it as the rootViewController of the window:

Build and run the application. Notice that the black tab bar appears at the bottom of the window, but there are no tab bar items. This is the UITabBar, a subview of the UITabBarController’s view. Notice, also, the big white space where your views will get swapped in.
In previous applications, you manipulated the view hierarchy directly. For example, in Chapter 5, you added subviews to the window using Interface Builder. In Chapter 6, you added subviews to the window using the method addSubview:.
When using view controllers, you don’t have to manipulate the view hierarchy directly. As of iOS 4.0, UlWindow implements a method named setRootViewController:. Passing an instance of UlViewController as the argument to this method automatically installs the view of that view controller into the view hierarchy and resizes the view to fit the window. The window also retains its root view controller.
Figure 7.5. View hierarchy with UITabBarController

Before iOS 4.0, you had to grab a pointer to a view controller’s view and add it as a subview of the window. That looked like this:
tabBarController = [[UITabBarController alloc] init];
[window addSubview:[tabBarController view]];
// Note that tabBarController is NOT released, because
// it is not retained by the window here.
Setting the rootViewController of the window still adds the view controller’s view to the window. It will also clear out any other subviews of the window, thus making the rootViewController’s view the sole subview of the window. (At the time of this writing, the iPad does not support 4.0. Therefore, you must use the pre-4.0 version of adding a view controller’s view to the window hierarchy.)
Creating view controllers and tab bar items
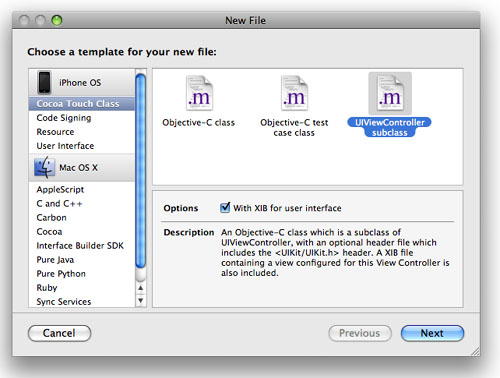
To create the first view controller for HypnoTime, select the New File... menu item and then UIViewController subclass. For this view controller, toggle on the checkbox titled With XIB for user interface (Figure 7.6). Name the file CurrentTimeViewController.m.
Figure 7.6. Creating CurrentTimeViewController
Now create another UIViewController subclass. This time, toggle off the XIB checkbox. Name this file HypnosisViewController.m.
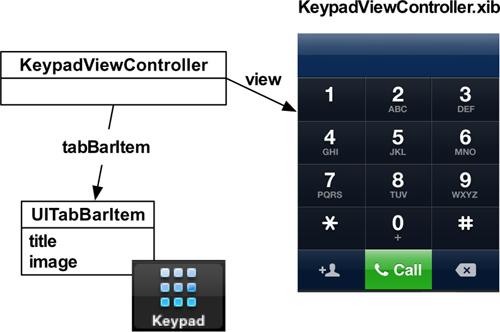
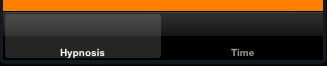
Every view controller has a tab bar item that controls the text or icon that appears in the tab bar as shown in Figure 7.7.
Figure 7.7. UITabBarItem example
Let’s start by putting a title on the tab bar items.
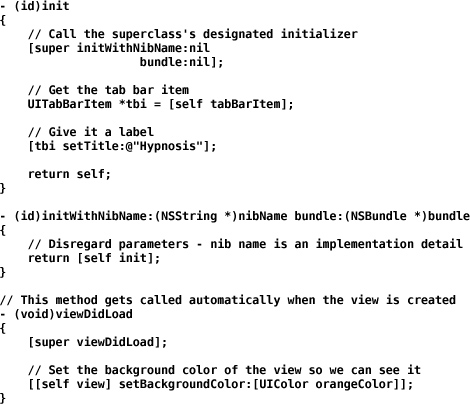
Open HypnosisViewController.m. Create a new init method, override the designated initializer for the superclass (UIViewController), and edit the viewDidLoad method to match the code below:
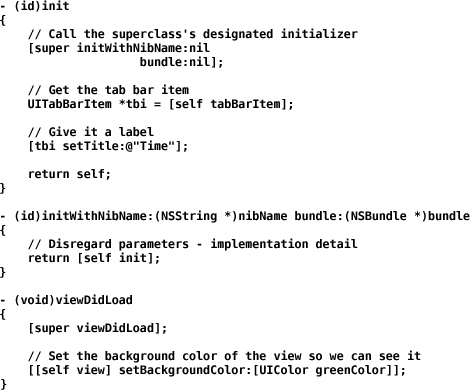
Open CurrentTimeViewController.m and do the same thing:
Now you need to create instances of the view controllers and add them to the tab bar controller. Open HypnoTimeAppDelegate.m and make the following changes:

Build and run the application. Two labeled tab bar items will appear on the tab bar (Figure 7.8). Tap one and then the other, and you will see that the views for the view controllers are getting swapped in.
Figure 7.8. Tab bar items with labels
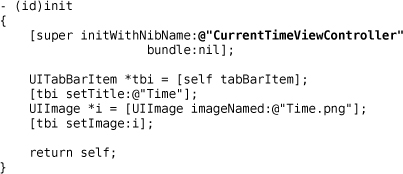
Now let’s add icons. Open HypnosisViewController.m and edit the init method:

Next, open CurrentTimeViewController.m and edit its init method:
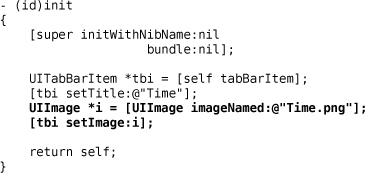
Now when you build and run the application, you will also see icons in the tab bar (Figure 7.9).
Figure 7.9. Tab bar items with labels and icons

Creating views for the view controllers
Now that you have a perfectly nice tab bar with two view controllers (and the two corresponding tab bar items), it’s time to give your view controllers views. There are two ways to do this:
• create the view programmatically
• create a XIB file
How do you know when to do one versus the other? Here’s a good rule-of-thumb: if the view has no subviews, create it programmatically; if it has subviews, create a XIB file.
When the view needs to be created, the view controller is sent the message loadView. In HypnosisViewController, you are going to override this method so that it creates an instance of HypnosisView programmatically. When an instance of a UIViewController is instantiated, its view is not created right away. A UIViewController’s view is created when it is placed in a view hierarchy (also known as “the first time it appears on screen”). Add the following method to HypnosisViewController.m:

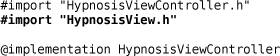
HypnosisViewController.m needs to know about the class HypnosisView. At this top of this file, import HypnosisView’s header file.
We no longer want the background of the view to be orange, so delete the following line from the viewDidLoad method in HypnosisViewController.m:
[[self view] setBackgroundColor:[UIColor orangeColor]];
Also, delete the corresponding line of code from the viewDidLoad method in CurrentTimeViewController.m.
[[self view] setBackgroundColor:[UIColor greenColor]];
Build and run the application. You should see a HypnosisView like the one in Figure 7.10.
Figure 7.10. HypnosisViewController

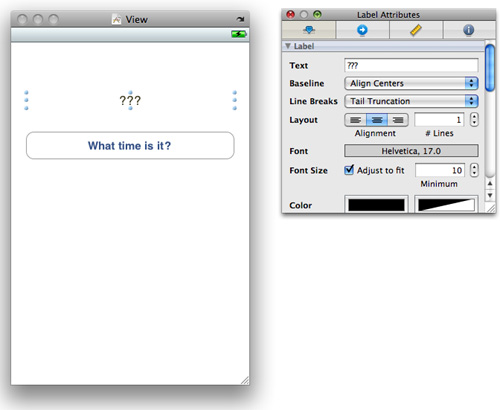
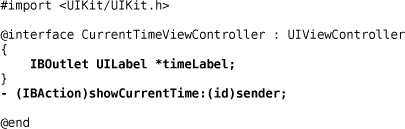
Double-click on CurrentTimeViewController.xib to open it in Interface Builder. Double-click on the View object in the doc window to open it. From the Library, drop a button and a label on the View’s window. Make them both nearly as wide as the window. Change the title on the button to What time is it?. Change the label to ??? and set the alignment to centered (Figure 7.11).
See that icon labeled File’s Owner? It is a placeholder for an object to be supplied when the XIB file is read in. When the view controller loads the XIB file, it says “Load the XIB named CurrentTimeViewController.xib, and I will act as File’s Owner.” Thus, you can know that the file’s owner is the view controller for this XIB. You know it is going to be an instance of CurrentTimeViewController, but Interface Builder does not.
In Xcode, add the necessary outlet and action to CurrentTimeViewController.h:
Save that file and return to Interface Builder.
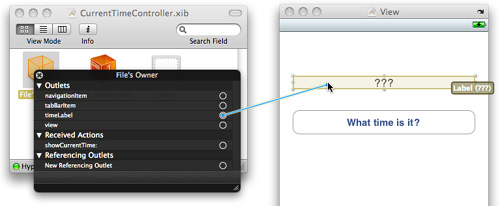
Control-click on File’s Owner to see its connection panel (Figure 7.12). Drag from timeLabel to the UILabel.
Figure 7.12. Connecting timeLabel and UILabel
The view controller has a pointer called view that needs to point to the entire view that is to be displayed. Notice that the view outlet is already connected to the instance of UIView in the doc window. (The template did this for you.)
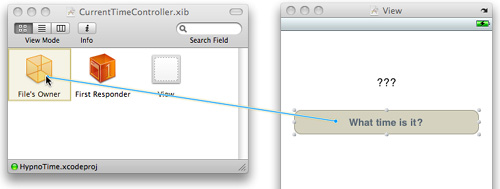
Control-drag from the button to the File’s Owner (Figure 7.13). Choose the action showCurrentTime:.
Figure 7.13. Setting the showCurrentTime: action
Return to Xcode and open CurrentTimeViewController.m. In init, tell it the name of the XIB file it is to load. Also delete the line that sets the background color to green:
Finally, implement the action method:
Build and run the application. You will be able to switch back and forth between the two views. Clicking the button on the time view will display the current time.
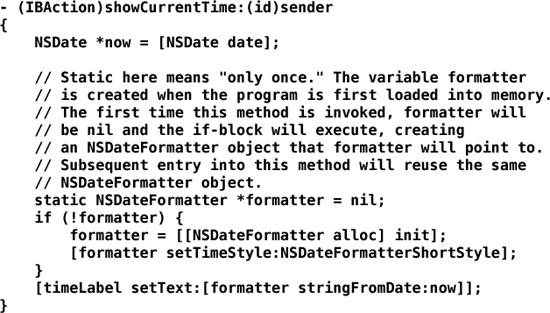
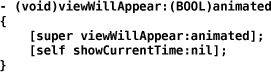
viewWillAppear
UIViewController has several methods that get called at certain times:

These methods are useful because a view controller is only created once but usually gets displayed (and dismissed or hidden) several times. You often need a way to override the default behavior at these times in the life of view controller. For example, you may want to do some sort of initialization each time the view controller is moved on screen. Here you would use viewWillAppear: or viewDidAppear:. Similarly, if you had a large data structure that you only need while the view controller is being displayed, you might want to do some clean-up each time the view controller is moved off screen. Then you would use viewWillDisappear: or viewDidDisappear:.
Note that these methods, as defined in UIViewController, do nothing. They are there so that your subclasses can override them.

Now let’s override viewWillAppear: to initialize the time label of the CurrentTimeViewController to the current time each time it is displayed. In CurrentTimeViewController.m, make the following changes:
Build and run the application. Note that each time you return to the Time page, the time label is updated.
The Lifecycle of a View Controller
A view controller is created through alloc and init. It does not, however, create its view at that time. Instead, it waits until the view is really needed before it executes loadView. (Remember that the default implementation of loadView reads in a NIB file, but you can override it to create the view programmatically.) This lazy creation of the view is good. For example, if you have a tab view with a dozen view controllers, the view for any particular view controller will only be created if that particular tab is selected.
First rule: Never manipulate your view in init. Wait until loadView or viewDidLoad before sending messages to the view. Trying to interact with the view in init will cause it to be created, which will destroy the lazy nature of your view controller.
Furthermore, a view controller’s view may get created and destroyed several times. Let’s say that you have several view controllers in memory (but only one on screen) and that all their views have been created. This could take up a lot of memory and trigger a low memory warning. At that point, didReceiveMemoryWarning is sent to all the view controllers. The default implementation of didReceiveMemoryWarning releases the view if it has no superview. (No superview indicates it is not on screen and no other view cares about it.) After the view is released, the view controller is sent viewDidUnload.
If the view is needed again, the view controller is sent loadView again. Thus, loadView may be called many times on a single view controller. However, init is only sent to a view controller once. If you were to send messages to a view controller’s view in init, they would not be sent to a reloaded view.
(When the view controller is deallocated, it releases its view, but viewDidUnload is not called.)
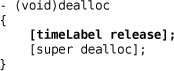
Second rule: For a view controller, any outlets that you set in Interface Builder must be released and set to nil in viewDidUnload. They must also be released in dealloc.
By default, any outlet from your view controller to a subview is retained by that view controller. For example, CurrentTimeViewController retains a UILabel because it has the outlet timeLabel. Thus, the timeLabel has a retain count of two: it is being retained by its superview and by CurrentTimeViewController directly. Thus, if the view is unloaded because of a low memory warning, it will not be correctly deallocated. Add a viewDidUnload method to CurrentTimeViewController.m to release timeLabel: and fix this problem:

Also, you need to release timeLabel in dealloc. While CurrentTimeViewController will never be deallocated in HypnoTime, other view controllers in other applications may. Accordingly, subviews of a view controller’s view that are also retained by the view controller must be released in dealloc:
Build and run the application in the simulator. While the CurrentTimeViewController is off-screen, simulate a low memory warning by selecting Simulate Low Memory Warning from the Hardware menu. You should see the log statement from viewDidUnload on the console.
Challenge: Map Tab
Add another view controller to the tab bar controller that displays an MKMapView. When the map view appears on the screen, have it show the user’s location.
For the More Curious: Paging
Some applications, like Weather, allow you to “page” through views by swiping your finger from left to right. People occasionally mistake this behavior for something that UITabBarController can do. It is actually the work of another class you have already used, UIScrollView.
Each page is a UIView subclass. All of the pages are typically controlled by a single UIViewController, and the UIScrollView is responsible for managing which view is currently on screen. There actually is not a whole lot to it once you have used a UIScrollView.
Let’s say you wanted two views to be pages within a UIScrollView that is controlled by a UIViewController. The view controller’s view would be an instance of UIScrollView, and the scroll view’s subviews would be the two pages.
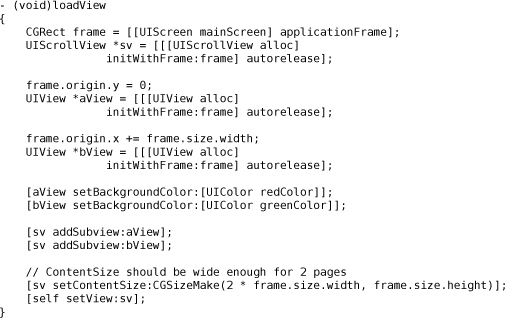
Notice how the second page view is offset from the first page view by the width of the screen. This puts the two views side-by-side, but the second one is off to the righthand side of the screen. The contentSize of the scroll view accommodates this by having a width that is twice the size of the screen (and a height that is the same as the screen).
If you stopped here, the scroll view will work normally: the user can move around the double screen-sized area and see the content of the two pages. However, a scroll view can also automatically stop at each page. To enforce the display of only one page at a time, the scroll view needs to enable paging:
[sv setPagingEnabled:YES];
Now when the user swipes to the left or right, one of the pages will lock itself onto the screen. The scroll view will automatically stop and recenter its content based on the bounds of the scroll view. Just make sure the UIScrollView’s size matches the size of each page and that the contentSize has enough room for all of the pages.