
Managing Your Course Data and Staying Up-to-Date
After creating content, uploading it to your course, setting up various activities, and getting your course running successfully, you may feel very pleased with yourself. Well done. But you have more to do: Now you need to be able to handle the updates and maintenance of your course. One of the most important aspects of keeping your learners engaged is keeping your course current by updating your files, deleting old files, and linking to new sites.
 Learners are tech savvy: They can download a document and view the date when it was last updated. Recently, one of my students told me how grateful she was that I kept the course fresh and interesting. She told me that one of her online courses had material dated 2003, broken links to sites that did not exist, and a recycled syllabus dated 2000. She learned all of this within the first week of the course, and she withdrew from the course and demanded her money back. Rightly so!
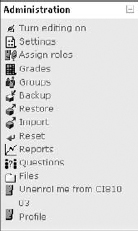
Moodle has added tools in the course Administration block to help you manage and keep your files updated. To view the Files tools, go to your course front page, locate the Administration block (by default, Moodle displays it on the left side, as shown in Figure 14-1), and click the Files link.
Figure 14-1: The Admini-stration block on the course front page.
Moodle then takes you to the Files editing page, shown in Figure 14-2. Here you find a number of tools to help you manage your course. All the files you've uploaded are listed with a check box on the left. At the bottom of the list, you find the following four buttons, which enable you to work with these files:
Figure 14-2: The Files editing page.
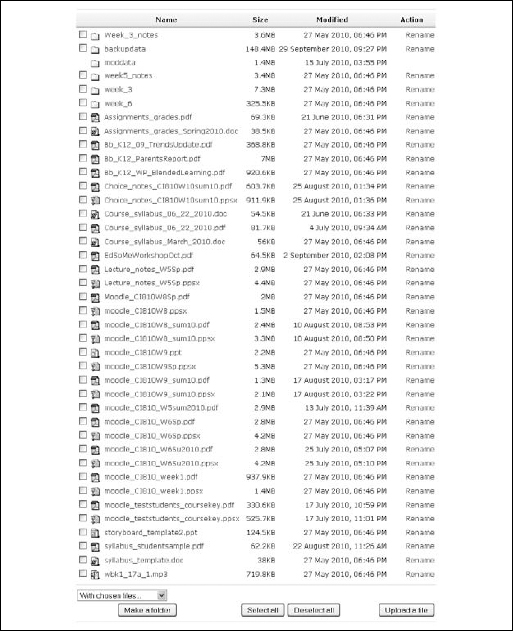
- Make a Folder: Click the button to create a folder and place files into the folder. You can make this folder available to your learners on the course front page, or you can just use it to organize your files. For a step-by-step explanation on how to create a folder and display it to your learners, see Chapter 5. The process is quite simple.
- Select All and Deselect All: By clicking one of these two buttons, Moodle enables you to select all the files or deselect them.
 You may find these buttons useful if you're deleting or moving many files. Even though you may not want to move or delete all the files, by selecting them all, you can go back and deselect individual files you don't want to move or delete and save a little time. When you click the Delete button and realize that perhaps you didn't want to delete certain files, no worries. Moodle has a safety net: Moodle prompts you to confirm that you want to delete selected files.
 - Upload a File: Click this button to upload any selected file from your computer.
After you've selected the check boxes next to the files you want to manage, select one of these options from the With Chosen Files drop-down list:
- Move to Another Folder: Moving your files to specific folders you created (such as YouTube tutorials, lecture notes, and so on) takes just a few steps.
- 1. From the With Chosen Files drop-down list, select Move to Another Folder.
- 2. Select the folder in which you want to place the files.
Moodle lists all the folders above the list of files. Empty folders are at the very top. (See Figure 14-3.) In Figure 14-3, above the table of file, notice that Moodle informs you of your actions and instructs you on what to do next: 2 files selected for moving. Now go into the destination folder and press ‘Move files to here’.
- 3. Click the Move Files to Here button at the bottom of the screen.
Moodle moves your files. (See Figure 14-4.) Notice at the top of the page, in the navigation bar, the new folder where you're moving the files is listed. In this example, it's Example_For_Dummies_Folder.
Moodle moves the files to the new folder and displays them. Above the new files, you see a folder with an up arrow, called the Parent directory. If you select this folder, Moodle returns you to the list of all folders and files.
Figure 14-3: On the Files page, Moodle informs you that you selected two files to move.
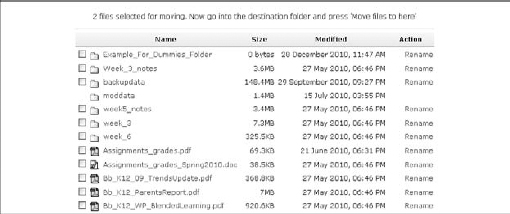
Figure 14-4: Moodle shows you files have been moved to the chosen folder.

In my example, notice that the name of the folder is connected with underscores (_). You don't need to use underscores when you give names to files or folders — Moodle adds them automatically when it saves the folder name. The database doesn't like names that aren't connected. - Delete Completely: Selecting this option from the With Chosen Files drop-down list deletes the selected files and folders from your Moodle course and site. Moodle prompts you to make sure you want to delete the selected files.
- Create ZIP Archive: A Zip file (an archive) consists of a folder that holds any number of files you select, and the Zip utility compresses them in size and creates a Zip file. This utility is very useful for storing files in archives or storing larger files such as audio, images, and video. By using Zip files, you can easily upload or download the files. You can make Zip files available to your learners; however, they need a Zip utility in order to unzip the folders. Most operating systems have a built-in Zip utility, such as WinZip in Windows and MacZip or StuffIt Expander for Macintosh.
To zip a folder of files, follow these steps:
- 1. From the With Chosen Files drop-down list, select Create Zip Archive.
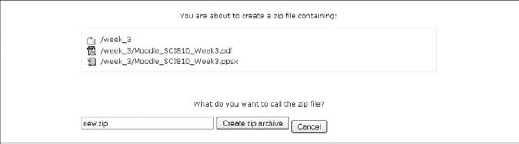
Moodle takes you to a new page where you see the files you selected. In the example, I chose a folder with two files, as shown in Figure 14-5. Moodle tells you that you're about to create a Zip file containing the listed files.
- 2. In the field below Moodle's statement What do you want to call the zip file?, give your Zip folder a name.
The default name is new.zip.
Figure 14-5: Creating a Zip file.
- 3. Click the Create Zip Archive button.
Moodle returns you to the list of files. You see the Zip folder listed alphabetically in your list of files. Notice three additional links on the right side of the list:
Unzip: This link unzips your archived files and adds them to the files area where the Zip file is stored.
Lists: If you click this link, Moodle displays all the files that are stored in the archive. Note that you can't view the files by click this link. It's there to refresh your memory. Moodle understands that no matter how intuitive and logical your naming structure becomes, you may forget at some point.
Restore: This link is related to the backup tools. After you've backed up your course or specific data within the course and uploaded it to your new course, you use this link to restore the files and content. I cover restoring content in the “Backing Up Your Course and Data” section, later in this chapter.
- 1. From the With Chosen Files drop-down list, select Create Zip Archive.