
Editing Fundamentals
Moodle gives you resources to set up, edit, and maneuver almost every aspect of your course. The editing tool icons are structured into four groups: general, middle column (the main course section), blocks, and activities/resources. I describe each group here and show you what the icons look like.
General icons
![]() Two general icons — the help icon and the main editing icon (both shown here) — are used across all Moodle tools. Some of the icons will also be available to your learners in activities they have permission to develop and edit, such as wikis, glossaries, and databases.
Two general icons — the help icon and the main editing icon (both shown here) — are used across all Moodle tools. Some of the icons will also be available to your learners in activities they have permission to develop and edit, such as wikis, glossaries, and databases.
Middle column
The middle column is the main course section. After you've chosen a format for your course (weeks or topics are most frequently used), Moodle provides you with specific tools to add, alter, and customize the main section used by your learners. You can add a summary to the sections by selecting the standalone edit icon. You move sections, resources, and activities up or down to change the order in which the course is displayed. You can hide whole sections from learners or make them visible. If you set up your course by topics, you have an extra icon allowing you to set it as the current topic. You can also compress and display only the current topic (kind of an accordion functionality). Table 3-1 lists the icons used in the middle column.
Table 3-1 Editing in the Front Page's Middle Column
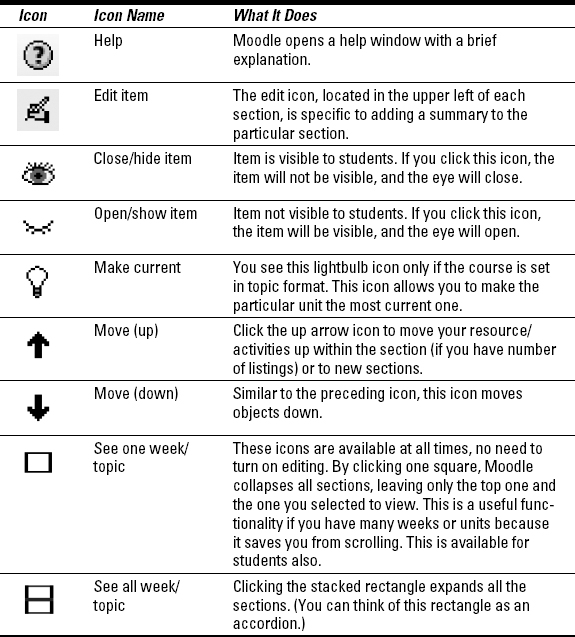
![]() In the main course section, when you turn on editing, the standalone edit icon for the summary is displayed at the top of each section, located above the News forum and below the date or unit titles. (Refer to Figure 3-4.) The editing icon for the summary allows you to place content right at the top of each section. Instructors use this space for titles with images, short instructions, summaries of weekly or unit events, or highlights about any other learning goal–related activity to draw learners' attention.
In the main course section, when you turn on editing, the standalone edit icon for the summary is displayed at the top of each section, located above the News forum and below the date or unit titles. (Refer to Figure 3-4.) The editing icon for the summary allows you to place content right at the top of each section. Instructors use this space for titles with images, short instructions, summaries of weekly or unit events, or highlights about any other learning goal–related activity to draw learners' attention.
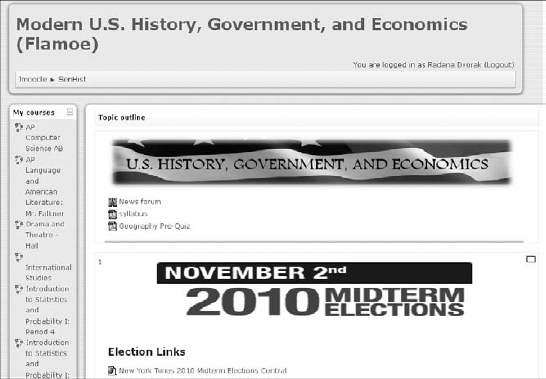
When you click the edit icon for the summary, Moodle opens a summary page with a Web-based editing text box, enabling you to use the space creatively. Don't forget to click the Save changes button when you finish adding content to the summary. See Figure 3-5 for a neat example of how the summary is used with a history course.
Figure 3-5: Using the summary creatively.
Blocks
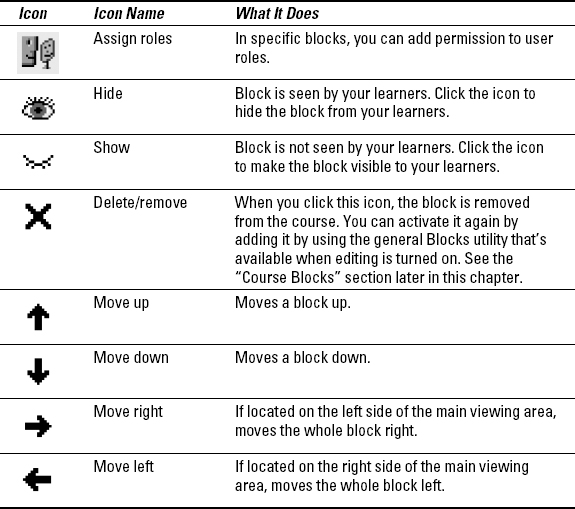
Blocks are tools that add information or functionality. Blocks are loaded to the left or right of the middle area of the course's front page (refer to Figure 3-3); some appear by default, and others you must add. Each block has its own functionality and is related to the course or a specific learning objective. People, Activities, Search Forums, Administration, Latest News, Upcoming Events, and Recent Activity are just some examples of blocks you can use in your course. I discuss individual block functionality in detail in the “Course Blocks” section, later in this chapter. Editing features allow you to relocate, hide, or remove blocks. A block's editing icons, shown in Table 3-2, appear on each block and are particular to only that block.
Table 3-2 Icons Used with Blocks
Activities and resources
Resources allow you to add content to the course, and activities are collaborative and/or interactive modules you add to the course. Both make up the bulk of your online learning environment. You can add these modules from drop-down lists when editing is turned on. Editing icons appear next to every activity and resource (refer to Figure 3-4), which allows you to make changes by selecting the appropriate icon. Table 3-3 shows the editing icons for activities and resources.
Table 3-3 Icons Used with Resources and Activities
