
Adding Learners to Your Course
The methods to enroll learners in your course fall into two categories: manual registration and self registration. The Manual method is part of the Administrator role, a responsibility that falls to the Moodle administrator. If, however, you're wearing both hats, instructor and administrator, you can review enrollment in Chapter 13.
Enrolling learners through self registration
In this section, I take you through the process of self registration, which Moodle refers to as internal enrollment; it's the default setting in Moodle. Using this method is the most efficient and effective way to get learners into your course.
![]() What URL that you use for Moodle depends on how your organization or Internet service provider has it set up, and it can take any number of forms. For example, it can look like http://nameoforganization.com/moodle or http://moodle.nameoforganization.org.
What URL that you use for Moodle depends on how your organization or Internet service provider has it set up, and it can take any number of forms. For example, it can look like http://nameoforganization.com/moodle or http://moodle.nameoforganization.org.
When you're in the middle of creating a fabulous course for your learners, you need to have learners in your course. At this point, you may be asking yourself,
- Will learners be able to navigate my course?
- Will learners read the right information to start?
- Are my instructions for assignments and quizzes easy to understand?
These are all great questions, and the only way you can answer yes to all of them is to get a few students to test your course. Run a minipilot session, observe your students, and get feedback. Your test students can be previous students; students from your current courses; or if you're setting up training sessions, a colleague or two. Rounding up testers who will do a complete run-through of your course and give feedback is a valuable exercise, and it will put your mind at ease. To prevent self-induced panic, just be sure to set all this up with plenty of time for testing before you launch your course.
Give your leaners these instructions to follow to self enroll:
- Go to the Moodle site URL (Web address) provided by the system administrator or instructor.
A screen appears, asking whether you're returning to this site or it's your first time here. See Figure 4-6.
Figure 4-6: Moodle login page.

- Click the Create a New Account button on the lower-right side of the screen.
The New Account page appears, as shown in Figure 4-7.
Figure 4-7: Creating a new account.
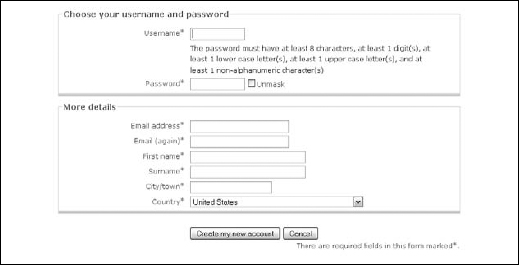
- Choose your username and password.
With Moodle versions 1.9.7 and higher, your password has to be at least eight characters long and include at least one lowercase letter, at least one uppercase letter, at least one digit, and at least one nonalphanumeric letter (such as %, #, *, or !).
- Fill in the remainder of the fields, making sure your e-mail address is valid.
Note that all these fields are required in order for you to successfully create an account.
- Select the Create My New Account button.
- Log in to your e-mail account.
You should receive a confirmation within a couple minutes of submitting the Create My New Account form. You must click the link in your e-mail, which confirms your registration and takes you to the Moodle site. You also receive a default Welcome message.
The Welcome message that learners receive is standard, and you need administrative permissions to make changes to or disable it.
When self enrolling, your learners may either enter your course, or enter your organization's site front page. If they enter the organization's front page, a number of courses may be listed. New learners need to select your course from the list. Most often, a pop-up window appears because the learners need a key to enter your course. (I highly recommend requiring a key, or you may never know who is in your course!) The learners can enter the key into the pop-up window. After entering it, they are automatically registered for your course. This is a one-time procedure. Next time they come to the course, they will need to enter only the username and password.
If your course doesn't require a key, the learners will be directed straight to your course. They will be required to enter their username and password every time they revisit the course.
 If you set a key for your course, make sure you give the key to students with the URL and registration instructions.
Enrolling learners through manual enrollment
If your learners are manually enrolled in a Moodle site, they need to receive the username and password from you or your Moodle administrator before they can enter the course. If they have the login information and the organization's Moodle Web address, they need to access the Moodle site (by placing the URL into a browser) and then enter their username and password on the left side. (Refer to Figure 4-6.) As discussed previously, if your course has an enrollment key, students are required to enter it. This is a one-time procedure. Next time they come to the course, they will need only the username and password.
If your learners are using Mac computers, advise them that the Firefox browser is much more compatible with Moodle than Safari.
Here's the catch with manually enrolled students: Before they can access your course, you need to add them by assigned role in the course. This process is slightly different than the preceding one. To add learners who are manually enrolled, follow these steps to add them into your course.
![]() You would follow the same process for adding non-editing teachers or guests to your course.
You would follow the same process for adding non-editing teachers or guests to your course.
- Click the Assign Roles link in the Administration block of your course front page.
Moodle takes you to an Assign Roles in Course: [Course ID] page, as shown in Figure 4-8.
Figure 4-8: Assigning roles in your course for manually registered users.

- Click the Student link in the left column in the table.
Moodle takes you to the Assign Roles in Course: [course short name] page, as shown in Figure 4-9.
Figure 4-9: Adding students (assigning roles) to your course.
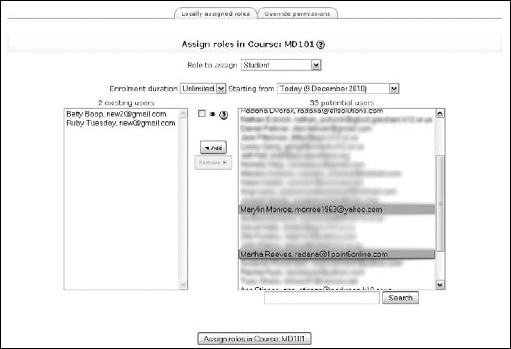
- Select the learner in the list of students on the right side.
You can select multiple learners by holding down the Ctrl or
 key while clicking the names.
 - Click the Add button between the columns to move the selected learners to the left column.
You can remove learners from the course by highlighting names in the left column and clicking the Remove button.
- Click the Assign Roles in Course: [Course short name] button at the bottom when you finish moving the names.
Moodle takes you back to Assign Roles page (shown earlier in Figure 4-8). You can return to your course by clicking the Click Here to Enter Your Course button.
To make sure all your learners are in the correct course, go to your course front page and click the Participant link in the People block located, by default, in the top-left column. If all your learners are listed, you are set to start teaching and Moodling — enjoy!
Unenrolling learners from your course
In the unimaginable case that a learner may need to unenroll from your course, you have two options:
- You can remove the student from the course on the Assign Roles in Course: [course short name] page. (Refer to the preceding steps and Figure 4-9.)
- You can allow for self unenrollment. Moodle, by default, does not give student accounts permission to unenroll themselves from courses.
To enable students to unenroll themselves from any course, follow the steps in this section. Note that to take these steps you need either administrative privileges or permission status on your Teacher role enabled.
![]() If your IT administrator is new to Moodle and/or wears too many hats and Moodle tasks are a low priority, see whether you can bribe him to set a few extra permissions on your Teacher role so you don't need to keep running to him (or inundating him with threats such as you're going to jump off the building if he doesn't help you). Knowing how to change permissions on rolls will impress him.
If your IT administrator is new to Moodle and/or wears too many hats and Moodle tasks are a low priority, see whether you can bribe him to set a few extra permissions on your Teacher role so you don't need to keep running to him (or inundating him with threats such as you're going to jump off the building if he doesn't help you). Knowing how to change permissions on rolls will impress him.
- In the Site Administration block, (located on the site front page), click the Users link to expand your options. Click the Permissions link and then click the Define Roles link below that.
Moodle opens a new Roles page with three tabs on the top. On the Manage Roles tab, roles are listed in the left column, editing options in the right. See Figure 4-10.
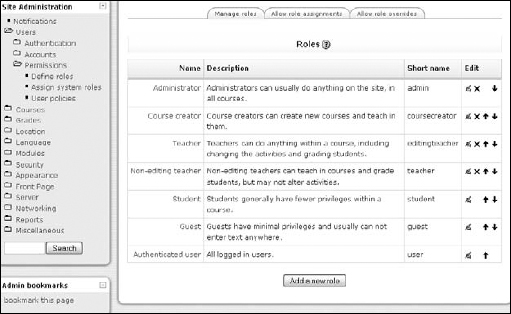
- Click the editing icon opposite the Student role.
Moodle opens the Edit Role page. (See Figure 4-11.)
- Scroll down until you see moodle/role:unassignself in the column on the left.
- On the right, select the Allow radio button.
- Click the Save Changes button at the bottom of the page.
You have to scroll down quite a bit. The role change is enabled immediately when students log in.
Returning to your course, switch your role to Student view (by using the drop-down list in the top-right corner of your course front page). Notice in the students' Administration block (the third down on the left, as shown in Figure 4-12) that Moodle has enabled an Unenroll Me from [Course short name] link.
Moodle default settings allow teachers to unenroll themselves. You may be enrolled in a number of different site courses that you may have shared with your colleagues or just enrolled in to have a look. Often, Moodle administrators change this unenroll permission to prevent teachers from mistakenly unenrolling themselves. If this is the case and you have permissions to access to the site administration settings, follow the preceding steps to change permission status on the student roles; in Step 2, instead of selecting the Student role, select the Teacher role. You can then continue and change the permissions as outlined in Steps 3-5.
Figure 4-11: Editing a student role.
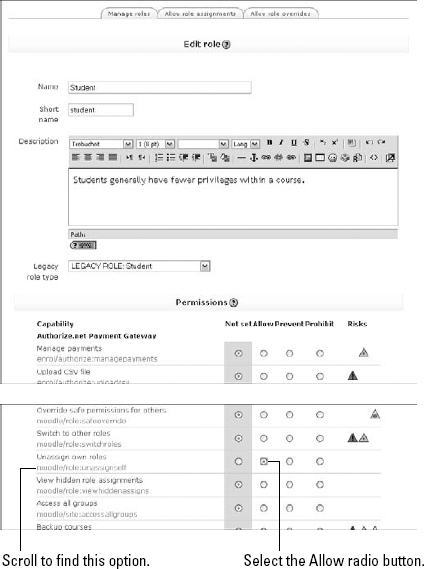
Figure 4-12: The student view of the Administra-tion block.
