
Exploring the Grader Report Pages in Moodle
When you initially set up activities in Moodle, you can set up most of them to be graded; to do so, simply choose the grading option during setup. Moodle automatically records the activity in the grade book and records the grades after learners complete the work and you mark it. Or if it's a quiz, Moodle marks it automatically and pushes the grade to the grade book. You don't have to do a thing! See Chapter 11 to read more about the Quiz module. The Assignment module (see Chapter 10) is set up so you can create course-specific activities outside the scope of Moodle and enter the grades manually in the grade book, allowing for a complete record for your purposes. Your learners can access their grade books at anytime and see anything that will be evaluated with a grade or a scale. As soon as you add grades/comments, learners can see them.
Moodle has tools that calculate, aggregate, and display grades in standard formats that support most educational and training organizations' requirements. Moodle also includes exporting functionalities that instructors can use to export and upload grades to an organization's database. Before you start using this grading tool (which will save you from marking and calculating overall grades), you need to become familiar with the Grade module, so I start this chapter by giving you a tour of the tabs you find on the Grader Report pages.
Discovering the Grader Report tabs
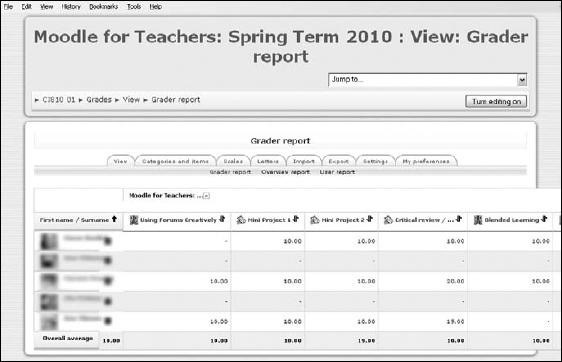
From your course front page, locate the Administration block (on the left side, unless you moved it) and click Grades. Moodle takes you to the Grader Report page with the View tab selected, showing a grid with your students listed down the left and graded activities displayed in columns, as shown in Figure 7-1.
Depending on how the administrator set up the Grader Report, you see a view similar to the one shown in Figure 7-1 (with tabs across the top) or the Choose an Action drop-down list in the upper-left corner. Both offer the same choices.
To begin, I explain the tabs you see on the Grader Report pages and the information on each. The Categories and Items tab enables you to group specific activities (such as forums) and then change the grade setting for that group only, so I discuss that tab separately in more detail later in the chapter.
Figure 7-1: The View tab of the Grader Report page.
View tab
If you aren't on the View tab already (the default tab when you first enter Grader Report), click the View tab, or from the Choose an Action drop-down list, select View Grader Report. Moodle displays the following information:
- The first column lists all your students, sorted by last name. You can change the sort order by selecting First Name at the top of the column and then clicking the sort icon (the black arrow). Each name is also a link that will take you to the student's profile page, where you can add notes, read blogs, send messages, and so on.
- The grade totals for each activity and assignment are listed, and you can view them in ascending or descending order. Click the small black arrows at the top of the columns to change the order.
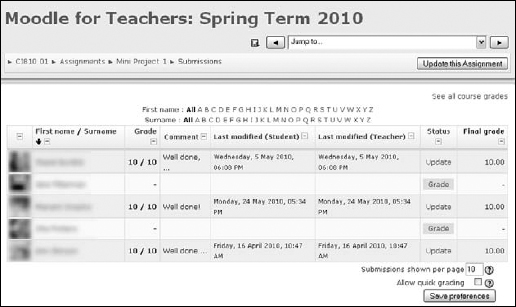
- Each activity title is a link that displays the particular activity only, with the following columns (as shown in Figure 7-2):
- • Grade
- • Comment: This is your feedback.
- • Last Modified (Student)
- • Last Modified (Teacher)
- • Status: Brings up the grade window where you can enter or update a grade and/or feedback.
- • Final Grade
- The last column on the right displays the statistics for the course total. (You don't see this column in Figure 7-1 because there are many items. You have to use the horizontal scroll bar to see the last column.)
Figure 7-2: The Grader Report, Submissions page.
Scales tab
The Scales tab lists the Moodle scale provided and all the scales you set up. You also have editing capabilities from this tab. See the later section, “Creating Moodle Scales,” for more information about setting up scales.
Letters tab
The Letters tab shows the settings for percentage ranges and letter grades from highest to lowest. For example, 100 to 93 percent = A, 92.99 to 90 percent = A–, and so on. You can edit the letter grade/percentage by clicking the Edit link located on the tab.
Import/Export tabs
Moodle provides you with tools for importing and exporting grades in various formats. For example, you can export to Excel by saving your exported files as CSV files. When your grades are saved as a CSV file, you have a backup if somehow your grade book is lost, and you can import the file and send it to your organization's grade database. You may also want to import grades from a spreadsheet into your grade book. Moodle enables you to export or import your grade book to or from an OpenDocument spreadsheet, a plain text file, or an XML spreadsheet. Note: If you upgrade grades for any particular activity, say for an assignment activity, after they're imported, you can't edit the grades on the Submissions page.
Settings tab
The Settings tab allows you to decide how the grade book appears to all learners in the course.
- Aggregations Position: Set this option to First if you want the Course Total column in the first column in the Grader Report, or select Last if you want the course total listed in the last column in the Grader Report. The default is Last. Set this option to First if you have many activities forcing you to scroll horizontally.
- Grade Item: Enables you to choose the grade display type: real numbers, letters (such as A, B, C, and so on), or percentage, in any combination. You can also choose the overall decimal point, which is the number of decimal points in the grade that Moodle displays. The default settings are Real and 2 decimal points.
- Overall Report Displaying Ranking: The default is Hidden, but you can choose to show rankings.
- User Report: These settings decide whether learners can view overall rankings and a percentage grade. The default is set to learners seeing the overall ranking; however, you can override it.
My Preferences tab
The My Preferences tab lets you set up how the Grader Report displays grades and other relevant information. You have to select options from a number of choices or leave the default settings. Here's a rundown of given options:
- General Options: Enables you to adjust display of the following:
- • Aggregation View: Choose from Report Default (set by an administrator for all courses on the site), Full View (displays grades and totals), Aggregates Only (displays only category and course totals), and Grades Only.
- • Quick Grading: If enabled, the Grader Report includes text boxes for each grade so that you can alter grades for a list of learners. This quickens the process of entering grades for many learners.
- • Quick Feedback: Same as for Quick Grading, but for feedback.
- • Students Per Page: This function enables you to set how many learners you want to see in each page of the Grader Report.
- Show/Hide toggles: This is a list of various display modes. I recommend leaving the default settings unless you specifically need one that is hidden.
- Special Rows: Options for displaying column averages.
I recommend leaving the default settings unless you need more information displayed.
Categories and Items tab
The settings on the Categories and Items tab are important if you want to group specific activities, such as forums, and then change the grade setting for that group only. For instance, if you're using the forums and giving extra credit to students who add discussion topics, the Categories function enables you to group all forums from one course together and then assign extra credit by setting weights. Weights determine how much the grade is worth in the overall total. For example, a grade can have a weight of 25 for participation, 50 for homework, 20 for quizzes, 30 for final exams, and so on. Note: The weights don't have to add up to 100.
You can also change the aggregations and a few other functions. Grouping the graded activities also makes it easier to view the Grader Report.
When you click the Categories and Items tab, you see the Simple view of the Edit Categories and Items page. In Simple view, you see only the Name, Aggregation, Weight, Max Grade, Actions, and Select columns. You can toggle between Simple and Full views. (Both links appear below the tabs, in the center of the page.)
In Full view, the Edit Categories and Items page expands to open all functionality, as shown in Figure 7-3, and you're ready to manipulate your grading options.
Figure 7-3: The Edit Categories and Items page in Full view.
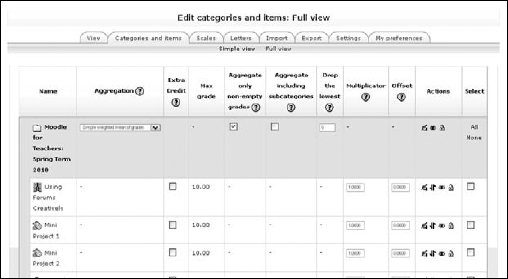
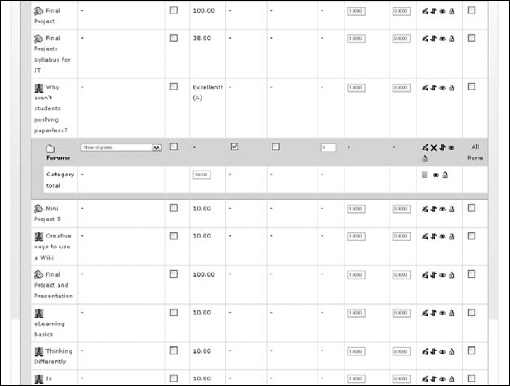
You see all your graded activities and assignments listed in chronological order. Categories are useful if you want to group a set of activities so you can manipulate them to add extra credit, weights, or curved grades. To group specific activities, select the check boxes in the rightmost column (under Select) or choose All from the top or bottom of the page. At the bottom, select the Add a Category by clicking it. Moodle groups the selected items, creates a folder, and highlights the row in light blue, as shown in Figure 7-4. Notice you have the standard editing icons to change settings or to delete the category. To make changes to the category, click the editing icon.
The Edit Categories and Items page shows many columns (refer to Figure 7-3), which I detail in the following list:
- Name: This is the name of your item or category.
- Aggregation: The Aggregation table has a separate drop-down list, enabling you to choose the aggregation method you're comfortable with or required to use by your organization to calculate students' grades. Moodle converts to percentage values before the grade is aggregated and then uses the method you have chosen to convert it to the ranges. Explaining each grading option is beyond the scope of this book. Visit http://doc.moodle.org for a rundown on the choices. From the drop-down list, you can choose from the following options:
- Extra Credit: Enables you to set extra credit values.
- Weights: After setting up the categories, you can set specific weights. Moodle calculates weights as a percentage and adds it to a grade's total.
- Max Grade: What you set the activity grade for. Usually if this column is set for real numbers, you may have added anywhere between 5 and 100. In the example shown in Figure 7-3, all mini projects and forum contributions are worth 10 points.
- Aggregate Only Non-Empty Grades: Select the check box below this column heading to treat empty grades as minimal grades or not include them in the aggregation. For instance, if a specific assignment is set up to be graded between 0 and 100, and 25 percent of the students completed the assignment and received grades, Moodle ignores the grades if you've selected the check box; otherwise, Moodle counts the non-graded assignment and gives 0 in the aggregation.
- Aggregate including Subcategories: Subcategories of assignments are not included in the aggregation unless you select the check box. For example, a project may have a number of assignments associated with it, such as an outline, introduction, list of resources, and so on. You can choose whether these will be counted in the aggregation.
- Drop the Lowest: By selecting the check box, you can drop the lowest grade. For example, if your values are set 0–100, you can choose to drop anything below 20. You need to input the value next to the assignment or grouped assignments.
- Multiplicator: Allows you to change the value of a specific activity, multiplying the maximum grade with the maximum value you input.
- Offset: If you applied the multiplicator, this number is added to every grade. Moodle added these options to give you more flexibility and control over your graded assignments, tests, and quizzes. These settings can be adjusted anytime throughout the duration of the course.
- Actions: Notice a number of standard icons allowing you to edit, hide, move, and lock the category and assignment. If you choose the hidden option, Moodle removes a category for display and grade calculation.
- Select: Click this check box when selecting any of the listed activities you need to make changes to. For instance, if you're setting up a category, select the check boxes in the Select column to move to the category.
Moodle gives you the Grade Calculations tool to set up your own grade based on other graded items. Use this tool when you group together activities, such as forum contributions. To set up the grade calculation, you have to follow a formula-and-functions pattern found in most industry-standard spreadsheets like the ones in Excel. I recommend that you do not use this unless you experiment with the tool first. If incorrectly set up, this tool affects your whole grade book. You can easily make a small typographic error in the syntax when you're rushed to submit your grades before the deadline.
If you want to play with the Grade Calculations tool, click the Calculator symbol shown next to the group category, as shown in Figure 7-4, and you're taken to the Edit Calculations page. First visit Moodle's detailed explanation and have a look at the syntax (http://docs.moodle.org/en/grade_calculations). Then, find a bit of time (not the day before your grades are due), make yourself a cup of tea, and try it.
 After you make any changes on the Categories and Items tab, make sure you click the Save Changes button at the bottom of the page.
Excluding from grades, and other exceptions
You can change various settings for assignments relevant to individual students. This can be useful if, for example, your student is ill during a specific assignment and you want to exclude the assignment from her grade calculations. To exclude a graded activity or an assignment, follow these steps:
- Click the View tab and click the Grader Report link among the links under the tabs.
Alternatively, after selecting Grades from the Administration block, you can use the Choose an Action drop-down list and select Grader Report under the View option.
- Find the student in the list on the left, and next to the assignment listing, click the editing icon.
Moodle has a nice feature: As you place your cursor over the editing icon, the name of the student and the assignment are displayed. This is very handy when you have a long student list and many assignments, forcing you to scroll horizontally.
Moodle takes you to Edit Grade page.
- Select the check box next to the Excluded option (the third one down).
Notice that you have many different grade options, such as overriding grades, dates, and so on. Also included is a feedback text box where you can communicate with your student regarding the particular assignment.
- Click the Save Changes button
Moodle returns you to the Grader Report page.
Displaying grades
Your learners can view their grades and the grade book anytime. Direct them to their Administration block, where they should have only two listings: Grades and Profile. When students click the Grades link, Moodle takes them to the User view and displays all the set work, their grades, and the course average for each listed work and overall. The Moodle default setting enables learners to view the course average. If you don't want learners to see the course average for overall assignments, you can change the setting by clicking the My Preferences tab (which I discuss earlier in the “My Preferences tab” section) and choosing No from the Show Column Averages drop-down list. Don't forget to scroll down and save your changes.