
Managing and Administering Forums
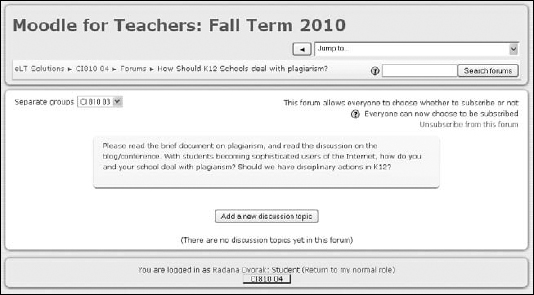
![]() After you create your forum and when your learners are ready to post discussions, click the Forums icon from your course front page to access your forum. Click the Add a New Discussion Topic button, as shown in Figure 8-3, and you're taken to the Your New Discussion Topic page where you create a discussion.
After you create your forum and when your learners are ready to post discussions, click the Forums icon from your course front page to access your forum. Click the Add a New Discussion Topic button, as shown in Figure 8-3, and you're taken to the Your New Discussion Topic page where you create a discussion.
Figure 8-3: Click the Add a New Discussion Topic button.
Moodle provides forum tools for you and your learners:
- Subscriptions links: Your learners see these links and have a choice to subscribe to the forum and receive all post in their e-mail. If you enabled learners to unsubscribe, they see a link in the same area on the forum page.
- Forum instructions: These appear in the center, followed by a button to add a discussion topic. You and your learners need to click this button to start the forum. When you use a forum for the first time, take the initiative and post the first discussion to get your learners familiar with the layout.
For instructors, this forum page has three extra options:
- Update This Forum: This button, located in the top-right corner, takes you back to the main editing page, where you can, for example, change the forum instructions.
- Show/Edit Current Subscribers: Located with the subscriptions links, this functionality allows you to make subscription changes, such as pushing the forum to e-mail, forcing all members to subscribe, and so on. Generally, you have at your disposal all the functionality you have when you set up the forum.
- Separate Groups: This drop-down list is located in the top-left corner and allows you to choose groups if you have group sets within your course.
Adding forum discussions
Beginning a discussion topic requires only a few simple steps:
- Click the Forums icon from your course front page.
- Click the Add a New Discussion Topic button in the center of the page.
The Your New Discussion Topic page, as shown in Figure 8-4, appears.
- Fill in the following fields (anything marked with an asterisk is required):
- Subject: Give your discussion a name.
- Message: Write what you want to discuss — identify the topic. It's useful to remind your learners to stay within the scope of the central theme or topic.
- Format: When you're using text editing boxes in Moodle, they can come in a number of formats, of which HTML is the most widely used and is set as default. You can leave the default setting, and things will work as you expect. For instance, URLs will automatically become links and indenting or line breaks will be interpreted as new paragraphs. For more information on the formats, click the Help icon.
Figure 8-4: The Your New Discussion Topic page.
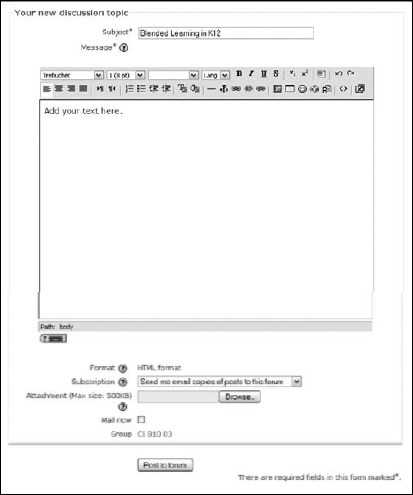
- Subscription: You and your learners can decide whether you want to receive e-mail copies of the posts.
- Attachment: Lets you attach a file to the forum.
- Mail Now: This field is available only to you. Student accounts cannot override this. Select the check box if you want to override the 30-minute posting delay.
- Group: Shows the group that's involved in this discussion. You set this group when you set up this particular forum discussion.
- Click the Post to Forum button.
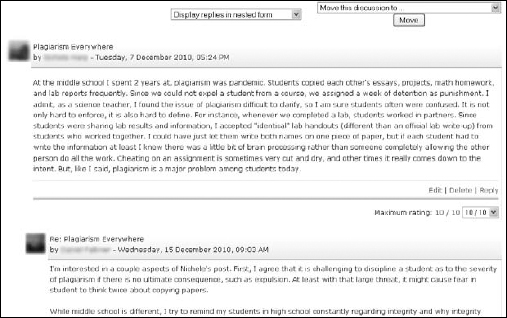
After you submit the discussion topic, Moodle tells you the post was saved and informs you that it will be posted in 30 minutes. After making a post, you (or your learners) have 30 minutes to go back and make changes. When the discussion is posted, your learners cannot make changes to it unless permissions are changed on students' profile settings. See Figure 8-5, which displays a learner's posting and a reply from another learner.
Figure 8-5: Example of a learner posting a discussion to the topic and a reply from another student.
Viewing, archiving, and searching forum discussions
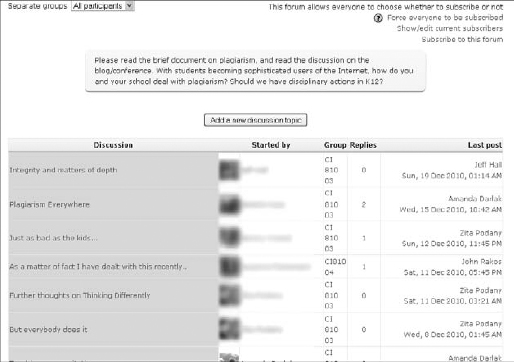
The forum viewing pages offer you a few more forum capabilities and information about the postings. Figure 8-6 shows a standard list of discussions, who posted them, and the date and time of posting.
Figure 8-6: Forum page listing all discussions and replies, by whom, and when posted.
Here are the most widely used tools:
- Reply: Clicking this link opens an editing window, allowing you and your learners to reply to a posting.
- Edit/Delete: These links take your learners back to their posting to edit it or delete it — as long as they do so within 30 minutes of posting. After 30 minutes, they can't make changes. There's no time limit for you to make changes.
- Show Parent: Shows the original discussion topic.
- Split Discussions: This option allows you to split the discussion to create new ones. This option is useful if a new topic is started in a reply that begins to generate discussions and you think it may be of more value to stand on its own.
- Rate Posts: Allows you to rate the postings. If you want users to be able to rate the postings, permissions need to be set in student profiles. Permission changes are beyond the scope of the book. Please visit http://docs.moodle.org/en/Forum_permissions for more details.
Above the discussion topics is a Display option drop-down list, which is useful for managing discussions. Moodle lets you view the discussions in four ways. The drop-down list gives you the following options:
- Display Replies Flat with Oldest First: All replies are displayed under the discussion topic with oldest first.
- Display Replies Last with Newest First: This option is the same as the preceding one except that newest replies display first.
- Display Replies in Threaded Form: The discussion is in complete form, but all replies post only headlines and author and date posted.
- Display Replies in Nested Form: My preferred viewing. You see all discussion topics and replies in full form with replies tabbed to the right. (Figure 8-5 displays the nested form.)
Moodle provides these extra tools that aren't seen by your learner:
- Move This Discussion To: Moodle lets you move the forum discussion to any other area in your course. If one of your forum discussions gets very long, you can use this utility to create a forum archive and then move all the entries there. The drop-down list enables you to move the forum discussion to any other forum listed in other units or weeks, or to an archive folder. This drop-down list is not available for learners.
Categorizing forum discussions and storing them in archive folders or combining them with other discussions keeps the current discussion easier to maintain, and makes the information available as a reference for your learners.
You can create an archive with few simple steps.
- a. Turn on editing, locate the unit or week in your Moodle course where you want to place the archive, and select Forum from the Activities drop-down list.
I usually place the archive in the last week/unit.
- b. Set up the forum as instructed in “Creating forums” section, earlier in this chapter.
I suggest you call the forum Archive and let learners know in the instructions let learners the title of the forum as it was listed prior to archiving.
- c. Go back to the forum you want to archive and click it.
- d. Click the Move This Discussion To drop-down list and select Archive Forum, and then click the Move button.
Archive Forum should be the last one in the list if you placed it at the bottom of your course.
Moodle moves the whole discussion to the Archive forum. You and your learners can view the archived discussion by clicking it from the forum listing accessed from the Activities block on the course front page.
- a. Turn on editing, locate the unit or week in your Moodle course where you want to place the archive, and select Forum from the Activities drop-down list.
- Search Forums: Searching a forum is useful if you or your students want to find certain terms or topics. Located on the front page, this tool can be handy if you use forums extensively and if the discussions become a resource for your students. It's also useful if you need to grade the forum. Enter the student's name in the forum search, and Moodle returns all forum contributions for that student.
You can enter a search term from the front page Search Forums block, or you can use the search feature within the discussion itself. The Search field is located in the top-right corner. If your search yields too many results, you can refine your search using the advanced search link, located in the right corner of your search results page. Clicking the link takes you to a detail search page where you can search your topic in any number of ways, such as by student name, date, and specific forums. You can use the standard advanced search options by clicking the advanced search link located below the search field. A new search page opens enabling you to enter details related to what you're trying to search. For example, if you're searching for a specific learner and dates he may have been active in the course, you have that option.