
Adding Wikis to Your Course
Wiki-wiki is a Hawaiian word meaning quick. In Moodle and other learning content management systems (LCMS), a wiki is a collection of collaboratively authored Web pages that are set up to be easy to add to and edit. The most famous wiki is Wikipedia (www.wikipedia.org); you and your class are most likely familiar with this online encyclopedia.
Wikis can be powerful modules for collaborative activities because their structure includes Web page–editing capabilities that help you coordinate information between any number of class members. As a teacher, you can decide whether the entire class can edit a wiki together, or you can create group wikis that are editable by specific class members. Moodle ensures that wikis are easy to set up and even easier to use, which makes them a great resource for any type of course project.
Effectively using wikis with your learners
Use your imagination and make wikis work for you and your class. Teachers and trainers use wikis in various ways: with a whole class, with multiple classes, with groups (subdivisions of courses), or with specific learners for individual research projects.
Here are a few ways that using a wiki can benefit your learners:
- Encouraging creativity: Use wikis to encourage learners to upload images, link to resources, use graphical editing options, and add sound and/or video clips as appropriate for the course. For example, a wiki designed for an introductory fashion design course can allow class members to get more creative by posting their fashion designs, linking to fashion shows, adding designs by famous designers, and planning and staging a show.
- Encouraging group work: Use wikis to encourage learners to work in groups on activities such as sharing lecture notes. For instance, you can set up a group wiki for each topic or lecture to encourage learners to share notes, add concrete examples, and decide what's valuable to review for exams.
- Managing group projects: Assign a group project and give each group a specific topic to post research, link to resources, create outlines and presentations, or design and develop a product. For example, a graduate student in my course, a teacher, who was reading the book The Outsiders (by S. E. Hinton) with her class set up group wikis around various '60s themes, such as hairstyles, music, culture, fashion, art, TV programs, movies, and significant political events in the United States and around the world. The kids loved it and had lots of fun creating the wiki pages (and learning while doing so).
- Enlivening individual research project work: Use the wiki to supervise individual project work that's shared only between you and your learner. Encourage your learner to use multimedia presentations, video, sound, text, readings, debates, interviews, and reference lists to create a project for assessment. You can use the wiki to observe and guide the learner from the beginning stages starting with an outline.
Just think of how green you and your learners will be as you save mountains of paper when you don't require your learners to hand in paper-based project work.
Choosing the right wiki structure
You have standard information to fill in and choices to make when you set up a wiki for your course. Preparing standard information for your wiki — such as a name and a descriptive summary — may seem simple, but giving a little thought to making these items informative, engaging, and intuitive for the class is important. Some choices you make affect the overall wiki configuration and determine who has access to read, edit, and add to the wiki materials. Other options you must choose are more technical in nature and relate to the level of complexity you want to incorporate.
The wiki name and summary description are required information in Moodle. Give your wiki a name that ties it closely to the course outcomes, learning objective, or specific project. In the summary field, describe the purpose of the wiki and how it will be used as part of your course, or if it's a wiki for a project, describe how you expect participants to contribute to it and how you'll assess it.
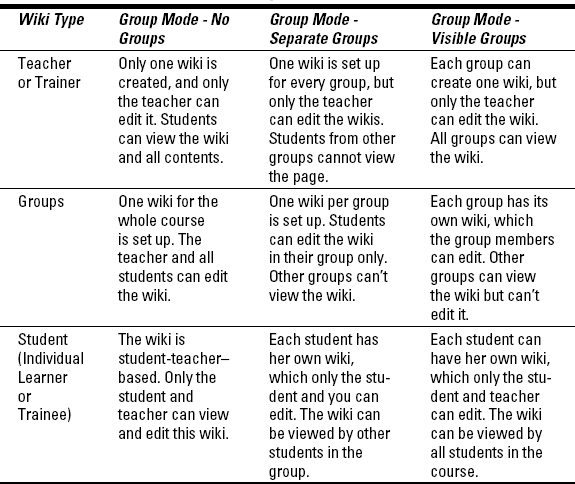
After naming your wiki and adding a summary, you need to determine how your wiki will be used with the course and set the appropriate permission in the Type field. This field is important because the setting determines who has editing permissions and can add to or help maintain the wiki, as follows:
- Teacher: Choose this option if you're the only one with editing permission.
- Groups: Select the Groups setting if the group has editing and/or viewing permissions.
- Student: If students have editing permission, select this choice.
Table 9-1 gives you a comprehensive explanation about setting options.
Table 9-1 Wiki Types and Permissions
Creating wikis
Creating and setting up a wiki are relatively simple processes. Moodle follows the same editing procedure that you use when setting up other Moodle modules. (See Chapter 3 for the discussion on basic editing procedures.) After you've decided where you want to add the wiki, follow these steps:
- Click the Turn Editing On button in the upper-right corner of your course front page.
The front page changes to show editing tools, allowing you to change the appearance and add functionality to your course.
The editing tools are listed in Chapter 3 and on the book's Cheat Sheet at Dummies.com. (See the inside front cover for more details about the Cheat Sheet.)
 Note the question mark icon next to certain features. Clicking this icon opens a help window that explains Moodle specifics about that feature.
 - Find the section or week in your course where you want the wiki to appear. In each section, you should see two drop-down lists, one for Add a Resource, the other for Add an Activity. Click the down arrow next to Add an Activity and select Wiki from the list.
Moodle takes you to the Adding a New Wiki page, shown in Figure 9-1, which has a similar layout to the pages for other activities — such as setting up a forum, as outlined in Chapter 8.
The top portion of the Adding a New Wiki page is shown in Figure 9-1; you have to scroll down to see the rest, which is shown next in Figure 9-2.
Figure 9-1: The settings on the Adding a New Wiki page.
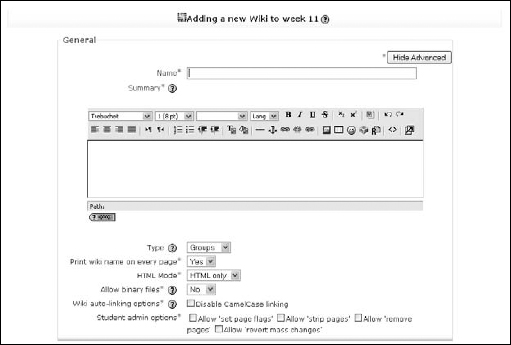
- Fill in the Name and Summary fields, which are required.
 In the Summary description, if the wiki is meant to be used by learners for a project, you may want to add requirements and state whether you'll use any assessment to evaluate class members' work on the wiki. Be as clear and concise as possible. Bullet points may help here.
 - Select what type of wiki you want to set up from the Type drop-down list.
Your choice here sets the editing permissions, which I describe in the preceding section.
- From the Print Wiki Name on Every Page drop-down list, select No if you don't want the name showing on every page; alternatively, leave the default, Yes.
- Select the HTML setting from the HTML Mode drop-down list.
Usually, the default setting is HTML Only, which means you don't see the HTML tags.
Make your selection based on the technical skill level you have and the skill level you expect from your wiki participants. Unless you and your class are very familiar with HTML and want to add or change the look and feel of the page, you may want to stick with the default HTML Only setting and rely on the Moodle wiki editor, which allows you to view and edit HTML source code using the toggle editing tool. (See Chapter 5 for instructions on how to use the WYSIWYG editor.)
The other two settings are No HTML, which shows all HTML tags, and Safe HTML, which shows only certain tags.
- Continue selecting options that define the wiki's allowable features.
Make choices for the following:
- • Allow Binary Files: Select Yes if you want to have the option of uploading graphics, audio, video, and other nontext resources. Your learners will have much more fun creating and viewing the wiki if you allow them to add media. Text-based-only wikis are boring!
You always want the option to upload various types of media (other than text) unless your IT support puts a tight cap on space allowance. To combat this situation (should it arise), get your picket signs out and march with your class to the IT office and demand more space. Or picking up the phone or sending the IT folks an e-mail may work also.
- • Wiki Auto-Linking Options: Select the check box next to Disable CamelCase Linking if you don't want Moodle to automatically create a new wiki page when it sees a word with a capital letter at the beginning and another capital letter somewhere in the middle. For example, the name GeorgeWashington (no space between the first and last name) creates a new wiki page.
 If you don't disable CamelCase linking, you must make sure there's no space between the words you're using to link! I tend not to use CamelCase — it's prone to causing errors whenever students type text or copy and paste text into the wiki editor.
You can disable this feature because Moodle provides you with another way to create new pages — by putting brackets around the words. For example, if you discuss the [first moon landing], putting brackets around these words, Moodle recognizes this as an instruction to create a new wiki page, with the text in the brackets becoming a link to the new page. I go into further detail on this in the upcoming “Checking out a new wiki page” section.
- • Allow Binary Files: Select Yes if you want to have the option of uploading graphics, audio, video, and other nontext resources. Your learners will have much more fun creating and viewing the wiki if you allow them to add media. Text-based-only wikis are boring!
- Select the check box next to the desired student admin options.
Moodle gives students specific editing and administrative privileges, which you control. I cover each of these options in the next section.
- Type a name in the Page Name text box, shown in Figure 9-2.
Adding a name here is important only if you want the name of the first page to be different from the name of the wiki.
Figure 9-2: Scroll down to make all your wiki settings.

- Choose the Common Module Settings as you would when you set up any Moodle activity. Then click the Save and Return to Course button.
Moodle saves your settings and returns your new wiki-editing page, as shown in Figure 9-3. See Chapter 3 for a rundown of the Common Module Settings.
