Just about everyone who’s reading this book will eventually use some form of Windows networking. You may have a Linux, NetWare, or other server on your system, but eventually you’ll want to use the peer capabilities that Windows provides. In fact, many people use Windows networking as their only form of networking.
You’ll run across several forms of Windows networking. For example, there’s the pure peer-to-peer network designed so that every machine acts as a workstation without a server. A second form of Windows networking relies on a single Windows Server machine to provide file, print, and communication services. The third form of Windows networking relies on more than one server connected in one of several ways to provide services to a large network.
Microsoft might want you to believe that there are serious differences between these configurations, but they all rely on the same basic networking principles. You’ll want to start with the pure peer-to-peer network, but building up to large networks isn’t that hard. Yesterday you learned some of the principles for building and working with a Windows network. Today we expand that conversation to specific Windows networking areas.
We’ll begin with a look at Microsoft’s attempt to automate networking using the Network Setup Wizard. You’ll find that this effort wasn’t as successful as it could have been, but it does help a little. Someone who’s never put a network together before has the most to gain from using the wizard but will also suffer the most confusion regarding the interesting choices it makes.
The remainder of our discussion today focuses on what you need to do in order to create a network using manual methods. It’s important to realize that even if you do get the Network Setup Wizard to work as expected, you still have to perform tweaks to your network to gain full functionality from it. In addition, you’ll need to make changes as your network changes. For example, if someone leaves your organization, changes jobs, or receives a promotion, you’ll likely need to make a change to the network.
Let me say at the outset of this section that creating any form of automated network installation is difficult because the vendor can’t guess the specifics of your network while designing the wizard. Even if the vendor writes software that correctly determines the capabilities of every device on your machine (something Windows XP does well), a network isn’t about one machine. Networks consist of several machines connected together using cable. Many networks require add-on devices, such as hubs or switches, for even basic network functionality. In short, attempting to guess the specifics of your network from the clues left in the machinery is nearly impossible.
The Network Setup Wizard does a reasonably good job at setting up small (two- or three-machine) networks where your computing needs are light. Microsoft designed it to meet the needs of the home network, not the corporate environment or even the small business environment in many cases. In fact, Microsoft originally called this tool the Home Networking Wizard.
You’ll find the Network Setup Wizard in the Start | Programs | Accessories | Communications folder. When you start the application, you’ll see a Welcome screen that tells you the tasks the wizard can perform. It pays to read this list so that you know precisely how Network Setup Wizard can help you. The following steps tell you how to complete the process:
Click Next. You’ll see a list of tasks that you need to perform before you use the wizard. Make sure that you perform all of these asks before proceeding; otherwise, the wizard won’t perform as expected.
Tip
Some of the bullets on the Before you continue dialog box are unclear. When Microsoft says that you need an Internet connection, it means you must have a live connection. If you’re using dial-up networking, make sure that you can interact with the Internet (the telephone is connected) before you begin this wizard. In addition, you need to verify that all printers and other peripherals have a connection to the network and are turned on and active. Windows XP seems to have a problem detecting printers and other peripherals in the “power saving” state. The printer will still accept print jobs, but it doesn’t always provide a response to Windows XP queries for information.
Complete the preparatory steps requested by the wizard and click Next. You’ll see a Select a connection method dialog box. This dialog box contains options for three types of Internet connection. Essentially, you need to decide if your computer connects directly to the Internet, or if you use another machine to make the connection. If you select the direct Internet connection option, the wizard assumes that you want to install Internet Connection Sharing (ICS). The Other option takes you to another screen with three more options: using a hub, establishing a direct connection without any network support, or having no connection at all.
Choose an Internet connection option and click Next. You’ll see a Give this computer a description and name dialog box.
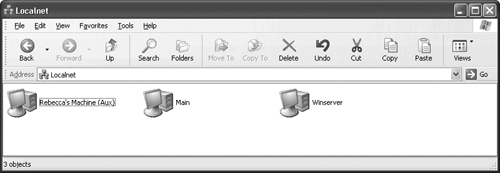
You must provide a name for your computer. However, the description is optional, and some people find the description more trouble than it’s worth on a small network. Older versions of Windows would display the actual name of the machine, and you could obtain the machine description if desired. Windows XP provides the machine description first, with the machine name in parentheses afterward as shown in Figure 15.1 for the Aux machine. If the network administrator uses an inconsistent description or leaves out the description on some machines, you’ll see the flawed network setup shown in the figure.
Type a name for your computer in the Computer Name field. Type a description in the Description field, if desired. Click Next. You’ll see a Name your network dialog box. Every computer on your network has to use the same network name. Otherwise, the computers will act as if they’re on different networks and won’t talk with each other. Make sure that you select a name you’ll remember to use for all computers on your network.
Type a network name and click Next. You’ll see a Ready to apply network settings dialog box like the one shown in Figure 15.2. This is your last chance to verify the network settings before you begin the network installation. Make sure that you check every entry on the list before proceeding.
Check the network settings and click Next. The Network Setup Wizard will perform some analysis and setup on your system. This process can take a long time. Be patient and wait for it to complete. A small two-machine network requires about 5 minutes for this step to complete; larger networks will require more time. When the configuration process is complete, you’ll see a You’re almost done dialog box. This dialog box contains four options for saving your network settings. Generally, using the floppy will work best.
Select one of the setup disk options. The procedure assumes that you’ll select the Create a Network Setup Disk option. Click Next. You’ll see an Insert the disk you want to use dialog box.
Insert the floppy disk in the drive. Click Format Disk, if required. Click Next. The Network Setup Wizard will copy the setup information to the floppy disk and then display a dialog box containing instructions for using it.
Write or type the instructions in a safe place so that you can find them later. Click Next. You’ll see a completion dialog box.
Click Finish. At this point, your network setup should be ready to go, at least on this machine.

If you decide to go the manual-networking route, the first thing you’ll need to do is create a design of your network. You need to decide that the printer goes in one place and your workstation in another. Write everything down so that you can document your network and make it easy to work on. Decide how you plan to run cabling before you actually begin to do it. Measure everything so that you know precisely how much this network will cost (the estimate will probably be off a little, but you can come very close if you plan your system well).
One of the most important tasks in building a usable network is deciding up front who will serve which functions on the network. A network administrator is a requirement on even a small network. If someone doesn’t take responsibility for the network, you’ll experience problems with it. Even a home network requires a network administrator in the form of Mom or Dad. The network administrator is the person who takes care of the network as a whole—the person who has the greatest access but also the greatest responsibility. On a small network, the network administrator is also the person who takes care of maintenance tasks, such as performing backups and cleaning the machines.
Workgroups function because they have structure. Not everyone should access every resource; they should access only the resources they need to access. Even on a small network, the network administrator has to maintain control over portions of the system. For example, on a small network, no one should have access to the network administrator’s machine except the network administrator. If this isn’t possible, at least secure the machine to hide the networking features from view and secure them from misuse. In short, security begins with the design and setup of your system. It shouldn’t be an afterthought. (I’ll show you how to create a security plan for larger networks in the “Creating a Security Plan” section tomorrow.)
Of course, a written design does much more than assign tasks and tell where to place equipment. It can also help keep you on budget when the salesperson tries to tempt you with just one more gizmo. The whole design process should help you think things through—to find potential problems in the way you want to configure the network.
At some point, you’ll finish your network design and purchase all of the required equipment. It’s important to put all of the equipment in place, connect it to the network, and test everything as much as possible in a stand-alone mode. Take time to learn about any special configuration requirements for the equipment. Make sure that you have optional features, such as network cards, loaded. Finally, make sure that you download all of the latest drivers for every piece of equipment on your system.
Part of the network setup also involves documentation. I’ve worked with small businesses for many years. The number one problem when I walk through the door is that no one has any documentation for anything. Every piece of equipment becomes a mystery to solve because I don’t have the documentation required to work with it. In addition, no one knows when the machine was maintained last (if ever).
Keeping the documentation for a machine with that machine is the best way to make life easy. Toss out old documentation when you replace it with something new. Keep the documentation in order so that you can find it when needed (large businesses tend to store their documentation in a central area but identify the associated machine on the documentation. It also helps to maintain logs for every machine containing the following information:
Part replacement
General maintenance, such as cleaning
Backups
Updates
Software installation and removal
When you get all of this prepared, you’re finally ready to install the operating system and associated network software. We discussed installation procedures during Day 2, “Windows XP Installation and Configuration.” Make sure that you understand how to work with Windows Explorer (Day 3, “Exploring the Interface”) before you proceed to the Sharing Resources section that comes next.
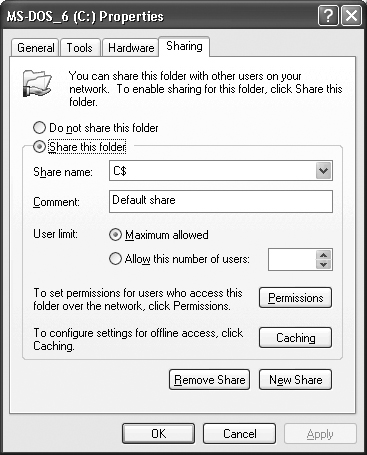
You can share many of your resources with other people on the network. However, before you can share anything, you’ll need to install the File and Printer Sharing for Microsoft Networks service shown in Figure 15.3. Generally, you’ll install this service during the installation process. However, you can also install it later using the procedure found in the “Installing Protocols, Clients, and Services” section of Day 14. Make sure that you disable this service or remove it if you decide not to share any resources later. We discussed this process in the “Removing Versus Disabling Features” section of Day 14.

Every printer or disk resource you can share will have a Sharing tab on its property dialog box (see Figure 15.4) and a Sharing entry on the context menu. As you can see, this drive has at least one “share” that people with the proper rights can use to access it. In many cases, you’ll create several shares for drives and may even create shares for lower-level objects, such as folders. Unfortunately, you can’t share individual files within a folder, so it’s important to create shared folders on the drive. These folders don’t even have to contain the original file; you can place file shortcuts within them. We’ll discuss sharing and security issues in detail in the “Managing File/Folder Access” section tomorrow.
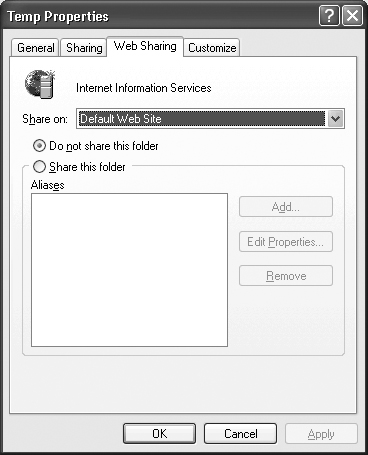
Windows XP also provides a method for sharing data over the Internet (or, at least, the company intranet). You can’t share an entire disk drive over the Internet. Actually, it isn’t safe to share this much of your system over a connection that a cracker could use. However, you can share individual folders on a drive using the Web Sharing feature shown in Figure 15.5. This feature works with Internet Information Server (IIS). Of course, you must have a Web server installed in order to use this feature. The Windows XP Professional Edition comes with a simple version of IIS that you can use.
Note
Generally, it’s safer to share resources using an e-mail connection. This one-way data transfer helps keep your network secure because the recipient never has access to your system (barring a Trojan Horse or back-door program). Collaboration using NetMeeting is also safer than using a Web share. Even a remote desktop is safer than a Web share in some respects. In short, use this feature with caution because you never know who will try to access your network.
While printers and disk drives both use the sharing methods just described, you also have to consider other resource-sharing scenarios. Some of these scenarios are under your direct control. For example, Internet Connection Sharing (ICS) permits you to share a connection with other people on the network. (See the “Connecting with Dial-Up Networking” section for details.) We’ll also discuss Remote Access Server (RAS) in the “Using Remote Access Server (RAS)” section. RAS is another means to create a remote connection.
In other cases, the resource sharing hides within the dark recesses of applications. For example, a developer can create an application that looks for resources on your machine. Using technologies such as simple object access protocol (SOAP) and distributed component object model (DCOM) allows applications to share remote resources. Don’t worry; you still have full control over your machine. The security settings you use either permit or deny access to the remote application. You can also control the level of access that the remote application obtains.
The Remote Access Server provides an external connection for someone to use to access your system. RAS supports a number of connection types; most of them are secure. Some of these connections provide straight access, while others require your machine to call the user back. In short, there’s a type of connection for just about every need.
You’ll normally use RAS for an extremely small number of people when working with Windows XP Professional Edition. (This service is unavailable to Windows XP Home Edition users.) For one thing, Microsoft didn’t design this version of the operating system for heavy server use. Another consideration is that you don’t want to give the entire world access to your system data.
The one thing you won’t want to do is confuse the RAS support provided with a server with the support provided in Windows XP Professional Edition. Microsoft turns the support on by default for server products, and servers support many options not found in Windows XP Professional Edition. You may also have problems using the Routing and Remote Access MMC snap-in with the Professional Edition. Yet, this is the main utility for working with RAS on a server. Professional Edition users will find that Microsoft has provided other means for working with RAS and the connectivity it provides.
There are two phases for creating a RAS connection. First, you have to create the connection using the special Incoming Connections applet. Second, you need to configure the user account to use the RAS connection by using either the Incoming Connections applet or the User Properties dialog box. You can use the Routing and Remote Access snap-in to monitor the connections you create. The following sections discuss all three issues. In addition, we’ll discuss some command line utilities that help you to work with RAS.
Configuring RAS for Windows XP Professional Edition is different from using RAS under Windows Server. Microsoft assumes that you aren’t going to use RAS on your machine, so they disable this support. To use RAS, you need to start the Routing and Remote Access server manually in the Services snap-in. Right-click the Routing and Remote Access entry and then Properties. You’ll see a Routing and Remote Access Properties dialog box. Change the Startup Type field from Disabled to Manual or Automatic. Windows XP will enable the Start button. Click Start to start the service. Click OK to close the Routing and Remote Access Properties dialog box. Reboot your machine.
Note
Starting the Routing and Remote Access server will disrupt all of your network connections, especially those for Linux and NetWare. Although you don’t need to reboot the machine to start working with RAS, you do need to reboot it to reestablish contact with the rest of the network. In some cases, you’ll find that the network still won’t respond, and you may have to work with the various protocol and service settings to get things working again. If you have problems with your NetWare network, ensure that you have the NWLink NetBIOS protocol installed and enabled. You’ll also notice a significant decrease in network speed when using NetWare or Linux in combination with RAS.
You’ll know that you’re successful in starting RAS when you see the Incoming Connections icon in the Network Connections window. In some cases, this means creating an outgoing connection using the New Connection icon first. You need to perform the extra step to set up security and other internal settings.
When you see the Incoming Connections icon, double-click it to open the Incoming Connections Properties dialog box shown in Figure 15.6. The first configuration step is to select a device for the incoming connection on the General tab. Windows XP will list the devices in the Devices field. Check every device you want to use to create a connection. Note that you can click Properties to set the properties for each device.
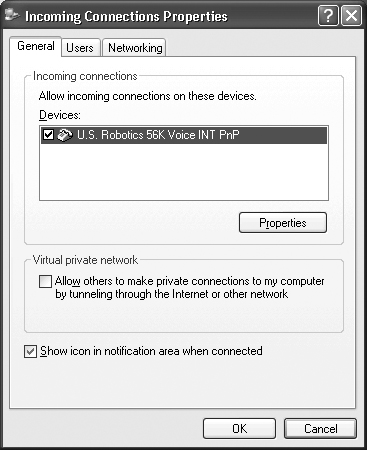
If you plan to use RAS to enable Internet connectivity using a Virtual Private Network (VPN), you also need to check the Virtual Private Network option. On the other hand, keep this option clear if you only plan to support dial-in connections. Checking this option could open your system to security risks and will definitely result in a performance hit.
At this point, someone could access your system, but no one has permission to do so. Select the Users tab, and you’ll see a list of users on your machine as shown in Figure 15.7. If you want to allow a user to create a remote connection, check their name in the list. You can also use the New and Delete buttons to add and remove users. Note that adding or removing a user here also adds or removes on your machine as a whole.
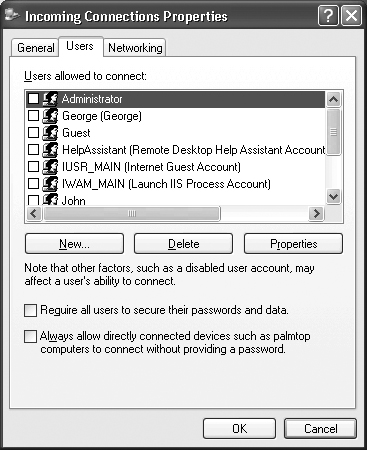
It’s important to click Properties for each user that you add to the list of those who can remotely access your system. The General tab of the User Properties dialog box contains the username, full name, and password. Make sure that every user has a password. The Callback tab contains the options for setting callback. The following list explains these important options:
Do Not Allow Callback. This is the least secure way to make a remote connection. Users can call in, provide stolen credentials (no doubt obtained from someone in your organization), and do whatever they like on your system without any verification. However, this may be the only option, in rare circumstances, when someone is calling from a location where it isn’t easy to call back, such as a motel room with a central switchboard.
Allow Callers to Set the Callback Number. This is a good solution for people who spend a lot of time on the road. Users call in, supply a callback number, and then wait for the system to call them back. This option has two advantages over the no-callback option. First, you verify the location of the remote user. Second, you can usually obtain lower long-distance rates, making the remote connection less expensive to operate.
Always Use the Following Callback Number. This is the most secure option but also the least flexible. Someone calls into your system, provides identification, and waits for the system to call back. Always use this option if someone will always call from the same location. For example, if you have an employee who will call from home and from no other location, it’s best to use this option. This method provides positive verification that the caller is actually the person granted access. There are still ways to thwart this access method, but someone has to be both determined and skilled in order to do it.
Notice the two options at the bottom of the Users tab of the Incoming Connections Properties dialog box. The first option is an essential aid to security. It requires that all users use encryption for their passwords and data. If you allow connections with this option disabled, Windows XP will send all passwords and data in clear text. That’s akin to leaving the key to your system under the doormat. If you select this option, make sure that you also select the Require Data Encryption option for the user account.
The second option is a security risk. If you check this option, any computer that looks like it has a direct connection can access your system without a password. Unfortunately, this means that a cracker posing as someone on your network by using techniques such as spoofing has direct access to your system. Of course, if you clear this option (the default), local users will have to supply a password, which is a small inconvenience to maintain network security.
The Networking tab controls the clients, services, and protocols available to the incoming call. Changing these options won’t change your settings for the machine as a whole. You’ll notice that you can install and uninstall network features. This does appear to affect the network as a whole, so exercise caution when using these buttons. You’ll also notice that some clients, services, and protocols have grayed-out check boxes. You can’t deselect these items. However, you can disable any item that has a normal check box, disabling that feature for the remote caller. When you complete configuring the RAS connection, click OK and users will be able to call into your system.
For those of you who normally work with Windows Server for RAS connections, you’ll find the Routing and Remote Access snap-in almost useless for Windows XP Professional Edition. As shown in Figure 15.8, the information that you obtain from Professional Edition versus any version of Windows Server is paltry indeed. Because of the lack of support for Windows XP Professional Edition in this snap-in, I’ll only provide an overview of Routing and Remote Access snap-in functionality. You’ll also want to spend some time reading specifics at http://www.microsoft.com/windows2000/en/server/help/sag_rasstopnode.htm.

The main reason for the Routing and Remote Access snap-in limitation is that Windows XP Professional Edition limits the connection types that you can create. If you try to configure Windows Server for a basic RAS connection (the only type available under Windows XP Professional Edition), you’ll find that you have to use the same process as for a Windows XP Professional Edition connection. The fact that you can’t create an advanced connection under Windows XP Professional Edition is the reason the Routing and Remote Access snap-in is less than helpful.
The Routing and Remote Access snap-in provides access to other servers, much like other snap-ins. To add a server, right-click the Routing and Remote Access entry and then choose Add Server from the context menu. You’ll see an Add Server dialog box. Use the options in this dialog box to add the server from the current computer, a server from a specific computer, or all of the Routing and Remote Access computers from a domain, or to browse Active Directory.
Windows servers don’t provide RAS support by default. However, you can enable the support by right-clicking the server name and choosing Configure and Enable Routing and Remote Access from the context menu. You’ll see a Connecting dialog for a few moments, and then the Routing and Remote Access Server Setup Wizard will appear.
Follow the prompts to create a connection. Note that this wizard only works if you want to create an advanced RAS connection. Otherwise, you need to configure the RAS connection locally on the server. Creating an advanced RAS connection may require that you install other support on the server, such as Dynamic Host Configuration Protocol (DHCP).
After you install the required support on a server, you can use the Routing and Remote Access snap-in to add additional routing and remote communication features. You can also configure the server properties (something you can’t do for a Windows XP setup). These properties include security, protocol setup (IP and IPX in most cases), point-to-point protocol (PPP) options, and event logging. The Routing and Remote Access snap-in also helps you monitor the server status. For example, you determine the port status and monitor which users have logged in.
I wanted to include this section because many administrators use the user account as the means to configure RAS support. This feature only works on Windows servers, not on Windows XP. You can use your local computer to configure a user account on the server, but attempting to configure a user account on a local machine will display an error message telling you that the feature is unavailable. The only way to configure a local user account for RAS access is to use the Incoming Connections Properties dialog box mentioned earlier.
However, you may want to configure a user account directly on a server. In this case, open the Users folder in Local Users and Groups (or use the Active Directory equivalent). Right-click the user account that you want to modify and choose Properties from the context menu. Select the Dial-in tab, and you’ll see a display similar to the one shown in Figure 15.9.

The Remote Access Permission section of the User Properties dialog box determines if the user can call in. Normally, Windows controls access through a policy unless you specifically give the user access. You won’t find the Verify Caller ID option when working with Windows XP Professional Edition. This feature verifies caller identify through the telephone number used to contact the server. As you can see, the User Properties dialog box provides callback options similar to those found in Windows XP. The last two options are also unique to Windows Server. The first assigns the same address to the user for every call. The only time you need this feature is if people on the main network need that specific IP address to contact the caller. The Apply Static Routes option is a performance feature. By setting a static route for the caller, people on the main network can make contact with fewer routing errors.
Windows XP provides two RAS-related command line utilities you should know about. The NETSH utility provides invaluable information about your RAS setup. You can also use this utility to make configuration changes. The RASDIAL utility enables you to call a remote server. It provides command line entries for most of the RAS features we’ve discussed, such as a callback number. Both utilities are important because you can access them from batch files and scripts. You can perform every task using command line arguments, which means you can automate many of your RAS tasks. The following sections describe both utilities.
NETSH is the more complex of the two command line utilities. It comes in most helpful for viewing statistics. If you decide to use scripts in place of the GUI tools that Microsoft provides for managing your RAS connections, NETSH is also the tool of choice. The scripting features of NETSH come in most handy for large networks because writing and debugging a script is no small undertaking where RAS is concerned.
You start NETSH at the command prompt. If you type NETSH and press Enter, you’ll see a NETSH prompt where you can type additional commands. This is an interactive mode. The first command you should learn when using NETSH is Help. This simple command displays all of the other commands you can use in the current NETSH context. A special section called “Commands in this context” displays context-specific commands.
NETSH has several contexts or areas of control. One of those areas of control is RAS. If you type RAS at the NETSH prompt and press Enter, the prompt will change to NETSH RAS. At this point, you can access RAS statistics and make changes to its configuration.
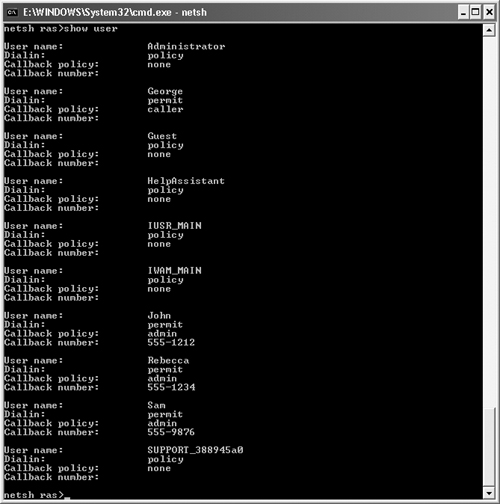
One of the more useful commands for verifying your RAS setup is Show user. Figure 15.10 shows the output for this command on my text machine. As you can see, it provides a quick overview of the RAS user account settings. You can gain the same information by typing NETSH RAS SHOW USER at the command prompt and pressing Enter. If you want to send the output of this command to a text file for further processing, you can extend it even further by typing NETSH RAS SHOW USER >> MYOUTPUT.TXT and pressing Enter. In short, you can use NETSH interactively or automate the process.
NETSH can show you a lot more than just the user information. For example, you can display a complete list of all the helper files that RAS uses. This is helpful information when you’re trying to troubleshoot a problem with your RAS configuration. If you want to see a complete list of SHOW commands, type SHOW at the NETSH RAS prompt and press Enter.
Some of the benefits of NETSH won’t be apparent at first. For example, if you type NETSH RAS DUMP >> MYSCRIPT.TXT and press Enter at the command prompt, you’ll generate a NETSH script that you can edit and move to another machine. Type NETSH -f <Script Name> and press Enter at the second machine to configure it automatically. As you can see, all you really need to do is configure RAS once and then move the configuration to other machines as needed. Of course, you’ll still need to configure machine-specific information, such as the list of users who can make remote connections.
When you finish using NETSH, type BYE or QUIT at the prompt and press Enter. You’ll exit to the command prompt. NETSH will also recognize the Ctrt+Break key combination as a signal to quit.
RASDIAL is a simple command line utility for making a remote connection. The benefit of using RASDIAL is that you can include it within scripts. This means you can create automated connections to other servers to download information during periods of inactivity. Of course, you can use it to automate user connections as well.
Before you can use RASDIAL, you need to create a phonebook of connections using the RASPHONE utility. This utility displays a Network Connections dialog box that contains a list of your current connections. Click New, and you’ll start the New Connection Wizard. Use the Properties button to display the properties of an existing connection or click Connect to dial an existing connection.
You use RASDIAL by specifying the name of the phonebook connection that you want to use. For example, if the name of your connection is MyPlace, type RASDIAL MyPlace at the command prompt and press Enter. RASDIAL also includes command line arguments to specify the username and password, telephone number, callback number, and the location of a phonebook you want to use. The default phonebook appears in the Documents and SettingsAll UsersApplication DataMicrosoftNetworkConnectionsPbk folder as RASPHONE.PBK.
Dial-up networking is the means to connect to a number of server types using a standard modem. Generally, you’ll create the one connection you need to your ISP during Internet Explorer configuration. We explored this configuration process in the “Creating a Connection Using Internet Connection Wizard” section during Day 4.
Sometimes, you’ll need to create an additional connection to another server. Perhaps you use more than one ISP, or you need to connect to an older remote system. To start this process, you’ll start the New Connection Wizard found in the Network Connections applet of the Control Panel. Click Next to get past the Welcome screen, and you’ll see that you can create four new connection types. As we’ve already discussed the Internet connection type, I won’t discuss it again here.
We’ve also looked at another one of the options listed on this dialog box. The Set up a home or small office network option starts the Network Setup Wizard described in the “Using the Network Setup Wizard” section. The following sections describe the remaining two connection types.
You can create two types of connections with this option. The first is a Virtual Private Network (VPN), and the second is the more traditional dial-up connection. The VPN option enables you to create a connection through the Internet. The following sections show you how to create both connection types.
When you create a dial-up connection for your workplace, you’ll use a telephone to dial out to a RAS server (or any other server that allows telephone communication). The following steps show you how:
Select Dial-up Connection in the Network Connection dialog box and click Next. You’ll see a Connection Name dialog box.
Type a name for the connection. The New Connection Wizard suggests your company name, but any name will do. Click Next. You’ll see a Phone Number to Dial dialog box.
Type the telephone number. Include the area code if necessary. Click Next. You’ll see a completion dialog box. This dialog box contains an option for placing a shortcut to the connection on your desktop.
Click Finish. The New Connection Wizard creates the connection for you.
The VPN connection works by creating a connection through the Internet. Think of the Internet as the land and VPN as the tunnel that data travels through. The data still travels across the land, but no one can see it because the data travels in a tunnel. The following steps show how to create this connection type.
Select Virtual Private Network connection in the Network Connection dialog box and click Next. You’ll see a Connection Name dialog box.
Type a name for the connection. The New Connection Wizard suggests your company name, but any name will do. Click Next. You’ll see a Public Network dialog box. Use this dialog box to choose either a dial-up connection or a connection through a proxy using the Do not dial initial connection option. If you use the Automatically dial this connection option, you can also choose an existing dial-up connection for your ISP. Unfortunately, this dialog box doesn’t allow you to create new connections.
Select a connection option and click Next. You’ll see a VPN Server Selection dialog box.
Type a server name or the server IP address and click Next. You’ll see a completion dialog box. This dialog box contains an option for placing a shortcut to the connection on your desktop.
Click Finish. The New Connection Wizard creates the connection for you.
When you select the Set up an advanced connection option on the Network Connection Type dialog box, you’ll see the Advanced Network Connection Options dialog box containing two options. The Accept incoming connections option is really the Incoming Connections Properties dialog box in disguise. We discussed this dialog box in the “Configuring RAS” section.
The second option, Connect directly to another computer, enables you to connect to other computer systems, even those running other operating systems. You can use a parallel, serial, or infrared port to make the connection. Of course, when using the parallel or serial port options, you need the proper cable setup to make the connection between machines.
A serial port connection is especially practical if you need to access machines with other operating systems. Most computer systems support a serial communication program that helps someone to transfer data files. Of course, text files are the universal format for most machines, but this form lacks any type of formatting.
I’ve used serial connections on many systems to perform hardware upgrades when the two systems wouldn’t talk to each other any other way. You need a standard serial cable, a NULL modem, and an RS-232 gender changer. The serial cable makes the connection possible. The NULL modem simulates the action of a modem and aids in the data transfer. The gender changer modifies one end of the serial cable so that it will plug into the second machine.
Now that you have some idea of how you can use a direct cable connection, let’s see how to create one. The following steps help you to configure a direct connection. It helps if you make the cable connection (if required) before you create the connection.
Select the Connect directly to another computer option and click Next. You’ll see a Host or Guest? dialog box. It doesn’t matter which machine is the host or which one is the guest. All you need is one machine configured as a host and another as a guest. I normally make the machine sending data the host.
Select the Host or Guest option and then click Next. If you select the Guest option, you’ll see a Connection Name dialog box. Type the name of the connection and click Next. Both connection types will lead to a Select a Device dialog box.
Select a device to use for the direct computer connection and click Next. If you selected the Host option, you’ll see a User Permissions dialog box. Select the users who can make a connection and click Next. Both connection types will lead to a completion dialog box.
Click Finish. The New Connection Wizard creates the connection for you.
Windows XP provides a wealth of other networking features. We discussed some of these features yesterday. Others will appear during the next three days. The following sections contain services and features that you’d consider Windows networking-specific. They can work with other networks, but you’ll use them most often to meet the specific needs of Windows.
The Simple Network Management Protocol (SNMP) has been an important part of remote computer management for a long time. This protocol allows someone to monitor specific events on remote computers using agents. If your network is large enough that you don’t want to check each computer individually on a daily basis, SNMP might be the answer you’re looking for. It allows you to track the status of all the machines on your network, no matter which operating system they use. We discussed this feature in detail in the “Simple Network Management Protocol” section of Day 14.
Windows XP provides support for SLIP (Serial Line Internet Protocol). However, unlike earlier versions of Windows, you won’t find CSLIP (Compressed Serial Line Internet Protocol) support, which means that you lose the performance benefits a CSLIP connection can provide. Both protocols support remote network connections, such as those supported by older UNIX remote servers over a serial port. You can find a detailed description of SLIP in RFC1055 (http://www.faqs.org/rfcs/rfc1055.html) and CSLIP in RFC1144 (http://www.faqs.org/rfcs/rfc1144.html). The operator of the host machine should let you know if you require this level of support.
The first thing you need to do to make a SLIP connection is open Dial-Up Networking and create a new connection using the procedure in the “Connecting with Dial-Up Networking” section. After you complete this task, right-click the new connection and select the Properties option. Select the Networking tab and choose SLIP: Unix Connection from the Type of dial-up server I am calling drop-down list box.
After you select a SLIP server, select the Internet Protocol (TCP/IP) entry. Click Properties. You should see the Internet Protocol (TCP/IP) Properties dialog box. Notice that it contains all the familiar TCP/IP address information required by the host computer. Configure these settings as needed for your connection.
Desktop Management Interface (DMI) is part of Systems Management Server (SMS) (http://www.microsoft.com/smsmgmt/default.asp) that works as the hardware-auditing component of Windows XP. It follows the standards set by the Distributed Management Task Force (DMTF) (http://www.dmtf.org/).
A vendor writes a Management Information File (MIF) that contains all the particulars about a piece of equipment. When the SMS looks at a workstation and finds this file, it adds the file contents to an SQL database that you can open with any number of products. In addition to the hardware information, SMS adds the software auditing information that it finds to the database. The combined software and hardware information gives you the data required to know whether a particular workstation can run a piece of software without an upgrade.
You need a Windows server working with Windows XP as a client to use this feature. The Windows server will need a copy of SQL Server and SMS installed.
Remote procedure calls (RPCs) begin with the network transport layer of your network. The complexity of your setup and the requirements of the protocol determine number of pieces in a network transport installation. There are four elements within the network transport: the transport driver interface (TDI), the transport protocol, the network device interface specification (NDIS) interface, and the NIC driver.
Microsoft first added RPC to Windows NT 4. However, it wasn’t until Windows 2000 that Microsoft made tools available to make use of this technology. Windows XP implements RPC as a network-transport mechanism using named pipes, NetBIOS, or WinSock to create a connection between a client and a server. RPCs are compatible with the Open Software Foundation (OSF) Data Communication Exchange (DCE) specification.
So what do RPCs do for you? OLE uses them, for one. Actually, OLE uses a subset of RPCs called light RPCs (LRPCs) to enable you to make connections that you couldn’t normally make in complex documents. You’ll also find that RPC makes technology such the distributed component object model (DCOM) possible. Developers use this technology to execute application code required by a local application on a remote machine.
Windows Sockets (WinSock) is a developer support tool that helps applications make TCP/IP connections. The developer plugs an application into a WinSock (socket) to create a connection. The only requirement is that the developer writes the application to make WinSock calls properly. WinSock makes all of the required connections, leaving the developer free to concentrate on the tasks that the application must perform. Microsoft includes two WinSock applications with Windows XP: SNMP and FTP.
Besides making the interface easier to use, WinSock provides another advantage. Normally, an application has to add a NetBIOS header to every packet that leaves the workstation. The workstation at the other end doesn’t really need the header, but it’s there anyway. This additional processing overhead reduces network efficiency. Using WinSock eliminates the need for the header, and the user sees better performance.
Sockets are an age-old principle (at least in the computer world), but they’re far from obsolete. The WinSock project proved so successful that Microsoft began to move it to other transports. For example, Windows XP includes a WinSock module for both the IPX/SPX and NetBEUI transports.
The most important lesson you could learn today is that networking with Windows isn’t an impossible task. Given a little time, most people can set up and configure at least a pure peer-to-peer Windows network. Many of you will have the knowledge required to perform complex setups.
You learned three networking skills today. First, we examined the automated method of installing a Windows network using the Network Setup Wizard. Second, we discussed the tasks that you’ll perform to manually create a Windows network. Finally, we looked at some features that Windows XP provides to make networking easier.
Why does Microsoft provide so many ways to share resources? Why not use a Sharing tab for all resources to make it easier to share just the resources I want to share? | |
The problem is one of configuration. Printers and disk drives lend themselves to the Sharing tab. However, creating a shared resource connection with ICS or RAS requires more work. You need to specify how to create the connection as well as how to share the resource. In the case of a Web share, you need to configure the resource for use with a Web server (generally IIS). In short, it would be nice to have a consistent way to share resources, but it simply isn’t possible given the diversity of resources you can share. | |
How do I determine which remote connection to create using the New Connection Wizard? | |
Microsoft bases connections on the destination you want to reach. Breaking the problem down into destination types is the best way to determine which connection to use. For example, you’ll use the Connect to the Internet option for all Internet connections, even those that involve a connection to the office. The Set up a home or small office network option is actually the Network Setup Wizard in disguise. You’d use it to create a network at home. You’ll use the Connect to the network at my workplace option for all dial-up connections to a company site, even if it isn’t your workplace. For that matter, you’d use this connection type to dial your home computer from the office. The Set up an advanced connection option helps you create incoming connections (described in the “Configuring RAS” section) or create a direct connection to another computer using infrared, parallel, or serial port connections. | |
How many applications actually use WinSock? I’ve never heard of it before. | |
Most communication programs today use WinSock or rely on a component that implements the WinSock code for them. The ability to create connections quickly and easily in our connected world becomes more important every day. WinSock represents one of the best choices for developers. The reason you need to know WinSock exists is that communication applications will occasionally display a WinSock error message. Knowing the source of this message can help you diagnose and fix the problem. |
It’s the end of the fifteenth day. You should know how to perform most essential Windows networking tasks. Now it’s time to see how well you can perform Windows network configuration tasks. You can find answers to the quiz and exercise questions in Appendix A at the back of the book.