
Building a WCF Consumer
Now that a TCP service is out there, which you built using the WCF framework, the next step is to build a consumer application that uses the simple Calculator service. The consumer sends its request via TCP using SOAP. Using TCP means that the consumption can actually occur with a binary encoding of the SOAP message on the wire, substantially decreasing the size of the payload being transmitted.
This section describes how to consume this service. You have two options at this point: You can open a second instance of Visual Studio and create a new WPF Application project to reference your service or you can add a new WPF Application project to your current solution. For simplicity, this example uses the latter.
The only difference in terms of what is needed occurs as part of adding a reference to the service. If you create your application in a new solution, then in order to add the reference you'll need to have a copy of the service running. To that end, after you add a new project to your current called ProVB_WCFCalculatorClient you can start the add reference process by adding a reference to the service project in the shared solution.
Adding a Service Reference
Right-click on the project name in the Solution Explorer and select Add Service Reference from the dialogue. After selecting Add Service Reference, you are presented with the dialogue shown in Figure 11.8. The selections you make within this dialogue, and to some extent what you'll get at the other end, depends on how you've approached creating your project. You'll start with what you need to do if you have your client in a separate solution.
Figure 11.8 Adding a reference to the service while it is running in your custom console application

The Add Service Reference dialog asks you for two things: the Service URI (basically a pointer to the WSDL file) and the name you want to give to the reference. The name you provide the reference is the name that will be used for the instantiated object that enables you to interact with the service.
Referring to Figure 11.8, you can see that the name provided for the Address text box is http://localhost:8000/calculator. Remember that this is the location you defined earlier when you built the service. This URI was defined in code directly in the service:
Dim smb As New ServiceMetadataBehavior()
smb.HttpGetEnabled = True
smb.HttpGetUrl = New Uri("http://localhost:8000/calculator")
serviceHost.Description.Behaviors.Add(smb)
Manually entering that URL is the difference between having your client in a separate solution and what you are about to do for a client in the same solution. Since in this case you are working with a service within the same solution, you are going to use the Discover button. The Discover button has a single option: Services in Solution. Using this button will trigger Visual Studio to look at the current solution, locate any services, and dynamically create a host for that service.
This is a great feature of Visual Studio, as it recognizes and supports the developer who needs to implement and test a WCF Service. Instead of needing that production URL, which you would need to track, it will simply create a runtime reference. Figure 11.9 illustrates the Add Service Reference dialog after having located the local service using the Discover button.
Figure 11.9 Adding a reference to the WCF service in the same solution
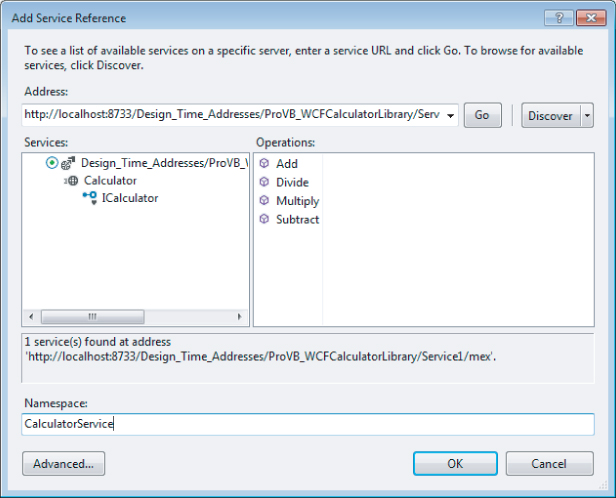
Notice that by expanding the top-level Calculator node within the Services pane in Figure 11.9, a single interface is exposed, and selecting that interface populates the available operations in the Operations pane.
Rename the service reference to CalculatorService from ServiceReference1 (refer to Figure 11.9). Press the OK button in the Add Service Reference dialog.
Finally, a quick best practices note concerning the address. For this example and as a tester, you will of course have a generated or test URI. When the application is ready to deploy, you want this URI to reflect production. The best practice is to have a custom configuration setting in your app.config (or web.config) file that is updated with the production URI. This application setting is read at runtime, and then after the service reference is created, its uri property is updated with the correct value from the application configuration file.
Reviewing the Reference
You've now added a Service References folder to your project, which contains the proxy details for your Calculator service. This proxy is a collection of files, as shown in Figure 11.10. Note that you'll need to show all the files in order to see the files shown in Figure 11.10.
Figure 11.10 Solution Explorer displaying the Calculator service methods

Digging down into these files, you will find Reference.svcmap and Reference.vb. The other important addition to note is the System.ServiceModel reference, made for you in the References folder.
Looking at the Reference.svcmap file, shown in Listing 11.4, you see that it is a simple XML file that provides information about where the WSDL file is located, as well as the location of the service (referenced through the configuration.svcinfo file):
Listing 11.4 : Service Mapping—Reference.svcmap
<?xml version="1.0" encoding="utf-8"?>
<ReferenceGroup xmlns:xsi=http://www.w3.org/2001/XMLSchema-instance
    xmlns:xsd="http://www.w3.org/2001/XMLSchema"
    ID="d5ec45e4-5a67-4609-840b-e332497cfb00"
    xmlns="urn:schemas-microsoft-com:xml-wcfservicemap">
  <ClientOptions>
    <GenerateAsynchronousMethods>false</GenerateAsynchronousMethods>
    <GenerateTaskBasedAsynchronousMethod>true</GenerateTaskBasedAsynchronousMethod>
    <EnableDataBinding>true</EnableDataBinding>
    <ExcludedTypes />
    <ImportXmlTypes>false</ImportXmlTypes>
    <GenerateInternalTypes>false</GenerateInternalTypes>
    <GenerateMessageContracts>false</GenerateMessageContracts>
    <NamespaceMappings />
    <CollectionMappings />
    <GenerateSerializableTypes>true</GenerateSerializableTypes>
    <Serializer>Auto</Serializer>
    <UseSerializerForFaults>true</UseSerializerForFaults>
    <ReferenceAllAssemblies>true</ReferenceAllAssemblies>
    <ReferencedAssemblies />
    <ReferencedDataContractTypes />
    <ServiceContractMappings />
  </ClientOptions>
  <MetadataSources>
    <MetadataSource Address="http://localhost:8733/Design_Time_Addresses/
ProVB_WCFCalculatorLibrary/Service1/mex"
           Protocol="mex" SourceId="1" />
  </MetadataSources>
  <Metadata>
    <MetadataFile FileName="service.wsdl"
     MetadataType="Wsdl" ID="b37c05b8-9185-433b-8138-c1ee6fff00e4" SourceId="1"
SourceUrl="http://localhost:8733/Design_Time_Addresses/
ProVB_WCFCalculatorLibrary/Service1/mex" />
    <MetadataFile FileName="service.xsd"
     MetadataType="Schema" ID="4558c7db-7585-4726-9b85-f8bdfc066c9c" SourceId="1"
SourceUrl="http://localhost:8733/Design_Time_Addresses/
ProVB_WCFCalculatorLibrary/Service1/mex" />
    <MetadataFile FileName="service1.xsd" MetadataType="Schema"
     ID="c532cecc-b644-4883-88b0-81ff697b608c" SourceId="1"
SourceUrl="http://localhost:8733/Design_Time_Addresses/
ProVB_WCFCalculatorLibrary/Service1/mex" />
  </Metadata>
  <Extensions>
    <ExtensionFile FileName="configuration91.svcinfo"
                   Name="configuration91.svcinfo" />
    <ExtensionFile FileName="configuration.svcinfo"
                   Name="configuration.svcinfo" />
  </Extensions>
</ReferenceGroup>
Note that due to the length of many of the embedded strings, the preceding snippet has additional carriage returns embedded that are not part of the original file.
This file provides the capability to later update the reference to the service if needed, due to a change in the service interface. You can see this capability by right-clicking on the CalculatorService reference; an Update Service Reference option appears in the provided menu.
The other file in the reference collection of files, the Reference.vb file, is your proxy to interact with the service. The Reference.vb file, not shown, defines the four methods and the class CalculatorClient, which contains the method stubs to call the Calculator service built earlier in the chapter.
Configuration File Changes
Another addition to your project is the app.config file. After the service reference is made, the app.config file contains several new configuration settings. These configuration settings were automatically added by the Visual Studio WCF extensions. The new app.config file is presented in Listing 11.5:
Listing 11.5 : Configuration—App.config
<?xml version="1.0" encoding="utf-8" ?>
<configuration>
    <startup>
        <supportedRuntime version="v4.0" sku=".NETFramework,Version=v4.5" />
    </startup>
    <system.serviceModel>
        <bindings>
            <basicHttpBinding>
                <binding name="BasicHttpBinding_ICalculator" />
            </basicHttpBinding>
        </bindings>
        <client>
            <endpoint address= "http://localhost:8733/Design_Time_Addresses/
                                ProVB_WCFCalculatorLibrary/Service1/"
                                binding="basicHttpBinding" bindingConfiguration=
                                "BasicHttpBinding_ICalculator"
                                contract="CalculatorService.ICalculator"
                                name="BasicHttpBinding_ICalculator" />
        </client>
    </system.serviceModel>
</configuration>
The information in the basicHttpBinding section is greatly reduced from previous versions. Note that if you right-click on your service reference, another context menu option is to Configure Your Service Reference. The resulting dialogue has far fewer options then previous versions as most settings are now handled under the covers automatically.
The other key node in the configuration document is the <client> element. This element contains a child element called <endpoint> that defines the where and how of the service consumption process.
The <endpoint> element provides the address of the service—and it specifies which binding of the available WCF bindings should be used. In this case, the BasicHttpBinding is the required binding. Although you are using an established binding from the WCF framework, from the client side you can customize how this binding behaves. As noted, the settings that define the behavior of the binding are specified using the bindingConfiguration attribute of the <endpoint> element. In this case, the value provided to the bindingConfiguration attribute is BasicHttpBinding_ICalculator, which is a reference to the <binding> element contained within the <basicHttpBinding> element.
Note one important distinction here. If instead of using the built-in Visual Studio test engine to test your service declaration, you bound to the custom client, you would find that this configuration file would be subtly different. Instead of having a basicHttpBinding, you would have a netTCP binding. This binding would have different setting defaults and, more important, indicate a different transport protocol for your requests. If you play with these two different bindings, you'll find that the binary format used by netTCP responds much more quickly than the basicHttpBinding that Visual Studio has generated for you.
As demonstrated, the Visual Studio 2012 capabilities for WCF make the consumption of these services fairly trivial. The next step is to code the Windows Forms project to test the consumption of the service interface.
Writing the Consumption Code
The code to consume the interface is quite minimal. End users will merely select the radio button of the operation they want to perform. The default radio button selected is Add. The user places a number in each of the two text boxes provided and clicks the Calculate button to call the service to perform the designated operation on the provided numbers.
To accomplish this, add two text boxes, four radio buttons, one button, and one label to your window. The display (for labeling the controls) should look similar to what is shown in Figure 11.11. Next, you want to create two event handlers; the first is on Form Load to prepopulate the text boxes with default numbers (to speed testing), and the second is an event handler for the button you've labeled Calculate.
Figure 11.11 Designing the calculator client

Clicking the Calculate button will create an instance of the service and then open a connection and make the appropriate call. In a production environment, you might keep a static instance of the service available in your application so you could create it once instead of for each event. Similarly, you'll want to follow the best practice mentioned earlier of assigning the URI at runtime based on an application setting.
To implement a call to the service add a button handler for the button labeled Calculate. Also note that you'll need to name each of the radio buttons and the text boxes used in the client. The button doesn't need a name. A copy of the code is shown in Listing 11.6:
Listing 11.6 : Calculate Event Handler—MainWindow.xaml.vb
Class MainWindow

    Private Sub Button_Click_1(sender As Object, e As RoutedEventArgs)
        Dim result As Integer
        Dim ws As New CalculatorService.CalculatorClient()
        ws.Open()
        If RadioButton1.IsChecked = True Then
            result = ws.Add(Integer.Parse(TextBox1.Text),
                            Integer.Parse(TextBox2.Text))
        ElseIf RadioButton2.IsChecked = True Then
            result = ws.Subtract(Integer.Parse(TextBox1.Text),
                                 Integer.Parse(TextBox2.Text))
        ElseIf RadioButton3.IsChecked = True Then
            result = ws.Multiply(Integer.Parse(TextBox1.Text),
                                 Integer.Parse(TextBox2.Text))
        ElseIf RadioButton4.IsChecked = True Then
            result = ws.Divide(Integer.Parse(TextBox1.Text),
                               Integer.Parse(TextBox2.Text))
        End If
        ws.Close()
        Label1.Content = result.ToString()

    End Sub
End Class
This is quite similar to the steps taken when working with Web references from the XML Web Services world. First is an instantiation of the proxy class, as shown with the creation of the svc object:
Dim ws As New CalculatorService.CalculatorClient()
Working with the ws object now, the IntelliSense options provide you with the appropriate Add, Subtract, Multiply, and Divide methods. Running this application provides results similar to those presented in Figure 11.12.
Figure 11.12 Displaying the results of the service call in the client
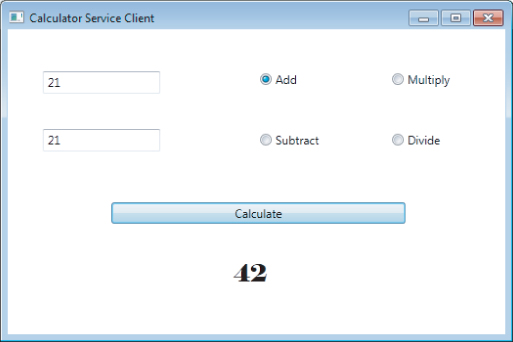
In this case, the Add method is invoked from the service when the form's Calculate button is pressed.
Another best practice is to get a tool such as Fiddler2 to track communication with your service. (www.fiddler2.com/fiddler2/) This free tool enables you to view messages sent across a HTTP/HTTPS connection.
Note that while this tool will work if you've used Visual Studio to configure your testing to be transported via HTTP, if you've relied on the custom client, you'll find that the requests are instead sent as binary data over TCP and are not available to Fiddler2.
Using a binding to the custom client means the requests and responses are sent over TCP as binary, dramatically decreasing the size of the payload for large messages. This is something that .NET Remoting was used for prior to the release of the WCF framework.
This concludes the short tutorial demonstrating how to build a single service that can support two different endpoints. Visual Studio 2012 can generate one such endpoint, which is based on the same XML and open standards as a traditional Web service. The other you built manually into your command-line application to support the TCP protocol and binary data transfer. Depending on how you map that service to your client, you can consume the service as either an XML-based data transfer or a binary data transfer that can map directly into your .NET Windows Forms application.