
CHAPTER 28
Integration with Other Office Applications
- Sending data between Excel and Word
- Copying tables between Excel and Word
- Exchanging outlines between Word and PowerPoint
- Using the Outlook Address Book in Word
In some ways, using the Office suite is like using a single multipurpose program. Features from the different programs mesh together almost seamlessly. For example, when you create a chart in a Word 2013 document, the data also lives in Excel 2013, almost as if Excel were an extension of Word.
In this chapter, you explore the ways in which Excel, PowerPoint, Word, and Outlook communicate with each other. Some things are perfectly intuitive, and others aren't. The casual PowerPoint user might never stumble on how to send outlines back and forth with Word. Do you ever wonder about the array of picture options available to you when copying images between Word and other programs? Which format should you use, and what are the consequences of using this one or that? How can pasting a 40 KB picture into a Word file add 900 KB to its size? In this chapter, the focus is on the less intuitive, to get you over some hurdles and stumbling blocks, and to make sense of some of those little mysteries that can make using Word seem like a struggle.
Excel
Although sharing work between Word and Excel often works well, differences in how the two programs operate can produce confusing results. This can be addressed by becoming aware of those differences, and working in a way that accommodates them and smoothes the way. This section looks at Word and Excel and ways to share text, data, tables, and graphics.
Using Excel content in Word
Word offers a variety of ways to share and exchange content with Excel:
- Clipboard: Copying content to the Clipboard, and then using Paste or Paste Special to insert the contents into Word or Excel. Commandment: When in doubt, use Paste Special.
- Chart: Using Office 2013's Chart feature to create a chart inside Word using Excel's facilities.
- Object: Using Insert
 Text Object Create New tab or Create from File tab to embed all or part of an Excel worksheet into a Word document.
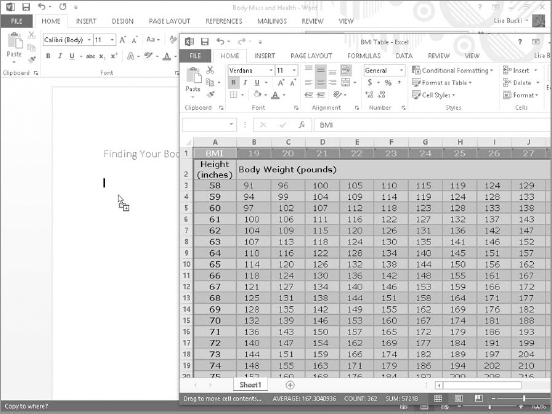
A common method that also works is drag-and-drop. You can select data or other content in Excel and drag it into Word. Make sure you press and hold the Ctrl key while dragging. If you do not see the plus with the mouse pointer as shown in Figure 28.1, the selection will be cut from Excel rather than copied. By default, the Excel data becomes an embedded object in the Word document, and you can double-click it there to display Excel tools for making changes. If you want the data to become a table in Word instead, use the Clipboard as described next.
Press Ctrl when dragging from Excel to Word to copy the range.
Read on to learn more about using the Clipboard, Chart, and Insert ![]() Object features.
Object features.
Clipboard
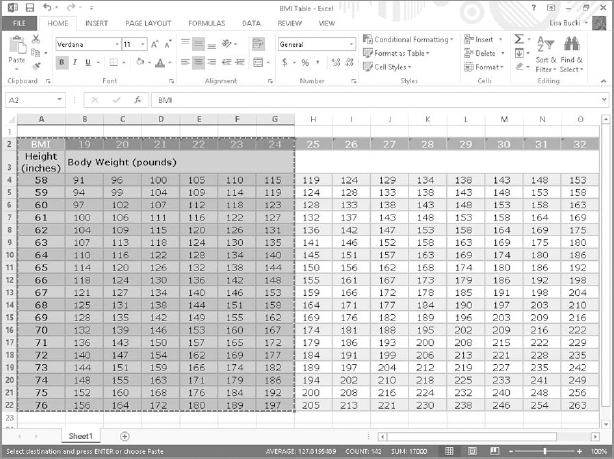
Excel's Clipboard works slightly differently from the Clipboard in most other Office programs. When you select cells in an Excel worksheet, they are highlighted. At this point, they are merely highlighted and cannot be moved or otherwise acted upon. You need to copy (or cut) the selection to the Clipboard, by pressing Ctrl+C or Ctrl+X, or right-clicking and choosing Copy or Paste. As in Word, you also can use the tools in the Clipboard group of Excel's Home tab to cut, copy, and paste a selection. After you cut or copy a selection of cells in Excel, an animated border appears around the selection, as shown in Figure 28.2.
The animated marquee around a selection in Excel shows you that you have cut or copied it.
If you press Esc in Excel or double-click elsewhere (or perform any of a dozen or more other actions in Excel), the animated border disappears and you cannot paste the selection. Even if the data has actually been copied to the Clipboard, you still can't use the Paste button unless the animated border still appears in Excel. Dismissing the animated border also disables Paste Special, which is a helpful tool to use to determine how to paste Excel data.
TIP
There is one exception to this behavior. You can open the Clipboard pane in either Word or Excel by clicking the dialog box launcher in the Clipboard group of the Home tab. This will ensure that the Office Clipboard will collect the copied or cut data and keep it even if you press Esc or take another action that removes the animated border. (However, the Paste Special options still won't be available.) You can set the Office Clipboard to collect copied and cut selections in this way even if it is not open. To do so, click the Options button at the bottom of the Clipboard pane, and make sure that Collect Without Showing Office Clipboard is checked.
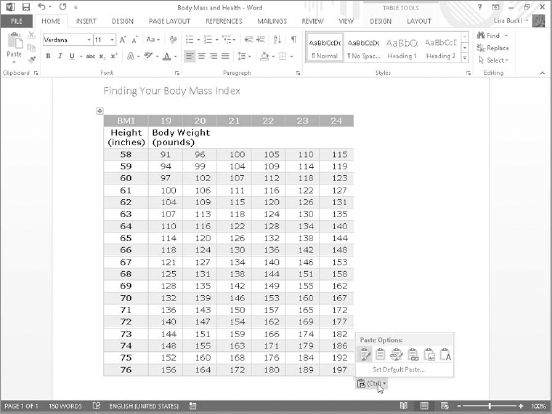
With the selection active in Excel, click where you want the data to appear in Word. If you simply click the Paste button in the Clipboard group of the Home tab, the cut or copied Excel selection pastes into Word as a Word table. As shown in Figure 28.3, the Paste Options button appears. You can click it to reveal options for how to paste the data. Move the mouse pointer over a paste option to see a description of what it does and a Live Preview of it on the pasted data. From left to right, the Paste Options for pasting Excel data and the key you can press to apply each are:
- Keep Source Formatting (K)
- Use Destination Styles (S)
- Link & Keep Source Formatting (F)
- Link & Use Destination Styles (L)
- Picture (U)
- Keep Text Only (T)
TIP
The Paste Options also are available when you click the Paste Special arrow, under Paste Options.
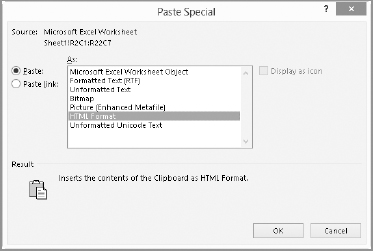
You also can use the Paste Special dialog box to paste and control how Word formats the data and whether the data stays linked to the source data in Excel. This method provides a few different format choices than the Paste Options button, but the downside is that you don't see a Live Preview of the pasted data. To use Paste Special, click the Paste button's down arrow (the bottom half of the button), and choose Paste Special (or press Ctrl+Alt+V). The Paste Special dialog box, shown in Figure 28.4, appears. Notice that the default is HTML format.
With a straight paste, the Excel data appears as a table, but you can use Paste Options to control how the pasted data appears.
When using Paste Special to paste a selection of cells from Excel into Word, you'll have several options regarding how to paste.
At the end of the day, both HTML and RTF retain both formatting and table structure, but there are differences. They might seem subtle, or they might seem substantial, depending on your needs. There also are differences among other options that might seemingly appear similar. Different Paste Special options are as follows:
- Microsoft Office Excel Worksheet Object: Inserts the selection as a complete mini-worksheet, complete with Excel editing if you double-click the object.
- Formatted Text (RTF): Inserts formatted text as a table, retaining the cell, column, and row formatting in effect in the Excel file. This option often misinterprets cell shading and other colors.
- Unformatted Text: Inserts plain text with no attributes. Tabs are used to separate text that originated in different cells.
- Bitmap: Inserts a .bmp picture file.
- Picture (Enhanced Metafile): Inserts an .emf picture file that is essentially identical in appearance to the Windows Metafile but is slightly smaller in size.
- HTML Format: Retains text formatting, but doesn't retain all of the table formatting. This usually results in a table that is smaller in width than the RTF table. This option inserts cell shading and colors more accurately than RTF.
- Unformatted Unicode Text: Usually, this yields the same result as unformatted text. Unicode goes well beyond ASCII and ANSI and provides for many more characters and languages. If you find that linguistic information is being lost when pasting as unformatted text, then switch to unformatted Unicode text.
Click the Paste link option button to the left of the list of formats if you want copied Excel data to be linked to its source. This means that any changes you make to the Excel data will appear in Word when you reopen the Word file. Click OK to finish the paste.
NOTE
Generally speaking, you can right-click linked data and click Update Link to refresh the data. Or in the shortcut menu, you can click the command for the linked object (such as Linked Worksheet Object for linked Excel data), and then click Links. The Links dialog that appears gives you options for working with the linked data, including a Break Link command for removing the link.
Chart
If you simply paste a chart from Excel to Word, the chart is pasted as an unlinked, embedded chart. Once the chart is in Word, when you click it, the Chart Tools contextual tabs—Design and Format—appear. If you need to change the data, choose the Chart Tools Design tab, and then click Select Data or Edit Data in the Data group of the tab, as shown in Figure 28.5.
Clicking Edit Data in the Chart Tools Design tab selects and opens the data in Excel.
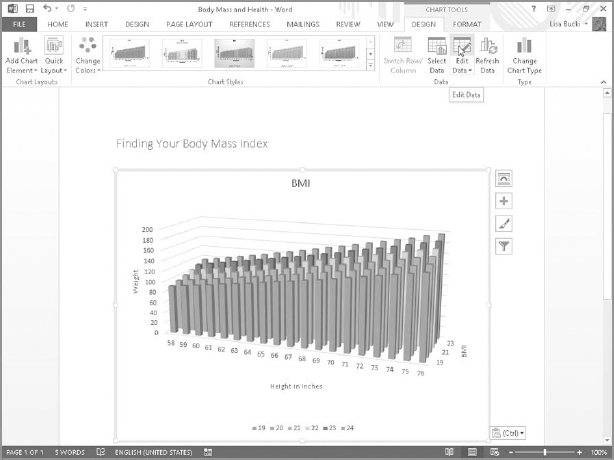
When you make changes to the data, the chart in Word is updated automatically to reflect the data changes. If there's a chance that you'll need to undo changes, leave the Excel window open. As long as it remains open, Ctrl+Z will work if you want to undo a change. If you close the Excel window with the data, changes to the chart and data are saved automatically, and Ctrl+Z will no longer undo changes you might have made.
When you copy graphics such as charts from Excel to Word with Paste Special, the rules change a bit. Right-click the chart or graphic and choose Copy. This time, you don't get the dashed selection because you're not copying cells—so it's a bit simpler, and once something has been copied to the Clipboard, the Paste Special options remain available. Switch to Word, click the Paste Special arrow or press Ctrl+Alt+V, and you'll see the options shown in Figure 28.6.
When you're copying graphics such as charts from Excel to Word, most of the formats presented are picture formats.

The first option, Microsoft Excel Chart Object, inserts the chart as an embedded object, which I'll discuss more in the next section. To find out about any of the other formats—various picture formats—click the format to see a description of it under Result at the bottom of the dialog box. For example, Figure 28.6 shows the Bitmap format selected and its description. The different picture formats each result in a different appearance for the pasted object in the Word document, so you might want to experiment to see which format gives you the best appearance in your document considering how it's going to be presented—online versus on paper.
NOTE
Even though you can use Paste Special to change a picture format when pasting into Word, for best results you should still use a dedicated graphics program for working with various file formats and other graphics modifications.
Object
A third way to use Excel data in a Word document is as an object. In Word, choose Insert ![]() Text
Text ![]() Object. The Object dialog box appears. To use an existing Excel worksheet, click the Create from File tab. To create a new Excel object, stay on the Create New tab. Each tab is described next.
Object. The Object dialog box appears. To use an existing Excel worksheet, click the Create from File tab. To create a new Excel object, stay on the Create New tab. Each tab is described next.
Create from File
On the Create from File tab, click the Browse button to navigate to the target file. As described in Chapter 12, “Getting Smart with Text: Building Blocks, Quick Parts, Actions (Tags), and More,” choose Link to file and/or Display as icon, according to your needs, and click OK.
NOTE
Typically, you would use Display as Icon when the purpose is to provide access to the contents of the Excel file rather than to display it. For example, suppose you have a number of tax tables that you want to provide to the reader. Some readers need one table, others need another, and so on. A document will be much less cluttered if users can click a link to open the data set of interest in Excel, rather than make all readers have to look through all of the data files to find the one they want.
Create New
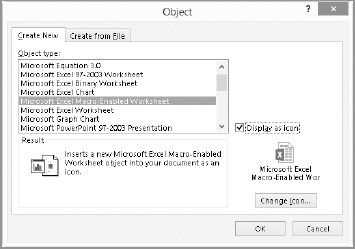
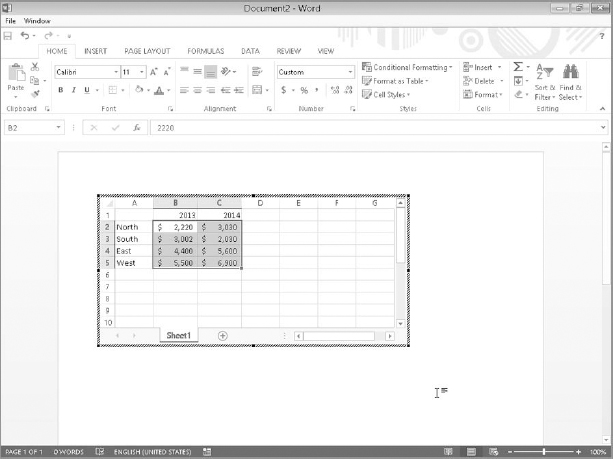
In the Create New tab of the Object dialog box, select the desired type of Excel object, as shown in Figure 28.7. Choose Display as icon, if desired (click Change Icon, if appropriate), and then click OK. Use Excel's tools to create the desired object, as shown in Figure 28.8, and then click outside the object (or close Excel, depending on the object type).
The Change Icon button appears only if Display as icon is checked.
Creating an Excel worksheet object in Word
TIP
Notice that saving is controlled within the Word process. If you would like to have an independent version of the Excel object that is accessible from Excel without using Word, copy the contents of the “objectized” Excel worksheet to the Clipboard, open the full Excel application, paste your work into it, and save it.
From worksheet to table
As noted earlier, directly pasting formatted Excel data into Word creates a new table automatically. Sometimes, however, you need to insert data into a table that already exists. Typically, two problems can occur. First, sometimes the pasted cells don't go exactly where you want them to go. Second, no matter what you do, the formatting in the table never ends up exactly as you want.
To handle the first problem, the dimensions (rows and columns) of the source must be identical to the destination and the destination cells must be selected. For example, if you are pasting a selection of cells that contains 5 rows and 4 columns, then the destination must also be 5×4, and you must select the destination cells. If you try to paste in the top-left cell (which seems logical, right?), Word will paste the entire selection into that cell, so you end up with a table within a table.
TIP
If you are inserting new cells into an existing table (as opposed to replacing existing material), insert blank rows so you have empty cells that you can select and into which you can paste the incoming cells.
There is no perfect way to handle the second problem. Even if you choose the setting File ![]() Options
Options ![]() Advanced
Advanced ![]() Pasting from other programs to Match Destination Formatting or Keep Text Only, something in the formatting will be messed up—usually the spacing.
Pasting from other programs to Match Destination Formatting or Keep Text Only, something in the formatting will be messed up—usually the spacing.
Your best bet, assuming you're using a style, is to choose Keep Text Only from either Paste Options or the Paste Special button, and then reapply the style to the pasted cells. Alternatively, if there are table cells that contain the correct formatting, use the Format Painter to reformat the pasted cells as desired.
NOTE
The Paste Options differ slightly when pasting into an existing table. Nest Table (N) enables you to paste all the cells from the copied data into a single cell; or if you selected multiple cells before pasting, each of the selected cells receives a full copy of the pasted data. Insert as New Rows(s) creates new rows to hold the data for you and pastes beginning at the first column, which can lead to a ragged right side if the pasted selection has more or fewer columns than the destination table. Overwrite Cells (O) replaces any existing content in the selected destination but may alter the formatting. Keep Text Only (T), mentioned earlier, pastes without any text formatting but doesn't impact cell formatting.
Using Word content in Excel
Going from Word into Excel isn't quite as tricky as going from Excel into Word, although the setup of the Word content matters more in terms of how it pastes into the destination cells in Excel.
Clipboard
If you simply copy content from Word and paste it into Excel—using the Paste button or Ctrl+V—the setup of the original data controls how it is distributed in the destination cells in Excel. When you paste text that includes one or no paragraph marks, Excel inserts all of the text into the selected cell. If the selection contains multiple paragraphs, it is inserted into consecutive cells in the target column. For example, if the Clipboard contains three paragraphs and you paste into cell A1 (Row 1 Column 1), the three paragraphs are inserted into cells A1 (Row 1 Column 1), A2 (Row 2 Column 1), and A3 (Row 3 Column 1), respectively.
When pasting all or part of a table or text delimited with tabs into Excel, the cells are inserted into separate cells matching the original selection in Word. (Point to the table and then click the table move handle that appears to select the entire table or drag over cells to select them before clicking Copy or pressing Ctrl+C.) You only need to select the cell in the upper-left corner of the destination range. For example, to copy a 5×4 table from Word to Excel, select the table and copy or cut it to the Clipboard. In Excel, right-click in the upper-left cell of the 5×4 area where you want the table to appear and choose Paste or press Ctrl+V. By default, any formatting or shading from the original table appears when you paste to Excel.
Paste Options (also available via the Paste Special arrow) are a bit more limited, as shown in Figure 28.9. In this case, the two options are Keep Source Formatting (K) or Match Destination Formatting (M).
You also can choose Paste Options when pasting from Word to Excel.
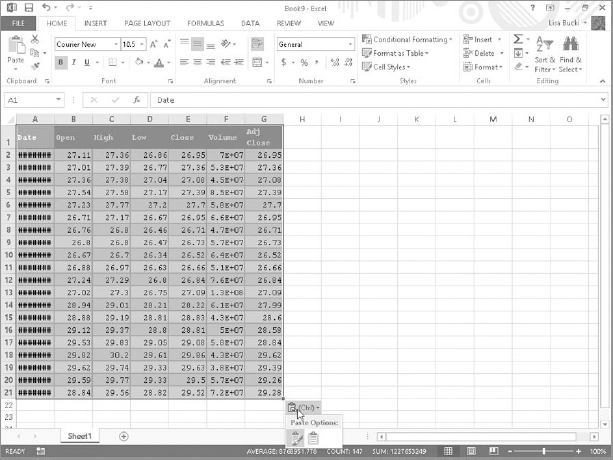
Notice in Figure 28.9 that you may need to make adjustments to column widths and number formatting. Columns A and F in the pasted data in the figure need to be widened. In the case of column A, the column is too narrow to display the date information, so pound signs appear instead. In the case of column F, the numeric values appear in scientific notation because the column is too narrow. Double-clicking the right border of the column heading (beside the column letter) AutoFits the column to the appropriate width. Also, the dollar values shown would have their decimal points vertically aligned with Accounting or Currency number formatting applied. Use the tools in the Number group of Excel's Home tab to work with the number formats for pasted data.
CAUTION
Note that even if you press Ctrl+A (Select All) to select the entire document and then copy, certain elements will not be copied. That's because Ctrl+A excludes content such as headers, footers, and footnotes. If you want to see the entire file, insert it as an object as described later.
When you paste a picture from Word into Excel, it is inserted into Excel's drawing layer rather than into cells. Note that Excel does not have text wrapping options for graphics, because cell text can't wrap around them.
Drag-and-drop
Unlike when copying via drag-and-drop from Excel to Word, when you do so from Word to Excel, you also need to press and hold Ctrl while dragging. Otherwise the text will be moved from Word. When dragging and dropping a table, drag from within the table; attempting to drag via the table move handle doesn't work. And if you drag and drop a table without using Ctrl, an empty table remains in Word after you move the contents to Excel.
NOTE
If you try dragging and dropping to Word and it doesn't work, make sure dragging and dropping is enabled in Word Options (File ![]() Options
Options ![]() Advanced
Advanced ![]() Editing Options
Editing Options ![]() Allow text to be dragged and dropped).
Allow text to be dragged and dropped).
Object
You can insert a new or existing Word document into an Excel file as an object. In the destination file in Excel, click the cell where you want it to reside. Click the Insert tab, click the Text button to display the Text group if needed, and click Object. Click the Create from File tab and, as described earlier, use the Browse button to select the file to insert. Select Link to file and Display as icon, as needed, and then click OK. The inserted document looks like a picture object on the worksheet, but if you double-click it, you can edit its contents.
PowerPoint
In some ways, Word and PowerPoint were meant to work together. That's because PowerPoint uses heading levels that are similar to Word's Heading styles. When creating a PowerPoint presentation, for example, it's a simple matter to convert a Word outline into a PowerPoint presentation (or at least the basis for one), or to use a PowerPoint presentation as an outline for a Word document.
Converting a Word outline to a PowerPoint presentation
Converting a Word document outline into a PowerPoint presentation is simple—as long as you've used Word's Heading styles for your outline or created it in Outline view, which automatically applies the heading styles. Unfortunately, PowerPoint is not able to extract just the outline from a Word document with body text under the headings, so you would have to strip out the body text manually yourself if the document has already been written. Also keep in mind that you need to have saved and named the file. PowerPoint opens the outline from a saved file rather than using a copy type of process.
TIP
A quick way to strip body text from a Word document that was formatted using Heading styles is to copy the entire document to new blank file. Click a paragraph using the main style for body text. In the Editing group of the Home tab, click Select, and then click Select All Text with Similar Formatting. Press the Delete key to remove the text. Repeat the process to select and delete text formatted with other styles representing content not needed in the presentation. Save the file under a new name, and then create the PowerPoint presentation from it.
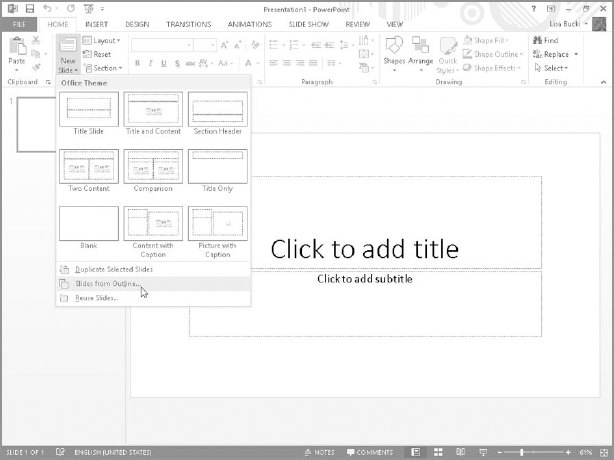
To convert a Word outline into a PowerPoint presentation, in PowerPoint start a new PowerPoint presentation (Ctrl+N). In the Slides group of the Home tab in PowerPoint, click the New Slide button arrow, and click Slides from Outline, as shown in Figure 28.10. In the Insert Outline dialog box, find the document containing your outline, select it, and click Insert.
NOTE
Once you've inserted an outline into a PowerPoint presentation, you'll often discover that stray or extra paragraph marks insinuate themselves prominently in the PowerPoint presentation, creating unsightly gaps. You can fix them in PowerPoint, or, if it's easier, press Ctrl+Z to undo the insert, clean up the outline in Word, and then try again. Or change to PowerPoint's Outline view by clicking the View tab and then clicking Outline View in the Presentation Views group. Note that Tab and Shift+Tab demote and promote outline levels in PowerPoint's Outline view as they do in Word's Outline view.
You can use a Word outline to create a PowerPoint presentation.
Converting a PowerPoint presentation to a Word document
You can also go in the other direction, using a PowerPoint presentation as a starting outline for a Word document. In PowerPoint, choose File ![]() Save As. After selecting the save location from Backstage or clicking Browse and entering a name if needed in the File name text box, open the Save as type drop-down list and click Outline/RTF—near the bottom of the nonalphabetized list—and then click Save.
Save As. After selecting the save location from Backstage or clicking Browse and entering a name if needed in the File name text box, open the Save as type drop-down list and click Outline/RTF—near the bottom of the nonalphabetized list—and then click Save.
In Word, choose File ![]() Open
Open ![]() Computer
Computer ![]() Browse, navigate to the .rtf file you just created, and open it. Then switch to Outline view. The top level for each slide was assigned Heading 1, the next level Heading 2, and so on.
Browse, navigate to the .rtf file you just created, and open it. Then switch to Outline view. The top level for each slide was assigned Heading 1, the next level Heading 2, and so on.
NOTE
You can export a PowerPoint presentation to a Word handout document that you can edit as needed. To do so, open the presentation in PowerPoint. Click the File tab ![]() Export
Export ![]() Create Handouts
Create Handouts ![]() and Create Handouts. In the Send to Microsoft Word dialog box that appears, choose an option under Page layout in Microsoft Word, such as Notes below slides, and then click OK. The handout document gets sent to Word as a new document. From there, save, name, and format the new document as desired.
and Create Handouts. In the Send to Microsoft Word dialog box that appears, choose an option under Page layout in Microsoft Word, such as Notes below slides, and then click OK. The handout document gets sent to Word as a new document. From there, save, name, and format the new document as desired.
Outlook
Outlook 2013 contains a number of tools for creating and formatting messages that greatly resemble the tools for creating and editing documents in Word 2013. This integration of functionality in both programs should make it comfortable for you to use both programs together. You've already seen in Chapter 22, “Data Documents and Mail Merge,” how to use your Outlook Address Book contents for a mail merge. Read on to learn other ways that Word and Outlook interact.
Using the Outlook Address Book in Word
One of the more conspicuous relationships between Word and Outlook is in the use of the Outlook Address Book for addresses in Word documents—especially letters and envelopes. For example, in the Create group of the Mailings tab in Word, click Envelopes or Labels, and then click the Insert Address button (see Figure 28.11), which opens the Select Name dialog box.
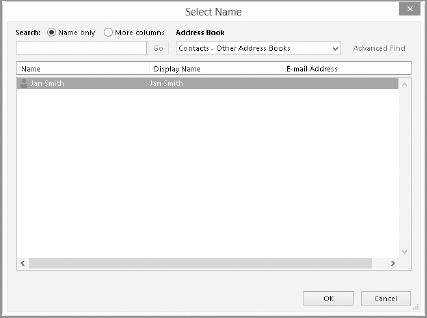
The Select Name dialog box appears, as shown in Figure 28.12. If you have multiple address books set up, click the Address Book drop-down arrow and choose the one you want. Note that the Search option enables you to search the Name only or More columns. When you use Name only, the dialog box displays only names that start with what you type.
Alternatively, click More columns, type what you're looking for, and click Go. This search feature searches for occurrences of the search text anywhere in any contact field. If that still gives you too many hits, click Advanced Find. Use the Find dialog box to search for names containing text you type. When you find the person or business whose address you want, select it and click OK.
Once the address you need is selected in the Select Names dialog box, click OK, finish selecting settings in the Envelopes and Labels dialog box, and then click OK again.
You can access the Outlook Address Book using the Insert Address button.

Insert addresses for Word envelopes or labels via the Address Book.
Summary
In this chapter, you've learned several ways to exchange data between Word and Excel. You've also seen how to convert Word outlines into PowerPoint presentations, and how to create a Word outline using a PowerPoint presentation. Additionally, you've looked at several ways that Outlook and Word stay in contact with, well, Contacts. You should now be able to do the following:
- Insert Excel content in a Word document and vice versa using a variety of different methods
- Use the Clipboard and drag-and-drop to copy or move content between Word and Excel
- Exchange outlines between Word and PowerPoint
- Use the Address Book tool to insert a contact's address in Word envelopes or labels