
CHAPTER 6
Paragraph Formatting
- Working with paragraph styles or direct formatting
- Finding and applying paragraph formatting tools
- Indenting and aligning paragraphs
- Adding spacing around and within paragraphs
- Lining up text with tabs
- Applying numbering, bullets, shading, and borders to emphasize paragraphs
Everything you type in Word exists in paragraphs. Even if you type nothing at all, every Word document—even one that you believe is completely empty—contains at least one blank paragraph that already has formatting settings assigned to it. You can think of each paragraph as another type of formatting unit.
This chapter goes into detail about the numerous paragraph formatting choices available in Word, including indentation, alignment, spacing, list formats, shading, and borders. You'll also learn about the interaction between selected Word options and the nuances of paragraph formatting.
Choosing Between Styles and Paragraph Formatting
When it comes to document design and formatting, you can often achieve a similar look using totally different tools in Word 2013. For any given paragraph, however, only one way is the most efficient. After you learn about the various ways to format paragraphs, developing the habit of using the most efficient tools will serve you well, especially when much of your workday involves creating documents.
As with character formatting, when you are formatting paragraphs, you have to choose between applying direct formatting and using paragraph styles. Many users simply ignore the existence of styles and use all direct formatting. But whether they realize it or not, every blank document created using the default Normal.dotm template contains a single paragraph style, called Normal, and a single character style, called Default Paragraph Font.
Generally speaking, paragraph styles can save a lot of time, because you can apply several new formatting settings to a paragraph in only a couple of mouse clicks. And when you update any style, either character or paragraph, Word updates all the text in the document with the new style settings.
Despite the obvious advantages of using paragraph styles, such as the ability to find and replace styles, which you'll learn more about in Chapter 9, “Find, Replace, and Go To,” you may not find a style that includes all the formatting that you want to apply to a given paragraph. In such a case, you will need to apply direct formatting. That's the reason why this chapter takes the time to highlight the various direct paragraph formatting settings.
For a one-time ad hoc need, direct paragraph formatting is entirely appropriate. For example, if you're creating a centered title on a one-page flyer you're going to tack to a bulletin board, feel free to simply press Ctrl+E or click the Center button in the Paragraph group to align the text.
On the other hand, if it's formatting that you're going to need again and again, then use a paragraph style, even if you have to modify an existing style or create a brand-new style. For example, if you are formatting a number of headings in a newsletter you will be writing monthly for the next five years, either adapt and start applying the built-in heading styles (Heading 1, Heading 2, and so on), or create and use your own custom heading styles. The more work styles can do for you, the less time you're going to have to spend applying and reapplying direct paragraph formatting.
Finding Paragraph Formatting Tools
Word stores each paragraph's formatting in its paragraph mark. Say you have two paragraphs with different line spacing settings applied. If you click at the beginning of the second paragraph and press Backspace to combine the paragraphs, suddenly the combined paragraphs use the same line spacing. (They use the spacing of the top paragraph, which is a little counterintuitive.)
Similarly, say you create a double-spaced paragraph and then press Enter to start a new paragraph, creating a paragraph mark on a line by itself. Then, you cut a few sentences from a single-spaced paragraph elsewhere in the document and paste them just to the left of the new paragraph mark. Word reformats the pasted single space text with the double-spaced formatting setting stored in the paragraph mark.
That's just two examples of why you may need to see the paragraph marks when formatting and editing a document, especially when you're cutting or copying and pasting text. Pressing Ctrl+Shift+8 or clicking the Show/Hide button in the Paragraph group of the Home tab toggles the paragraph marks and other nonprinting characters on and off as needed.
The paragraph mark is also called a pilcrow or an alinea. Remember that if you show nonprinting characters and any of them, such as the paragraph marks, do not appear, you can control their display in Word Options. Choose File ![]() Options
Options ![]() Display, make sure that Paragraph marks and any other character types you want are checked under Always show these formatting marks on the screen, and then click OK.
Display, make sure that Paragraph marks and any other character types you want are checked under Always show these formatting marks on the screen, and then click OK.
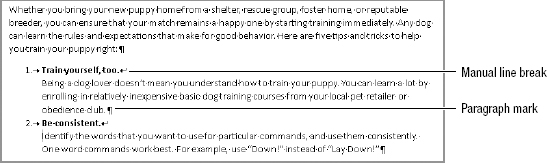
In Figure 6.1, all of numbered item 1 is a single paragraph. The character that you see after “Train yourself, too.” is called a manual line break, which is the type of line return you create when you press Shift+Enter. Because a manual line break does not create a paragraph mark, text before and after a manual line break is within the same paragraph, as you see in the numbered item in Figure 6.1. To Word, the only thing that distinguishes one paragraph from another is the paragraph mark. A single sentence or short phrase with a paragraph mark after it, as for a list of items, is considered to be a complete paragraph. Similarly, a paragraph mark that contains no associated text at all is also considered to be a paragraph.
A paragraph is everything between two paragraph marks.
Many new Word users find the display of nonprinting characters (such as paragraph marks, manual line breaks, spaces, and tabs) distracting. However, displaying them can give you essential clues about what's going on in a document.
Sometimes it's useful to use a manual line break within a paragraph while still keeping it as a single paragraph. This most often is done within numbered or bulleted paragraphs, as shown in Figure 6.1. That way any paragraph formatting you do to any part of the paragraph is done to the entire paragraph (such as the main indentation and numbering). If the paragraphs are numbered or bulleted, a manual line break prevents a new number or bullet from being assigned while keeping all the text pertaining to that topic or item together as a single paragraph.
You also can use the Reveal Formatting pane shown in Figure 6.2 as a formatting diagnostic aid. You display it by pressing Shift+F1. It shows all the formatting that's applied to the selected text or the word holding the insertion point. It has four segments: Font (character formatting), Paragraph, Bullets and Numbering, and Section. It also displays the selected text, if any, using the current common formatting. If the insertion point is beside a paragraph mark without any text, the Reveal Formatting pane displays the words “Sample Text” using common current formatting.
Press Shift+F1 to open the Reveal Formatting pane. It shows all the formatting in effect for the selection.
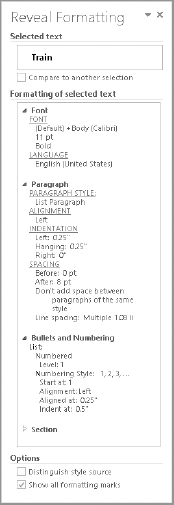
Why do I say that it displays the common formatting? That's because the selected text might not be formatted homogeneously. Say the selected sentence was “It was a dark and stormy night.” Because some formatting (bold and italic in this case) might not be common to the entire selection, you have to bear in mind that Reveal Formatting may not list all the formatting applied in a given selection.
You can use the triangles beside the section names in the Reveal Formatting pane to expand and collapse the formatting information. Clicking a black triangle collapses the formatting details, whereas clicking a white triangle expands and reveals formatting details. When you finish using the pane, click its Close (X) button to close it.
TIP
The Reveal Formatting command does not appear on the Ribbon. If you can't remember the Shift+F1 shortcut for displaying it, you can add a button for it to the Quick Access Toolbar or the Ribbon. Reveal Formatting is listed with the Commands Not in the Ribbon. See Chapter 30, “Customizing the Quick Access Toolbar and Ribbon” to learn how to add the button in the desired location.
Paragraph formatting attributes
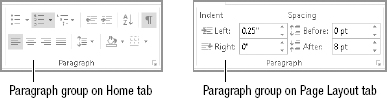
You can apply paragraph formatting using a wide variety of paragraph attribute buttons and tools. Many of those attribute controls, but not all, can be found in the Paragraph group in the Home tab, shown in Figure 6.3. Indent and Spacing, both of which are paragraph attributes, are located on the Paragraph group in the Page Layout tab, also shown in Figure 6.3. A number of attributes missing from the Ribbon are on the horizontal rulers: left and right indent, hanging and paragraph indent, and tab settings.
The Paragraph sections in the Home and Page Layout tabs contain a number of paragraph-formatting controls.
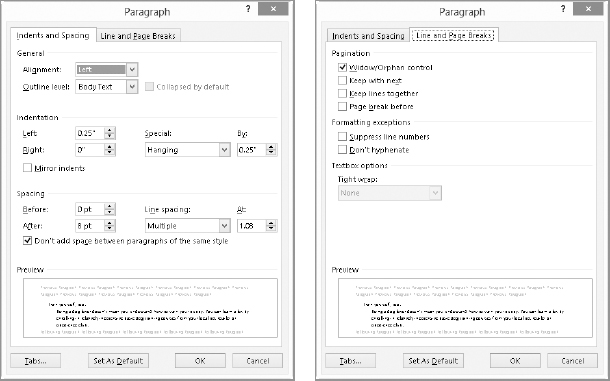
Many paragraph attributes—but again, not all—are also found in the Paragraph dialog box, shown in Figure 6.4. You can display the Paragraph dialog box by clicking the dialog box launcher in the lower-right corner of either Paragraph group, by double-clicking any of the indent controls on the horizontal ruler, or by pressing the legacy keystrokes Alt+O and Alt+P.
The Paragraph dialog box contains controls for most, but not all, of Word's direct paragraph-formatting attributes.
You have to open other dialog boxes to find additional paragraph-formatting settings. For example, click the Tabs button in the lower-left corner of the Paragraph dialog box to open the Tabs dialog box. To find border and shading formatting choices, click Borders and Shading in the bottom of the Border tool's list of settings (on the Home tab), shown in Figure 6.5.
You might be wondering from all this how to determine whether a setting is a paragraph-formatting attribute. One way is to see whether the attribute can be applied to a paragraph without the whole paragraph's being selected. For example, if you click anywhere inside a paragraph and click the Center button in the Paragraph group of the Home tab, Word centers the whole paragraph. The same anywhere-in-the-paragraph rule is true for each of the other alignment options. The same applies to borders, shading, indentation, bullets, numbering, and line spacing.
Note, however, that two “paragraph-formatting” attributes behave according to the if nothing is selected, format the whole paragraph rule, but behave differently if part (but not all) of a paragraph is selected. These two are shading and borders. While they generally are considered paragraph formatting, they also can be character formatting.
Open the Borders and Shading dialog box by clicking Borders and Shading at the bottom of the Borders menu in the Paragraph group of the Home tab.

Paragraph formatting techniques
You can use either of two techniques to apply paragraph-formatting attributes. As noted, you can simply place the insertion point in the paragraph you want and then choose the attribute (using the Ribbon, a dialog box, a keystroke, the shortcut menu, or the Mini Toolbar).
The other technique is to select a range of paragraphs (up to and including the entire document), and then apply the formatting. Note that even though shading and border formatting can apply to a selection of characters/words, if the selection includes or spans a paragraph mark, the formatting is applied to the entirety of all the paragraphs in the selection, even those that aren't fully selected.
Structuring Text with Paragraph Formatting
You can think of Word's paragraph formatting choices as encompassing two approaches:
- Structural formatting: Attributes that affect the overall structure of the text, such as alignment, indentation, tabs, and so on
- Decorative formatting: Attributes that add other elements to affect the interior appearance of the text, such as shading, borders, numbering, and bullets
Used properly, both structural and decorative formatting can help the reader navigate the document more easily or find important information. This section deals with structural formatting. The subsequent section covers decorative formatting.
Adding indentation
Indentation refers to adding extra space between one or more lines of a paragraph and the left and/or right margins. You typically use indentation for automatically indenting the first line of paragraphs, indenting quotes relative to both the left and right page margins, and setting up hanging indentation for bulleted or numbered text. Add or remove indentation in preset, half-inch increments by clicking the Decrease Indent or Increase Indent button in the Paragraph group of the Home tab.
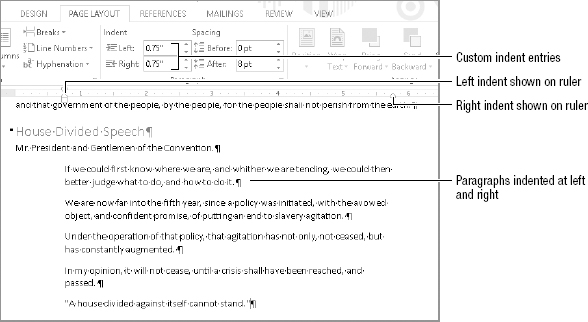
You can also add indentation using the Indent Left and Indent Right controls in the Paragraph group of the Page Layout tab. For example, most report styles call for all lines in quotations to be indented .5 inches from the left or right margins, but you may want to use .75 inches instead. As shown in Figure 6.6, you can enter the desired indent settings for the selected paragraph in the Indent Left and Indent Right text boxes.
Set custom left and right paragraph indentation in the Paragraph group of the Page Layout tab.
Indenting with the Ruler
The horizontal Ruler provides a mouse-based way to create indents and is especially easy for creating first line and hanging indents. A first line indent indents only the first line of a paragraph. A hanging indent indents all lines except the first line, as for the numbered and bulleted lists you see throughout this book.
This method also enables you to see how the text will change as you drag, so that you can judge as you go how much indentation to apply.
- To display the ruler if needed, click the View tab and click Ruler in the Show group. The Ruler check box controls the display of the ruler within the current document only, so you may need to turn it on and off frequently.
- Select the paragraphs to indent.
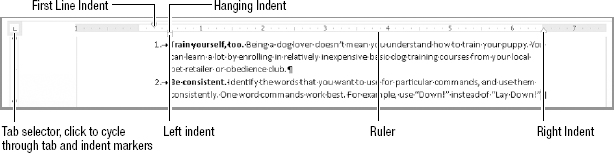
- Drag the indent symbols on the ruler as needed to apply the desired indentation. Refer to Figure 6.7 to see what each of these symbols looks like:
- First Line Indent: Drag to the right to indent the first line or to the left to reduce or remove indentation.
- Hanging Indent: Drag to the right to indicate the amount of indentation to apply to all but the first line of the paragraph.
- Left Indent: Drag right or left to add or remove indentation for all lines of the paragraph relative to the left margin.
- Right Indent: Drag left or right to add or remove indentation for all lines of the paragraph relative to the right margin.
- Repeat Steps 2 and 3 to apply different indentation settings to other paragraphs as needed.
- To hide the ruler if needed, click the View tab and click Ruler in the Show group.
Use the mouse to drag indentation controls on the ruler provides.
TIP
If you have trouble dragging the ruler's tiny indent controls with the mouse, you can use the tab selector control at the left end of the horizontal ruler. Click the (usually) L-shaped control to cycle through the different tabs and indents and stop at the either the First Line Indent or Hanging Indent marker. With that control displayed, you can now set a first-line or hanging indent by clicking the desired position on the ruler.
If you press the Alt key while dragging the indent controls on the ruler, Word displays the measurement as shown in Figure 6.8, allowing for more informed positioning.
Press Alt while dragging indent controls on the ruler to see precise measurements.

Custom and mirror indents
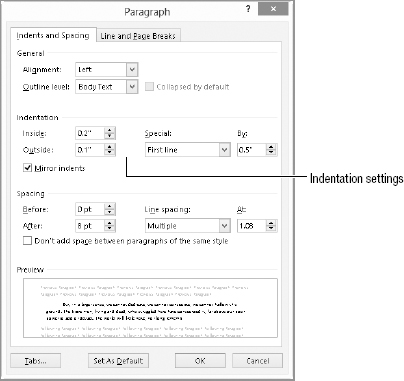
Many users still prefer to set indents in the Indentation section of the Indents and Spacing tab of the Paragraph dialog box, shown in Figure 6.9. For example, clicking the up and down arrow buttons for Left or Right increments those settings by .1 inch. You can choose either First Line or Hanging from the Special list to immediately set up either of those types of indents, or click the Mirror indents check box so that you can create indents to accommodate book style printing. When Mirror indents is enabled, the Left and Right text boxes become Inside and Outside, as shown in Figure 6.9.
Use the Paragraph dialog box to enter precise indent settings or add mirror indents.
Mirror indents are different from Mirror Margins, which is a Page Setup setting discussed in Chapter 16, “Setting Up the Document with Sections, Headers/Footers, and Columns.”
Changing text alignment
Horizontal alignment determines how any given paragraph is oriented between the left and right margins. The Paragraph group of the Home tab includes four alignment buttons. Click a button or use its shortcut key to apply the specified alignment to the selected paragraph(s):
- Align Left (Ctrl+L): Starts the left side of each line of text at the left margin, leaving a ragged right paragraph edge.
- Center (Ctrl+E): Centers each line in a paragraph between the left and right margins, giving both sides of the paragraph a ragged appearance.
- Align Right (Ctrl+R): Moves each line of the paragraph over to the right, so the right side aligns at the right margin, leaving a ragged left edge.
- Justified (Ctrl+J): Adds additional spacing between letters to align the left and right side of each line of text to its respective margin, giving straight left and right paragraph edges.
CAUTION
Justified alignment can cause an unpleasant appearance when used in combination with a font size that's too large. With a large font size, fewer words fit on each line, and Word therefore might have to add large amounts of white space to justify the text, creating a distracting amount of white area within the text. If you notice this effect when using justified alignment, experiment with applying a smaller font size to fix the problem.
Changing spacing
You also may need to change the paragraph spacing settings for various documents to improve readability or conform with document-formatting styles and requirements. For example, most academic reports require double-spaced formatting, whereas most business letters use single-spaced or a limited amount of space between lines.
By default, the Normal paragraph style includes extra spacing after the paragraph. Pressing Enter once at the end of a paragraph automatically includes the needed spacing between the current paragraph and the next paragraph.
Use the Line and Paragraph Spacing drop-down list in the Paragraph group of the Home tab to change paragraph spacing.
Between lines
By default, the Normal paragraph style is set to 1.15 line spacing. To change to another line spacing setting:
- Select the paragraphs to change.
- Click the Paragraph and Line Spacing button in the Paragraph group of the Home tab. A menu with preset spacing settings and other commands appears.
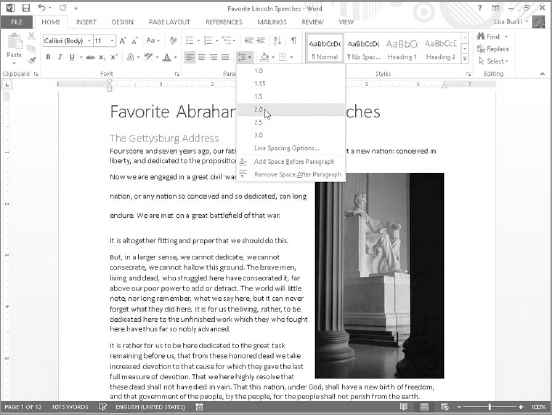
- Move the mouse pointer over one of the spacing choices. A Live Preview of the spacing appears in the document, as shown in Figure 6.10.
- Click the spacing to apply.
Changing line spacing within the second paragraph of the document
If you click Line Spacing Options in the menu in Figure 6.10, Word opens the Paragraph dialog box, with its Indents and Spacing tab displayed. You can use the Line Spacing choice there to apply Single, 1.5 lines, or Double spacing. You also can use the At least, Exactly, or Multiple choices and make an entry in the At text box to set line spacing by smaller increments such as the 1.08 default for Word 2013's Normal paragraph style.
When you install Word 2013 for the first time on a system, the Normal style's line spacing will be 1.08 and spacing after will be 1.08 and 8 pt, as described above and below. However, if you upgrade a prior version of Office, your Normal paragraph style may use the default settings from the prior version, 1.15 and 10 pt, respectively. If this is not what you want, you can edit the Normal style to match the new settings as described in “Modifying an existing style” in Chapter 7, “Using Styles to Create a Great Looking Document.” Another more drastic workaround would be to delete the Normal.dotm file so that it will rebuild when you start Word; however, use that technique with caution, because you would also lose any other style modifications or custom macros stored in the default template.
Before and after paragraphs
The Normal paragraph style also includes 8 pt of extra spacing after each paragraph. You can add spacing both before and after paragraphs to set them apart and make your document more readable. For example, the built-in Heading 1 style includes 12 pt of spacing before the paragraph. This creates a larger gap between the preceding text and a heading, visually cueing the reader that one major topic is ending and another beginning.
To adjust spacing before and after paragraphs:
- Select the paragraphs to change.
- Click the dialog box launcher in the Paragraph group of the Home tab. The Paragraph dialog box opens with its Indents and Spacing tab selected.
- Under Spacing, change the values in the Before and After text boxes as desired. Clicking one of the up and down arrow buttons increments the setting by 6 pt. If that's too large a change, drag over the entry of one of the text boxes and type the desired size.
- Click OK to apply the new spacing.
TIP
The Add Space After Paragraph command on the Line and Paragraph spacing menu adds 12 pt of space after the selected paragraph. Remove Space Before Paragraph sets the space before the paragraph to 0 pt.
Setting and using tabs
Computer users increasingly have been using tables rather than tabs for aligning lists of text within a document. Although both formatting methods can give similar results and derive from the same root word, tabulation, tables give better control, more flexibility, and more formatting options than tabs. Still, there are many instances where using tabs on the fly provides a faster document-formatting solution.
By default, a new document includes default preset tabs every .5″. When you set your own tab, all the built-in preset tabs to the left of the one you set are removed, leaving the manually inserted tab and all remaining preset tabs to the right.
Tabs versus tables
If you can use tabs, and you can use tables, when should you use which? There are times when tabs give you precisely what you want, and in a way that a table either can't or can't without your jumping through hoops. For example, if you want lines connecting two tabbed items, while there are other ways to accomplish the same effect, it's almost always faster and easier to use tab leaders.
If you need to create an underscored area for a signature or other fill-in information on a paper form, the solid tab leader line is definitely the way to go, even though you could draw lines where you want them instead, using Insert ![]() Illustrations
Illustrations ![]() Shapes
Shapes ![]() Line (holding down the Shift key as you draw to keep the line perfectly horizontal, of course). However, graphical lines have a way of not always staying where you put them, so you'll usually find that it's much more efficient and predictable to just use a leader line, as described shortly under “Working with tab leaders.”
Line (holding down the Shift key as you draw to keep the line perfectly horizontal, of course). However, graphical lines have a way of not always staying where you put them, so you'll usually find that it's much more efficient and predictable to just use a leader line, as described shortly under “Working with tab leaders.”
TIP
Word includes a new feature for creating a formal document signature line rather than a basic fill-in area. For more, see “Adding a signature line” in Chapter 26, “Managing Document Security, Comments, and Tracked Changes.”
Another situation in which tabs give you what you want is with simple document headers. The default header for Word 2013 documents contains a center tab and a right tab. This enables you to easily create a header with text to the left, centered text, and right-aligned text, simply by separating those three components with tabs. Tabs also can be useful inside actual tables for aligning numbers at the decimal point. (To insert a tab inside a table, press Ctrl+Tab.)
However, for more complex presentations of information, particularly when you might need organizational control (copying and moving rows and columns), you'll save time and work by creating a table. Chapter 13, “Building Tables, Charts, and SmartArt to Show Data and Process,” covers how you can quickly build and format tables in a document.
Setting tabs in a dialog box
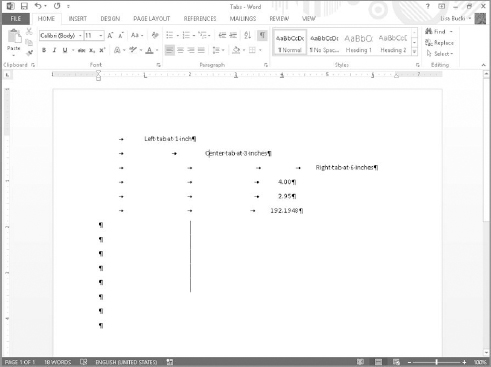
If you prefer the precision of typing in the tab measurements you want or if you need to include a leader, use the Tabs dialog box shown in Figure 6.11 to create your tabs. With the Tabs dialog box, you also can specify a tab alignment. Figure 6.12 shows examples of the various alignments.
- Select the paragraphs to change.
- Click the dialog box launcher in the Paragraph group of the Home tab. The Paragraph dialog box opens with its Indents and Spacing tab selected.
Use the Tabs dialog box to set and clear tabs, set the default tab stop interval, and set a tab leader.

The first three lines show left, center, and right tabs; the number lines show a decimal tab; and the final lines show a bar tab.
- Click the Tabs button in the lower-left corner. The Tabs dialog box appears.
- To set a tab, click in the Tab stop position text box, type the tab measurement, click the desired choices under Alignment and Leader, and click Set.
- To remove a tab, click it in the Tab stop position list, and click Clear.
- Click OK to close the dialog box.
Working with tab leaders
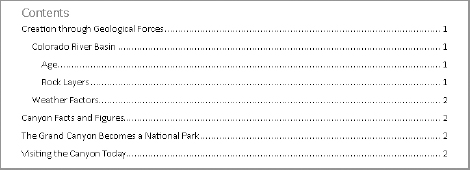
Tab leaders are dashed or solid lines typically used to help the reader visually line up information separated by tabs. Tab leaders often are used in tables of contents and indexes, such as the one shown in Figure 6.13. You choose the type of leader to add when setting the tab, as noted in Step 4 above. The Leader section of the Tabs dialog box (Figure 6.11) offers four leader settings. The first removes any previously-applied leader for the tab selected in the Tab stop position list. The next three choices create a dotted, dashed, or underline leader, respectively, for a new or existing tab.
Tab leaders are visual aids that help the reader better track content separated by tabs.
For example, to create a signature or other fill-in area for a printed form, type and format the prompt (Name:, Phone:, and so on). Open the Tabs dialog box, enter the desired Tab stop position value, click Right under alignment, and then click the Leader option 4 (solid underscore). Click OK, and then click to the right of your prompt and press Tab. This creates something like what is shown in Figure 6.14.
Tab leader lines are ideal for creating underscored fill-in areas for paper forms.

To change a tab leader, click the tab in the Tab stop position list of the Tabs dialog box, click the desired style under Leader, and then click Set. Similarly, you can click a tab in the Tab stop position list, and then click Clear to remove the tab stop. When you finish working with Tabs, click OK to close the Tabs dialog box.
Setting tabs with the ruler
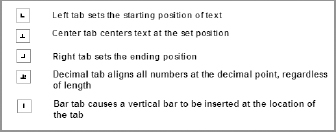
You can set tabs using the horizontal ruler as well. First, display the ruler if needed by checking Ruler in the Show group of the View tab. Then determine the tab type by clicking the tab selector control at the left end of the ruler. (Refer to Figure 6.7 for its location.) As indicated earlier, this control cycles among Word's five built-in tab types, as well as First
Line Indent and Hanging Indent controls. Figure 6.15 shows the markers or buttons for the five built-in tab types. When the desired tab type appears on the control, click the lower portion of the ruler (below the eighth-inch hash marks) to set the desired tabs. Drag a tab marker along the ruler to correct its placement; holding the Alt key while dragging shows you the exact location.
Choose a tab type using the control at the left side of the ruler, and then click the ruler to set the tab.
To remove a tab from the ruler, simply drag the tab marker down and away from the ruler until the mouse pointer is no longer in the ruler area.
Setting Off Text with Paragraph Decoration
A second overall kind of paragraph formatting is something that might be termed paragraph decoration. This includes shading, boxes, bullets, and other semi-graphical elements that help the writer call attention to particular paragraphs, or that help the reader better understand the text.
Numbering or bulleting lists of text
Automatic numbering and bulleting helps clarify the nature of the lists in your document, as well as saving you the trouble of having to insert numbers and bullets manually, set tab stops and a hanging indent, adjust the spacing between paragraphs, and apply all the other paragraph-formatting settings needed for a list. Another benefit of using Word's numbered list tool is that if you need to change the order of the items in the list, all you have to do is drag or cut and paste them. The list then automatically renumbers itself.
Traditionally, you create a numbered list to show steps in a process and a bulleted list for a nonchronological list of items. Numbered lists are also useful when you want to count the items in a list, such as when you are providing a “Top 10” list.
You can apply numbering or bullets to selected paragraphs by clicking the Numbering or Bullets button in the Paragraph group of the Home tab. Each paragraph in the list becomes a separate numbered or bulleted item.
You also can click the Numbering or Bullets tool and just start typing a brand-new list. When you're done with your list, simply press Enter twice to stop the numbering or bulleting. If you create additional indent levels in the list by pressing the Tab key, Word automatically uses different and appropriate numbering or bullet schemes for each level.
NOTE
If Automatic bulleted lists or Automatic numbered lists are enabled, then you don't even need to click the Numbering or Bullets tool. To begin a numbered list, simply type 1. (1 followed by a period) and press the spacebar, and Word automatically replaces what you type with automatic number formatting. Other variations work, too, such as 1<tab>. To begin a bulleted list, simply type * and press the spacebar. When you want to end either kind of list, press Enter twice.
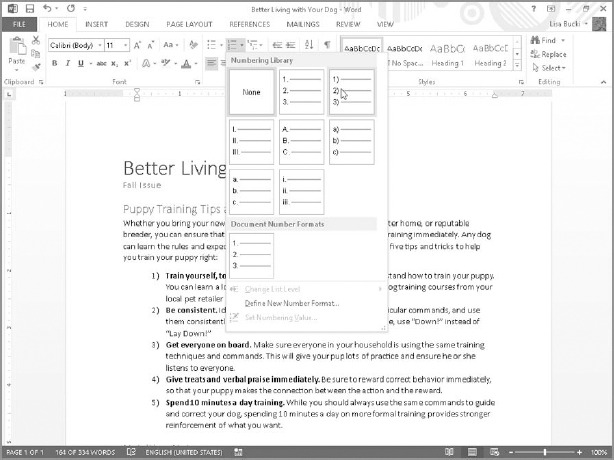
You can change the number or bullet style by clicking the arrow for either the Numbering or Bullets tool. As shown in Figure 6.16, when you move the mouse pointer over a new bullet or numbering style, a Live Preview appears in the selected list. Click the desired format in the gallery to apply it to the list.
The Multilevel list button to the right of the Numbering button in the Paragraph group of the Home tab enables you to create an outline-style multilevel list. Its default format uses 1. (level 1), a. (level 2), i. (level 3) style academic formatting, but it, too offers a gallery of other formal and informal styles. Use Tab or Shift+Tab at the beginnings of lines to build the multilevel outline.
Live Preview shows the new numbering or bullet style.
Line and page break controls
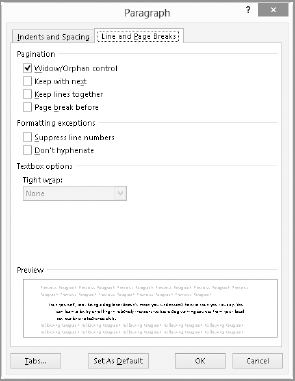
Figure 6.17 shows the Line and Page Breaks tab of the Paragraph dialog box, which offers additional paragraph-level formatting controls. Some of the settings found here are particularly useful for long documents with abundant headings, because they enable you to control what text stays together without the need for you to insert manual page breaks that you'd have to remove or move later if you edit the document.
Control how paragraphs behave around page breaks and with special formatting here.
To set Line and Page Breaks options:
- Select the paragraphs to change.
- Click the dialog box launcher in the Paragraph group of the Home tab. The Paragraph dialog box opens with its Indents and Spacing tab selected.
- Click the Line and Page Breaks tab.
- Click to check (enable) or uncheck (disable) the desired options under Pagination:
- Widow/Orphan control: Prevents a solitary paragraph line from being “stranded” on a page by itself without the rest of the paragraph. Widows precede the main portion of the paragraph and thus appear alone at the bottom of a page above the page break, whereas orphans follow the rest of the paragraph and appear alone at the top of the page below the page break).
- Keep with next: Forces a paragraph to appear with the paragraph that follows. Use this setting to keep headings together with at least the first few lines of the first paragraph under that heading. You can also enable this setting to keep captions and pictures, figures, tables, and so on, on the same page.
- Keep lines together: Prevents a paragraph from breaking across two pages.
- Page break before: Forces an automatic page break before the paragraph. For example, you could enable this check box to force each chapter to begin on a new page.
- Click to check (enable) or uncheck (disable) the desired options under Formatting exceptions:
- Suppress line numbers: Enable this check box to temporarily hide line numbers that you've previously set up. (You will learn to do this in Chapter 16.) Hiding the line numbers is faster than removing and reapplying them.
- Don't hyphenate: Instructs Word not to perform hyphenation in the selected paragraphs. This often is done by those trying to reproduce a quote and maintain its integrity with respect to the words and position of the original being quoted.
- Click OK to close the dialog box.
What's That Dot?
As you are working with various paragraph formatting choices you may notice a square dot appear at times to the left of some paragraphs. The square dot appears to the left of a paragraph when any of these attributes are assigned to that paragraph:
- Keep with next
- Keep lines together
- Page break before
- Suppress line numbers
The dot will not print, but provides a visual reminder that you have applied special line and page break formatting.
Shading paragraphs
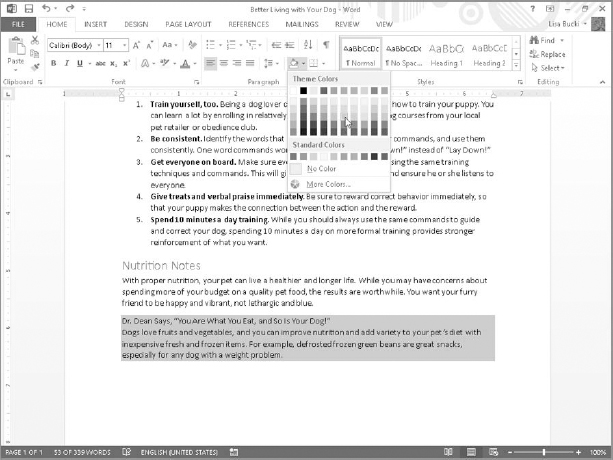
You can shade paragraphs as well as individual words with the Shading drop-down in the Paragraph group of the Home tab. As shown in Figure 6.18, after you open the control, point to a color to see a Live Preview on the selected text. Or, if no text is selected within a paragraph, Word applies the shading to the entire paragraph holding the insertion point. When you find the color you want, click it to apply it.
Word applies the shading to selected text or the whole paragraph holding the insertion point.
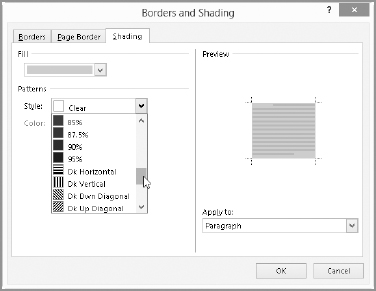
The Shading tab of the Borders and Shading dialog box offers additional shading options. To display the Borders and Shading dialog box, click the drop-down arrow next to the Border tool in the Paragraph group of the Home tab, and click Borders and Shading (at the bottom of the list). As shown in Figure 6.19, open the Style drop-down list under Patterns, and scroll down to view the various opacity and pattern settings that can be applied to the shading. Click the one you want, check its appearance in the Preview area at right, and then click OK to apply the change. Patterns often are more useful when you're preparing documents for grayscale printing in which shading variations might be too subtle.
Change opacity or apply a pattern to a shaded selection.
Borders and boxes
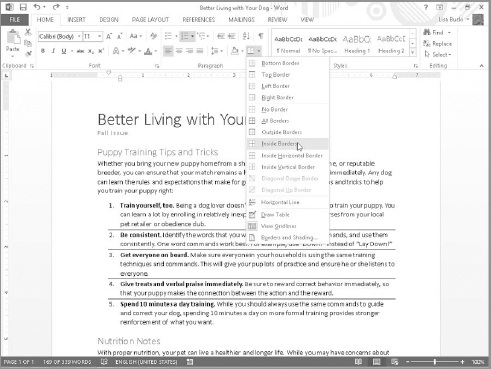
You can apply borders above and below or beside selected paragraphs for emphasis, or to set off one or more paragraphs from the rest of the text by boxing it. The Borders gallery in the Paragraph group of the Home tab offers several preset border types that you can preview with Live Preview. For example, as shown in Figure 6.20, after you click the Borders drop-down list arrow, pointing to Inside Borders displays lines between the paragraphs in the selected numbered list. Click a preset in the menu to apply it. Using Live Preview helps in this instance because the resulting box or border applied depends on how many paragraphs you've selected and how they're otherwise formatted.
Click the Borders and Shading command at the bottom of the drop-down list shown in Figure 6.20 to open the Borders and Shading the dialog box with the Borders tab selected, as shown in Figure 6.21. To use the dialog box to apply a border:
- Click the Border drop-down arrow in the Paragraph group of the Home tab, and then click Borders and Shading.
- Make a selection from the Style list.
- Click the Color box and click the border color to use.
Preview and apply a border or box preset
The Borders and Shading dialog box provides complete control over a paragraph's border.

- Open the Width drop-down and click a width.
- Then, either click one of the presets under Setting to apply that style of box to the selected paragraph (Figure 6.20 shows the Shadow style of box selected), or click the four sides of the Preview box at right as needed to apply or remove the border on the specified side.
- Make sure Paragraph is selected from the Apply To drop-down.
- Click OK.
Additionally, you can adjust the distance between the border and paragraph text by clicking Options in the lower-right corner of the dialog box. You can individually adjust the distance for any of the four sides.
CAUTION
Note that the Border button in the Paragraph group of the Home tab changes to the last border preset that you applied. This does not apply if the last option you picked was Borders and Shading.
Caveats for printing and viewing
With formatting tools that are so easy to use, it's always tempting to think that more is better. Sometimes more is just more. And sometimes more can create issues for readers of your documents, whether they are printing them or viewing them onscreen. Before you wrap up that document and send it to the printer or email it to another user, review your document for these potential problems:
- Lack of spacing between paragraphs: Applying bold and italic character formatting to create “headings” often doesn't break up the text enough. Use paragraph styles or insert spacing above and below heading paragraphs to give your reader's eyes a break. Adding a border below every heading also helps.
- Lack of spacing between lines: Make sure you understand the intended purpose of a document, and set line spacing accordingly. If your instructor or boss wants you to double-space the text in your report, make sure that you've done so.
- Shading that's too dark for printing: If you apply navy shading behind black text, chances are it won't be readable when printed, especially if your color printer does a poor job rendering color or you are printing to a black and white printer. Choosing the Lighter 60% or Lighter 80% variations of the right six accent colors under Theme Colors in the Shading pallet usually is safer than choosing one of the deeper variations on the rows below.
- Shading that's not optimized for onscreen viewing: If you believe most users will be reading your document online or if you plan to convert it to a PDF, keep in mind that it's sometimes easier to read light text on a dark background onscreen. This means that you might consider changing to a white text fill and dark shading for paragraphs you want to emphasize.
Summary
In this chapter we've explored the ins and outs of direct paragraph formatting. You should have also started to develop a better sense of when to use direct paragraph formatting, and when to take it to the next level and create your own style, one of the skills you'll learn in Chapter 7. You should now be able to do the following:
- Decide when to use direct formatting, and when to use a style
- Distinguish between paragraph-formatting attributes and other kinds of attributes
- Properly indent and align any paragraph, as well as determine how to find and use the appropriate tools
- Adjust line spacing in a paragraph and spacing before and after paragraphs
- Decide when to use tabs versus when to use a table
- Apply and remove bullets and numbering
- Use shading and boxes to highlight paragraphs