
CHAPTER 24
Creating Custom Forms
- Understanding Legacy form fields versus modern content controls
- Working in Design mode
- Creating forms using legacy tools
- Creating templates using content control tools
- Importing Word forms into InfoPath
It seems that just about every time you turn around, someone has a form you need to fill out. There are job applications, credit applications, school forms, medical forms, subscription forms, tax forms… the list goes on and on. All these forms aren't just on paper, either. Many of the same forms—and plenty more, to boot—are now online.
Word's form-building capabilities have evolved over time. Word currently provides multiple methods for creating forms. Each approach has its own strengths, as you'll see in this chapter. Let's dive in.
Forms Basics
Word 2013 has three different sets of tools that can be used to create electronic forms:
- Content control tools
- Legacy form fields from Word 2003 and earlier
- ActiveX form controls
Ostensibly, legacy form fields and ActiveX form controls are included with Word 2013 only to provide limited support for legacy documents. However, because while Word 2013's Help focuses on the new content control features when you ask it how to create forms, Word's other options give you reasons you may want to use legacy form fields from Word 2003 and earlier (and not the ActiveX tools).
Two Word options—designed to save forms data and print only forms data—work only with forms having legacy controls. Choose File ![]() Options
Options ![]() Advanced
Advanced ![]() When printing this document. Notice the option that says Print only the data from a form. A little further down, under Preserve fidelity when sharing this document, notice the option that says Save form data as delimited text file. Both of those options work only with legacy Word 2003 form fields, so if you choose to use the new content controls, you'll have to use other means to gather the data collected from the form files. Later sections in this chapter will show you how to work with both types of form controls. I suggest that you read through both sections before starting any important form project, as you'll want to have a clear understanding of which of the form tools will better suit your needs.
When printing this document. Notice the option that says Print only the data from a form. A little further down, under Preserve fidelity when sharing this document, notice the option that says Save form data as delimited text file. Both of those options work only with legacy Word 2003 form fields, so if you choose to use the new content controls, you'll have to use other means to gather the data collected from the form files. Later sections in this chapter will show you how to work with both types of form controls. I suggest that you read through both sections before starting any important form project, as you'll want to have a clear understanding of which of the form tools will better suit your needs.
One way to think about a form is as a kind of reverse mail merge. Whereas the objective in a mail merge is to display data in a particular way, often combining data and document elements, the objective in using forms typically is to obtain data. Hence, document elements are combined with empty slots for the form recipient to use to type in the data manually. Document elements are instructions telling the form user what kind of information is being sought. Such forms often are used for job applications, placing online orders, filling out surveys, and a host of other purposes.
NOTE
In Word 2013, forms have another purpose: to create document templates in which the objective is not specifically to obtain data. Rather, the purpose is to provide a method for constructing content-oriented templates. Extracting data from these new documents requires considerably more effort, as well as the talents of a programmer who knows his or her way around VBA (Visual Basic for Applications, which is the macro/scripting language that Word uses for its macros) and XML. While Word provides the ability to view XML structure via the XML Mapping Pane button in the Mapping group of the Developer tab on the Ribbon, most of the useful XML editing capabilities were removed from Word due to litigation. For that reason, XML is not covered in this book.
Creating and using forms: general steps
In Word, you create a data collection form using the following general steps:
- Combine text instructions and content controls (or legacy form fields) in a Word document.
- Protect the document, enabling entry only in content control or legacy form field areas. Do not protect the document or template for fill-in forms when the goal is to create a template that is not data-oriented.
- Save the form as a Word template.
To use a form, you use the form template to create a new document. That document (or the original template.) can then be sent out to be filled in, posted online, emailed, and so on. Make sure to provide users with any applicable saving and naming instructions, as well as instructions for how to return their completed forms to you or another person or online location.
You can also create a form or template that isn't data-oriented per se. Rather, it contains strategically placed content controls to help users to create a document more quickly and to use precise formulations of text and formatting (in some instances) to promote consistency and accuracy.
Form tools and controls
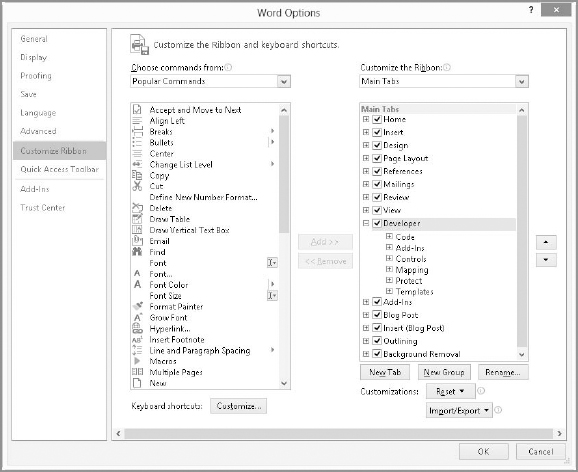
Word's form tools and controls are located in the Developer tab of the Ribbon. To display the Developer tab, choose File ![]() Options
Options ![]() Customize Ribbon. In the Main Tabs list at the right, click the Developer check box to check it, as shown in Figure 24.1, and click OK.
Customize Ribbon. In the Main Tabs list at the right, click the Developer check box to check it, as shown in Figure 24.1, and click OK.
The Developer tab does not appear by default; turn it on in Word Options.
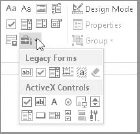
The primary tools used for creating and working with forms are in the Controls group of the Developer tab, shown in Figure 24.2. In addition to the nine content control tools, the Legacy Tools control provides access to the legacy forms tools from Word 2003 (and earlier), as well as ActiveX tools. Note that using ActiveX tools requires additional programming knowledge that is beyond the scope of the Microsoft Word 2013 Bible. For information about programming and forms, visit www.mousetrax.com, or search for help on the Internet. To access legacy forms tools and ActiveX controls, click the Legacy Tools drop-down arrow. Both Legacy Forms tools and ActiveX tools are also shown in Figure 24.2.
Content controls and access to legacy form and ActiveX tools is provided in the Controls group on the Developer tab.
Content control tools
Word 2013 provides nine content control tools in the Controls group. If the control icons aren't self-explanatory enough, move the mouse pointer over the control to see a ScreenTip telling what it does. The controls are:
- Rich Text: Provides an area in which the user can type formatted text.
- Plain Text: Provides a plain-text area that cannot contain formatting.
- Picture: Provides a control in which the user can insert or paste a picture.
- Building Block Gallery: Provides a drop-down menu of Building Blocks. This enables you to include larger selections of boilerplate and other preset text than otherwise can be selected using the other controls. This can be handy for more complex forms.
- Check Box: Provides a check box that can be toggled checked/unchecked by clicking.
- Combo Box: Provides a combination of preset options and user entry.
- Drop-Down List: Provides a list of preset options only.
- Date Picker: Provides a drop-down menu that enables you to pick the date using a calendar.
- Repeating Section: Enables you to organize the form by creating a section or area to hold other controls.
Unlike Word's legacy form fields, the content controls are not specifically designed to facilitate data collection. Rather, they are present in Word to facilitate constructing document templates. You can protect a content control–based document or template, permitting entry of data only in content controls. Therefore, you can send such a document to users so they can fill in the blanks, so to speak. However, extracting data from them is not supported by Word 2013 directly and requires a fair amount of programming effort.
If you don't need to extract data directly from such documents, or use them to print data only onto preprinted forms, and if you find these tools more accessible than the legacy tools, then feel free to use them.
If you do need a systematic way to extract data from your forms, however, use the legacy tools described in the following section.
Legacy form tools
Click the Legacy Tools button in the Controls group of the Developer tab to access Word's legacy form field tools:
- Text Form Field: Insert a text form field; use can be controlled to prevent non-numeric or non-date entry in a text form field.
- Check Box Form Field: Create a clickable check box.
- Drop-Down Form Field: This tool enables users to choose from a list of preset options.
- Insert Frame: Insert an old-style Word frame as a container for manipulating form fields.
- Form Field Shading: Toggle shading of form fields, which enables you to quickly identify where form fields are located in a document.
- Reset Form Fields: Restore all form fields in a forms document to their default entry settings.
The legacy tools are used to create forms from which you will need to extract or print just data. One use for such tools is to create a specific pattern of data you can use to print onto preprinted forms (such as tax forms, order forms, and so on). Another use is so you can save just the data to a delimited text file, with each text file containing one record. You would then need to collect the text files into a single data file, wherein each file would be the basis for a single record in the data file. The details of how to print and save data only are provided later in this chapter.
ActiveX controls
The third set of controls is the ActiveX controls (refer to Figure 24.2). Like content controls, ActiveX controls are of limited utility to most Word users from a data standpoint. They require a skilled programmer to use properly and are therefore beyond the scope of this book.
Like the legacy tools and content control tools, the ActiveX controls can also be used to record a document user's responses to questions. Like the content control tools, however, the ActiveX controls do not have the ability to save or print just data. If your document contains such controls, any responses recorded in them will not be retained when printing or saving just data. That talent belongs exclusively to the legacy tools.
Forms protection
Protecting forms documents has been mentioned several times in this chapter without any explanation. Like so many concepts in Word 2013, it's difficult to talk about any one concept without mentioning others. When you protect a document for forms in Word, that means the user cannot edit any of the static text. The only places where the user can type or otherwise interact with the document's contents are in the form controls themselves.
Consider the simple document shown in Figure 24.3. The shaded second column contains a series of form fields. When the document is protected after you create all the form information, you can type only in the form fields. If displayed, the Restrict Editing pane informs you that you are only allowed to fill in the form. The prompt or label text (Name, DOB, City, and so on) is off-limits.
When you protect a document for forms, you can type only in the form fields.

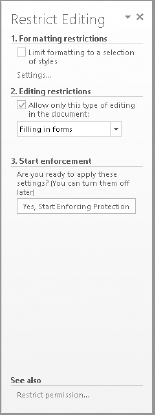
To protect a document for forms editing, in the Controls group of the Developer tab, first make sure that the Design Mode button is not selected or turned off (you cannot protect a form if Design mode is active). Then, click Restrict Editing in the Protect group, which displays the Restrict Editing pane, shown in Figure 24.4. In section 2, Editing restrictions, click the Allow only this type of editing in the document check box to check it, open the drop-down list, and click Filling in forms. When you're ready to begin enforcement, click Yes, Start Enforcing Protection.
Choose the Filling in forms editing restriction when creating your forms.
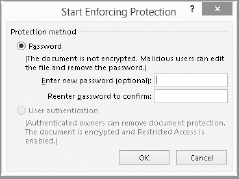
Word displays the Start Enforcing Protection dialog box, shown in Figure 24.5. You can include a password if you like—the choice is yours. Type it in the two text boxes prompting for it, and click OK. Note that the User authentication option appears only if you're using Word 2013 in an enterprise environment, such as with Office 365. An authenticated user is one who is logged on to the computer or network to which the computer is attached—and only on certain kinds of networks. Don't be concerned if this option is grayed out or missing completely.
A password isn't mandatory, but it's often not a bad idea to avoid confusing and/or tempting users.
CAUTION
Most users don't know how to enable or disable forms protection. If they do turn off protection via the Review tab, then at worst they will mess up the document and won't give you any useful information. If you set a password and forget it, you will have completely lost the capability to modify the document or template, probably with no hope of recovery. If it's a complex document, you're going to have to redo all that work. Make sure you record your form passwords and store them in such a way that you will always be able to retrieve them.
Determining when to protect a document
If the document you are creating is not being used for data collection of some kind, but rather uses content control to drive the creation of a document, you do not need to protect the document for fill-in forms. In fact, if you do, the template will not be terribly useful.
Removing form protection
To remove protection for fill-in forms, if the Restrict Editing pane isn't displayed, in the Developer tab, choose Restrict Editing in the Protect group. At the bottom of the Restrict Editing pane, click Stop Protection. If a password has been set, type the password and click OK or press Enter. If you forgot the password, unfortunately, you will not be able to remove the protection.
Creating a Fill-In Form Using Legacy Tools
Now that you know the basics about forms, it's time to create one. In addition to using the legacy tools to create basic forms, you must use the legacy form tools in the following two situations:
- When you want to be able to print only the field data that the user inputs, because you already have preprinted paper forms. (Turn on the Print only the data from a form options in Word's Advanced options for this to work.)
- When you want to be able to save the field data that the user inputs as a commadelimited text file so that you can easily compile the user responses. (Turn on the Save form data as delimited text file in Word's advanced options.) When you set the form file up to do this as described in the warning below, when the user enters their responses in the form five and then saves it, only the responses are saved in a single delimited line in the the Plain Text (.txt) file format. You can then use the Insert
 Text Object arrow Text from File command to insert the response file from each user into a new line to create a single delimited document. Save that file in the Plain Text format, and then you can import its data into Excel or Access for analysis.
One of the most common uses for online Word forms is subscriptions and order forms. In this section you learn how to create a simple order form template using Word's legacy form tools. The basic steps are as follows:
- Draft or sketch what you want the form to look like. This will speed the process of designing your form.
- Create a document that contains instructional text and form fields in which the user can provide answers to questions and save the file as a Word document.
CAUTION
If you need to enable the legacy options under File
 Options Advanced, Save form data as delimited text file and Print only the data from a form, you will need to leave the form saved as a Word document (not a Word template). Then create a VBA macro that turns on these options when the user opens the original Word file, because these options can only be set in the current file, and a template spawns a new file which then disables the options. Save the macro in the form Word file. You can then right-click the first form Text control in the Word file, and click Properties. In the Text Form Field Properties dialog box that appears, open the Entry list under Run macro on, and click the name of your macro. Click OK and proceed with creating the form, but do not save it as a template.
 - Turn on protection for fill-in forms.
- Save the document as a template, if you are able to do so based on the previous warning.
- Create a new document based on the template.
- Make the new document available to customers so they can fill it out with the needed information.
In addition, legacy form fields provide the following advantages and features that content controls do not:
- The ability to control the type of data entry (for example, to reject non-date data from a date field and non-numeric data from a numeric field)
- The ability to automatically perform calculations
- The ability to specify numeric formatting
Creating the form document
In a new Word document, type any prompts or labels (instructional text) you need. Often, setting up a form is easiest when you create a table, including your labels in one column and the fill-in or other legacy fields in a second column, as shown in Figure 24.6. To create the form shown here, I inserted a 2×13 table. I merged the top cell to add the company information and split the lower-right cells to hold the numeric calculations (see Chapter 13, “Building Tables, Charts, and Smart Art to Show Data and Process,” for more information on working with tables).
Tables help in the organization and positioning of form fields and other information.

Turning on nonprinting formatting characters and form field shading
To facilitate working with form fields, it helps to display nonprinting formatting characters and form field shading. It sometimes helps to turn on the display of bookmarks as well, although bookmarks are turned off here so that you can read the field contents better.
NOTE
Legacy form fields use bookmarks as their names. You can customize the bookmark names to enable the fields to be used by other fields for calculations and logic tests. This topic is discussed more a little later in this chapter.
To toggle the display of nonprinting formatting characters, press Ctrl+Shift+8 (Ctrl+*) or click Show/Hide in the Paragraph group of the Home tab. To turn on the display of form field shading if it is not already on, in the Controls group of the Developer tab choose Legacy Tools ![]() Form Field Shading (the second item from the right under Legacy Forms).
Form Field Shading (the second item from the right under Legacy Forms).
To turn on the display of bookmarks, choose File ![]() Options
Options ![]() Advanced. Under Show document content, ensure that Show Bookmarks has a check next to it, and click OK.
Advanced. Under Show document content, ensure that Show Bookmarks has a check next to it, and click OK.
Inserting a text form field with date format
Word's legacy text form fields actually provide a lot more than just a place to type text. To create the date field shown in Figure 24.6, in the Developer tab's Controls group choose Legacy Tools ![]() Text Form Field. If field shading and nonprinting formatting marks are displayed as instructed earlier, the text form field includes five little circles that are special spaces. If you press Ctrl+Shift+8 (Ctrl+*), the circles disappear. If you do that and turn off form field shading, the entire field becomes invisible (for now). This can make working with such form fields rather difficult.
Text Form Field. If field shading and nonprinting formatting marks are displayed as instructed earlier, the text form field includes five little circles that are special spaces. If you press Ctrl+Shift+8 (Ctrl+*), the circles disappear. If you do that and turn off form field shading, the entire field becomes invisible (for now). This can make working with such form fields rather difficult.
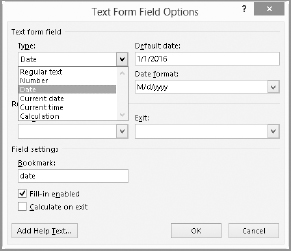
Double-click the text form field to open the Text Form Field Options dialog box. This is where you make the field more specific and choose display settings and behavior. Open the Type drop-down list and choose Date, as shown in Figure 24.7.
You can set a text form field to any of six types of data.
TIP
You also can right-click a legacy control and click Properties to open its options dialog box.
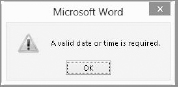
When you set the type to Date, notice that the default and format settings titles change to Default date and Default format. For the date style shown in Figure 24.6, set Date format to m/d/yyyy. If the user types 7-31-16, Word automatically converts it to July 31, 2016. You can also type an entry such as 1/1/2016 in the Default date text box to help prompt the user to enter the date in the default format. Click OK to finish setting up the field. If the user types something other than a date and presses Tab or Enter, Word prompts for a valid entry, as shown in Figure 24.8.
When the text form field type is set to Date, Word will not accept any other type of entry in the form field.
If you want to be able to use the date elsewhere, use the Bookmark text box under Field settings in the Text Form Field Options dialog box to assign a bookmark to it. You might want to change the bookmark to something more memorable that offers a better reference point, such as OrderDate. You can then use { REF OrderDate } to insert that date elsewhere in the file. Ensure that Fill-in enabled is checked if you want the user to be able to type a date.
If a field requires special instructions, click Add Help Text. In the Form Field Help Text dialog box, shown in Figure 24.9, you can specify two kinds of help: Status Bar and Help Key (F1). When the form field is selected (by clicking on it or tabbing to it), the status bar Help message (up to 138 characters) is displayed on the status bar at the bottom of Word's window. If you press F1 while the form field is selected, your Help Key text (up to 255 characters) is displayed in a message box. If you have an existing AutoText entry you want to reuse as either your Status Bar or your Help Key text, select it from the AutoText entry drop-down list.
Word enables you to provide two flavors of Help for form fillers.

Click OK to close the Form Field Help Text dialog box, and then click OK again to finish setting up the field and close the Text Form Field Options dialog box.
Inserting a regular text form field
When you insert a text form field, Word defaults to using the Regular text type. Position the insertion point where you want the field to appear. Then in the Developer tab's Controls group, choose Legacy Tools ![]() Text Form Field. Double-click the form field (gray rectangle) to open the Text Form Field Options dialog box (refer to Figure 24.7). Type should already be set to the default Type. Under Default text, you can reinforce an instruction such as NAME by including some default text, such as Please type your name here. If the name field ultimately will be used by a process that has a length limit, use the Maximum length control to set a limit. Note that because this is a simple example, there is only one field for name. Ordinarily, however, you might invest a few more minutes and include separate fields for first name, last name, middle initial, title, and suffix. For title and suffix, you might use drop-down fields (which you'll see shortly) instead of text fields, both to facilitate entry and to restrict the entry to the range of options you want to accommodate.
Text Form Field. Double-click the form field (gray rectangle) to open the Text Form Field Options dialog box (refer to Figure 24.7). Type should already be set to the default Type. Under Default text, you can reinforce an instruction such as NAME by including some default text, such as Please type your name here. If the name field ultimately will be used by a process that has a length limit, use the Maximum length control to set a limit. Note that because this is a simple example, there is only one field for name. Ordinarily, however, you might invest a few more minutes and include separate fields for first name, last name, middle initial, title, and suffix. For title and suffix, you might use drop-down fields (which you'll see shortly) instead of text fields, both to facilitate entry and to restrict the entry to the range of options you want to accommodate.
TIP
Anytime you create a form field that has reuse potential, save it as a Building Block Gallery item. You might consider creating a new Category (for example, Form Fields) expressly for this purpose and to make them easier to find when you are designing forms.
If the ultimate data handler can benefit from specific text formats (for example, uppercase, lowercase, first capital, or title case), choose a specific Text format. Otherwise, as long as it doesn't exceed the maximum length you set, the text form field will accept anything you type. Ensure that Fill-in enabled is checked, add Help text, if needed, and then click OK to accept the changes.
Inserting a drop-down list
To insert a drop-down list, in Legacy Tools in the Controls group of the Developer tab, click the Drop-Down Form Field tool (refer to Figure 24.2). With form field shading turned on, this inserts a gray rectangle, as for the other field types so far.
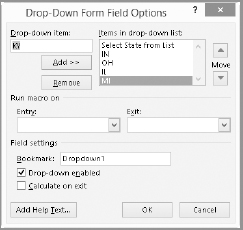
Double-click the Drop-down form field to display the Drop-Down Form Field Options dialog box. As shown in Figure 24.10, type each item you want to add into the Drop-down item text box, and then click Add. The item then appears in the Items in drop-down list. Continue adding items until you're done, or until you reach 25, which is the limit. As shown in the Figure 24.10, the first item you add can serve as a prompt to tell the user what to do.
You have to build the list of items for a drop-down list field as shown here.
TIP
When adding a long series of items, you don't have to reach for your mouse. Instead, notice in Figure 24.10 that the Add button has an underlined A. It means that you can “press” the Add button by pressing Alt+A. You can more quickly enter your list of items by typing the item, pressing Alt+A, typing the next item, pressing Alt+A, and so on, until you're done.
Inserting numeric and calculation fields
Some form fields are designed to work together. In the example form shown in Figure 24.6, the Price form-field uses the contents of the Quantity field to perform a calculation. The user doesn't type a value into the Price field; the form calculates that field automatically.
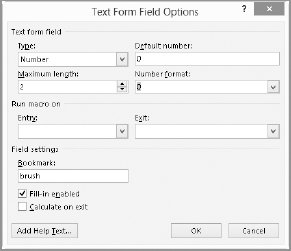
To insert a number field like the Brush Set Quantity field shown in Figure 24.6, position the insertion point and click Legacy Tools in the Controls group of the Developer tab, and then click Text Form Field as before. Double-click the gray form-field box to open the Text Form Field Options dialog box. Set the Type field to Number, and enter 0 in the Default number text box. Maximum length determines how many characters the user can enter in the field, so choose a length that's reasonable (for example, if your inventory is 50, it wouldn't make sense to allow more than two digits as shown in Figure 24.11). Open the Number format drop-down list and click 0. In the Bookmark text box under Field settings, drag over the Text# bookmark name and type a descriptive name that you'll remember for use in calculations. Let's call this one brush, but this makes sense only for the example shown here. Ensure that Fill-in enabled is checked. Figure 24.11 shows the finished settings for this field. Click OK to apply them and finish setting it up.
Example settings for a Number type text form field
CAUTION
Whereas the date type of text form field alerts you when a non-date is entered, the numeric type isn't quite so clever. If you type text into a numeric type form field, instead of alerting you that your entry isn't valid, Word simply removes the non-numeric part of whatever you type, except for the letters h and t. Somewhere along the way, this aspect of the text form field's type checking broke and was never fixed, so don't count on type checking to prevent incorrect data.
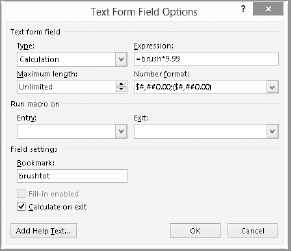
Now, insert a calculated field like the first Price field in the example in Figure 24.6. As before, position the insertion point and use the legacy Text Form Field from the Controls group of the Developer tab to insert the field. Double-click the form field to open the Text Form Field Options dialog box. Set Type to Calculation. In Expression, you want to calculate the price to display based on the number of items in the first row (Brush Set) shown under Quantity. If the quantity field is bookmarked as brush, and the price of a brush set is $9.99, then you would enter the expression as =brush*9.99 in the Expression text box, as shown in Figure 24.12.
For a calculated field, leaving Maximum length set to the default Unlimited setting makes sense because the control needs to be able to display as many characters as needed for the calculated result and formatting. Make a choice from the Number Format drop-down list. Change the bookmark name to something you can remember because the result of this calculation is going to be used in another one later. In this example the bookmark name is brushtot. Notice that Fill-in enabled is grayed out. That's because this is a calculation field, and you want it to be automatic. Check the Calculate on exit check box; otherwise the field will not perform the calculation. If needed, you can add some help text. Whether you should do that depends on the complexity of the information being presented. Click OK to finish setting up the form field.
When Type is set to Calculation, enter the calculation Expression.
Once the prices for other items have been determined, a third calculation field would also be needed to compute the total. This one would be the simple sum of the other two prices (in this example, =brushtot+painttot).
After setting up all your form fields, remember to enable form protection as described earlier. Then, the form user can press Tab to move between and fill in fields. The user may have to press Tab a few extra times after filling in the form data to ensure that all calculated fields recalculate as needed.
Run Macro On
Up until now, we've ignored the Run Macro On drop-down lists in the Form Field Options dialog boxes. If the current document or template contains macros, you can select them using the Entry and Exit drop-down lists. You can use macros to perform setup/housekeeping tasks when a given form field is selected, as well as when the insertion point leaves that field.
For example, suppose somewhere else in the form is a form field for selecting a country. When entering a drop-down field, if the country selected is Canada, it doesn't make sense to have a list of US states. Rather than have a longer list that combines both US states and Canadian provinces, an entry macro could redefine the options for this field.
Suppose also that your business has offices in a number of states and therefore must charge sales tax in those states. Similarly, for international sales, shipping would be different. You might use an exit macro to take care of those details once a state, province, or other destination has been selected.
And as noted earlier, you may need to use macros to set Word Options for saving and printing the form. For an introduction to writing macros, see Chapter 32, “Macros: Recording, Editing, and Using Them.”
Using Content Controls
Content controls, unlike Word's legacy tools, are of limited utility for data collection by most Word users. That's because in order to use them, you need the services of a programmer who understands how to extract data from the resulting Word XML file.
If you have InfoPath, another scenario is to design data collection forms using Word, and then import those into InfoPath. They can then be published to a SharePoint, InfoPath, or other server, where they can be downloaded, filled out, and returned.
Word's content controls are useful, however, in developing document templates. This section looks at several of the controls and how they might be used to put together a document template.
Design mode
For full access to content controls, you need to be in Design mode. In the Controls group of the Developer tab, click Design Mode to enable it.
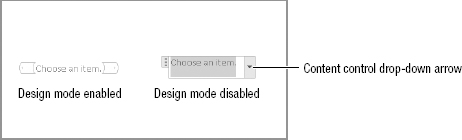
Design mode provides full access to content controls. For example, if a content control is protected against deletion, you can delete it only in Design mode. Placeholder text can also be changed only in Design mode. Additionally, when Design mode is turned on, the content control itself gains horizontal scroll controls (beginning and end of text), as shown in Figure 24.13. To change the placeholder text, select the existing text and edit it or type over it.
Design mode is needed to edit placeholder text.
Once you're finished designing your form and are ready to save it, turn Design mode off. This enables forms to function properly. Note that you will not be able to protect a document for fill-in forms unless Design mode has been turned off (assuming you want to; if the document you are designing isn't a fill-in form for data collection, you don't need to protect it in this way).
Content control tools
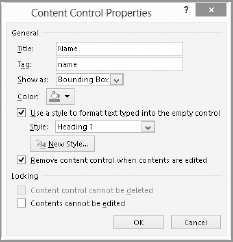
Word 2013 has nine content control tools, described earlier in this chapter. Each of these has an associated Properties dialog box that enables you to control most aspects of the content control. The Properties dialog box for the Rich Text control is shown in Figure 24.14.
Content Control Properties for different controls have a number of common settings.
Though each Properties dialog box has some differences, they also share a number of common features and settings:
- Content control cannot be deleted: Enable this setting when you are planning to use the resulting document for data collection and programmatic data extraction. Extracting the data depends on the data fields being identified.
- Contents cannot be edited: Use this setting to lock in a particular value. If you are assembling a contract or other document using boilerplate contained in content controls, there are some aspects that you do not want an end user changing.
- Remove content control when contents are edited: Use this option if the content controls are part of a document template and are only there to provide general guidance as to document structure. Once the document is done, there is no harm in removing the content controls. (This option is not present for the new Check Box content control.)
Now you will explore each specific content control.
Rich Text content control
Use the Rich Text content control to reserve a place for the user to enter formatted text. The term rich text is sometimes confusing. Here, the term stands not in contrast to HTML (which it usually does) but simply to indicate that formatting is allowed. You are not limited to character formatting. A Rich Text content control can contain paragraph formatting, styles, headings (as in the example in Figure 24.14), columns, equations, and so on. It can also contain paragraph breaks, page breaks, and even section breaks. If you want to get thoroughly obsessive about it, a single Rich Text content control could contain a whole multipage, multisection document, with pictures, tables, and charts.
To change a Rich Text content control's default settings, right-click anywhere in the content control and then click Properties (or click the content control and click Properties in the Controls group of the Developer tab), which displays the dialog box shown in Figure 24.14. A Title entry isn't essential unless you plan to export the document to InfoPath or otherwise plan programmatic access to the data fields. If you're just putting together a document template and the controls are there more for guidance than for control, a title isn't essential. Title adds a little ID label at the top of the content control container that identifies the control when it's selected.
Tag is used for identifying XML data. Again, if you're using content control to provide guidance in a document template, a tag isn't useful. If you're using content control to collect or present data that will be repurposed or otherwise used in an XML process, then you should supply a useful tag. It's not unusual for tags and titles to be the same.
The Use a style to format text typed into the empty control option is used to limit some of the variation just discussed. When this setting is enabled, you cannot have variations in style, and only the style chosen will be used. Click OK after entering your settings to finish formatting the controls.
Plain Text content control
Use the Plain Text content control to contain text in which you do not want formatting variation. Any formatting applied affects all text in the control. The Properties dialog box for the Plain Text content control is almost identical to that for the Rich Text control, with one additional option: Allow carriage returns (multiple paragraphs)
This option is disabled by default. With this option enabled, you still can't really insert carriage returns per se. Instead, Word now allows you to insert new line (Shift+Enter) breaks, as well as page breaks and column breaks (but not section breaks). Oddly enough, with or without this setting, Word allows Plain Text content control content to be formatted into columns.
NOTE
To open a content control's properties dialog box, right-click anywhere in the content control and then click Properties or click the content control and click Properties in the Controls group of the Developer tab.
Picture content control
Use the Picture content control to provide a place for the user to insert a picture. In setting up a data collection form, this control might be used for inserting a picture of the respondent (or whatever other item is appropriate). The Picture content control is inserted in line with text, and the wrapping cannot be changed. If you try to drag the picture control to a new location, the control will be copied to the new location instead.
TIP
If you need more flexibility, you can get around this limitation by first inserting a text box, and then inserting the picture control inside the text box. The text box's wrapping style is not limited, so the picture can be dragged as needed. Be careful when dragging, however, and make sure you're dragging the text box, rather than the picture control. If you drag the picture control, it will be copied!
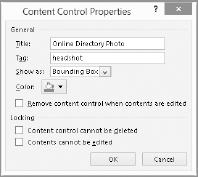
The picture control's Properties dialog box, shown in Figure 24.15, offers fewer options than any of the others. Use the Locking check boxes, if desired, to prevent the picture control from being deleted or to prevent the picture itself from being replaced or edited, and then click OK.
The picture Content Control Properties dialog box offers limited options.
Drop-Down List content control
Use a drop-down list to restrict user responses only to those that are provided in the drop-down list. One of the most common applications for this is a list of state abbreviations, as shown in the earlier example for a legacy drop-down list field. Hence, for users, Virginia could select VA rather than type it. Drop-down lists can make using and processing data faster and easier, as you don't have to allow for a lot of strange variations and possible ambiguity.
Setting up a drop-down list is a little different from the content controls discussed so far. Until now, the controls discussed are pretty much ready-to-use straight off the rack, so to speak. A drop-down list, however, requires additional setup. In the Developer tab, click the Drop-Down List content control, shown in Figure 24.2. Right-click the control and then click Properties, which displays the dialog box shown in Figure 24.16.
Use the Drop-down content control to limit the user's range of options.

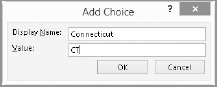
To add drop-down options, click Add. In the Add Choice dialog box, shown in Figure 24.17, in the Display Name field type the name that will be displayed as the drop-down option. Notice that as you type the name, Word adds the name as the value. You're not stuck with that value, however. Press the Tab key to move to the Value field, type the desired value, and click OK. Click again to apply the field options and finish setting up the field.
Adding choices for a drop-down list control
TIP
In the default drop-down settings, notice that the first choice really isn't a choice at all. It is an instruction. In more sophisticated forms, you can't select that item. In Word, you can, which might lead to user errors. If it does, you can delete the descriptive choice, and provide a valid default choice.
Despite the fact that the default placeholder text and the default first item both are Choose an item, setting the default first item to something different does not change the placeholder text. To change the placeholder text to match any instructional text you might have included as the first drop-down item, with Design mode turned on, drag over the content control's placeholder text, type new text, and click on another part of the control.
Combo Box content control
A combo box is a combination of a text box and a drop-down list. The idea is to provide the most common options in the drop-down list but allow for the possibility that one size doesn't fit all. When you do this, of course, you open yourself up to the problem indicated earlier, in which you might end up with a lot of different responses to handle.
TIP
Rather than use a combo box, use a drop-down box with an “Other” option instead. Then provide a separate text control in which the user can clarify what “Other” means.
To create a combo box content control, click the Combo Box tool shown in Figure 24.2. Then right-click it in the document, and click Properties, which displays the Combo Box Content Control Properties dialog box. Follow the same procedure shown for the Drop-down content control to add drop-down options, or choices. Click OK to finish the control set up.
You might also notice that the properties for the Combo Box and the Drop-down control are identical. The only difference is in behavior, in that you can overwrite the choice shown in the Combo Box to provide your own.
Date Picker content control
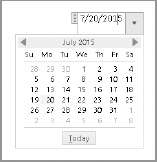
Use the Date Picker to insert a calendar control, like the one shown in Figure 24.18, for choosing the date. Use the arrows shown to go to the next/previous month. Click a date to enter it into the date control. Note that there is no easy way, for example, to jump to the year 2016. You basically have to repeat clicking the Next Month control until the desired year appears.
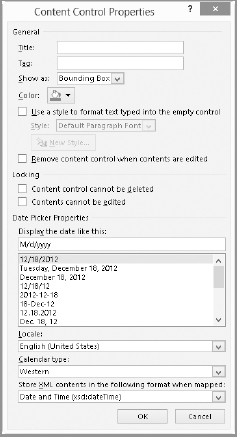
To insert the Date Picker content control in Design mode, click the Date Picker button in the controls group of the Developer tab, and then right-click it and click the Properties button to display the Date Picker's Content Control Properties dialog box, shown in Figure 24.19. Note that the selections that appear under Locale are determined by which languages you have installed. Calendar type will include only Western unless you've installed support for certain Asian calendars. For the final option, check with your IT department to determine whether you need to use a particular format.
The Date Picker inserts a GUI control for entering dates.
You can set the date format, locale, calendar, and format for storing the date in XML.
Building Block Gallery content control
The Building Block Gallery content control enables the form user to access to the Building Block gallery. One way to leverage this feature is to create a specific category designed to work with the form or template you are designing, using items created in a specific gallery. Then, using the Properties dialog box, limit the content control to using that specific gallery and category. You would need to set up the categories and content separately.
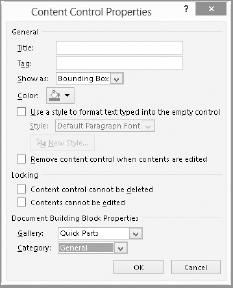
Click the Building Block Gallery tool in the Controls group of the Developer tab to insert the content control in Design mode. Right-click the control and then click Properties to display the Properties dialog box for the Building Block Gallery content control, shown in Figure 24.20. Type a title, if useful; choose any options you need; make the appropriate Gallery and Category selections; and then click OK. Now, the chosen gallery items will be available for drop-down insertion into your document.
Use the Building Block Gallery content control tool to enable form users to insert boilerplate text.
TIP
Note that all the content control properties dialog boxes now include a Color choice. You can click it and then click a color to color-code your content controls or help them stand out from other form content.
Check Box content control
Use the Check Box content control to insert a clickable check box into your document. Unlike the legacy check box, you do not need to protect the document for the check box to function. By default, “checked” displays an X in the box. In the Content Control Properties dialog box, use either Change button to choose different characters for Checked and Unchecked.
Repeating Section content control
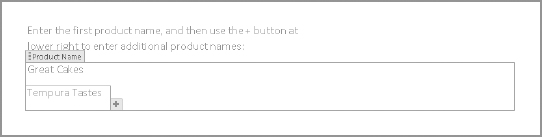
Use the new Repeating Section content control to insert a control that can hold content that you want to repeat, as well as other controls. When you want the user to be able to give multiple responses to a form question or prompt, as shown in the example in Figure 24.21, you would insert a Repeating Section content control. To add another answer, the form user would simply click the plus (+) button at lower right. (Notice how the text above this control explains how to use it.) The Properties for this control for the most part resembles those you've seen for other controls, but you need to make sure that Allow users to add and remove sections is checked under Repeating Section Properties to ensure that the user can add rows with the plus (+) button. While in Design mode, edit the prompt text within the control, and add any other controls or contents within the Repeating Section control. For example, you could insert a table and then insert additional controls within the table.
A Repeating Section content control enables the user to click the plus (+) button and enter more data.
Importing a Word Form into InfoPath
There are a number of deficiencies in Word's ability to create and handle forms. The most glaring deficiency is the nearly complete inability to perform data validation without resorting to macros/VBA. If you have InfoPath 2013, however, you can easily avoid many of those problems by designing your basic form in Word 2013 (assuming you're most comfortable using Word), importing the form into InfoPath, and adding data validation and other missing features using InfoPath's capabilities.
InfoPath 2013 can import forms created in Word, provided that any of the following file formats are used: .doc, .dot, .xml, .rtf, .docx, .dotx, .docm, or .dotm. Design your form in Word, and save it to one of those formats.
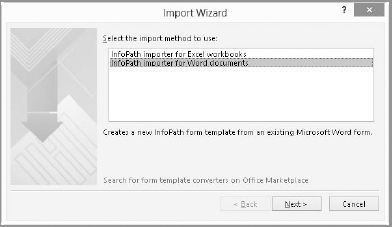
Start InfoPath Designer 2013. From the New screen in Backstage view (choose File ![]() New to return there if needed), choose Convert Existing Form under Advanced Form Templates. Then click the Design Form button at the right. This starts the Import Wizard. Click InfoPath importer for Word documents as the import method as shown in Figure 24.22 and click Next.
New to return there if needed), choose Convert Existing Form under Advanced Form Templates. Then click the Design Form button at the right. This starts the Import Wizard. Click InfoPath importer for Word documents as the import method as shown in Figure 24.22 and click Next.
Use InfoPath's Import Wizard to import a form created by Word or Excel.
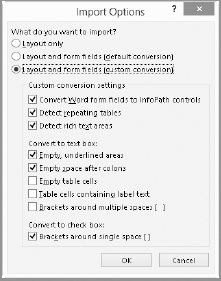
In the next window, click Browse to navigate to and select the Word document you want to import, and click Open. Back in the Import Wizard dialog box, click Options to open the Import Options dialog box, shown in Figure 24.23.
Choose what/how you want to import:
- Layout only: Choose this option if you want to insert the form fields from within InfoPath and abandon any that were inserted using Word. This option requires familiarity with InfoPath, or a willingness to learn. If you're familiar with InfoPath and plan to convert a normal Word document into a form, your best bet is to skip using Word's form tools, import the document, and choose Layout only (there won't be any form fields to import anyway).
- Layout and form fields (default conversion): In most cases, this option results in the least work and reinventing of the wheel.
- Layout and form fields (custom conversion): Choose this option if you need to deviate from the defaults. When you click this option, the checked settings you see at first reflect the defaults.
When you click the Custom Conversion option, the checked options are the ones InfoPath uses by default.
When you've selected any options you need, click OK to continue, and then click Finish back in the wizard. Note that it's not unusual to see a message that says there are potential issues, and to use the Design Checker to review them. More often than not, there are simple formatting issues that InfoPath was able to resolve. You might also see a message saying that tracked changes were discarded. It's not unusual to see this message even when the document didn't contain any tracked changes. It's simply InfoPath's way of asserting its independence.
NOTE
Once your form is done, whether it is in Word format or InfoPath format, you can publish it to a SharePoint server, as you would any other document, to make it available to the users in your organization.
Summary
In this chapter, you've learned that Word has access to three sets of form tools. You've learned how to use Word's legacy form fields to create an order form, and you should be able to translate those techniques into creating a variety of different forms. You've also learned about Word's content controls feature, and how you can use content controls to create a document that basically tells the user what to type. And you've been exposed to Word's ActiveX controls, which are of limited use but can be explored further. You should now be able to do the following:
- Decide what set of form tools to use, based on your level of knowledge and your support resources
- Create a form for collecting information
- Use content controls to create a document template
- Protect and unprotect a document for forms entry