
CHAPTER 15
Adding Drop Caps, Text Boxes, Shapes, Symbols, and Equations
IN THIS CHAPTER
- Decorating a document with a drop cap
- Understanding text boxes and when to use them
- Using a text box preset or drawing your own
- Formatting text boxes
- Adding and formatting shapes
- Adding text to a shape to make it a text box
- Inserting symbols and special characters
- Inserting built-in gallery equations or creating your own
- Editing and numbering equations
This chapter zeroes in on a group features that you can use to add decorative interest or emphasis to text or to incorporate special information in ways not possible through basic typing. The chapter starts by looking at drop caps and text boxes, which you can use to emphasize text. You'll also learn how to insert and format basic shapes. Depending on how you position and format shapes, you can create some interesting effects, including adding text to a shape to make it into your own unique text box.
This chapter also covers symbols, including how to locate the symbol you need and how to insert it into your document. Then it's time to put on your Dexter glasses and look using Word's equation tools to represent often complex concepts in mathematics, statistics, engineering, and other quantitative fields.
Adding a Drop Cap for Drama
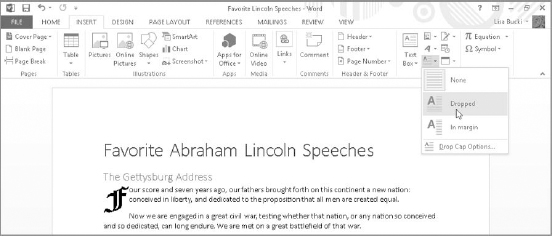
When you want to emphasize the beginning of an article or a chapter, try converting the first character or word of the paragraph into a drop cap. This historical technique was developed to call attention to the first part of the document and grew to involve hand-drawn decorations and coloring along with the letter or word itself. At the most basic level, you can create a drop cap by making the letter or word significantly larger than the rest of the paragraph. But you also can use the Drop Cap feature in Word to size and position the selected letter or word as a drop cap in one action. Here's how to add a drop cap in your document:
- Select the letter or word to make into a drop cap. Note that if you intend to position the drop cap beside the text, you should select only a letter, not a word.
- (Optional) Apply a different font to the selection to further distinguish it from the rest of the text.
- Click the Insert tab, and click Drop Cap in the Text group. Note that if your screen is at a higher resolution, the button may appear larger and its name may be visible.
- Move the mouse over either the Dropped or In margin choice to see a Live Preview, as shown in Figure 15.1.
- Click to choose the drop-cap style to apply.
Add a drop cap at the beginning of an article or chapter.
NOTE
After you insert the drop cap, you can leave it selected and reopen the Drop Cap menu. Click Drop Cap Options. In the Drop Cap dialog box, you can change the Position and Font, and also fine-tune the drop cap by changing the Lines to drop and Distance from text settings. Click OK to apply your changes.
Why Use Text Boxes?
Text boxes are shapes that can contain text. They are containers that themselves can be manipulated as graphics but that can contain text (and some other objects). Text boxes do the following:
- Enable you to place text anywhere on the page, including on top of other text
- Can be bordered or unbordered, filled or unfilled
- Can be chained or linked together so that text flows from one into a second, into a third, and so on
- Can be any shape, although the inside text itself is constrained to a rectangular shape)
- Can be rotated to any angle
When you first insert a text box, it's purely a rectangular container for text. However, you can quickly and easily transform it through a variety of formatting tools, including rotating the text box. There are at least three possible alternatives to text boxes, so it's appropriate to ask why you should use them. Each of the three alternatives offers different capabilities:
- A single-cell table: Pro: It can automatically expand as text is added to it. You can selectively border the sides differently, if needed. It can be divided internally into more cells with hidden internal borders for special effects. It can be made into a floating table so that text can wrap around it. Con: It has limited wrapping talents, its wrapping points can't be changed, it cannot be rotated, and it's limited to a rectangular exterior format.
- A WordArt object: Pro: Almost infinite possibilities for shaping and contouring text. Fully flexible wrapping capabilities. Con: It is limited to a rectangular exterior shape.
- A bordered paragraph: Pro: It is normal text, so it has a full range of regular text properties. It's easy to understand. Con: It has no wrapping capabilities and can appear only in line with other text, since it is regular text. Note that if you insert a bordered paragraph as an object, it will simulate some aspects of a text box. However, manipulation and editing then become correspondingly more tedious. Moreover, it's no longer “normal text” that doesn't require special handling.
Inserting a Text Box
To insert a predefined text box from the Text Box gallery:
- Click to position the insertion point to where you want the text box to appear in the document.
- Click the Text Box button in the Text group of the Insert tab. As shown in Figure 15.2, the gallery of ready-to-use text boxes appears.
You can insert any of more than 30 prebuilt text boxes, or draw your own from scratch.
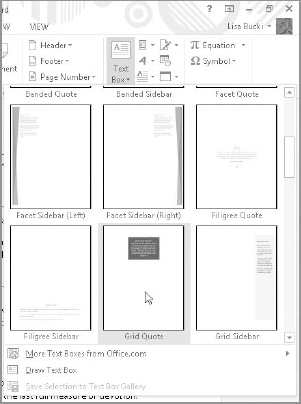
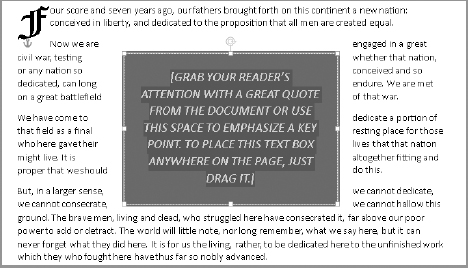
- Scroll through the list and, if you see a text box that looks as if it will work for your purposes, click it. As shown in Figure 15.3, the text box appears approximately at the insertion point.
- Type your text to replace the placeholder text.
The text boxes that come with Word have been preformatted with a variety of attributes that make them suitable for different purposes. You can use them to provide tips in a how-to document or to add a box with a list of topics or scheduled events. A traditional use is to present a quote “pulled” from the text of the document. Often used in magazines, pull quotes highlight an interesting portion of the text.
TIP
To make creating your pull quote faster, copy the text you want to quote first. Then create the text box and paste the quoted text in.
Ready-to-use text boxes are preformatted with borders, wrapping styles, and other formatting attributes that make them easy to use.
NOTE
The text inside the text box in Figure 15.3 appears in square brackets because it is a content control device. Developers use content controls to create forms and templates that guide you in adding your own text where required. See Chapter 24, “Forms,” for more about content controls.
More about prefab text boxes
Word stores all the predesigned text boxes in the Building Blocks gallery. To open it, click the Quick Parts button in the Text group of the Insert tab, and click Building Blocks Organizer. Scroll down until you can see Text Boxes in the Gallery column. As shown in Figure 15.4, you can click a text box Building Block to see a preview at the right. If you create your own text boxes or modify prefab ones that you want to reuse, you can add them to the Text Box gallery, and they will appear both there and in the Building Blocks Organizer. To save a text box as a Building Blocks gallery item, see “Adding a new Building Block or Quick Part” in Chapter 12, “Getting Smart with Text: Building Blocks, Quick Parts, Actions (Tags), and More.”
You can insert text boxes from the Building Blocks Organizer if you prefer to see a terser listing.

Designing your own text box
You can also insert your own text boxes from scratch. Click Text Box in the text group of the Insert tab on the Ribbon and click Draw Textbox. The mouse pointer turns into a large plus sign. Drag on the document until the text box reaches the size you want, as shown in Figure 15.5. Release the mouse button and you now have your text box. If you click the text box, it will display six sizing handles.
When drawing a text box, you can hold down the following keys to modify the resulting box:
- Shift: Forces the box to retain the current aspect ratio.
- Ctrl: Forces the box to expand symmetrically in two directions, expanding from the center (up and down or left and right, depending on which way you drag), rather than just in the direction being dragged.
- Alt: If gridlines are not displayed, this forces the box to increase in discrete increments that are aligned with the invisible grid. If gridlines are displayed, Alt allows smooth dragging that ignores the grid. With a text box selected, click the Drawing Tools
 Format tab, click Align in the Arrange group, and click View Gridlines to toggle gridlines.
Drag to create the text box size you want.

After drawing the new text box, type or paste your text into it. From there, you can format it as needed. One obvious change for a hand-drawn text box is the need to wrap other document text around it. You can change wrapping and other formatting settings for a handdrawn or preset text box as described next.
Formatting a text box
Click a text box to select it and display its formatting tools, which appear in the Drawing Tools ![]() Format contextual tab, shown in Figure 15.6. Many of these tools were already covered in Chapter 14, “Adding Pictures and WordArt to Highlight Information,” and work just as explained there, so in this chapter, I'll just review the key points you need to recall.
Format contextual tab, shown in Figure 15.6. Many of these tools were already covered in Chapter 14, “Adding Pictures and WordArt to Highlight Information,” and work just as explained there, so in this chapter, I'll just review the key points you need to recall.
For all intents and purposes, text boxes can be formatted like other graphics as described in Chapter 14.

To edit or format the text itself—to change font, point size, and other character-formatting attributes—first select the text box and then drag over the text to change. Edit the text or use the tools in the Home tab, the tools in the Mini Toolbar (if text is selected), or keyboard shortcuts, as described in Chapter 5, “Font/Character Formatting.” Formatting works for text boxes as it does for ordinary text: Select what you want to format and then apply the formatting. You can apply paragraph and style formatting as well, perhaps even creating dedicated styles for formatting text box text.
Rotating the text box
You can display text box text (as well as table text) in any degree of rotation, as shown in Figure 15.7. Typical applications for rotated text include mirroring text for tent cards, calling attention to a banner headline, and the simulation of index tabs in the right margin. For example, you might include the current chapter number and title in a text box at the right side and rotate the text box so that the text down the side of the page.
You can rotate a text box to any angle.

To rotate a text box, drag the rotate handle above the top center selection handle until the text box is in the desired attitude. For very precise or 3-D rotation, right-click the text boxborder and choose Format Shape. The Format Text Effects pane appears at the right. Leave Shape Options selected at the top of the pane, click the Effects icon (with the pentagon shape), and then click the triangle beside 3-D Rotation to display its options. Use the X, Y, and Z Rotation tools to twist and turn the text box as desired. Or, use the Presets: to choose a rotation that fits your needs, or choose one that makes a better starting point before you customize the rotation. Click the pane Close (X) button to close it when you've finished changing Rotation and other settings.
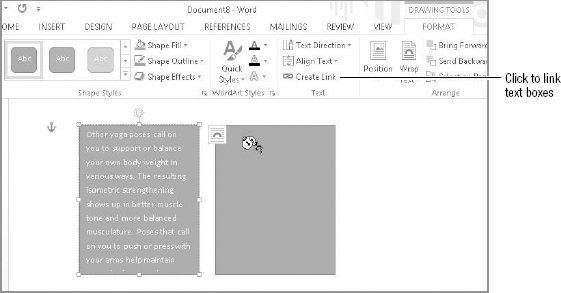
Chaining or linking text boxes
You can use the Create Link button in the Text group of the Drawing Tools ![]() Format tab to chain or link text boxes together. Many users see the name of this tool (Create Link) and immediately think about hyperlinks. That's not what this feature is about. Instead, the chain tool, as it's more appropriately known, makes text flow from one text box into another. For example, you could use this technique when creating a newsletter. The strategy is to use one or more linked text boxes for each story or article. If you paste the copied story into the first text box and it is too small to display all the pasted contents, you can continue the article in another text box by linking the two.
Format tab to chain or link text boxes together. Many users see the name of this tool (Create Link) and immediately think about hyperlinks. That's not what this feature is about. Instead, the chain tool, as it's more appropriately known, makes text flow from one text box into another. For example, you could use this technique when creating a newsletter. The strategy is to use one or more linked text boxes for each story or article. If you paste the copied story into the first text box and it is too small to display all the pasted contents, you can continue the article in another text box by linking the two.
For example, Figure 15.8 shows two text boxes. Some text was copied and pasted into the left text box, but there is too much text to fit there. With that text box selected, click the Create Link button in the Text group of the Format tab. This turns the mouse pointer into a cup that's tilted sideways with letters spilling out of it. Move the pointer over the text box into which you want that text to “spill,” and click to cause text to flow from the first text box to the second.
With one text box selected, click the Create Link button, and then click the text box into which you want the first text box's text to flow.
Applying a shape style
The Shape Styles tools, shown in the Shape Styles group of the Format tab shown in Figure 15.6, are used to apply preset combinations of fill, outline borders, shadow effects, and 3-D effects to text boxes. The same styles are available for formatting any WordArt objects, as described in greater detail in Chapter 14. To apply a style, click the More drop-down arrow at the bottom of the Shape Styles gallery, and then move the mouse over the styles. Use Live Preview to determine the style you want, and then click it.
You can apply shape styles to multiple objects at the same time. To select multiple text boxes, click the first one you want to select and then Shift+click each additional text box. Once they're all selected you can apply shape styles or other formatting as needed. When you're trying to achieve a particular theme by coordinating the shapes of all included text boxes, this can save you some work.
TIP
The F4 (repeat) key works in many cases for formatting graphical objects. If you apply a shape or other formatting to one text box, you can then reapply that formatting to another by clicking it and pressing F4.
Changing the fill outline
The Shape Fill and Shape Outline both work with Live Preview, and enable you to change the interior and outline of a shape respectively. As discussed in Chapter 14, rather than use one of the preformatted shape styles, you can apply your own shape fill and outline. You can also start with one of the preformatted styles, and then modify it as you like.
Applying shape effects
Shadow, Reflection, Glow, 3-D and other special effects can be applied to text boxes as shown in Chapter 14. As noted earlier, you can either completely format text boxes on your own or start with a preformatted shape style and then apply different touches as needed.
Changing text box positioning and wrapping
Use the Position tool group to simultaneously set the page position and wrapping of the selected text box. Click Position in the Arrange group of the Format tab, move the mouse over the various choices to see a Live Preview of where it would position the selected text box, and then click OK.
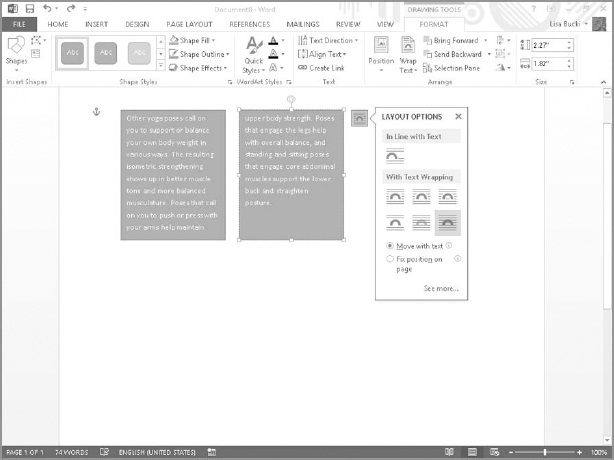
As for pictures and other objects, you generally have to change a text box's default wrapping setting from In Line with Text to something else to be able to move the text box. To change the text wrapping setting for the selected text box (instead of choosing a position), click it and open the Wrap Text drop-down list in the Arrange group of the Format tab, and then choose the desired wrapping setting. Or click the Layout Options button beside the selected box, and then click a choice under In Line with Text or With Text Wrapping, as shown in Figure 15.9. Chapter 14 provides a more detailed explanation of text wrapping.
TIP
Use the Text Direction and Align Text tools in the Text group of the Drawing Tools Format tab to position and rotate the text within the text box. Use the settings in the WordArt Styles group to change the formatting for the text itself, as well as the choices in the Font and Paragraph groups of the Home tab.
Use Layout Options to change text wrapping for the selected text box.
TIP
When you copy or cut and then paste a text box or shape, the Paste Options button appears. You can usually paste the object with its source formatting or paste it as a picture.
Bring Forward and Send Backward
Use the Bring Forward and Send Backward tools in the Arrange group of the Drawing Tools ![]() Format tab to change the text box's location in the graphics layers of the document. You can, for example, overlap text boxes with other text boxes and/or other graphics to create special effects. As a general technique, click the object you want to have reside at the deepest layer, drag it to where you want it, and then choose Send Backward
Format tab to change the text box's location in the graphics layers of the document. You can, for example, overlap text boxes with other text boxes and/or other graphics to create special effects. As a general technique, click the object you want to have reside at the deepest layer, drag it to where you want it, and then choose Send Backward ![]() Send to Back. Select the object that will be directly on top of the deepest one, and click Send Backward until it's where you want it. Depending on how many layers you have, you may need to switch among the Bring Forward and Send Backward options.
Send to Back. Select the object that will be directly on top of the deepest one, and click Send Backward until it's where you want it. Depending on how many layers you have, you may need to switch among the Bring Forward and Send Backward options.
TIP
When you're working with the Bring Forward and Send Backward tools, it's easy to lose your grip on graphical objects. If you have a hard time selecting one, use the Selection pane, described in Chapter 13, “Building Tables, Charts, and Smart Art to Show Data and Process.”
Aligning and grouping text boxes
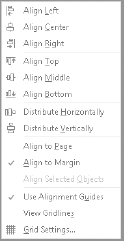
Use the Arrange group's Align tool options, shown in Figure 15.10, to align multiple selected objects relative to each other and relative to the page or margin. Use Shift+click to select multiple objects. This provides more precision than using your eyes and hands. If you have two text boxes of differing heights and want them to be the same distance from the top of the page, without changing their horizontal positions, select both of them and choose Align ![]() Align Top. Align Middle would move both objects vertically so that a single horizontal line would cut both in half while leaving their horizontal positions untouched, and Align Bottom would make the bottom of each text box the same distance from the bottom of the page. Similarly, use the Align Left, Center, and Right tools for horizontal alignment of text boxes and/or other objects that are vertically arrayed with respect to each other. Use Distribute Horizontally/Vertically to spread out three or more selected objects on the page. For a single object, the effects of Distribute will be the same as Align Center and Align Middle, respectively.
Align Top. Align Middle would move both objects vertically so that a single horizontal line would cut both in half while leaving their horizontal positions untouched, and Align Bottom would make the bottom of each text box the same distance from the bottom of the page. Similarly, use the Align Left, Center, and Right tools for horizontal alignment of text boxes and/or other objects that are vertically arrayed with respect to each other. Use Distribute Horizontally/Vertically to spread out three or more selected objects on the page. For a single object, the effects of Distribute will be the same as Align Center and Align Middle, respectively.
Chapter 14 introduced the Align tools.
Use the Group tool to connect two or more text boxes (and/or other objects) so that they act as if they were a single object. This typically is used when you have, for example, pictures that are positioned precisely either inside or relative to a text box and you want their relative locations maintained when the objects are moved or copied elsewhere in the document. To group selected objects, choose Group ![]() Group in the Arrange group of the Format tab. If you need to move or apply distinct formatting to an object relative to those in its set, click the group and choose Group
Group in the Arrange group of the Format tab. If you need to move or apply distinct formatting to an object relative to those in its set, click the group and choose Group ![]() Ungroup. Once you've moved or reformatted the object, choose Group
Ungroup. Once you've moved or reformatted the object, choose Group ![]() Group again to reconnect the group.
Group again to reconnect the group.
The Format Shape pane
When working with text boxes, you can use the Format Shape pane described earlier to make more detailed changes. To display it, right-click a text box's border and choose Format Shape, or click the dialog box launcher in the Drawing Tools ![]() Format tab's Shape Styles group. As shown in Figure 15.11, choose Shape Options or Text Options at the top to determine whether to format the box itself or the text within. Use the icons that appear below the first selection to determine what category to format such as Fill & Line, and then click a name such as Fill or Line to expand the detailed settings in the pane. Chapter 14 covered more about working with this pane. Explore it to learn about the detailed settings applying to text boxes. Click the pane's Close (X) button when you finish using it.
Format tab's Shape Styles group. As shown in Figure 15.11, choose Shape Options or Text Options at the top to determine whether to format the box itself or the text within. Use the icons that appear below the first selection to determine what category to format such as Fill & Line, and then click a name such as Fill or Line to expand the detailed settings in the pane. Chapter 14 covered more about working with this pane. Explore it to learn about the detailed settings applying to text boxes. Click the pane's Close (X) button when you finish using it.
Use the Format Shape pane for more direct and precise control over text boxes.

NOTE
Not everyone displays graphics. The visually impaired in particular depend upon document and web designers to use alternative text so that they or a screen reader can read what a particular illustration or text box is trying to convey. To enter Alt Text in the Format Shape pane, click Shape Options, click the right Layout & Properties icon, expand the Alt Text settings, and enter a Title and Description.
Inserting a Shape
In addition to inserting a rectangular text box into a document, you can insert a predefined shape. To add a shape to the current page of the document:
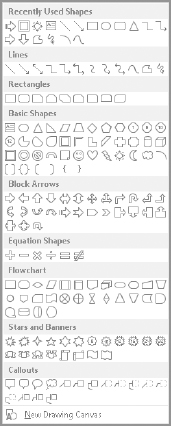
- Click the Insert tab, and in the Illustrations group, click Shapes.
- In the Shapes gallery (see Figure 15.12), click a shape in one of the categories: Recently Used Shapes, Lines, Rectangles, Basic Shapes, Block Arrows, Equation Shapes, Flowchart, Stars and Banners, or Callouts.
- Add the shape to the document using one of two methods:
- Click to insert the shape at its default size.
- Drag on the page to specify the size that you want for the shape.
NOTE
Generally speaking, you can combine Flowchart shapes along with the Lines shapes to create flowchart-like graphics. (Group the shapes after sizing and positioning them.) However, if you often need to create complex, professional flowcharts, a program such as Visio may be more appropriate for your needs.
Sizing and moving a shape
When you want to move a shape, you have to first change its wrapping setting to something other than In Line with Text, using either the Wrap Text choice in the Arrange group of the Drawing Tools ![]() Format tab or the Layout Options button that appears by the selected shape, as previously described. You can then drag the shape into the desired position. You also can use Position in the Arrange group to choose a preset location for the selected shape.
Format tab or the Layout Options button that appears by the selected shape, as previously described. You can then drag the shape into the desired position. You also can use Position in the Arrange group to choose a preset location for the selected shape.
Insert a shape from the Shapes gallery.
Working with smart shape features
In most cases, when you insert a shape and select it by clicking it, one or more yellow handles appear along with the regular selection handles. You can drag these handles to redefine the proportions of individual aspects of the shape within the overall shape boundary. For example, Figure 15.13 shows three copies of the same shape. The left one shows how the shape appeared when originally inserted. It is selected, and the yellow smart handle appears at the left side of the circular center. In the middle copy I dragged the smart handle as far toward the center as possible. In the right copy, I dragged the smart handle as far away from the center as possible.
Use any yellow smart handles that appear to redefine the internal proportions of the shape.
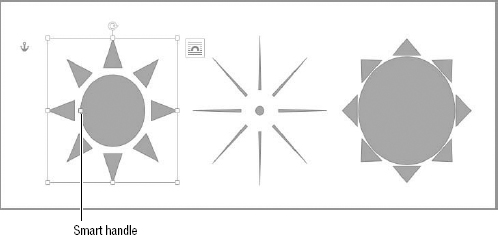
NOTE
Knowing how to use the smart handles is especially important when you are working with the Callouts shapes. Each end of the callout line has a smart handle that you need to use to change the line shape and angle.
Formatting a shape
Formatting a shape works just like formatting a text box or other types of objects as described in Chapter 14. The same Drawing Tools ![]() Format tab appears when you select a shape, and you can apply settings from the Shape Styles group and the Size group, as well as using the Arrange group tools. Most of the tools pertaining to text won't be active until you add text to the shape as described next.
Format tab appears when you select a shape, and you can apply settings from the Shape Styles group and the Size group, as well as using the Arrange group tools. Most of the tools pertaining to text won't be active until you add text to the shape as described next.
Adding text to a shape
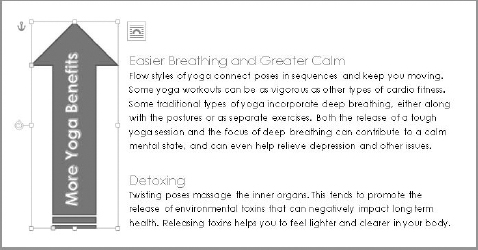
You can convert any Word shape into a text box: Just right-click it and choose Add Text. Type the text that you need, and click outside it to finish. From there, you can select the shape and use the choices in the WordArt Styles and Text groups of the Drawing Tools Format tab to make changes as desired. For example, in Figure 15.14, I added the Striped Right Arrow shape under Block Arrows in Shapes gallery. I clicked in the shape, typed the text, clicked out of it, and reselected it. I applied the Colored Fill - Dark Red, Accent 1 style from the Shape Styles gallery of the Format tab, and then used the Rotate handle to rotate the shape left to a vertical position, pressing Shift to help snap it into an absolute vertical position. (Note that I rotated the shape itself in this case rather than using the Text Direction tool in the Text group of the Drawing Tools Format tab.)
I then opened the Quick Styles gallery in the WordArt Styles group of Drawing Tools ![]() Format, and clicked Fill - White, Outline - Accent 2, Hard Shadow - Accent 2 (fourth style in the third row of the gallery). Finally, I changed the Wrap Text setting to Square, dragged the shape into position, and used tools in the Font and Paragraph group of the Home tab to better position the text within the shape. This is just one illustration of the possibilities for creating your own custom text box based on a shape that you could then save via the Building Blocks Organizer.
Format, and clicked Fill - White, Outline - Accent 2, Hard Shadow - Accent 2 (fourth style in the third row of the gallery). Finally, I changed the Wrap Text setting to Square, dragged the shape into position, and used tools in the Font and Paragraph group of the Home tab to better position the text within the shape. This is just one illustration of the possibilities for creating your own custom text box based on a shape that you could then save via the Building Blocks Organizer.
A shape converted to a custom text box
Adding a Basic Symbol
A symbol is a character for a font that's not one of the commonly used letter, number, or punctuation characters easily typed in via the keyboard. While technically you can use a character code to type in a symbol, most of us don't have time to memorize dozens of character codes. Symbols include things like trademark and copyright symbols, accented letters from non-English foreign languages, Greek letters, mathematical symbols, foreign currency symbols, arrows and fractions, and other more decorative choices like musical notes, playing card suits, starbursts, and more.
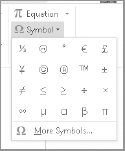
To insert a common symbol, click Symbol in the Symbols group of the Insert tab of the Ribbon. If the symbol you seek is shown in the symbols gallery shown in Figure 15.15, click it to insert it into your document. The first time you access the Symbol gallery, it contains 20 commonly used symbols for quick access, as shown in Figure 15.15. Each time you use the tool to insert a symbol, that symbol moves to the first position in the gallery the next time you use the Symbol gallery. Once you've inserted 20 distinct characters using the Symbol tool, the gallery is fully personalized and effectively becomes the “recently used symbols list.”
The Symbol gallery provides quick access to the 20 most recently used symbols.
Inserting a Symbol from the Symbol Dialog Box
If you don't see the symbol you seek in the Symbol gallery, click More Symbols at the bottom of the gallery (see Figure 15.15). More Symbols displays the Symbols tab of the Symbol dialog box, and you can proceed from there:
- Click to position the insertion point at the location where you want to insert the symbol in the document.
- On the Symbols tab, make sure that the Font selection is set to the desired font. For more decorative symbols, choose Webdings, one of the Wingdings choices, or Symbol.
- Scroll down until you see the desired symbol, and then click it as shown in Figure 15.16. Or click the desired symbol in the Recently used symbols list.
- Click Insert, and then Close.
Table 15.1 describes more of the features in the Symbol dialog box.
Click a symbol for the current font or in the Recently used symbols list.
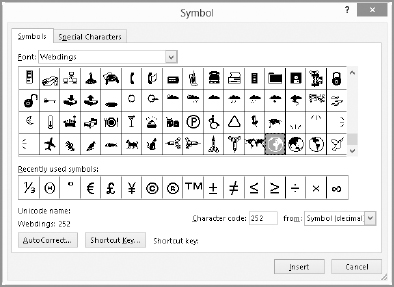
TABLE 15.1 Symbol Dialog Box Features
| Setting | Description |
| Font | Drop-down list of all of the fonts installed on your computer. The (normal text) entry shows characters available in the default character font. |
| Subset | Subset displays only if “from” in the lower-right part of the dialog box is set to Unicode and only if the selected font is a Unicode font. |
| Character set | The character set is the scrollable list that displays all the characters available for the listed font. If from: is set to Unicode, then Subset is displayed, and the focus changes to reflect the selected subset. |
| Recently used symbols | The Recently used symbols list contains just that, with the most recent listed first. If your monitor is wide enough, this list can display the 36 most recently used symbols. |
| Character code | The character code for the selected character using the displayed “from” numbering system. |
| from | Character system (ASCII and Unicode). ASCII is the traditional 256-character DOS system. Unicode was designed to provide consistent and uniform computer support for all writing systems. |
| AutoCorrect | Use AutoCorrect to assign mnemonic shortcuts for specific symbols. See Chapter 11, “Cleaning Up with AutoCorrect and AutoFormat,” for more about AutoCorrect. |
| Shortcut Key | Use Shortcut Key to assign keyboard shortcuts for specific symbols. See Chapter 29, “Keyboard Customization.” |
Note that the Symbol dialog box is non-modal, which means that you can move freely between it and the text of your document. This can be handy if you have several characters to enter in different places.
TIP
The Symbol dialog box's non-modality can be handy, but the process of inserting symbols is still rather ergonomically impoverished. It's sometimes easier to insert the characters needed in one place in your document and copy them individually to the Office Clipboard, thereafter using the Clipboard to insert the characters (up to 24) in other locations as needed.
Finding a character's code
Most Word users don't know that you can use the Symbol dialog box not only to insert characters by visual recognition, but also to learn character codes so that you can insert symbols by typing rather than displaying the dialog box.
Let's say you often want to insert a particular symbol from the Webdings font. You can open the Symbol dialog box, change the Font setting to Webdings, and then click the desired character. Make a note of the number or combination displayed in the Character code text box, and then click Cancel to close the dialog box. Then, when you want to insert the symbol into the document by typing, use the Font choice on the Home tab to select the applicable font. Make sure that NumLock is active, and press and hold the Alt key while typing the code you noted earlier.
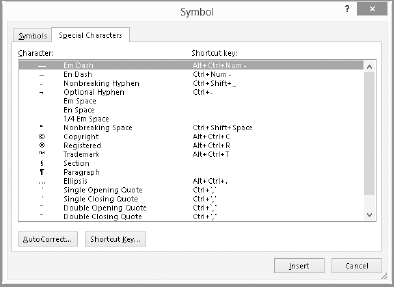
Finding other marks on the Special Characters tab
The other major feature of the Symbol dialog box is the Special Characters tab. Shown in Figure 15.17, this tab displays 20 characters often needed by Word, their uses, and their respective current shortcut key assignments. Why “current”? The assignments shown aren't necessarily Word's built-in defaults—if you change an assignment, then your assignment will be shown. When you need these characters, using this dialog box is a good way to refresh your memory about how to type them. To use one of the characters here, click it, and then click Insert.
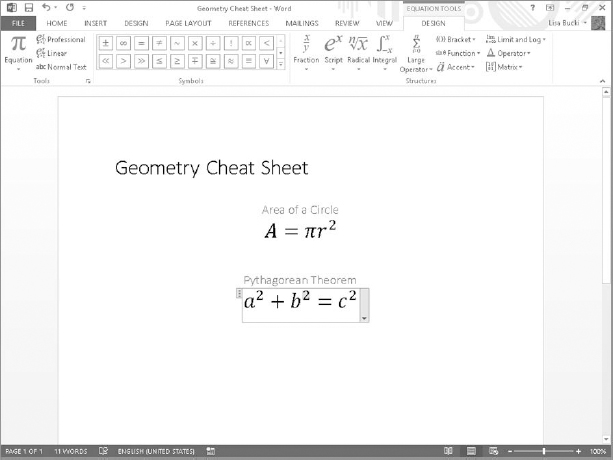
Adding an Equation to Your Document
If you need to insert mathematical equations using many mathematical symbols into a document, use the Equation tool. Click the Insert tab, and then click the Equation drop-down list arrow in the Symbols group. As shown in Figure 15.18, the Equation gallery and additional options appear. (Clicking the Equation button itself or clicking Insert New Equation creates a blank equation; see the “Creating an equation from scratch” section later in this chapter.
The Special Characters tab shows 20 frequently needed characters, along with their current shortcut assignments, if any.
The Equation gallery features a number of commonly used equations.
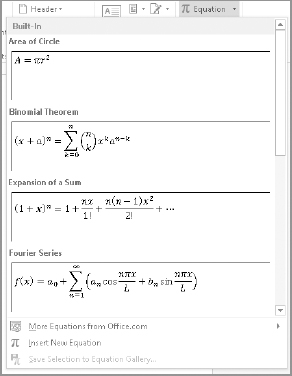
Inserting an equation from the gallery
Use the vertical scroll bar in the gallery to display additional equations. If you see what you want, click it to insert it at the current insertion point in the document. If you insert it into an otherwise empty paragraph, the equation defaults to appearing in its own paragraph, centered; if the equation is on the same line as text, it appears in Inline with Text mode. In Inline mode, you can surround the equation with other text. In Display mode, the equations appear by themselves, away from the document's normal text, as in Figure 15.19.
NOTE
In Display mode, you can center equations individually or you can center them as a group. In the latter case, the longest equation is centered, and the others are left-aligned with it. Use this type of centering when you need to line up coefficients for easier visual comparison. Centering as a group works only when the equations are separated by the newline (Shift+Insert) character instead of by paragraph markers.
Equations can be shown inline with text or in Display mode; in Display mode, they can be centered individually as shown here.
Creating an equation from scratch
To write your own equation, click the main Equation tool on the Insert tab, or simply press Alt+=. Word opens the Equation Tools ![]() Design tab, shown at the top of Figure 15.19. Use the tools in the Symbols and Structures groups to enter mathematical information within the blank math content control that appears, sometimes also called a math region. (Chapter 24, “Creating Custom Forms” provides more information about other types of content controls.) Type in anything that doesn't require special symbols or structures. When you finish, click outside the equation control.
Design tab, shown at the top of Figure 15.19. Use the tools in the Symbols and Structures groups to enter mathematical information within the blank math content control that appears, sometimes also called a math region. (Chapter 24, “Creating Custom Forms” provides more information about other types of content controls.) Type in anything that doesn't require special symbols or structures. When you finish, click outside the equation control.
TIP
When you're writing and editing equations, it's sometimes hard to detect nuances at the default zoom. Try zooming up to 150% or even 200% to make the details easier to see.
If you want to insert another related equation, press Shift+Enter and continue typing. This ensures your ability to use the Centered as a Group formatting.
Saving equations to the gallery
When you modify the built-in equations or create your own, you can save them to the Equation gallery for future use. If you include an automatic numbering solution such as the one described in the last section of this chapter, you can include the equation plus any formatting. That way, when you add the equation to your document, you won't have to go through any extra numbering steps.
To add an equation to the gallery, select it. Make sure you include any extra elements that play a role in positioning it, such as tabs, paragraph markers, or any other formatting. Click the Insert tab, click the drop-down arrow next to Equation in the Symbols group, and choose Save Selection to Equation Gallery. The selected equation will be appended to the end of the gallery and will be available the next time you're feeling especially mathematical.
TIP
To get started finding more equations online, click the Insert tab, click the drop-down arrow next to Equation in the Symbols group, and choose More Equations from Office.com.
Working with equations
While working with equations is largely intuitive and a matter of getting a feel for the process, some things proceed a bit more easily with a few hints and tips.
Take a quick tour of the equation tools, especially the structures. Although many are logical and possibly obvious based on the diagrams and names (assuming you're already familiar with the underlying mathematical concepts and terms), they will seem even more so once you've perused the possibilities. If you need anything highly specialized, verify that it's actually possible with Word's tools. It would be a shame to spend 10 minutes working on an equation only to discover that a lesser-known structure isn't there. It is best to discover that up front.
Linear versus Professional
Word provides two ways to present equations: Professional and Linear, shown in Figure 15.20. Word defaults to Professional (of course), but if you ever need Linear, it's yours with the click of a mouse. Select the equation(s) you want to change, and click the appropriate tool near the left end of the Equation Tools ![]() Design tab.
Design tab.
Word offers a choice between Professional (top) and Linear (bottom) equation presentation.
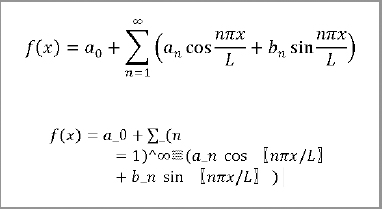
Linear mode also enables you to directly modify the structures. Suppose you need a four-by-four matrix, instead of the maximum three-by-three provided. Go ahead and insert a three-by-three, and then switch to Linear view. Replace (&&@&&@&&) with (&&&@&&&@&&&@&&&). Now switch back to Professional mode, and presto! A little experimentation will show you the myriad possibilities.
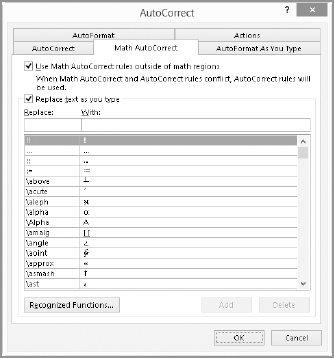
Math AutoCorrect
Some things can be done in more than one way. For example, if you need ln x, there's no need to reach for the mouse. Type limit and press the spacebar. The equation or symbol you want appears.
This happens courtesy of Math AutoCorrect. Choose File ![]() Options
Options ![]() Proofing
Proofing ![]() AutoCorrect Options, and click the Math AutoCorrect tab. As shown in Figure 15.21, the Replace/With list provides a long list of ways to insert various symbols and structures. (You also can click Recognized Functions to find other functions in the Recognized Math Functions list.) Scroll down the Replace text as you type list to find the shortcuts that Math AutoCorrect will automatically expand to full expressions or mathematical symbols.
AutoCorrect Options, and click the Math AutoCorrect tab. As shown in Figure 15.21, the Replace/With list provides a long list of ways to insert various symbols and structures. (You also can click Recognized Functions to find other functions in the Recognized Math Functions list.) Scroll down the Replace text as you type list to find the shortcuts that Math AutoCorrect will automatically expand to full expressions or mathematical symbols.
Math AutoCorrect simplifies and speeds work when building equations.
In Chapter 11, you learned how to save your own text AutoCorrect entries. A few math structures already have their own AutoCorrect entries. Some others don't. If you're a statistician, you probably have frequent need for a large sigma with room for the upper, lower, and following elements, or other structures specific to your routine analyses.
To save a custom Math AutoCorrect entry, choose Insert ![]() Equation to insert a blank math content control to serve as a shell for equation parts you'll need. Use the Equation Tools
Equation to insert a blank math content control to serve as a shell for equation parts you'll need. Use the Equation Tools ![]() Design tab and typing to build the equation inside the control. Then, inside the math content control, select just the structures or equation parts within the control (not the control itself). Open the Math AutoCorrect dialog box as just described (File
Design tab and typing to build the equation inside the control. Then, inside the math content control, select just the structures or equation parts within the control (not the control itself). Open the Math AutoCorrect dialog box as just described (File ![]() Options
Options ![]() Proofing
Proofing ![]() AutoCorrect Options
AutoCorrect Options ![]() Math AutoCorrect tab). The With box displays your selection. Type your Replace text, click Add, and click OK. Now delete the structure you created and try out the AutoCorrect entry. Type your Replace name and press the spacebar. Note that this method inserts the equation without the control.
Math AutoCorrect tab). The With box displays your selection. Type your Replace text, click Add, and click OK. Now delete the structure you created and try out the AutoCorrect entry. Type your Replace name and press the spacebar. Note that this method inserts the equation without the control.
Inserting text before or after an equation
To insert text before or after the equation, press the left or right arrow so that the container disappears, and then type. If you want to retain the equation's initial formatting you have several options. You can apply centered paragraph formatting, which won't necessarily give you identical results if you have a group of equations. Or you can add your normal text inside the equation container itself, as described in the following section.
Inserting normal text inside an equation content control
To add normal text inside the math content control, click in the control where you want the text to begin. In the Tools group near the left end of the Equation Tools ![]() Design tab, click Normal Text and start typing. The equation now maintains its formatting. Any text you add will be included if you now save the modified equation as a new gallery item. See the “Saving equations to the gallery” section earlier in the chapter.
Design tab, click Normal Text and start typing. The equation now maintains its formatting. Any text you add will be included if you now save the modified equation as a new gallery item. See the “Saving equations to the gallery” section earlier in the chapter.
Working with structures
Word gives you prompts to help you build equation structures. You can start an empty equation, type characters as needed, and then click Tools in the Structures group to display galleries of structures such as the Large Operator gallery shown in Figure 15.22. Click the structure to insert, and then click one of the placeholder boxes and type the contents for it. For example, the equation at the left in Figure 15.22 shows one sum operator with the three placeholders filled in, and another sum operator at right with its blank placeholder boxes.
Look through the structures shown to find the one you're looking for. Note that some might appear quite similar but are actually different, so you'll need to look carefully. For example, can you quickly spot the difference between the summation sign that's selected and the one to its immediate right? The selected one has boxes at the top and bottom to indicate the iteration counter and limit. The one to the right has boxes above and below, but shifted to the right, for superscript and subscript.
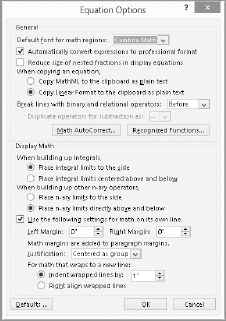
Choosing equation options
A number of equation options are not set in concrete. To access the Equation Options dialog box, shown in Figure 15.23, click the dialog box launcher in the Tools group of the Equation Tools ![]() Design tab. Make the desired choices, and then click OK.
Design tab. Make the desired choices, and then click OK.
Make a choice from one of the Structures galleries, such as Large Operator, and then fill in the placeholders in the equation.

Use Equation Options to control the way equations are created and inserted.
TIP
When you're editing equations, Word provides additional contextual tools that some users overlook. At any location in the equation, right-click to see a shortcut menu with options.
Numbering equations
Many people who work with equations need them numbered. Several approaches can be used in Word, none of them fully satisfactory. Word 2013 does not have a built-in way to number equations. Note that the References ![]() Captions
Captions ![]() Insert Caption feature does not enable you to add captions for Word 2013 equations.
Insert Caption feature does not enable you to add captions for Word 2013 equations.
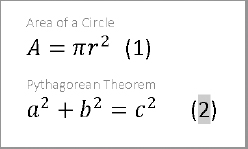
Although there are several ways to number equations, let's just look at one, which is probably the best way because it's flexible and hard to break. It uses the sequence field code. We'll be looking at fields in detail in Chapter 23, “Automating Document Content with Fields.” For now, however, let's look at one field in particular: the SEQ field.
The SEQ field is used for creating sequence numbers. The field code {SEQ name} creates a sequence number in your document. You can substitute anything for name, but consider using eq or equation. Note that this is just a convenient name, and doesn't in any way associate it with equations except in your mind. If you wanted to be willful, for example, you could use {SEQ EQUATION} to number the tables in your document.
In any event, if you include the field code {SEQ EQUATION} inside (or adjacent to) the equation container, it will number your equations. What if you have multiple sets or groups of equations that need to be independently numbered? Well, there's {SEQ EQUATION1} for the first set, {SEQ EQUATION2} for the second, {SEQ SUCCOTASH} for the third, and, well, you get the point.
Consider the example in Figure 15.24. In the blank line after an equation in display mode, I typed Equation and pressed the spacebar. On the Insert tab, I then clicked Quick Parts in the Text group, and clicked Field. I selected Seq from the Field names list, typed eq after SEQ in the Field codes dialog box, and then clicked OK. That resulted in the numbered field shown above the dialog box in Figure 15.24.
A semiautomatic way to number equations
A common way to number equations in a formal presentation is to center the equations themselves and to right-align parenthetical numbers at the right margin. Armed with this knowledge, let's create a style to use for formatting equations, and an AutoText entry to add the necessary numbering component. To create the style:
- Display the horizontal ruler (if it's not already showing) by clicking Ruler in the Show group of the View tab, and observe the right margin setting (and mentally divide it by two for use in Step 3). In the Home tab, click the Paragraph group dialog box launcher, and then click Tabs to open the Tabs dialog box.
Use the SEQ field to create numbered equation captions.

- Click Clear All to remove any unneeded tab stops.
- In Tab stop position, type the location of the midway point (often 3.25), click Center, and then click Set.
- In Tab stop position, type the location of the right margin (often 6.5), click Right, and then click Set. Click OK to close the dialog box.
- Assign a style name. Press Ctrl+Shift+S to open the Apply Styles pane. Type a name for the equation style (Equation Num isn't already taken), and press Enter to apply it to the current paragraph. Close the Apply Styles dialog box.
With the insertion point still in that empty paragraph (now formatted as Equation Num), create the AutoText entry:
- Press Ctrl+Tab to insert a tab, and then type ().
- Put the insertion point inside the parentheses, and press Ctrl+F9 to insert field braces.
- Inside the field braces, type seq equation and press F9 to update the field. If necessary, press Ctrl+Shift+8 to toggle the display of tabs and paragraph marks so that you can see them.
- Select the entire line, including the tab, the (1), and the paragraph mark at the end of the line. Choose Insert Text Quick Parts Save Selection to Quick Part Gallery.
- Replace the suggested name with something you can remember, such as eqnum. Set Gallery to AutoText. Set a category and type a description if desired. Leave Options set to Insert Content Only, and then click OK.
You can delete that line now that it's stored as an AutoText item. Now you're ready to number your equations. To do so:
- Click the equation, and then click the arrow at the right end of the equation; if necessary, click Change to Inline.
- Left align the equations and labels, click to the right of each equation container, and press Tab.
- At the end of the line (outside the equation container) type eqnum (or whatever name you used in Step 5 earlier), and press F3.
You now should have a numbered equation. If you did everything according to the steps, you should have something that produces numbering like that shown in Figure 15.25. Note that the selected number is shaded because it is a field code. If you insert or remove equations, you might need to select the whole group and press F9 to update the numbering.
Use a formatted AutoText entry that contains a sequence numbering field to semiautomatically number equations.
Summary
In this chapter you've explored creating text boxes and shapes. You learned how to use Word 2013's gallery of text boxes, as well as how to create your own text boxes and shapes. You've seen how to apply existing formats, as well as how to format from scratch. You also learned about symbols and equation editing. You've learned how to insert any of the built-in equations, as well as how to save your own equations to the gallery. You should now be able to do the following:
- Rotate a text box and its text to any angle
- Change the text direction as needed for positioning on different parts of the page
- Use text boxes to design newsletter or other content with text continuing from one text box to another
- Insert and format shapes
- Convert any shape into a text box
- Insert symbols
- Create and edit equations
- Set up a semiautomatic equation numbering solution