
CHAPTER 11
Cleaning Up with AutoCorrect and AutoFormat
- Reviewing built-in and do-it-yourself AutoCorrect
- Creating formatted AutoCorrect entries
- Exploring AutoCorrect limits
- Trying Math AutoCorrect
- Understanding the difference between AutoFormat and AutoFormat As You Type
- Finding the AutoFormat command
- Running AutoFormat
- Using AutoFormat As You Type
- Changing AutoFormat As You Type settings
- Working with hyphenation
Word's automated correction and formatting features can save you a lot of document cleanup work you'd otherwise have to do, including eliminating typos and formatting certain characters such as quotation marks and fractions. AutoCorrect actually refers to a collection of correction features. Word can correct typos just as quickly as you can type them. If you type recieve and press the spacebar or add a period or other punctuation, practically before you can blink, Word changes it into receive. Similarly, the AutoFormat feature automatically converts some things that you type into their formatted counterparts, converting lone lines into headings, asterisks into bullets, numbers into formatted numbering, straight quotes into curly “smart quotes,” and so on.
This chapter's mission is to show you how to take advantage of the options for AutoCorrect and AutoFormat that you do like, turn off the options you don't care for, and even create your own custom corrections. And as a bonus, you'll learn a little more about working with automatic and manual hyphenation.
Revisiting AutoCorrect
As you first saw in Chapter 3, “Working Smarter, Not Harder, in Word,” Word comes with a host of built-in AutoCorrect pairs—common misspellings and their corrected counterparts. By default, Word uses them to correct your mistakes. For example, if you type abscence, Word corrects it to absence. This is different from spell checking—which highlights a suspected misspelling but does not automatically correct it. This section of the chapter helps you delve more deeply into how you can exploit AutoCorrect's ability to clean up your typos.
NOTE
AutoCorrect and spell checking sometimes converge, in that you frequently have an opportunity to automatically add a flagged misspelling and suggested correction as an AutoCorrect pair. This is discussed later in this chapter.
Capping corrections
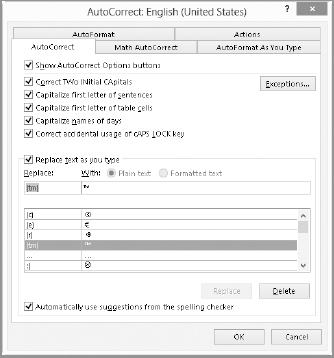
Most of us manage to not quite press the Shift key and thus fail to capitalize letters as needed on a regular basis. As shown near the top of Figure 11.1, AutoCorrect fixes several capitalization errors. To display this dialog box, choose File ![]() Options
Options ![]() Proofing
Proofing ![]() AutoCorrect Options. AutoCorrect makes fixes when you:
AutoCorrect Options. AutoCorrect makes fixes when you:
- Accidentally type two capital letters at the beginning of a sentence
- Fail to capitalize the first letter of a sentence, table cell, or day name
- Accidentally type with the Caps Lock key on
Controlling the AutoCorrect Options button
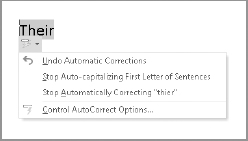
The meaning of the Show AutoCorrect Options buttons check box at the top of Figure 11.1 might not be perfectly obvious. After an AutoCorrect occurs, if you hover the mouse pointer over the correction, an AutoCorrect button appears at the left edge of the corrected word. It's a thin blue rectangle. Microsoft's aim was to make it unobtrusive. For some users it's so unobtrusive that they hardly ever even notice it. If you drag the mouse pointer down slightly from the rectangle, a button with a lightning bolt appears, and you may also see a tooltip that says AutoCorrect Options. If you click the AutoCorrect Options button, you see options similar to those shown in Figure 11.2.
When Show AutoCorrect Options buttons is enabled on the AutoCorrect tab of the AutoCorrect dialog box, Word remembers the locations in the current paragraph where AutoCorrect actions occurred. You can display and click the AutoCorrect Options button for any of them to undo a correction, to suppress a rule, or to open the AutoCorrect dialog box to change options (using the Control AutoCorrect Options command in the bottom of the shortcut menu shown in Figure 11.2). If AutoCorrect made multiple corrections at the same time (as shown in Figure 11.2), the top option, Undo Automatic Corrections, enables you to undo all of the corrections in one step.
AutoCorrect corrects several types of errors, as well as correcting listed typos and inserting symbols.
The AutoCorrect Options button gives you the opportunity to undo or stop listed corrections.
TIP
You also can immediately press Ctrl+Z to undo the most recent automatic correction. However, if you kept typing after the correction occurred you will have to press Ctrl+Z several times, as you will have to undo the subsequent typing before you can undo the AutoCorrect changes. You'll have to decide how much retyping you're willing to do.
Replacing text as you type
The Replace text as you type check box on the AutoCorrect options tab controls the most powerful and flexible part of AutoCorrect. When enabled, this feature uses hundreds of built-in AutoCorrect pairs, automatically replacing misspelled words with their correct counterparts. Common default AutoCorrect Replace/With pairs include accross/across, realyl/really, questioms/questions, and teh/the. It also can replace short typed entries with corresponding symbols, such as replacing (c) with ©, or (tm) with ™. Scroll through the top of the list under Replace text as you type to see exactly which symbols AutoCorrect can insert by default.
Word's built-in list of AutoCorrect pairs is by no means exhaustive, though, so many misspelling are not automatically corrected—particularly when there are competing possibilities about what the intended word might be. For example, if I type intented, Word will flag it as a misspelling. But because I could have meant indented, intended, or invented—to name a few—Word does not automatically correct it.
Many Word power-users capitalize on this feature to create shorthands for longer words and phrases that are tedious to type and retype. If you're a lawyer, you might have encountered such memorable phrases as “party of the first part” and “party of the second part.” You could create AutoCorrect entries that automatically replace p1, p2, and p3 with “party of the first part,” “party of the second part,” and “party of the third part,” respectively. Then when you need to insert one of those phrases, simply type the appropriate shorthand and press the Spacebar.
To add a Replace/With pair to AutoCorrect:
- Choose File
 Options Proofing AutoCorrect Options. The AutoCorrect dialog box opens with the AutoCorrect tab selected.
 - In the Replace text box, type the incorrect version or shorthand you want to replace.
TIP
Some users like to include an asterisk or other symbol at the beginning of the Replace entry as a best practice. This helps avoid unwanted AutoCorrect changes.
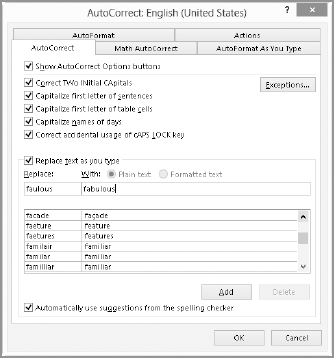
- In the With box, type the replacement text AutoCorrect should insert. The With text can be up to 255 characters, including spaces. Figure 11.3 shows example Replace/With entries.
- Click Add.
- Repeat Steps 2–4 to create additional list entries as desired.
- Click OK twice.
Make Replace and With entries to create a new automatic correction.
TIP
To create a Replace/With pair for a longer phrase, sentence, or word that you've already typed in the document, select the applicable text and then open the AutoCorrect dialog box. The selected text appears automatically in the With text box.
Note that you also can delete Replace/With pairs in the AutoCorrect tab. Just select the entry to delete in the list of pairs and click Delete. You will not see a warning when making a deletion, so tread carefully. You will learn how to back up your AutoCorrect entries shortly.
TIP
If you find yourself adding numerous entries to AutoCorrect's Replace text as you type list, you can give yourself a faster way to open the AutoCorrect dialog box by assigning a shortcut key such as Ctrl+Alt+Shift+C to the AutoCorrect Options command. Chapter 29, “Keyboard Customization,” covers assigning shortcut keys to commands. Or, you could add AutoCorrect Options to either the QAT or Ribbon using the methods detailed in Chapter 30, “Customizing the Quick Access Toolbar and Ribbon.”
Creating formatted corrections
When you enter new Replace/With pairs on the AutoCorrect tab of the AutoCorrect dialog box, by default the Plain text option button is selected to the right, above the With text box. With that option, the With replacement text takes on the formatting of the surrounding text after an automatic correction.
Sometimes, however, you might want formatted text. You might even want something other than pure text, such as a table or a picture. Or perhaps you do want plain text, but have a With item that exceeds 255 characters. For these, you need to use the Formatted text option button instead. For example, let's say you're a math teacher, and when preparing handouts and quizzes for students, you like to include a table of common length conversions for students to use with word problems. You could create an AutoCorrect Replace/With entry so that you can insert that table whenever needed, rather than retyping it in multiple documents.
To create a formatted Replace/With AutoCorrect pair (only the With item is formatted):
- Create, format, and select the text, table, picture, or other item you want to use as the With item.
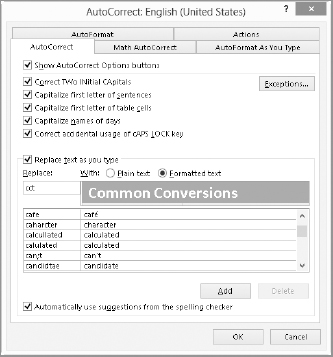
- Open the AutoCorrect dialog box (File Options Proofing AutoCorrect Options), and click the AutoCorrect tab if needed. As shown in Figure 11.4, Word attempts to preview the With item, in this example the first row of a table. If the selected item is a picture or other graphic, the preview will be empty.
Word tries to preview the selected formatted item.
- In the Replace box, type a name for the item. It can be up to 31 characters. Keep in mind that this name will automatically expand into the With item when you type it into a document, so don't make it so complicated that you can't remember it, but don't use existing words or common abbreviations or acronyms that you ordinarily use either. If you want to use a common word or abbreviation, add a number to it.
- Click Add.
- Click OK twice.
AutoCorrect limits
Word 2013 does not have any arbitrary limits on how many AutoCorrect entries you can create. Nor are there arbitrary limits on how large a formatted With entry can be. You are limited only by the amount of available memory and disk space. If Word runs out of either, it will tell you. However, few users run into limits, even when they include entire large documents as AutoCorrect entries.
On the other end of the spectrum, for plain-text entries, as noted earlier, the size of the With item cannot exceed 255 characters. That is the usual limit on text box entries in Windows applications.
For both formatted and plain-text entries, the Replace entry cannot exceed 31 characters. As a practical matter, it's hard to imagine why you'd ever want it to get anywhere near that large. Most AutoCorrect aficionados tend to prefer terse letter-and-number combinations that give some idea about the nature of the item as an aid to memory. Keep in mind that unlike with Building Blocks there is no dialog box or gallery mechanism for inserting AutoCorrect items, so keep your Replace entries short enough to type easily.
Backing up AutoCorrect entries
Your Office 2013 AutoCorrect entries are stored in an .acl (AutoCorrect list) file. You do not have distinct lists for each Office 2013 application, nor for each Word template. Instead, there is a separate list for each language you use with Office. Word doesn't have a mechanism for automatically backing up your .acl files, so you need to make a copy of the file in Windows and place the copy in the location where you store various types of backup files.
Your .acl files are stored in C:Usersuser nameAppDataRoamingMicrosoftOffice. The English (U.S.) AutoCorrect entries are stored in MSO1033.acl, so back up that file. For another language, replace the number in the file name with the appropriate Windows locale code to identify which file holds the entries for that language. Other common locale codes are 1034 for Spanish (Traditional Sort) and 1036 for French (France). Additional locale codes can be found on several Microsoft operated services, including MSDN:
http://msdn.microsoft.com/en-us/goglobal/bb964664.aspx
Sharing AutoCorrect entries
Unfortunately, Word does not provide a built-in way to selectively copy AutoCorrect entries from one computer to another. You can, of course, copy your entire .acl list, but the entries in the replaced list will be lost.
A better alternative, if you have access to the macros that came with Word 2003, is to use the AutoCorrect Backup macro. It still works with Word 2013, and the procedure is described here:
http://support.microsoft.com/kb/826147
Using Math AutoCorrect
Math AutoCorrect works the same way that regular AutoCorrect does, but can be enabled or disabled independently. This feature provides more intuitive access to math symbols than other ways in Word and interfaces directly with Word's equation tools.
To view Math AutoCorrect options and Replace/With entries, choose File ![]() Options
Options ![]() Proofing
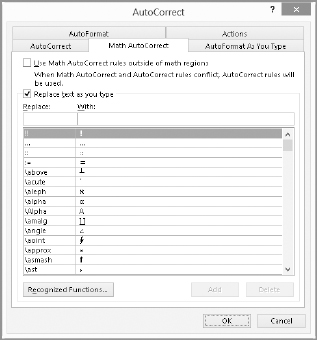
Proofing ![]() AutoCorrect Options, and choose the Math AutoCorrect tab. Shown in Figure 11.5, Math AutoCorrect provides AutoCorrect access to over 200 commonly used math symbols (well, commonly used by some folks). Just go to this tab and scroll down the list to find the symbol you are looking for in the With list. Then you can type the corresponding Replace entry any time you want to insert the applicable symbol.
AutoCorrect Options, and choose the Math AutoCorrect tab. Shown in Figure 11.5, Math AutoCorrect provides AutoCorrect access to over 200 commonly used math symbols (well, commonly used by some folks). Just go to this tab and scroll down the list to find the symbol you are looking for in the With list. Then you can type the corresponding Replace entry any time you want to insert the applicable symbol.
In the Math AutoCorrect dialog box, enable both Use Math AutoCorrect rules outside of math regions and Replace text as you type, and click OK. A math region is another name for the content control that appears when you choose Insert ![]() Symbols
Symbols ![]() Equation
Equation ![]() Insert New Equation. An area “outside of math regions” therefore means in the body of your document, so enabling the top check box is important.
Insert New Equation. An area “outside of math regions” therefore means in the body of your document, so enabling the top check box is important.
After enabling the Math AutoCorrect options just mentioned, you can then click in the body of your document, type one of the Replace entries, and press the Spacebar. For example, type heta to insert the theta symbol.
Alternately, choose Insert ![]() Symbols
Symbols ![]() Symbol
Symbol ![]() More Symbols. In the Symbols tab, set Font to Symbol. Theta is in the fourth row, second column from the left. Double-click it, or select it and click Insert.
More Symbols. In the Symbols tab, set Font to Symbol. Theta is in the fourth row, second column from the left. Double-click it, or select it and click Insert.
For most, typing heta is a lot faster. There are over 200 Replace/With pairs in the Math AutoCorrect list, and learning them all might be a bit of a chore. However, if you already speak math, then many of them will occur to you quite readily. If the built-in names aren't intuitive to you, you can change them to something that is more intuitive.
Math AutoCorrect can work in math regions or in regular text.
Recognized functions
In Word's equation tools, variables such as x, y, z, a, b, and c are italicized. However, functions, such as sin, cos, sec, tan, and other expressions that don't represent variables are not italicized. When you're using Math AutoCorrect inside a math region (that is, when you're editing an equation), Word maintains a list of expressions and functions that are not italicized, shown in Figure 11.6. You open the Recognized Math Functions dialog box by clicking the Recognized Functions button on the Math AutoCorrect tab of the AutoCorrect dialog box, shown in Figure 11.5.
You can add or delete expressions you don't want italicized when you're editing in a math content control.

For example, suppose for some reason you suddenly want arg to be italicized in the math expressions you create. To remove arg from the do not italicize list, open the Recognized Math Functions dialog box. Scroll down to and select arg, and then click Delete.
You can also add items to the Recognized Math Functions list. Type the expression you want to add in the text box above the list and click Add. Once done, click OK, and then click OK twice more to close the AutoCorrect and Word Options dialog boxes.
Backing up the Math AutoCorrect list
As for text AutoCorrect entries, Math AutoCorrect entries are also stored in an .acl file in the C:Usersuser nameAppDataRoamingMicrosoftOffice folder. The Math AutoCorrect list file is named MSO0127.acl. If you modify the built-in list, you should make a backup copy of that file in another location periodically.
AutoFormat versus AutoFormat As You Type
Word's AutoFormat feature makes automatic formatting changes such as applying heading styles, creating bulleted and numbered lists, and formatting special characters such as replacing straight quotation marks with curly ones (smart quotes) or converting typed in fractions to fraction symbols. AutoFormat comes in two flavors: AutoFormat and AutoFormat As You Type. The first, the AutoFormat command, works on demand. When you run AutoFormat in the current document, AutoFormat examines the text and automatically formats elements in it.
The other version, AutoFormat As You Type, works like AutoCorrect. It automatically converts certain things that you type or applies various kinds of formatting. It shares some of the same converting elements as the AutoFormat command, but offers additional options.
To set the record straight here and now, AutoFormat As You Type settings affect what happens as you type. AutoFormat settings affect what happens when the AutoFormat command is applied to existing text.
Working with AutoFormat
When might you use AutoFormat? You could format a plain-text document that has never previously been formatted and uses various text conventions to simulate formatting. You might also use AutoFormat to “clean up” a Word document that has never been formatted properly. You might in addition consider using the AutoFormat command to try to reformat a document converted from another word processor, particularly one that doesn't use styles, or, in any case, a document that manifests no indication of styles having been used.
You can use AutoFormat on the current document in its entirety, or you can apply AutoFormat to selected text. Word searches through the selected text or through the document for formatting patterns and changes. By default, Word applies automatic formatting only to text styled as Normal, leaving alone styles applied by you. Therefore, for a true test of AutoFormat, the starting document should have just a single style, Normal, with all changes made via direct formatting.
If AutoFormat encounters a standout line with bold text that's larger than the surrounding text, Word formats it as Heading 1. If AutoFormat finds smaller text but with characteristics similar in other respects, it applies Heading 2. If AutoFormat trips over a bunch of one-line text entries all together, Word will assume that's a list. If that list has numbers or bullets… well, you get the point.
Preparing to run AutoFormat
Before you run AutoFormat, you should check AutoFormat options to ensure it will make the corrections you want. Changing AutoFormat options works much like working with AutoCorrect settings, as follows:
- Open the document that you want to AutoFormat.
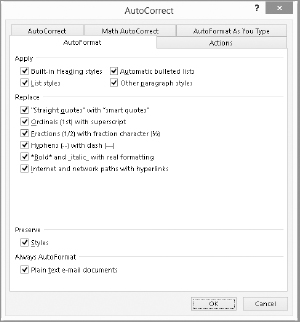
- Open the AutoCorrect dialog box (File Options Proofing AutoCorrect Options), and click the AutoFormat tab. As shown in Figure 11.7, the tab lists all the corrections that running the feature will make.
- Check or clear options as needed under Apply and Replace.
- (Optional) Clear the Styles check box under Preserve or the Plain text e-mail documents under Always AutoFormat if you want to turn off those functions.
- Click OK twice.
Check AutoFormat options before running AutoFormat in a document.
Unfortunately, AutoFormat is not included in the Ribbon or QAT by default, so if you want to run it, you'll need to add a shortcut key combo for it (refer to Chapter 29) or add it to the Ribbon or QAT. Here's a quick look at how to add it to the QAT:
- Right-click the QAT (Quick Access Toolbar) and click Customize Quick Access Toolbar.
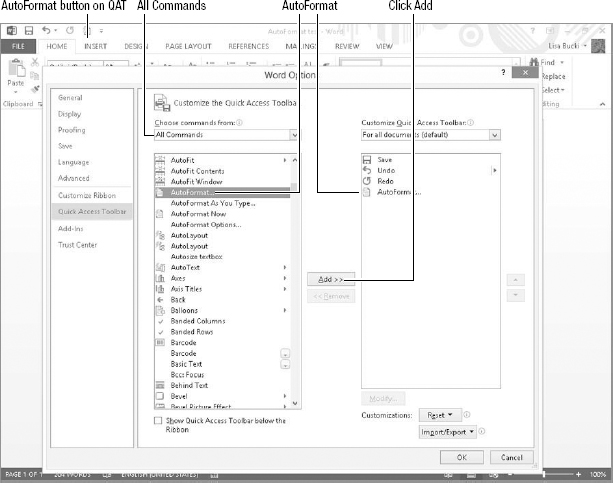
- Open the Choose commands from drop-down list, and click All Commands.
- In the left list, scroll down to and click AutoFormat.
- Click Add. The AutoFormat command appears in the right list, as shown in Figure 11.8.
- Click OK.
The AutoFormat command is not present in the Ribbon, but you can add it to the QAT or Ribbon.
There are four AutoFormat commands from which to choose. To make this chapter easier to navigate, you might consider temporarily (at least) putting three of these onto the QAT . You can always remove them later (right-click the tool and choose Remove from Quick Access Toolbar). To save time, we'll assume for the purposes of this chapter that you've followed this advice.
The three I am suggesting you add to the QAT are:
- AutoFormat: This command launches the AutoFormat process, opening the AutoFormat dialog box shown in the next section so you can better control that process.
- AutoFormat Now: This command runs AutoFormat immediately using the current defaults.
- AutoFormat As You Type: This command displays the AutoFormat As You Type dialog box. You'll learn more about this a little later in this chapter.
Running AutoFormat
Now that you're set up to run AutoFormat, open a document that's in need of formatting, or paste text from the Internet or some other source. If you want to format only part of the document, select only what you want AutoFormatted. Then click the AutoFormat command on the QAT (or use any Ribbon button or shortcut key you've created). The dialog box shown in Figure 11.9 appears. Open the drop-down list under Please select a document type to help improve the formatting process, and click General document, Letter, or Email as applicable.
The AutoFormat command enables you to AutoFormat in one fell swoop (AutoFormat Now) or to review each proposed change.
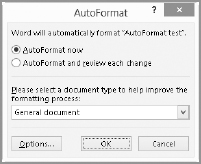
If you're satisfied with the options settings you previously made (Figure 11.7), leave AutoFormat now selected and click OK. Word AutoFormats the entire document. If you want more control over how the formatting proceeds, click the AutoFormat and review each change option button, and then click OK. Word performs the AutoFormat in one fell swoop, and then presents you with the dialog box shown in Figure 11.10. Click Accept All to accept all the changes, or Reject All to reject the changes. The example in Figure 11.10 shows some repeated text. The selected text is a copy of the text above that has been AutoFormatted. You can see that AutoFormat has applied heading styles, converted a fraction at the end of the first full paragraph, and applied real bullet list formatting to the final two lines.
The selected text in this example is an AutoFormatted copy of the text above it.

AutoCorrect turns on Track Changes behind the scenes when it formats. If you click Review Changes, the Review AutoFormat Changes dialog box adjusts to enable you to accept or reject changes, as shown in Figure 11.11.
You can review and accept or reject individual changes.

Proceed through the review as you like using the Find previous (with the left arrow) and Find next (with the right arrow) buttons. The dialog box updates with a description of the current change. Choose Hide Marks (which switches to Show Marks) to toggle the revision marks off and on. If you see a change you don't want, click Reject. When you finish here, clicking Cancel will remove any changes you rejected, while everything else will be left intact. This takes you back to the dialog box shown in Figure 11.10.
Back in the AutoFormat dialog box, click Cancel when you've finished working with changes.
AutoFormat As You Type
Word 2013 offers several AutoFormat As You Type options that it can perform to make your word processing life easier.
All but three of the AutoFormat As You Type settings are enabled by default, as shown in Figure 11.12. Open the AutoCorrect dialog box (File ![]() Options
Options ![]() Proofing
Proofing ![]() AutoCorrect Options), and click the AutoFormat As You Type tab.
AutoCorrect Options), and click the AutoFormat As You Type tab.
All but three of Word's AutoFormat As You Type settings are enabled by default.
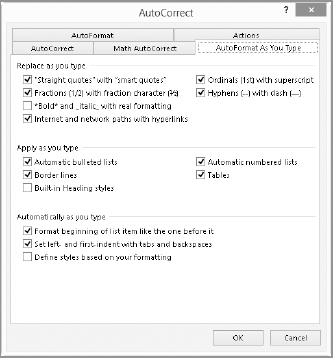
Some additional options appear if support for certain Eastern languages is installed, so don't be alarmed or feel deprived if your dialog box doesn't exactly match what you see here. If you're using those languages, let's go out on a limb and assume that you know what those options mean. The common ones present for a normal US installation are shown in Figure 11.12 and in Table 11.1.
TABLE 11.1 AutoFormat As You Type Options
| Replace As You Type | |
| “Straight quotes” with “smart quotes” | Replaces “ and ’ with the appropriate directional quotes |
| Ordinals (1st) with superscript | Replaces 1st with 1st, 2nd with 2nd, etc. |
| Fractions (1/2) with fraction character () | Replaces 1/2 with ½, 1/4 with ¼, and 3/4 with ¾ |
| Hyphens (--) with dash (—) | Replaces two hyphens with an em dash (—) whether it's truly appropriate or not |
| *Bold* and _italic_ with real formatting | Text enclosed in asterisks or underscores is automatically emboldened or italicized. |
| Internet and network paths with hyperlinks | Common Internet URLs and e-mail addresses (e.g., www.wiley.com, or [email protected]) are replaced with the corresponding links. URLs have http:// added, and e-mail addresses have mailto: added. |
| Apply As You Type | |
| Automatic bulleted lists | When you begin a line with an asterisk (*) followed by a space or tab, bullets formatting is applied. Oddly enough, if you use an actual bullet character, you must use a tab to force the AutoFormat. |
| Automatic numbered lists | When you begin a line with 1.<space>, 1.<tab> or 1<tab>, Word replaces the numbers and other punctuation with numbering formatting. |
| Border lines | Typing a series of dashes or underscores causes Word to replace them with border formatting. |
| Tables | If you type a pattern of +-+, +_+, or +=+, Word assumes that you're trying to create a table. You get one column for each hyphen, underscore, or equals sign enclosed by plus signs. So +-+ yields one column, +-+-+ yields two, and so on. If you've ever seen old computer printouts from the 1970s, this makes perfect sense to you. |
| Built-in Heading styles | Word automatically applies heading styles (Heading 1, Heading 2, etc.) to text you type, based on the formatting. Apparently I don't think like Word, because I've never been able to get this to work at all. |
| Automatically As You Type | |
| Format beginning of list item like the one before it | When you're typing a list (formatted with one of Word's built-in list styles), Word observes how you format the beginning of the list, and then applies the same formatting to the beginning of each item that follows. For example, if each list item begins with a bold word and a period (or some other punctuation), Word will embolden the front end of each list item that follows. It doesn't work without punctuation, though. |
| Set left- and first-indent with tabs and backspaces | Pressing tab at the beginning of a line causes Word to indent that line. Each press indents further. Pressing Backspace removes indents. See the section “Adding indentation” in Chapter 6, “Paragraph Formatting,” for a complete discussion of how this works. |
| Define styles based on your formatting | This IntelliSense feature is supposed to notice what you're doing and apply styles accordingly. Except for numbered and bulleted lists, I've never gotten this feature to work. |
Auto tips and techniques
Sometimes AutoFormat As You Type fills a void. Sometimes, to paraphrase an old left-handed compliment, it fills a much-needed void. There are a few tips and tricks that having AutoFormat As You Type turned on makes possible (or necessary), or that remind you that other gaps are much in need of filling.
Tricks with quotes
What would you do if your editor suddenly told you that all your directional quotes needed to be removed? Or that all the straight quotes needed to be curved?
Either way, there's an easy solution. In the AutoFormat As You Type options, change the “straight quotes” with “smart quotes” option to reflect what you actually want in the document. If you want straight quotes, disable the option. If you want curly quotes, enable it.
Press Ctrl+H to open the Replace dialog box (or click Replace in the Editing group of the Home tab of the Ribbon). Make sure that no formatting is applied to the Find What and Replace With boxes, and click More to ensure that Use Wildcards and other options are all unchecked.
In both the Find What and Replace With boxes, type a single plain straight double quote (“). Note that when you type it the quote won't look curly, regardless of your settings. Click Replace All. That's it!
Use the same technique to fix the single-quote (’) character throughout the document. Put a single straight quote into both the Find What and Replace With boxes and again click Replace All.
What about the other fractions?
You might have noticed that the only fractions that are automatically replaced are 1/2, 1/4, and 3/4. What about the others, such as 1/3, 2/3, 1/5, and 1/8?
Well, you can have those too, but you'll have to DIY (do it yourself). Plus, to make it easy, it helps if you have the right fonts installed on your computer. There are two methods for changing typed fractions to the appropriate fraction symbols.
Assigning fractions using symbols and AutoCorrect
To use this method, you insert a symbol for the fraction into the document, select it, and make an AutoCorrect entry for it. To begin:
- With a blank document using the Normal template, choose Insert and then click Symbol in the Symbols group.
- On the Symbols tab, make sure that the Font selection is set to (normal text), and at the lower right change the from drop-down list setting to Unicode (hex).
- Scroll down in the table of symbols until you see the fractions, and then click the one you want as shown in Figure 11.13.
Insert a fraction symbol and then create an AutoCorrect entry for it.

- Click Insert, and then Close.
- Select the inserted symbol in the document.
- Open the AutoCorrect dialog box (File Options Proofing AutoCorrect Options), and click the AutoCorrect tab if needed. The selected symbol should appear in the With text box.
- In the Replace box, type the fraction as you normally would.
- Click Add.
- Click OK twice.
TIP
The MS Reference Specialty font and some other fonts contain many fraction symbols, as do some other fonts. If you don't see the fraction you need, change the Font list selection on the Symbols tab in Figure 11.13. Although this font's fractions use a horizontal divisor line versus the diagonal ones used by other font fraction symbols, they still may be a closer match than regular typed fractions.
You might be worried that if you ever change the font of an entire document, without regard to styles and the presence of the fraction symbols, the fractions will be wiped out. But Word usually notes that such characters are symbols, and they are protected in the application of different fonts. You will, naturally, want to test for robustness any AutoCorrect replacements you create. One way to do that is to insert the character, select it, and then click the Clear Formatting button in the Font group of the Home tab on the Ribbon. If it survives, it likely will work in Word documents you create. Note that characters created this way naturally scale up and down when you change font sizes, which is another advantage of this method.
Assigning fractions using equations and AutoCorrect
Assigning fractions using equations and AutoCorrect is a bit more complicated than assigning fractions using symbols and AutoCorrect, and it involves using either an EQ field or the equation tools to create the fractions you need. Then, assign an AutoCorrect entry to convert what you type into the necessary field or equation.
Using the EQ field is just about as tedious an exercise as anything you'll ever experience. The field exists only for reasons of backward compatibility.
NOTE
In Step 1, your insertion point should be at a normal place in the text, i.e., where you might normally type 1/3. If the insertion point is on a line all by itself, the resulting “equation” will be centered alone on a line, which presumably isn't satisfactory.
Follow these steps to assign fractions using equations:
- Click Insert and click Equation in the Symbols group. Word inserts a math content control, as shown in Figure 11.14, inviting you to type the equation.
Use a math content control to build your own fractions.
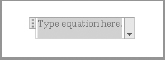
- Type 1/3 (for example) into the space provided.
- Press the Spacebar to finish the conversion.
- Select the inserted symbol in the document.
- Open the AutoCorrect dialog box (File Options Proofing AutoCorrect Options), and click the AutoCorrect tab if needed. The selected symbol should appear in the With text box.
- In the Replace box, type the fraction as you normally would.
- Click Add.
- Click OK twice.
That's all there is to it.
Handling Hyphenation
Hyphenation enables Word to fill each line of text more completely. Rather than moving an entire word to the next line via word wrap, Word can insert a hyphen between syllables and wrap only part of the word to the next line. In particular, enabling hyphenation with justified text can help Word fill each line more effectively. Or, turning on hyphenation can help more text fit on a single page with left-aligned text.
On the other hand, some editors and publishers frown on hyphenation, so you should always check to see if hyphenation is acceptable to your readers or clients before using this feature. Word can hyphenate text automatically or manually, and you can insert your own manual hyphens, as well.
Turning on automatic hyphenation
You can turn on automatic hyphenation for the entire document, or selected text. Optionally, you also can change the width of the hyphenation zone—the area between the word and the right margin (in left aligned text) that can be blank. When a word is long enough to place it within the hyphenation zone, automatic hyphenation inserts a hyphen in the word. The default hyphenation zone width is .25″. Changing the hyphenation zone width involves a tradeoff. The wider the zone, the more ragged the text and fewer the hyphens. A narrower zone results in neater text, but more hyphens, which may affect readability or result in multiple contiguous hyphenated lines, an effect frowned upon in design circles. To change hyphenation settings:
- Click the Page Layout tab, and then click Hyphenation in the Page Setup group.
- Click Hyphenation Options. The Hyphenation dialog box shown in Figure 11.15 appears.
Adjust settings before applying hyphenation.
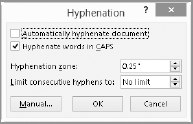
- Change the Hyphenate words in CAPS, Hyphenation zone, and Limit consecutive hyphens to settings as desired. Checking Automatically hyphenate document would apply the hyphenation when you closed the dialog box. That would save you the trouble of enabling the hyphenation separately, but it hyphenates the whole document, so you should not choose it if you want to hyphenate a selection.
- Click OK.
After you've changed settings as desired, you can apply the automatic hyphenation:
- Select the text to hyphenate; or, to hyphenate the whole document, make sure that no text is selected.
- Click the Page Layout tab, and then click Hyphenation in the Page Setup group.
- Click Automatic. Word applies the hyphenation immediately.
CAUTION
The hyphenation also will be applied to headings, which is usually not desireable. To remove unwanted hyphenation in a heading, select it, and then choose Page Layout ![]() Page Setup
Page Setup ![]() Hyphenation
Hyphenation ![]() None.
None.
Using manual hyphenation
When you want to hyphenate a selection or document but want to approve each hyphen before Word inserts it, use the manual hyphenation process. This method takes a little more time, but helps ensure your document won't include any unwanted hyphens. To use manual hyphenation:
- Adjust hyphenation settings as described earlier, if desired.
- Select the text to hyphenate; or, to hyphenate the whole document, make sure that no text is selected.
- Click the Page Layout tab, and then click Hyphenation in the Page Setup group.
- Click Manual. If the selection or document has a word that could be hyphenated, the Manual Hyphenation dialog box appears with a suggested hyphenation, as shown in Figure 11.16.
Choose where to place hyphens when using manual hyphenation.
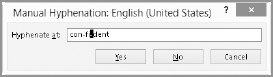
- Click on the hyphenation location to us in the Hyphenate at text box, and then click Yes; or click No to reject the hyphenation and move on to the next potential hyphen location.
- Review all potential hyphenations, and then in the Hyphenation is complete message box, click OK.
Adding a manual or nonbreaking hyphen
You can insert your own hyphen at a select location with a keyboard shortcut. And you can use another keyboard shortcut to insert a nonbreaking hyphen. This type of hyphen needs to appear within a phrase such as “laissez-faire” or a hyphenated number such as a phone number, but you typically want all parts of the phrase or number to stay together on one line rather than breaking between lines as in normal hyphenation. For example, for a phone number, you wouldn't want “555–” appearing on one line and “0101” appearing at the beginning of the next line. To insert each of these types of hyphens:
- Manual hyphen: Click within the word at the location where you want to insert the hyphen, and press Ctrl+− (the hyphen key) to the right of the 0 (zero) along the top of the keyboard. Note that using this feature is a little counter-intuitive. For the text to rewrap, you have to insert the hyphen in the word at the beginning of the line where you want the hyphen to appear. After you insert the hyphen, it and the text to its left will wrap up to the end of the line above.
- Nonbreaking hyphen: Click where you want the hyphen to appear and press Ctrl+Shift+− (the hyphen key); be sure to delete any unneeded spaces before or after the hyphen. Or, you type the first part of the phrase or number, press Ctrl+Shift+−, and then type the rest of the phrase or number.
NOTE
To remove a manual or nonbreaking hyphen, you have to use the Replace dialog box. Click Replace in the Editing group of the Home tab, or press Ctrl+H. Click the More button, click the Special button and then click either Nonbreaking Hyphen or Optional Hyphen (for manual hyphens). Word places the code representing the specified hyphen type in the Find what text box. You can then use the Find Next and Replace buttons to check and make each replacement, or Replace All.
Summary
In this chapter you've seen how to use and create AutoCorrect Replace/With pairs to work more efficiently. You've also learned the limits of text-only AutoCorrect entries and how to get around those limits. You've learned to exploit AutoFormat and AutoFormat As You Type to clean up document formatting. This chapter has shown you how to do the following:
- Store formatted text and graphics as AutoCorrect entries
- Back up your AutoCorrect entries to safeguard your investment of time, as well as for copying to another computer
- Enable and use Math AutoCorrect
- Suppress automatic italicization of math functions
- Back up Math AutoCorrect entries
- Turn off any AutoFormat As You Type feature you don't need
- Selectively use the AutoFormat command to convert pasted text from a series of one-line paragraphs into word-wrapped text
- Change curly quotes to straight quotes, and vice versa
- Create your own fraction AutoCorrections
- Control text hyphenation