
CHAPTER 32
Macros: Recording, Editing, and Using Them
- Recording macros
- Editing macros
- Testing macros
- Using SelfCert to create your own certificate for digitally signing macros
- The top 10 things you need to know about Visual Basic
Word macros are programs that you use to automate things you do in Word. At their simplest, macros can automate repetitive chores. At their most complex, macros are full-blown VBA (Visual Basic for Applications) programs that add features to Word. You can use macros to create shortcuts to features that aren't directly available and assign them to the Quick Access Toolbar or to keyboard shortcuts. You also can use a macro to perform a series of editing steps.
Why are they called macros? Macro means big. In effect, a macro is a way of boiling a lot of instructions (something big) into a single command (something small).
When Word for Windows first came out, a long time ago in a galaxy far, far away, its macro language was something called WordBASIC. At the time, it was new, exciting, and powerful, and was far easier to use than it is today, unfortunately. With that ease, however, came malice. It wasn't too terribly long before the macro virus was born, and life hasn't been as simple or as pleasant since.
As a result, much of the emphasis and coverage of macros necessarily deals with security and how you ensure that only the macros you trust can frolic across your computer screen. In this chapter, you learn about recording macros, performing simple editing to enhance your macros, and using macros. You also learn about the aspects of macro security not already covered in Chapter 31, “Word Options and Settings.”
Providing a full grounding in macros, Visual Basic, and using the Visual Basic Editor is beyond the scope of this book. If you're a Word developer, you very likely already know everything you'll read in this chapter. This chapter isn't for you. Instead, it's for users who want to know about how to get started recording and writing macros. Once you've gotten started, take a course or invest in a book devoted to Visual Basic.
Displaying Macro Tools and Creating a Macro
The Developer tab of the Ribbon, which is hidden by default, holds the macro tools. To make it available, choose File ![]() Options
Options ![]() Customize Ribbon. (You also can right-click the Ribbon and click Customize the Ribbon.) In the Main Tabs list at the right side of the Word Options dialog box, click the Developer check box to check it, and click OK. Find the Developer tab's key macro commands in the Code group, as shown in Figure 32.1.
Customize Ribbon. (You also can right-click the Ribbon and click Customize the Ribbon.) In the Main Tabs list at the right side of the Word Options dialog box, click the Developer check box to check it, and click OK. Find the Developer tab's key macro commands in the Code group, as shown in Figure 32.1.
The Code group of the Developer tab provides access to tools for recording and editing macros and for controlling macro security.
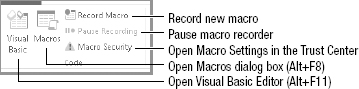
Here's more detail about the macro tools in the Code group of the Developer tab:
- Visual Basic: Opens the Microsoft Visual Basic Editor, providing full access to different macro projects.
- Macros: Opens the Macro dialog box so you can choose a macro to run, edit, create, delete, or step into.
- Record Macro: Use the Record Macro button to begin recording a macro. Most keyboard and Ribbon actions are recorded, but mouse selection and text manipulation are disabled.
- Pause Recording: Pauses the macro recording so you can perform actions you don't want recorded.
- Macro Security: Opens the Macro Settings section of the Trust Center for setting macro security.
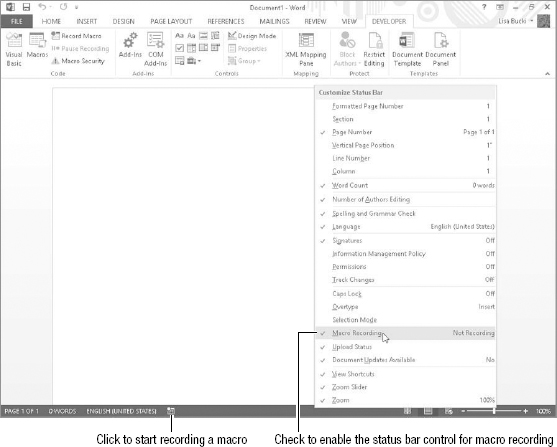
It's also possible to do a fair amount of work with macros without using the Developer tab at all, assuming you're willing to learn the keystrokes for opening the Visual Basic Editor and Macros dialog box, shown in Figure 32.1. To access macro recording without the Developer tab showing, enable the Macro Recording tool on Word's status bar. To do so:
- Right-click the status bar.
- Click Macro Recording to check it, as shown in Figure 32.2. This displays the macro recording (Record Macro) button on the status bar, also shown in Figure 32.2.
Enable macro recording via the status bar.
Recording a macro
To begin recording a macro, select some text or an object that you want to perform the recorded steps on. You can make selections with the keyboard while macro recording, but those selections are recorded as part of the macro, which may not be what you want. Say you want your macro to apply to a selection, no matter what its size—word, sentence, or paragraph. If you start your macro without making a selection and press Ctrl+Shift+Right Arrow to select one word, the macro will always select just one word and apply the rest of the recorded steps to it.
After making a selection, if needed, click the Record Macro button, either in the Code group of the Developer tab or on the status bar. This displays the Record Macro dialog box, shown in Figure 32.3.
Replace the default macro name with one that will help you identify it later.

In the Macro name text box, type a name for the macro. Note that macro names can contain letters, numbers, and the underscore character but cannot contain spaces. By default, Word numbers new macros sequentially, but those names are not descriptive enough to enable you to tell one macro from another. Replace the Macro# entry with a name that indicates something about what the macro will do. In Description, type a succinct description of the macro's intended purpose.
NOTE
If you give a macro the name of a built-in Word command, your macro will replace the built-in command while the template or document in which the macro is stored is active. To restore a command to its default, simply delete the macro. To see a list of built-in command names, click the Macros button on the Developer tab, and choose Word Commands from the Macros in drop-down list.
Use the drop-down arrow next to Store macro in to set the storage location. Macros can be stored in templates or documents. The default location makes the macro available in all documents and stores the macro in Normal.dotm. If you choose to store the macro in the currently open template file (.dotx) or document (.docx) file, ultimately the file will need to be saved as a .dotm or .docm (macro-enabled) file. This topic is discussed later in this chapter.
In the Record Macro dialog box, so you can easily access and test your macro, assign it to run from either a Quick Access Toolbar button or a shortcut key. Ultimately, it could be assigned to both, but you can only do one or the other from the Record Macro dialog box. Hence, you have three options:
- To run the macro from the Quick Access Toolbar, click Button under Assign macro to. Word displays the dialog box for customizing the QAT. Open the Customize Quick Access Toolbar at the upper right, and click the desired storage location for the customization (for all documents or the current file). In the list, click the only macro listed, and then click Add to move it to the right list. Click OK. You can easily remove the button later, if desired (by right-clicking it on the QAT and choosing Remove from Quick Access Toolbar); see Chapter 30, “Customizing the Quick Access Toolbar and Ribbon,” for more on customizing the QAT.
- To assign the macro to run from a keyboard shortcut, click Keyboard under Assign macro to in the Record Macro dialog box. In the Customize Keyboard dialog box, press the shortcut key(s) you want to use. Open the Save changes in drop-down list and click the appropriate location. Click Assign, and then click Close.
- If you choose not to assign the macro to the QAT or a keyboard shortcut, you can click OK.
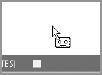
After you make an assignment or click OK, Word displays the Recording Macro pointer. In addition, on the status bar, the Record Macro tool changes to a white square. Figure 32.4 shows the recording pointer and Stop Recording button.
When recording is in progress, your mouse options are restricted. You can select commands from the QAT and Ribbon using the mouse, but you cannot use the mouse to select text or perform other editing. For selection and other editing, you need to rely on a combination of the keyboard, Ribbon, and QAT.
NOTE
Experts in VBA recommend creating a template file in which to store a macro before recording the macro. You can then save the macro directly to the template file.
Word has two ways to indicate that macro recording is in progress.
Let's record an example macro to toggle the display of bookmarks, both because there is no built-in command to do it and because doing it using the Word Options dialog box requires a number of steps:
- Open or create a document and add at least one bookmark so you'll be able to see the effect of the macro.
- Start macro recording by clicking Record Macro on either the Developer tab or the status bar. The Record Macro dialog box opens.
- For this example, type ToggleBookmarks in the Macro name text box.
- Leave All Documents (Normal.dotm) selected for Store macro in.
- Click OK. The macro recording begins.
- Choose File
 Options Advanced.
 - Scroll down to Show document content and click to reverse the setting of Show bookmarks, regardless of its current setting.
- Click OK.
- On the status bar, click the white square (Stop Recording button), seen in Figure 32.4. The macro recorder stops.
At this point, you have a macro that sets the current state of bookmark display to the selection you made in Step 7—either enabling or disabling bookmark display. To make the macro useful, you need to edit it to turn it into a toggle instead. Ideally, when you record a macro, it will work without further intervention. Sometimes, however (as in the current example), you need to edit it to make it do what you want.
CAUTION
There are certain actions that the macro recorder cannot capture, such as applying a theme color to text. In these instances, as in the example macro you just created, you have to learn a little about VBA to write your macro.
Editing a macro
To edit a macro, click the Macros button in the Code group of the Developer tab. This displays the Macros dialog box, shown in Figure 32.5. Select the macro to edit (select the ToggleBookmarks macro you just recorded if you're following along with the example) and click Edit. If you didn't store the macro in the default location (Normal.dotm), you might need to set Macros in to the correct location for your macro to appear in the list.
Make sure you click Edit to edit a macro. If you click Create rather than Edit, you will be prompted to replace the existing macro.
Select a macro in the Macro name list and click Edit.

When you click Edit, Word opens the Visual Basic Editor, as shown in Figure 32.6. The section on the left is called the Project Explorer. Because the macro was saved in Normal.dotm, it shows up in the NewMacros module. Ultimately, there could be many macros stored in that module. If the macro is to become a permanent addition to your tools, you probably want to create a module that contains common tools you create (for example, Toggles) and copy the ToggleBookmarks macro into it, rather than leave it in NewMacros to get lost as your library of macros grows. You look at how to create a new module and move a macro into it later in this chapter.
The right side of the window shows the contents of the NewMacros module. The example in the screenshot contains three macros. The blinking insertion point appears in the ToggleBookmarks steps, because the example macro has been selected for editing. You can use the drop-down arrow next to the current macro at the upper right (ToggleBookmarks in this case) to display a list of macros in the current module and click another macro name to scroll the window to that macro.
When you edit or create a macro, Word opens the Microsoft Visual Basic Editor.

To turn the example macro you recorded earlier into a toggle, you're going to have to make a slight change to its contents. Consider the following statement shown in the ToggleBookmarks macro in Figure 32.6:
ActiveWindow.View.ShowBookmarks = True
This statement instructs Word to set ActiveWindow.View.ShowBookmarks to True. ActiveWindow.View.ShowBookmarks is the state of the ShowBookmarks setting. If you set it to True, bookmarks will be displayed. If you set it to False, they won't be displayed. What you want to do is set it to the opposite of its current state.
As it turns out, this is ridiculously easy, and it might even seem that way if you enjoy and understand mathematics. The opposite of:
ActiveWindow.View.ShowBookmarks
Not ActiveWindow.View.ShowBookmarks
Therefore, you can turn this macro into a toggle by replacing True with the latter statement:
ActiveWindow.View.ShowBookmarks = Not ActiveWindow.View.ShowBookmarks
Make that change in the Visual Basic Editor window.
TIP
It's notoriously easy to mistype Visual Basic commands. Whenever possible, take advantage of existing code and make generous use of the Clipboard to copy and paste as needed. Here, copy ActiveWindow.View.ShowBookmarks to the Clipboard, and paste it over True on the right side of the =. Type Not in front of it, as shown in the preceding example.
Testing a macro
You can test a macro without closing the Visual Basic Editor. If you assigned the macro to a QAT tool or to a keyboard shortcut, switch over to the Word editing window and display something you know to be bookmarked. If the current document doesn't contain any bookmarks, then type some text, select it, press Ctrl+Shift+F5, type a bookmark name, and click Add.
Now run your macros such as the example toggle macro by clicking the corresponding QAT tool or pressing the assigned shortcut key. If it works, you should see the bookmark brackets toggling on and off.
If you didn't assign a keystroke or QAT tool, you can still test the macro, but it's a bit clumsier. Position the Visual Basic Editor window and the Word window so you can see both. Make sure that your macro (ToggleBookmarks in this example) is still selected from the drop-down list in the upper-right corner of the code window. In the Visual Basic Editor toolbar, click the Run button shown in Figure 32.7.
When you run a macro using the Run Sub/UserForm button, its steps happen in the corresponding open Word document window.

Managing Macros
To maximize the utility of macros, there are some things you can do. As mentioned earlier, one thing you can do is create a special module for containing your macros—something other than NewMacros, which can quickly become cluttered. Another thing you can do is sign your macros so you can choose higher levels of security and still be able to run your own macros.
Copying macros to a new module
You can create new modules in Normal.dotm or you can create a new template for storing your macros and put that macro into your startup folder (see “Global Add-Ins” later in this chapter). Using Normal.dotm is easier because it requires less work.
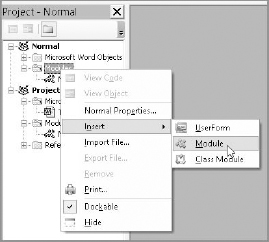
To create a new module in Normal.dotm, in the Project Explorer right-click Modules under Normal and choose Insert ![]() Module, as shown in Figure 32.8. If the Project Explorer is not showing, choose View
Module, as shown in Figure 32.8. If the Project Explorer is not showing, choose View ![]() Project Explorer (Ctrl+R). To rename the module, from the default Module# name click the module and choose View
Project Explorer (Ctrl+R). To rename the module, from the default Module# name click the module and choose View ![]() Properties (F4). Next to (Name), select Module# (for example, Module1) and replace it with a new name, such as Toggles or MyTools (the name can contain numbers, letters, and the underscore character). Click the X to close the Properties window.
Properties (F4). Next to (Name), select Module# (for example, Module1) and replace it with a new name, such as Toggles or MyTools (the name can contain numbers, letters, and the underscore character). Click the X to close the Properties window.
Right-click Modules in the Project Explorer to insert a new module.
Double-click the NewMacros module in the Project Explorer to display the contents of that module. Drag over the macro contents to select it. If you created the example macro, for example, you could drag from Sub ToggleBookmarks() through End Sub. Right-click and choose Cut (Ctrl+X). Double-click the new module in the Project Explorer to switch back to it. If you've previously added macros to the module, go to the end of an existing End Sub and press Enter. Right-click and choose Paste (Ctrl+V) to insert the macro at that location. If you have additional macros to transfer, repeat the procedure.
To go ahead and save your work now, choose File ![]() Save Normal (or Save filename, where filename is the name of the file in which the currently displayed module resides) or click the Save button on the Visual Basic Editor toolbar. If the Prompt before saving Normal.dotm option is enabled in File
Save Normal (or Save filename, where filename is the name of the file in which the currently displayed module resides) or click the Save button on the Visual Basic Editor toolbar. If the Prompt before saving Normal.dotm option is enabled in File ![]() Options
Options ![]() Advanced, you might still be prompted to save changes later if key assignments or QAT assignments have been made.
Advanced, you might still be prompted to save changes later if key assignments or QAT assignments have been made.
NOTE
If you've been using NewMacros as your macro repository for a while, it might sometimes seem simpler to rename NewMacros rather than create a new module and move macros over after they've been created, debugged, and tested. However, if macros are assigned to the QAT or keyboard shortcuts, those assignments will no longer work. Ultimately, it's the same amount of work, but it will seem like less work if you move macros to their permanent home on an as-you-go basis.
Digitally signing your macros
Signing your macros enables others to verify that they come from a trusted source, if you're in situation where you create templates with macros for colleagues or clients.
Installing and running SelfCert
First, make sure that you can create a certificate for yourself. Open Control Panel and under Programs, choose Uninstall a program ![]() Microsoft Office 2013
Microsoft Office 2013 ![]() Change
Change ![]() Add or Remove Features
Add or Remove Features ![]() Continue. Click the + (plus) button beside Office Shared Features. (Note that the name of your Office 2013 installation may vary.) If Digital Certificate for VBA Projects is not set to Run from My Computer, click the Digital Certificate for VBA button, click Run from My Computer in the drop-down, click Continue, and follow the setup instructions. Close the Control Panel window when you're done.
Continue. Click the + (plus) button beside Office Shared Features. (Note that the name of your Office 2013 installation may vary.) If Digital Certificate for VBA Projects is not set to Run from My Computer, click the Digital Certificate for VBA button, click Run from My Computer in the drop-down, click Continue, and follow the setup instructions. Close the Control Panel window when you're done.
In Windows 7, choose Start ![]() All Programs
All Programs ![]() Microsoft Office
Microsoft Office ![]() Microsoft Office 2013 Tools
Microsoft Office 2013 Tools ![]() Digital Certificate for VBA Projects. In Windows 8, open a File Explorer window, and navigate to C:Program Files (x86)OfficeOffice15 (for 32-bit versions of Office), or C:Program FilesOfficeOffice15 (for 64-bit versions of Office). Locate the SELFCERT.EXE command in the folder and double-click it.
Digital Certificate for VBA Projects. In Windows 8, open a File Explorer window, and navigate to C:Program Files (x86)OfficeOffice15 (for 32-bit versions of Office), or C:Program FilesOfficeOffice15 (for 64-bit versions of Office). Locate the SELFCERT.EXE command in the folder and double-click it.
In Create Digital Certificate, shown in Figure 32.9, type a name to use on the certificate—usually your own name. Click OK, and you should see a notice indicating success. Click OK to close that message dialog box.
NOTE
SelfCert certificates are for personal use only on the computer on which they were created. To learn more about working with digital certificates on your system, see the TechNet topic “Manage Certificates” at http://technet.microsoft.com/en-us/library/cc771377.aspx.
You can create a certificate for signing your own macro projects.

Signing your macros
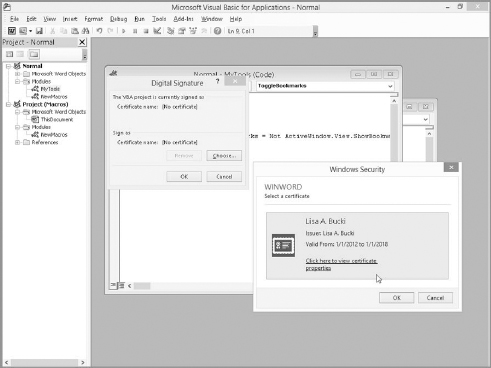
If it's not already open, open the Visual Basic Editor (Alt+F11). Expand the template or document that contains the macro project(s) you want to sign, click in the project you want to sign, and choose Tools ![]() Digital Signature to open the Digital Signature dialog box shown in Figure 32.10. Click Choose. In the Windows Security dialog box that appears, select your signing certificate, and then click OK. Click OK again back in the Digital Signature dialog box.
Digital Signature to open the Digital Signature dialog box shown in Figure 32.10. Click Choose. In the Windows Security dialog box that appears, select your signing certificate, and then click OK. Click OK again back in the Digital Signature dialog box.
NOTE
After signing a project, you might still need to close it and Word before your certificate takes effect.
Choosing a signing certificate
Understanding More about Macro Security
Macro security is one of those areas that has the power to thoroughly confuse and frustrate Word users. One of the primary reasons is that a number of settings are Office-wide and take effect when any macro-capable Office 2013 program is started. When you change settings, the changes often do not take effect until you close all macro-capable Office 2013 programs and restart. Some other settings don't take effect until just Word is closed and restarted. Let's start with four commandments. These represent elevated stages, so try them in order:
- When you make a change to Word's macro security settings and do not see a change in Word's macro behavior, close all instances of Word that are running and try again.
- When closing and restarting Word doesn't change Word's macro behavior, close all Office 2013 programs and try again.
- When changing a security setting and closing/restarting Office 2013 doesn't change Word's macro behavior, use Windows Task Manager to make sure all Office applications are really closed, and if not, close them and try again.
- When none of the above changes Word's macro behavior, check whether the recalcitrance is caused by a different security setting.
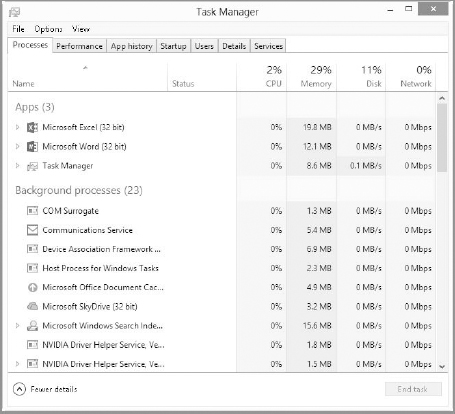
Confirming Office is really closed with Task Manager
For many users, Windows Task Manager is an essential tool. They could not get through a day of computing without it. Many others need Windows Task Manager but simply don't know about it.
To start Windows Task Manager, press Ctrl+Alt+Delete and click Task Manager. If pressing that key combination frightens you (even though it can't reboot or shut down Windows), right-click a blank area in the taskbar and choose Task Manager instead. You also can select the Search charm, scroll right, and click Task Manager under Windows System. One of these methods should start the Windows Task Manager.
NOTE
In Windows 7, you select right-click the taskbar and click Start Task Manager; there is no Search charm in Windows 7.
Look first in the Applications tab in Windows 7. Even if no Office applications show up there, it's possible that one or more are still running but unable to close due to an unseen problem. Click the Processes tab in the Windows 7 Task Manager. In Windows 8, click More details and then the Processes tab. Figure 32.11 shows the Processes tab in the Windows 8 Task Manager. (The Windows 7 Task Manager looks slightly different.) Click each Office application process to stop, and then click End Process (Windows 7) or End task (Windows 8). In Windows 7, you will see the startup command name rather that the program name listed among the processes. Look for the following processes, and end them:
- WINWORD.EXE (Word)
- ONENOTE.EXE (OneNote)
- ONENOTEM.EXE (OneNote Launcher)
- OUTLOOK.EXE (Outlook)
- EXCEL.EXE (Excel)
- MSACCESS.EXE (Access)
- POWERPNT.EXE (PowerPoint)
- MSPUB.EXE (Publisher)
- SPDESIGN.EXE (SharePoint Designer)
Close the Task Manager after you finish closing the processes. With some Office applications, such as Outlook, forcing it to close can result in data loss and possible damage to your Outlook data file. Try starting Outlook normally, wait until it is fully open, and then click the Outlook window's Close button to close the program. Wait two minutes to see if it has now disappeared from the list of running processes. If not, try signing out of your Windows session and then signing back in. When you sign out, this forces all programs in the current session to close.
Use the Processes tab in Windows Task Manager to determine whether you have running instances of Office applications.
Macros and security
Word's macro behavior is governed by a number of different settings, most of which are covered in Chapter 31. When Word appears to be unresponsive to changes in security settings, it's likely due either to a need to close all of Office for the change to take effect or to layers of security that are affecting things from multiple directions. Security settings that affect whether macros run are found in Word Options at File ![]() Options
Options ![]() Trust Center
Trust Center ![]() Trust Center Settings. The tabs and their key settings are:
Trust Center Settings. The tabs and their key settings are:
- Macro settings: A frequent problem is that the Disable all macros except digitally signed macros option is selected. If you need to leave this option selected, the workaround is usually digitally signing all the macros, and then closing and restarting Word. Moving the template or file containing the macros into a trusted location can also solve the problem.
When given a choice between putting a document into a trusted location versus designating the document's location as trusted, unless the location contains just that one file, it's almost always safer to move the document into a trusted location. If you set a storage location that you use often as “trusted,” it's too easy to inadvertently save untrustworthy files to that location. Moving files one at a time, however, requires more thought and attention, and accidents are less likely.
- Trusted Locations: You can use the Add new location button to add another folder that you want to designate as a trusted location. A common problem is that this setting often is forgotten, so efforts to prevent a certain set of macros from running fail. Moving the file that contains them to a nontrusted location usually solves the problem. Better still, it solves the problem without having to close and restart Word or Office.
- Trusted Publishers: You may be prompted to add a publisher to the list of Trusted Publishers when you install or load an add-in. In other cases a Security Alert may appear, in which case you can click Trust all documents from this publisher or Enable all code published by this publisher before clicking OK to continue opening the file and add the publisher to the list of trusted publishers. There are typically two other options in the Security Alert: The Help protect me from unknown content (recommended) option rejects the publisher, and content will not be run. The Enable this add-in for this session only option allows you to run the current content but does not add the publisher as a trusted publisher.
- Add-ins: You can control whether add-ins must be from a Trusted Publisher. Check Require Application Add-Ins to be signed by Trusted Publisher to tighten security.
- Message Bar: A common problem is that the choice of whether to enable content in a document with macros isn't presented because the Message Bar is disabled. If you want to take advantage of the prompt to enable content, you must enable Show Message Bar in all applications when active content, such as ActiveX controls and macros, has been blocked.
Macro Storage
Macros can be stored in macro-enabled document templates or in macro-enabled documents. Word 2013 has four different native file formats:
- .docx: Ordinary Word file that cannot contain macros
- .docm: Macro-enabled document file
- .dotx: Plain document template that cannot contain macros
- .dotm: Macro-enabled document template file
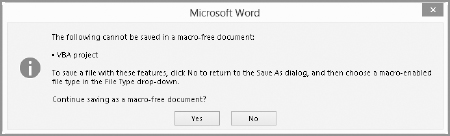
When you record or otherwise create a macro and instruct Word to store it in a .docx or .dotx file, Word doesn't balk at that point. When you save the file, however, Word now tells you that you cannot save the VBA project in a macro-free document, as shown in Figure 32.12.
VBA projects can be saved only in .docm or .dotm files.
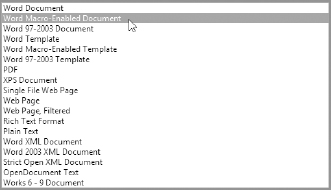
To save the macros, choose No. Word then opens the Save As dialog box. Open the Save as Type list, choose either Word Macro-Enabled Document (*.docm), as shown in Figure 32.13, or Word Macro-Enabled Template (*.dotm).
You can save macros only in macro-enabled documents and templates.
Global add-Ins
If you choose to store your macros in Normal.dotm, they are automatically loaded when you start Word. Any shortcut keys or Quick Access Toolbar tools assigned to run macros will run just fine, assuming that the macros and shortcuts are stored in Normal.dotm.
When a template or other add-in is available throughout the Word session, it is known as a global template or add-in. Normal.dotm by default is a global add-in. Other global add-ins can be loaded in one of two ways. They can be stored in Word's Startup folder, in which case they are loaded when Word starts, or they can be explicitly loaded using the Template and Add-ins dialog box.
To copy a file to the Startup folder, you first need to determine where that is. Choose File ![]() Options
Options ![]() Advanced
Advanced ![]() File Locations (under the General section). Click Startup
File Locations (under the General section). Click Startup ![]() Modify. Use Look in to determine the path where Startup is located. Then, open Windows Explorer (Windows 7) or File Explorer (Windows 8) and copy the template file to that location. The next time you close and restart Word, any Word template files in your Startup folder are loaded as global add-ins.
Modify. Use Look in to determine the path where Startup is located. Then, open Windows Explorer (Windows 7) or File Explorer (Windows 8) and copy the template file to that location. The next time you close and restart Word, any Word template files in your Startup folder are loaded as global add-ins.
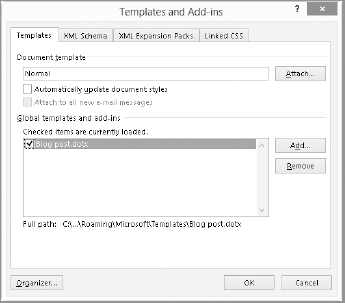
The other way to load a global add-in is using the Templates and Add-ins dialog box, shown in Figure 32.14, displayed through the Add-Ins tab of the Word Options dialog box or by clicking Document Template in the Templates group of the Developer tab. Under Global templates and add-ins, any templates loaded from the Startup folder appear, along with any that you have added here previously. When you open Word, only templates in the Startup folder are loaded. Other templates you've loaded in past sessions are listed, but are not checked. Place a check next to any unloaded templates you want to load. To load a template not listed, click Add. In the Add Template dialog box, the starting location is Trusted Templates. If the template you want isn't there, navigate to its location, select it, and click OK. Note, however, that depending on your macro security settings, if the template is not in a trusted location and isn't otherwise permitted, its macros will be disabled when you try to access them.
You can add and remove templates using the Templates and Add-ins dialog box.
One option is to designate a .dotm file other than Normal.dotm as your main storage location for macros, and store that file in Word's Startup folder. That way, your macros are loaded when Word starts. Moreover, if Normal.dotm becomes corrupted (which, unfortunately, is altogether likely at some point in your Word career), your task of rebuilding won't be quite as onerous, because you won't have all of your eggs in one basket, so to speak.
NOTE
If you choose to store your everyday macros in a .dotm file other than Normal.dotm, while the macros themselves are not stored in Normal.dotm, any key assignments or Quick Access Toolbar assignments that access those macros must be stored in Normal.dotm in order to work.
Automatic Macros
In designing document templates, as well as in setting up the Word editing environment, it sometimes is useful to perform setup or housekeeping chores. To facilitate this, Word has a collection of reserved names you can use to create automatic macros:
- AutoExec: Runs when you start Word. AutoExec works only when it is stored in Normal.dotm.
- AutoOpen: Runs when you open a document based on the template that contains it. If an AutoOpen macro is stored in Normal.dotm, it runs any time a document based on Normal.dotm is opened but not when a new document based on Normal.dotm is created. A popular use for AutoOpen is to set the desired zoom or other view-related settings when documents are opened. Another popular purpose is to update certain fields.
- AutoClose: Runs when a document based on the template that contains it is closed.
- AutoExit: Runs when you exit from Word. AutoExit works only when it is stored in Normal.dotm.
- AutoNew: Runs when a document based on the template that contains it is created. This is a popular kind of automatic macro to use when creating active document templates. An AutoNew document can populate a new document with content, prompt for a file name or other information, insert the current date as static text, and so on.
Macros by these names do not exist until you create them. For example, if you have a set of startup chores that you perform every time you start Word, the next time you start Word, before you do your startup chores, start the macro recorder, and name the macro AutoExec. Then perform your startup chores. Stop the macro recorder when you're done. The next time you start Word, your AutoExec macro will perform your startup chores for you.
Visual Basic for Applications: Quick and Dirty Answers
You've already learned a bit about Visual Basic and the Visual Basic Editor. In this section, you learn only what you need to know to get started—quick and dirty, as they say. The best way to gain an understanding of Word macros is by recording a macro and then looking at the resulting Visual Basic code to see how Word translated your actions into code.
All you really need to know
Visual Basic can be intimidating, as can the Visual Basic Editor. Understanding what's happening can help disarm its intimidating quality. On the other hand, too much too soon can be overwhelming, and you might never want to come back. Following are the top 10 things you need to know.
1. Starting and toggling the Visual Basic Editor
You can start the Visual Basic Editor any time you want by editing a macro or simply by starting the editor, without any particular macro in mind. To edit an existing macro or to create one, just press Alt+F8. If you see macros listed, click one, and then click Edit. If you don't see any, type a name and click Create.
To open the Visual Basic Editor with no particular destination in mind, press Alt+F11. Note that once you're in the Visual Basic Editor, Alt+F11 now returns the favor, and goes back to the Word document editing window. Hence, you can use Alt+F11, effectively, to toggle between the Visual Basic Editor and Word.
2. Project Explorer and code windows
The two main sections of the Visual Basic Editor you need to know about are the Project Explorer and the Code window, shown earlier in Figure 32.6. The left side, the Project Explorer, works like any tree structure in Windows. Click + to expand; click – to collapse. Double-click to select a macro, which is then displayed in the Code window. If the Code window is ever replaced by something else, try pressing F7 to bring the code back into view.
3. Running macros directly from the Visual Basic Editor
You can run macros directly from the Visual Basic Editor. While it's true that this works best if you have two monitors—one for showing the Visual Basic Editor and another for showing the Word document window—it's not essential. In the Windows taskbar, click the Visual Basic icon, and then Ctrl+click the icon for the Word window. Right-click either selected program and choose Tile Horizontally. Now you should be able to see both windows at the same time.
With the macro you're testing displayed in the Code window, click the Run button, also shown earlier in Figure 32.7. It's available in either the Standard or the Debug toolbar. If you run into an error, click Reset, fix the error, and try again. To run the macro one line at a time, click Step into.
Additional Run-related commands are contained in the Run menu. You can also run a macro by pressing F5, but the Visual Basic Editor window must be active for it to work. If the Word window is active, the F5 activates the Go To tab in the Find and Replace dialog box.
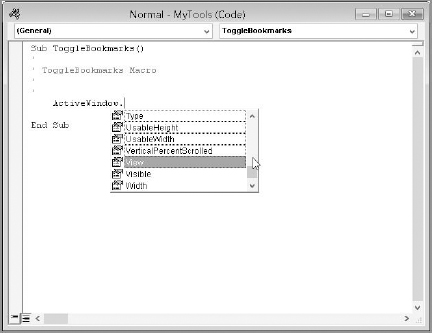
4. The Visual Basic Editor reads your mind
When you type a Visual Basic object name, the editor knows what “could” come next and shows you a list of the possible methods, properties, and more that you can add next, as shown in Figure 32.15. Use the Down arrow key to move down through the choices, and when you see what you want, press the Spacebar to insert it. Sometimes Word shows you a list; other times, Word shows you the syntax.
5. The Visual Basic Editor wants to help
If you want more information about a command, click it and press F1. The Object Browser window opens so that you can browse to explore the various commands and object relationships.
When you follow a Visual Basic object or keyword with a period, the editor shows you a list of what can come next.
6. If the Visual Basic Editor window doesn't respond…
If you try clicking somewhere in the Visual Basic Editor window but nothing happens, it's usually because a dialog box is open in Word itself but isn't displaying on top of the Visual Basic window. The two application windows might look independent, but they're not. Close Word's dialog box and try again.
7. If the Visual Basic project is “locked,” change security
If you try to expand the tree in the Project Explorer but it says that the project is unviewable, the quickest solution is to close Visual Basic and Word, move the template that contains the macros to a trusted location, and then try again.
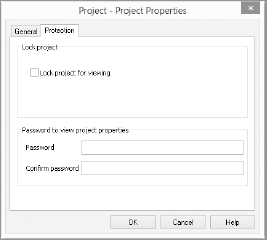
If that doesn't work, however, it's possible that the project really is locked. In the Project Explorer window, right-click the top level of the project (identified as Normal, Project, TemplateProject, or a name corresponding to a global add-in), and choose Project Properties. In the Protection tab of the Project Properties dialog box (Figure 32.16), remove the check next to Lock project for viewing; supply the password, if needed; and click OK. Reverse the process to lock and protect one of your projects.
Projects can be locked for security reasons or because the project was explicitly locked by the user.
8. The larger context
When you see commands listed in the code window, you're usually not looking at the entire command. Because you're within Word, Visual Basic saves space by not including the entire name. For example, consider the following brief macro, which types Hello at the insertion point:
Sub Hello()
 Selection.TypeText Text: = “Hello”
End Sub
Selection.TypeText is an abbreviation for Word.Application.Selection.TypeText. Because both Word and Application are assumed, however, you don't need either of those for the command to work.
9. Watch macros as they're being recorded
When you start recording a macro, immediately click the Pause Recording button in the Developer tab. Press Alt+F11 to display the Visual Basic Editor, and navigate to the macro being recorded. Arrange the Word window and the Visual Basic Editor window so you see both. Press Alt+F11 to return to the Word window, and click Resume Recording.
Now as you record your macro, you'll see the corresponding commands appear in the Visual Basic Editor. This is a great way to get a sense of what does what, and what kind of Visual Basic commands correspond to actions in Word. You'll also discover that some things cannot be recorded. If you watch your macro as it's being recorded, you'll know what is left out and have a better understanding of what kind of editing the macro requires in order to work properly.
10. Now you know why it's a good idea to prompt to save Normal.dotm
When you're experimenting with macros, there are a lot of things you'll do that you won't necessarily want saved as part of Normal.dotm. Choose File ![]() Options
Options ![]() Advanced. In the Save section, click Prompt before saving Normal template to check it.
Advanced. In the Save section, click Prompt before saving Normal template to check it.
For more information
The Microsoft Word 2013 Bible is a lot of things, but it is not a book about how to program using Visual Basic for Applications. For that, you need other resources. A good place to start is the Visual Basic for Applications online Help. Open the Visual Basic Editor, and press F1 to launch your Web browser and display the Word 2013 developer resources on MSDN. Once you're more involved in Visual Basic for Applications, you'll find the Word Object Model Reference to be invaluable.
You can find free online resources for learning and using Visual Basic for Applications at the following:
TIP
The Microsoft Developer Network website (msdn.com) has excellent VBA resources, even for beginners. Search the site for “VBA.” I also recommend searching for these articles: “Getting Started with VBA in Word 2010” and “101 VBA Samples for Office 2010.” Even though they are written for the prior versions, the syntax and techniques still apply in Word 2013.
Summary
In this chapter you've gotten your feet wet with Word's brand of VBA (Visual Basic for Applications). You've seen how to record a macro and test it. You've also learned a little about how to edit macros to make them do things that the recorder can't make them do. You're now also basically familiar with the Visual Basic Editor, and you should be able to do the following:
- Record a macro, and assign it to the Quick Access Toolbar or a keyboard shortcut
- Manage Visual Basic projects by creating new modules and copying new macros to them
- Manage your macros by storing them in global templates other than Normal.dotm
- Digitally sign your Visual Basic project