
CHAPTER 3
Working Smarter, Not Harder, in Word
- Using styles for consistent and professional formatting
- Building well-organized documents through outlining
- Making corrections automatically with AutoCorrect to save time
- Viewing and changing file properties
- Discovering power user techniques
Leverage increases power. This chapter provides a quick introduction to three of Word's power features that you can leverage to save time and create better documents: styles, outlining, and AutoCorrect. Using these features each time you start a new document ensures you will realize their maximum benefit. This chapter provides an overview of these features, which are covered in greater detail in subsequent chapters, as well as sharing information about adding file properties and giving you some power tips you can put to work right away.
Achieving Attractive Documents with Styles
Many users type text in a document and then apply individual formatting settings to selections throughout the document. This approach not only takes a lot of time, but also can lead to inconsistencies. Suppose, for example, that in the course of applying a half dozen formatting attributes to achieve a certain “look” for a heading, you forgot an attribute here and there, or maybe set a different indentation in one instance. This gives your document an uneven and unprofessional appearance. In the case of headings, it can also make a document harder to follow, creating confusion in the reader's mind about which heading levels are equal to one another and which ones are subheadings. Consistency helps your reader distinguish among chapter titles, magazine article titles, section titles, and other organizational cues in the text.
A style is a collection of formatting attributes that you can apply to text in a document. A style can contain information about the font (including whether it's regular, italic, bold, or bold italic), point size, text color, shading, borders, effects (such as strikethrough, superscript, or subscript), underlining, and even language. A style also can contain additional information about spacing, indentation, line and page break behavior, numbering, and bullets.
If you routinely create documents with headings, titles, lists, and other elements that require multiple formatting changes, using styles can save you time. Rather than applying several separate formatting settings, you apply the style to make all those formatting settings in one fell swoop. Using styles can also improve formatting consistency, making your documents look more professional.
Styles also provide leverage when and if someone wants something changed. For example, if a client or your boss doesn't like the heading formatting in a document you prepared and you didn't use styles, you could be in for a lot of arduous work in changing the heading formatting, particularly in a long document. If you use heading styles, however, all you have to do is change the style definitions, and all text formatted with the updated styles automatically changes.
Styles versus direct formatting
Say you type a heading, select it, press Ctrl+B (bold), and then open the Font dialog box to apply the Small Caps effect and a larger point size. You might also open the Paragraph dialog box to change the indentation and spacing.
This way of applying formatting attributes is called direct formatting, in contrast to style formatting. Direct formatting has a number of disadvantages that are discussed in Chapter 7, “Using Styles to Create a Great-Looking Document.” Repeatedly applying the same sets of direct formatting to particular kinds of recurring text, such as headings, is a procedure both tedious and error-prone.
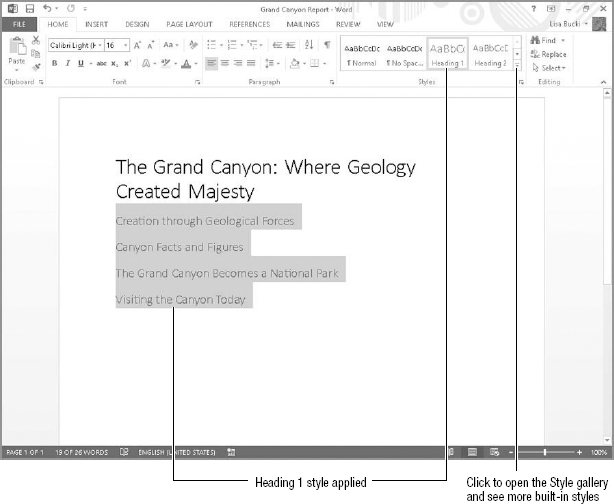
Instead of using direct formatting, you can use a style. The Normal.dotm template applied to blank documents includes a number of styles that you can work with immediately. For example, you can apply the Heading 1 style to headings at the top level of organization in your document. To apply this style to a heading, simply click in the heading and, with the Home tab of the Ribbon displayed, click Heading 1 in the Style gallery. As shown in Figure 3.1, you also can drag to select a series of headings and then apply the style to all of them.
To apply a style to selected text, click the style in the Style gallery.
Keyboard Shortcuts for Often-Used Styles
Word has built-in keyboard shortcuts for certain frequently used styles:
| Normal | Ctrl+Shift+N |
| Heading 1 | Ctrl+Alt+1 |
| Heading 2 | Ctrl+Alt+2 |
| Heading 3 | Ctrl+Alt+3 |
If the desired style does not initially appear in the Style gallery, you can scroll through the list of styles using the up and down scroll buttons at the right side of the gallery. Alternately, you can open the gallery by clicking the More drop-down arrow below the down scroll triangle.
NOTE
If the style you want still isn't shown, you might need to jump ahead to Chapter 7, to the section on the Style gallery.
Types of styles
There are two basic types of styles: character and paragraph. Character styles convey character-level formatting information and can be applied to any text selection in a document. If no text is selected, the character style will be applied to the current word (this is the default; to change the default, choose File ![]() Options
Options ![]() Advanced
Advanced ![]() Editing options, and clear the check beside the When selecting, automatically select entire word check box).
Editing options, and clear the check beside the When selecting, automatically select entire word check box).
Paragraph styles can be applied only to one or more whole paragraphs and affect the entire paragraph (although later in the book you will learn techniques that enable you to seemingly sidestep this limitation). Because paragraph styles affect the entire paragraph, if you're applying a style to a single paragraph, you don't need to select it—just make sure that the insertion point is in the paragraph you want to style.
Although Word offers just two basic types of styles, there are three additional special cases that are sometimes treated as distinct style types: linked (character and paragraph together in the same style), table, and list. Even so, you only need to know about the character/paragraph distinction to begin using styles effectively.
Constructing Documents Faster with Outlining
Word's outlining capability, long one of Word's strongest features, works in concert with the built-in heading styles you just learned about. When you use Word's Heading 1 through Heading 9 styles in a document, you can use Word's Outline view to organize and reorganize your text. Note that you don't need to use all nine levels. Most documents can be better organized within just two or three heading levels. The lowest level in the outline is the Body Text level.
To display a document in Outline view, click the View tab and click Outline in the Views group. Figure 3.2 shows a document using the Heading 1 through 3 styles for the levels of organizational hierarchy that were needed. The figure shows the style area at the left side of the view so you can see what styles are applied. (You can display the style area by choosing this is the default; to change the default, choose File ![]() Options
Options ![]() Advanced
Advanced ![]() Display, enter the width for the style area in the Style area pane width in Draft and Outline views, and click OK. Entering 0 for the width hides the style area.)
Display, enter the width for the style area in the Style area pane width in Draft and Outline views, and click OK. Entering 0 for the width hides the style area.)
Outlining enables you to see an overview of your document's organization. The style area at the left reveals the applied Heading styles.

The Outline view automatically indents lower-level headings to make the organizational hierarchy visually evident. Body text (non-heading text) can be suppressed so that you view only the overall organization.
You also can start a document in Outline view. The first line you type becomes a Level 1 (Heading 1) heading. From there, you can:
- Press Tab to indent a line to the next lower outline/heading level.
- Press Shift+Tab to promote line to the next higher outline/heading level.
Organizing content via outlining
Suppose, in reviewing the document shown in Figure 3.2, your boss decides that the Canyon Facts and Figures section should be moved to the beginning of the document. Without the benefit of Word's Outline view, you would have to carefully select everything encompassed in that section, cut it to the Clipboard, and then paste it before the current first Heading 1 heading.
You can accomplish this sort of task faster and with fewer errors in Outline view. Select Level 1 (for Heading 1) from the Show Level control shown in Figure 3.3 so that no detail below the Heading 1 appears. Click anywhere in the heading to move (Canyon Facts and Figures in this example), and click the Move Up button, shown above the headings and to the left in Figure 3.3. This moves the selected heading and all its text up.
Outline view gives you tremendous organizational power.
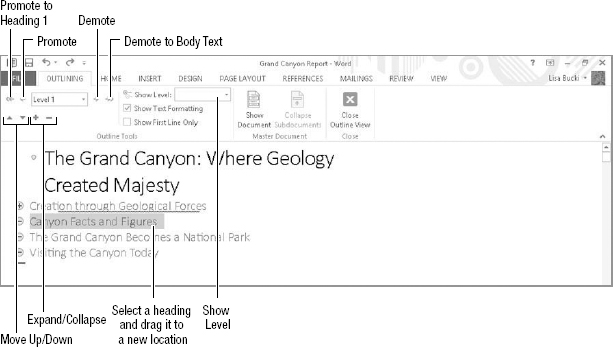
You can press Alt+Shift+Up, instead of clicking the Move Up button. Alt+Shift+Down moves the selected level down. (Note that rather than selecting a heading you can click in it to position the insertion point within it and then use a button or keyboard shortcut to move it up or down.) Finally, you can select and drag a heading to another location in the outline.
The Outlining tab also offers these tools in the Outline Tools group, identified in Figure 3.3, for rearranging and viewing your outline:
- Promote and Demote: Clicking the Promote button moves heading holding the insertion point up one level in the outline hierarchy, such as from Level 2 (Heading 2) to Level 1 (Heading 1). Clicking Demote moves the heading one level down. Find Promote and Demote in the Outline Tools group, at upper left.
TIP
The ScreenTips for the Promote and Demote buttons say that their shortcut key combinations are Alt+Shift+Left and Alt+Shift+Right, respectively. But as of this writing, in Word 2013 Tab and Shift+Tab still work for promoting and demoting, too.
- Show Levels: Click this drop-down list to open it, and then click the level to display. This action hides the levels below the selected level. For example, if your document has three heading levels, you can select Level 1 from Show Level to hide Levels 2 and 3 so that you can focus on the top-level flow of topics in the document.
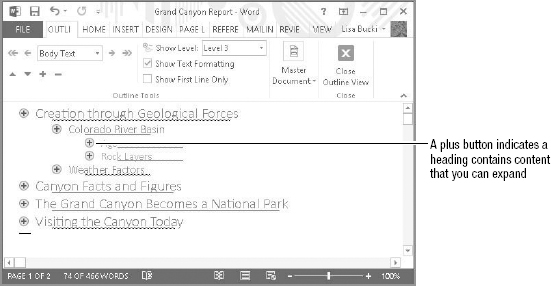
- Expand and Collapse: Clicking the Expand button displays the next heading level contained within the selected heading or heading holding the insertion point. Click Expand multiple times to display subsequent heading levels and the body text when you reach the lowest level of your outline. For example, in Figure 3.4, I clicked in the top Level 1 heading and then clicked Expand twice to display the Level 2 and 3 headings. Clicking Collapse hides the text and headings within a selected heading. When a heading has a plus button to the left, you also can double-click that button to expand and collapse the heading.
Click Expand twice to see the next two heading levels under a Level 1 heading, as for the top heading in this document.
If you delete a heading that has information collapsed under it, Word deletes the heading and all of its collapsed contents. If this isn't what you want, expand the heading contents, move them elsewhere in the document as needed, then delete the heading.
NOTE
Don't confuse the different level settings. The Show Level setting affects only what you see. The Level setting on the left, however, affects actual document contents.
When you are finished working with the outline and want to close the Outlining tab from the Ribbon, click the Close Outline View button in the Close group at the right end of the tab.
Creating custom levels for non-heading styles
Sometimes it can be useful to treat certain document styles, such as document titles, captions for tables, figures, and so on, as if they were heading levels in order to make them visible in Outline view. At the same time, you usually don't want to use the same styles you use for headings (except possibly for the document title when the document is to become part of a larger document). Word enables you to associate any style with any outline level.
For example, you could associate the Caption style with outline Level 9 if you're not using the Heading 9 style in the document. After you associated the style with the outline level, Outline view would use Level 9 to display any text using the Caption style.
To associate a style such as Caption with an outline level, use the following steps:
- Press Ctrl+Shift+S to display the Apply Styles task pane.
- Select the style from the Style Name drop-down list or click in that text box and type the style name without pressing Enter. Pressing Enter would inadvertently assign the style to the current selection.
- Click Modify. The Modify Style dialog box opens.
- Choose Format
 Paragraph from the menu at the bottom of the dialog box. The Paragraph dialog box opens.
 - On the Indents and Spacing tab, open the Outline level drop-down list under General, and click Level 9, shown in Figure 3.5.
- Click OK twice to close the open dialog boxes, and then click the Apply Styles task pane Close (X) button.
Use the Outline level drop-down list when modifying Paragraph style settings to associate a style with the designated outline level.

Outlining versus browsing headings in the Navigation pane
You learned in Chapter 2, “Diving Into Document Creation,” that you can use the Navigation pane to move around the document. When HEADINGS is selected at the top of the pane, the document's headings appear in an indented hierarchy in the pane, similar to the way they appear in Outline view. When headings appear in the Navigation pane, you can reorganize or shuffle them around in much the same way that you can in Outline view. Click a heading in the Navigation Pane to scroll the document and move the insertion point to the beginning of that heading.
Viewing headings in the Navigation pane also provides the advantage of enabling you to see the document outline while working in Print Layout view. This means that if the body text you're writing suggests a needed outline change, you can view the outline simultaneously and decide the best way to change it.
While the Navigation pane does not require the use of Heading styles, viewing headings in the Navigation pane again emphasizes how useful formal headings can be in formatting, organizing, and reorganizing all kinds of documents. Without styles that contain organizational-level settings, however, hierarchical information is hard to keep track of when you're moving things around, and what you see in the Navigation pane won't necessarily indicate which headings are subordinate and which are superior.
Here's how to use the Navigation pane to work with your document outline:
- Click the View tab, and then click Navigation Pane in the Show group to check it.
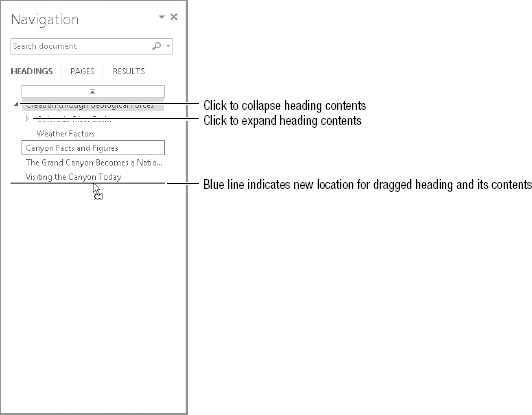
- Click HEADINGS below the Search document text box in the Navigation pane.
- To collapse a heading's contents, click the black triangle; to expand a heading's contents, click the white triangle.
- To move a heading, drag it until the blue horizontal line appears in the desired location as shown in Figure 3.6, and then release the mouse button.
- Click the Close (X) button in the Navigation pane to close it.
View and modify the document outline in the Navigation pane.
Cleaning Up Content with AutoCorrect
If you've spent some time now creating your first few Word documents, you may have noticed that Word automatically does things like capitalize the first letter of a sentence if you failed to do so, or correct typos such as changing teh to the.
This automatic feature is called AutoCorrect. Word has hundreds of built-in autocorrections that correct everything from abbout (about) to yoiu (you). Learn how to customize AutoCorrect to suit your needs in the rest of this section.
How AutoCorrect works
AutoCorrect by default fixes common typing and formatting errors that we all make:
- Accidentally typing two capital letters at the beginning of a sentence.
- Failing to capitalize the first letter of a sentence, table cell, or day name.
- Accidentally typing with the Caps Lock key on.
- Some words that are misspelled according to the Word spelling checker dictionary. (If AutoCorrect were able to correct every word according to the dictionary, you wouldn't need to run the Spelling & Grammar checker feature.)
In addition, AutoCorrect includes its own list of corrections. It not only can correct specific word misspellings, such as changing adequite to adequate, but also can convert certain character sequences into symbols. For example, when you type (tm), AutoCorrect by default changes it to the ™ trademark symbol. It also converts several typed character combinations into smileys (emoticons) and various arrows.
You can customize the list of entries that AutoCorrect automatically replaces as well as its other default corrections in the AutoCorrect dialog box.
TIP
Anytime AutoCorrect makes an unwanted correction, you can immediately press Ctrl+Z to undo it. If you don't do so immediately, move your mouse pointer back over the word until you see a bar with a blue outline under the first letter. Point to that bar to display the AutoCorrect Options button, and then click the button. Click the desired option for undoing the correction, including telling AutoCorrect to stop making that particular fix in the future.
AutoCorrect options
You can make changes to how AutoCorrect behaves on the AutoCorrect tab of the AutoCorrect dialog box. Choose File ![]() Options
Options ![]() Proofing tab
Proofing tab ![]() AutoCorrect Options to display that tab in the AutoCorrect dialog box, shown in Figure 3.7.
AutoCorrect Options to display that tab in the AutoCorrect dialog box, shown in Figure 3.7.
Choose settings on this tab to cure many typo headaches.

The top check box, Show AutoCorrect Options buttons, controls whether the AutoCorrect Options button appears when you point to an AutoCorrected word, as described in the previous tip.
The next five check boxes control the five formatting typos AutoCorrect automatically fixes. You can turn these options on and off as needed. For example, if you writing a poem and you don't want to use any capital letters, even in sentences, clearing the Capitalize first letter of sentences check box before typing the poem could save some frustration.
TIP
If you find yourself frequently customizing the list of entries that AutoCorrect replaces, you can add a button for opening the AutoCorrect dialog box to the QAT. Right-click the QAT and choose Customize Quick Access Toolbar. Open the Choose commands from drop-down list and click Commands Not in the Ribbon. Scroll down the left list that appears, and click the first AutoCorrect Options… item listed. Click Add, and then click OK. Then you can use the new button on the QAT rather than going through the Word Options dialog box.
The Replace text as you type check box controls whether AutoCorrect enforces its other list of symbol and word corrections. In most cases, you will want to leave this choice checked, but you might want to uncheck it if, for example, you are a teacher creating a spelling test and you don't want your typos corrected in the document.
Removing built-in AutoCorrect entries
For many of us, the Replace text as you type option's correction list saves many hours of proofreading and correcting documents. Becoming acquainted with Word's built-in list can save you some surprises, because you'll learn what corrections you can count on it to make. Even so, this list may include some corrections you probably can't live with.
Suppose, for example, that you are writing a business plan for your new business, Fall In Cafe. You want to keep the name simple, yet AutoCorrect insists on correcting Cafe to Café. You could delete the café entry from the corrections list to stop the unwanted correction.
- Click File Options Proofing AutoCorrect Options.
- Type the first three or four letters of the entry that you want to delete so that it displays in the list of replacements. If needed, scroll the list further to display the entry to delete.
- Click the entry in the list.
- Click the Delete button.
TIP
Word deletes the selected correction immediately. However, the typo and correction remain visible in the Replace and With text boxes above the list. If you need to reinstate the entry, immediately click the Add button. Otherwise, you'll have to add the entry back manually as described next.
- Repeat Steps 2 through 4 to delete additional corrections from the list as needed.
- Click OK twice to close the AutoCorrect and Word Options dialog boxes.
Adding an AutoCorrect entry
You can customize the AutoCorrect feature by adding more corrections. You can not only add entries to correct additional typos, but also create shortcut entries that make your writing life easier. For example, you could create a shortcut for automatically entering your company name. Instead of typing Fall In Cafe, you could type fic, and AutoCorrect would automatically change the text to Fall In Cafe. Creating AutoCorrect entries for names and words that are long or difficult to type increases your accuracy and speed.
Note in Figure 3.8 that you have the option of inserting the replacement either as plain text or as formatted text. You can create plain-text entries directly from the dialog box. To create formatted text entries, however, you must first type, format, and select the example With text in a Word document.
Select the Formatted text option to include the formatting of the example text with the AutoCorrect entry.

Follow these steps to make either a formatted or unformatted custom AutoCorrect entry:
- For a formatted entry, type the text in the Word document, select it, and format it as desired. Leave the text selected for the next step.
- Click File Options Proofing AutoCorrect Options.
- Under Replace text as you type, click in the Replace text box, and type the typo or shortcut entry that you want AutoCorrect to fix. For example, Figure 3.8 shows fic entered here, the new shortcut for the formatted Fall In Cafe text shown in the With box.
- For an unformatted entry, click in the With text box, and type the desired correction; for a formatted entry, the text you selected in step 1 should already appear, so just click the Formatted text option button beside With to select it. For an unformatted entry, leave the Plain text option selected as it is by default.
- Click the Add button.
- Click OK twice to close the AutoCorrect and Word Options dialog boxes.
TIP
To avoid AutoCorrect errors, some users like to include an asterisk or other symbol at the beginning of the Replace entry. For example, you could enter *fic in Step 3 above rather than just fic.
Adding and Reviewing Properties
Most users create a wide variety of documents or work in an environment where a number of users work together on documents. In such a case, finding the right document can be challenging at times, especially if there are many documents with similar names and subjects. That's why Word, like many other programs, enables you to add identifying properties or metadata to any file. Properties include such items as a Title, Tags (keywords), or Comments. Word 2013 actually includes three locations where you can add properties.
NOTE
Windows 8 in particular can help you find a file based on the Authors, Tags, and Title properties. In a File Explorer window, click in the Search Documents text box beside the address bar. Click the Search Tools Search tab, click Other Properties in the Refine group, click the property type to search for, type the property information, and press Enter.
Viewing properties on the Info screen
Clicking File and leaving Info selected shows basic properties along the right side of the screen in Backstage view, as shown in Figure 3.9. To add a property such as a tag, click the gray Add… choice beside it, type the property information to include, and click a blank area. You can separate multiple properties such as multiple tags by typing a comma.
Use File ![]() Info to view Properties at the right.
Info to view Properties at the right.

To view more properties in the Backstage, click the Show All Properties link below the displayed properties. Click Properties above the list of properties to open a menu that enables you to work with properties in two other ways, as described next.
Using the Document Panel
If you choose File ![]() Info, click the Properties choice above the properties at the right, and then click Show Document Panel, the Document Panel appears above the document, just below the Ribbon. You can type in any of the text boxes shown to make a change to a property. When you finish working with the Document Panel, click its Close (X) button to close it.
Info, click the Properties choice above the properties at the right, and then click Show Document Panel, the Document Panel appears above the document, just below the Ribbon. You can type in any of the text boxes shown to make a change to a property. When you finish working with the Document Panel, click its Close (X) button to close it.
The Document Panel appears above the document and enables you to display a limited number of properties.

Showing advanced properties
You can open a Properties dialog box that displays all the available properties for the document, divided on different tabs, as shown in Figure 3.11. You can display this dialog box in one of two ways:
- Choose File Info, click the Properties choice above the properties at the right, and then click Advanced Properties.
- Click Document Properties in the upper-left corner of the Document Panel, and click Advanced Properties.
The Properties dialog box is considered advanced because it holds all the properties.

Some tabs of the Properties dialog box, such as the Statistics tab, only let you view information. On others, such as Summary, you can edit property entries in text boxes as needed. The Custom tab works a little differently. To add a custom property there, click a choice in the Name list, select one of the items on the Type drop-down list, type the property contents in the Value text box, and then click Add.
Click OK when you finish working in the Properties dialog box.
Power User Techniques
In this section I highlight some great power techniques that have stood me in good stead over the years. Some of these are mentioned elsewhere in the book but only in passing, so it's possible that they have escaped your notice.
Updating styles
Word's built-in styles change in appearance when you apply a new theme to the document. However, there's no guarantee that changing themes alone will make a particular style look the way you want it to. For example, you might want to make headings using the Heading 1 style larger or apply bold to make them more prominent. When you update the style, all text formatted with the style throughout the document is updated to match. This gives you a fast way of changing the look of your document. By default, the style updates you make only appear in the current document and do not affect other documents using the same template and styles.
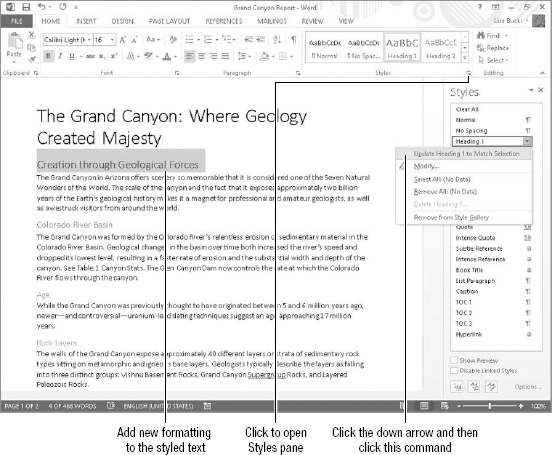
To update a style, use the Styles pane.
- Select the styled text, and change its formatting as desired. Leave the text selected for the next step.
- Click the Styles group dialog box launcher on the Home tab of the Ribbon. The Styles task pane opens.
- Move the mouse over the style in the task pane, click the down arrow that appears, and click Update [Style Name] to Match Selection as shown in Figure 3.12. (You also can right-click the style to open the menu.) Word immediately applies the style change throughout the document.
- Click the Styles pane's Close (X) button to close it.
Updating a style with new formatting changes all text using that style throughout the document.
Word offers a few optional shortcuts for updating a style:
- Update the style from the Style gallery. If the style to update appears in the Style gallery, you can right-click it there and click the Update [Style Name] to Match Selection command. This saves the trouble of displaying the Styles pane.
- Add Redefine Style to the QAT. If you frequently need to update styles, you can add the Redefine Style command to the QAT. Redefine Style is one of the many useful Word commands that exists behind the scenes until you add it to the QAT or Ribbon. Right-click the QAT and choose Customize Quick Access Toolbar. Open the Choose commands from drop-down list and click Commands Not in the Ribbon. Scroll down the left list that appears, and click the Redefine Style. Click Add, and then click OK. Then after you apply new formatting to some styled text, you can click the new button on the QAT to update the style rather than using the Styles pane.
GoBack
GoBack, another behind-the-scenes command that by default has the Shift+F5 shortcut key assigned to it, cycles the insertion among the current insertion point location and the last three places in which editing occurred. If multiple documents are open and editing last occurred in a document that's not onscreen, Shift+F5 will take you there.
If only one file is open, and if it was just opened, then Shift+F5 will take you to the last place in which editing occurred the last time that file was opened. This can be a good way to find where you left off.
Pasting unformatted text
One of the most frequently used features in Word is pasting unformatted text. When you copy text from a browser, another Word file, an Excel worksheet, or some other source, you very often just want the text, and not the extraneous formatting (which might include odd bits of HTML) as well. Microsoft realized that users often need to paste unformatted text, so the Paste button's drop-down menu includes the Keep Text Only button, shown in Figure 3.13. Pointing to one of the Paste Options buttons displays a Live Preview of how the pasted information will look as well.
If you prefer to use keyboard shortcuts, after copying text with Ctrl+C, you can press Alt+HVT to paste the table without formatting. In older versions of Word, you had to display the Paste Options dialog box to paste unformatted text. The keyboard shortcut was Alt+ESU, followed by Enter.
NOTE
Remember that with multikey KeyTip combinations, press Alt plus the first letter, and release. Then press the next letters in sequence. Another way of stating the Alt+HVT example is press Alt+H, then press V, then press T.
Live Preview shows how the top table would look when pasted as text.

Wrap to fit
If you don't like having to scroll horizontally in a document but keep Word zoomed above 150 percent most of the time and often create landscape oriented (wide) documents, you may want to take advantage of a couple of features that will eliminate the need to scroll horizontally.
First, use Draft view whenever possible. To use Draft view click Draft in the Views group of the View tab on the Ribbon.
Second, enable Word's ability to wrap text to fit the window onscreen. Choose File ![]() Options
Options ![]() Advanced. Scroll down to the Show document content section, and click to enable Show text wrapped within the document window. Note that this won't work in any of the layout views, because it doesn't accurately display document layout.
Advanced. Scroll down to the Show document content section, and click to enable Show text wrapped within the document window. Note that this won't work in any of the layout views, because it doesn't accurately display document layout.
Applying styles (Ctrl+Shift+S)
When you want to change the style applied to the selected text, press Ctrl+Shift+S, type the first few characters of the style name until it appears in the Style Name box (you can also press the up or down arrow to finish selecting the desired style). Press Enter to apply the selected style to the text. With this method, you never have to take your hands off the keyboard to apply the style. You'll save a few seconds every time you use a keyboard shortcut rather than the Ribbon.
Default file location(s)
If you store each and every file that you create in the Documents library (which by default places them in the My Documents folder that is part of your personal folders), you'll eventually have trouble finding the file you need, because you'll be scrolling through so many files. You can change the default location where Word saves files in Word options. For example, you might want to change the save location if your employer wants you to store project files in a network folder rather than your local hard disk. Or, you may have a second hard disk installed in your computer for your data files and want to save to a folder on it instead.
To change the default location to which files are stored in Word:
- Click File Options Save.
- In the Save documents section beside Default local file location, click the Browse button. The Modify Location dialog box opens.
- Navigate to the new file storage location using the Navigation pane, folder path at the top, or by double-clicking folder icons in the files list.
- Click OK twice. This applies your change and closes both the Modify Locations and Word Options dialog boxes.
NOTE
The Advanced tab of the Word Options dialog box enables you to change additional file locations. Scroll down to the General section, and click the File Locations button. Now use the File Locations dialog box to change other locations, such as the default location for User templates.
Playing Favorites
The Navigation pane in Word's Open and Save As dialog boxes includes a list of favorites—handy locations for storing files. You can customize the Favorites list to include your own favorite location:
- Click File Open.
- Click Computer under Open in the middle pane.
- Click the Browse button under Computer in the right pane. The Open dialog box appears.
- Navigate to and open the folder that you want to mark as a favorite.
- In the Navigation pane, right-click Favorites, and click Add current location to Favorites.
- Continue and open a file, or just click Cancel to close the dialog box and then the Back button at the upper left of the File tab to return to your prior document.
NOTE
You also can drag a folder to the Favorites list. This works within the Open dialog box, so in place of Step 4 above, you could navigate to the point where you see the folder in the file/folder list at left, and then drag it into the Favorites list in the Navigation pane at the left side of the Open dialog box. Or, in a File Explorer (Windows 8) or Windows Explorer (Windows 7) window, you can likewise drag a folder from the list at the right and drop it into the Favorites in the Navigation pane.
After you've added a location to the Favorites list, click it in the list to jump directly to that folder in the Open or Save As dialog box.
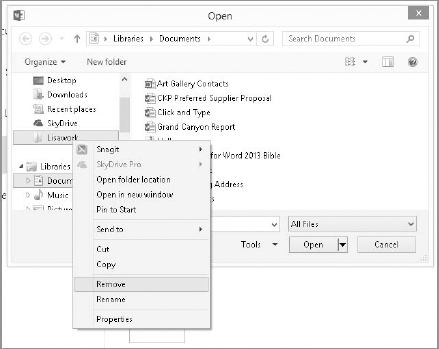
Once a favorite outlives its usefulness, remove it. Right-click it in the Favorites list in either the Open or Save As dialog box, and choose Remove as shown in Figure 3.14. The original location is untouched. Only the shortcut to it is removed from the Favorites area.
You can remove a favorite that you no longer need.
Don't like the default arrangement? Then drag the shortcuts around so that they meet your needs.
Enabling AutoRecover and backup saving
If you hate losing work (and most of us do), make sure that the AutoRecover feature is active and set to a relatively short save interval. Most users set up AutoRecover to save the necessary information every 10 minutes or less. AutoRecover is not the same thing as saving a copy of your file, however. AutoRecover attempts to recover your documents only if Word crashes or you otherwise forget to save something. It does not automatically do a normal save of your document. Saving your document is up to you.
In addition to pressing Ctrl+S often, it's a good practice to tell Word to make a backup copy each time you save your file. This feature does act as an automated way of creating another copy of your file. If somehow a crash corrupts the main document file, you can work from the backup copy instead. Depending on when you last saved, the backup copy may not have all of your most recent changes, but it will ensure you will lose less work than if your document is corrupted and you don't have a backup.
The AutoRecover feature is enabled by default, but saving a backup copy is not. Here's how to ensure that both of these features are turned on and set up as you prefer:
- Click File Options Save. The AutoRecover settings appear in the Save documents section of the displayed tab in the Word Options dialog box.
- Make sure that the Save AutoRecover information every check box is checked.
- If needed, change the minutes text box entry beside Save AutoRecover information every to adjust the save interval. You can either double-click the text box entry and type a new one, or use the spinner arrow buttons. Choose an interval that reflects your work habits. If you're a fast worker you might want to set it to as little as every minute or two. For most users the default 10 minutes seems a bit too infrequent.
- Make sure that the Keep the last autosaved version if I close without saving check box is checked. This ensures that Word's file versioning feature will keep at least one autosaved copy of your files available even if you forget to save.
- Click the Advanced tab in the Word Options dialog box.
- Scroll down to the Save section, and click the Always create backup copy to check (enable) it. Word will now begin saving a backup copy each time you save a file.
- Click OK to close the Word Options dialog box.
NOTE
When Word creates a backup copy of a file, it adds Backup of to the beginning of the file name and changes the file extension to .wbk. Despite the differing extension, the file works like a regular Word file. You can use the Open dialog box to open it, or double-click it in a folder window on the Windows desktop to open it.
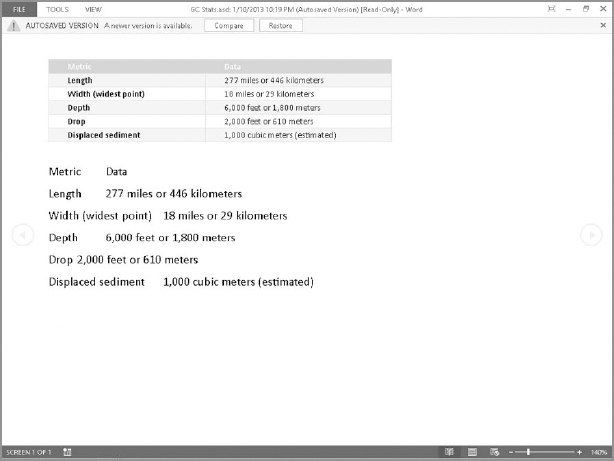
The AutoRecover save interval feature also controls how often Word creates autosaved versions of files (.asd files). When you choose File ![]() Info, the Versions section lists all .asd (autosaved) file versions. Click one of the listed autosaved files to open it. As shown in Figure 3.15, a yellow Message Bar appears at the top and asks whether how you want to use the file. Click Compare to incorporate any changes from the autosaved version of the file as marked corrections in the current version, or click Restore to replace the current file with the autosaved version.
Info, the Versions section lists all .asd (autosaved) file versions. Click one of the listed autosaved files to open it. As shown in Figure 3.15, a yellow Message Bar appears at the top and asks whether how you want to use the file. Click Compare to incorporate any changes from the autosaved version of the file as marked corrections in the current version, or click Restore to replace the current file with the autosaved version.
When you open an autosaved file version, you can compare it to the current file or restore it.
To access autosaved versions of other files from the Info choices on the File tab, click the Manage Versions button and then click Recover Unsaved Documents as shown in Figure 3.16. By default, this displays the Open dialog box and shows all .asd files in C:Usersuser nameAppDataLocalMicrosoftOfficeUnsavedFiles.
Note that this is not the same location as the AutoRecover files location set in File ![]() Options
Options ![]() Advanced
Advanced ![]() File Locations. Instead, this is where Word saves versions of unsaved files left over from previous Word work sessions. (You made sure that this feature was enabled in Step 4 earlier.) According to Word's online Help, the autosaved versions will be kept in the above folder for four days after Word creates them. These autosaved file versions serve as one of several last ditch efforts to recover a document you think something you worked on is hopelessly lost.
File Locations. Instead, this is where Word saves versions of unsaved files left over from previous Word work sessions. (You made sure that this feature was enabled in Step 4 earlier.) According to Word's online Help, the autosaved versions will be kept in the above folder for four days after Word creates them. These autosaved file versions serve as one of several last ditch efforts to recover a document you think something you worked on is hopelessly lost.
You also can choose a command that opens the location where Word stores autosaved versions of other files.

Don't save only to removable media
One of the most common causes of corrupted documents in Word (and other apps, for that matter) is saving a file directly to removable media such as a USB flash (thumb) drive. Because of the way Word creates and uses temporary files, many of those working files end up in the same folder in which the original file is being edited. As you edit, temporary files are constantly being opened. In some cases they can be many times larger than the original file. This makes it exceedingly easy for removable media to fill up. Once Word runs out of space, you can kiss your file goodbye. While the idea of saving your file directly to a USB drive, SD card, CF card, or other removable media may be tempting, it's a safer practice to save your files to your computer's hard disk, and then copy the files to the removable media after saving and closing them in Word.
Another corruption scenario occurs when removable media is removed while Word still has the file open. And by “open,” I mean that quite literally. Word often separates the file into different pieces to make editing more efficient from a programming standpoint. Usually Word doesn't reassemble the file until it has been fully closed. A recent Save isn't sufficient. If you remove the media before the file closes, you quite likely will corrupt the file. Even if you close the file, removing the media before you have properly ejected it from the system can damage files on the drive. (For this reason, better quality USB drives have an LED light that flashes while the drive is saving and remains on until you eject the drive.)
Something similar can happen, although this is less common, if a file being edited resides on a server and you lose connection with the server before the file is properly closed. Think of the server as you think of removable media. If you lose your server connection, you can save a copy of the file to your local computer, and then use Save As to later resave it to the server when you're able to reconnect.
So, if you shouldn't edit directly on removable media, what should you do? Use an Explorer window from the Windows desktop to copy the file to your own local hard drive. Edit it there, save it, and close it. Then use Explorer to copy the changed file back to the location or removable media where you want it.
You can further protect yourself by telling Word to copy remote files to your computer when they are stored on a server. In File ![]() Options
Options ![]() Advanced, scroll down to the Save section, and click to enable the Copy remotely stored files onto your computer, and update the remove file when saving check box.
Advanced, scroll down to the Save section, and click to enable the Copy remotely stored files onto your computer, and update the remove file when saving check box.
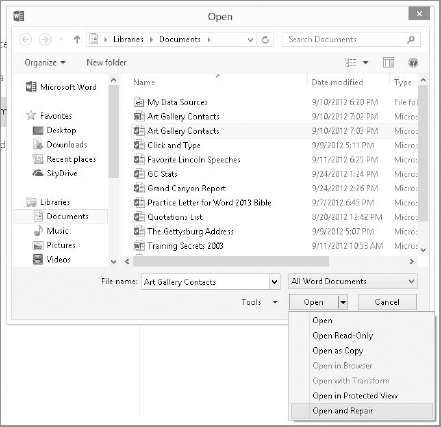
Open and Repair
Word's Open dialog box includes an Open and Repair command. It's easy to overlook this option because you have to know where in the dialog box to find it, but it is simple to access and use.
Whenever Word is unable to open a file the normal way, Open and Repair might be your best hope of recovering as much as possible to avoid losing difficult-to-redo editing. When you encounter a file that Word says it can't open, display the Open dialog box and select the file. Rather than click Open, click the drop-down arrow next to the Open button, and choose Open and Repair as shown in Figure 3.17. In recent Word versions, this has been fixing more and more documents (although it's not a miracle worker).
The Open drop-down list enables you to choose other methods for opening a file, including Open and Repair.
Last ditch salvage
If Open and Repair fails, your last resort might be to attempt to use Recover Text from Any File, which you access by selecting Recover Text from Any File from the File type list beside the File name text box in the Open dialog box. Note, however, that this recovery feature should not be used on files saved in any of Word's new .docx and .docm formats. That's because those files are actually compressed ZIP files, and you will not recover any useful text from them. Instead, rename the damaged file so that it has a .zip extension. Then, open the ZIP file and look for a folder named Word. Inside that folder there should be a file named document.xml (yes, document.xml is the actual filename). That file will contain the text of your document amid a lot of XML commands.
Sorting paragraphs that aren't in a table
Many Word users are familiar with sorting the rows in a table, but many don't realize that Word enables you to sort any list—even one that's not in a table. Select the items you want sorted and click the Sort button in the Paragraph group of the Home tab. This opens the Sort Text dialog box, which you can use to specify the details for the sort.
Moving paragraphs easily
If you ever have two paragraphs that you need to quickly swap, don't reach for the mouse. Instead, put the insertion point into either paragraph and use Shift+Alt+Up or Shift+Alt+Down to move the current paragraph up or down so that it changes places with the other paragraph. These are outlining keyboard shortcuts, but they work great for when you're editing text in Print Layout view as well. You can also quickly move rows around in tables using these shortcuts.
Summary
In this chapter you've learned about some of Word's most useful and important power features and tools. You should now be familiar with them and ready to start using them to enhance and simplify your work with Word documents. You can now work smarter in Word by:
- Using styles to format a document more quickly and consistently, ensuring a more professional and refined look for your documents
- Building a document from the top down by creating and organizing headings in Outline view
- Using the Navigation pane to view outline HEADINGS and rearrange them
- Understanding how AutoCorrect cleans up typos
- Removing unwanted AutoCorrect entries and adding your own automatic corrections and shortcuts to reduce tedium and improve your productivity
- Adding properties that make it easier to find files
- Taking advantage of some key Word Options and power techniques to make Word easier, faster, and more powerful for everyday word processing