
CHAPTER 2
Diving Into Document Creation
- Walking through a document from start to finish
- Making a new blank file or using a template
- Reopening a saved document
- Saving a document
- Reviewing file formats and compatibility issues
- Navigating in a document and selecting text
- Using Word's various views
- Making a document hard copy
When a coach teaches someone a new sport, he or she starts with the fundamentals. Eager students often want to skip the basics—especially when in a rush to be productive with new software—and what they miss out on learning now can trip them up later. The first section in this chapter gives a nod to your need to get up and running quickly in Word, showing you how to write and print a letter and envelope in 15 minutes or less. From there, the chapter moves on to discuss the essential skills that will serve you well every time you work with Word 2013. If you're new to Word, this chapter makes getting started painless. If you've been using Word for years, you may not only pick up some tricks you previously missed, but also get an introduction to a few new features in the latest version of Word. You also explore creating files, saving and reopening files, navigating in the text and making selections, viewing variations, and making a printout.
Creating a First Document
If your computer is connected to the Internet, as is more and more the case as high-speed and wireless connections proliferate, you can take advantage of a robust collection of professionally designed online documents to help you create a document. Using one of those as a head start, you can create a terrific-looking document such as a letter in 15 minutes or less. Follow the steps in this section to see how quickly you can get results and create your first document in Word 2013.
Creating and saving a new letter and envelope
The first part of this process involves starting up Word 2013, choosing a template to use for the document, and saving and naming your file. You'll learn about both templates and saving in greater depth later in the chapter, so just relax and follow the steps here for now.
- Start Word using the method of your choice as described in Chapter 1, “Taking Your First Steps with Word.” For example, in Windows 8 you can click the Word 2013 tile on the Start screen or use the Search charm to find it. In Windows 7, click Start
 All Programs Microsoft Office 2013 Word 2013.
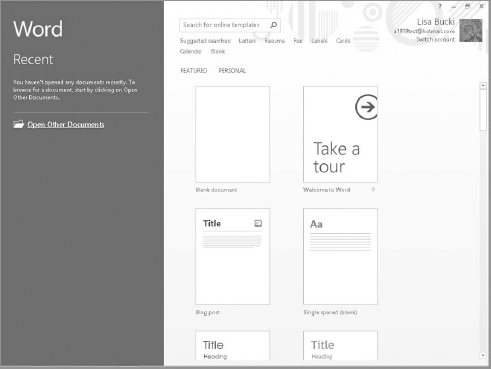
By default, the main template choices for creating a new document appear in the Word Start screen, as shown in Figure 2.1. The FEATURED and PERSONAL choices above the templates in Figure 2.1 do not appear until you have created and saved a custom template as described later in Chapter 18, “Saving Time with Templates, Themes, and Master Documents.”
NOTE
You can use the charms in Windows 8 to easily access commonly used functionality, including finding and starting applications or Windows 8 apps. The charms appear at the right side of the screen and include Search, Share, Start, Devices, and Settings. To display the charms, you can move your mouse to one of the right screen corners (or simply touch the right border of the screen on a touch screen); then you can click a charm to select it.
Create a blank document or choose a template here.
- Click in the Search online templates text box, type letterhead and envelope, and press Enter.
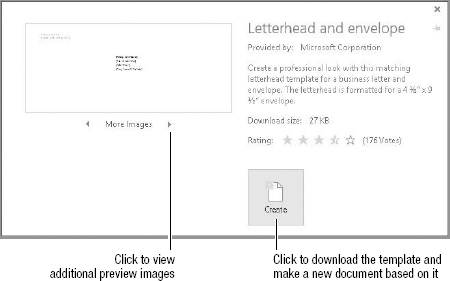
- In the results that appear, click the Letterhead and envelope template choice. A small window describing the template appears, as shown in Figure 2.2. If you see More Images and arrow buttons below the template preview image, you can click the arrow buttons as desired to see additional preview images.
NOTE
The templates available online change over time. If you don't see the Letterhead and envelope template, pick any other template that has an envelope and letter or another that appeals to you, and follow those steps that still apply in the rest of this section.
Word displays a preview and description of the selected template before you download it.
- Click the Create button. The window displays a message that the template is downloading, and then the new document opens onscreen, showing a page for the envelope at the top, and then a page for the letter itself.
- Click File Save As. The Save As choices appear.
- Click Computer in the middle pane, and then click Documents in the right pane under Computer. (If you don't see Documents, click Browse.) This opens the Save As dialog box, where you can specify a name for the letter file. The temporary name in the File name text box is selected by default.
- Type Practice Letter for Word 2013 Bible, and then click the Save button.
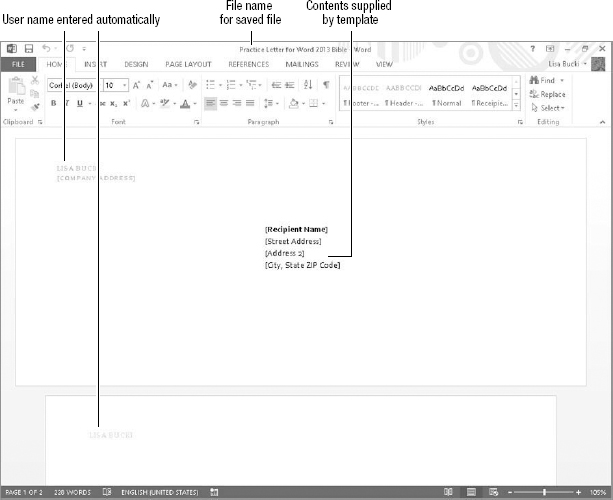
- If you see a message box informing you that the document will be upgraded to the newest file format, click OK. The new name for your document appears in the Word window title bar as shown in Figure 2.3. Notice that the template also may fill in some information for you, such as adding your username above the return address on the envelope, and at the upper-left corner of the letter.
The newly named file was set up based on the downloaded template.
TIP
As you work on this and any other document, press Ctrl+S frequently to save your most recent changes. Like any other application, Word 2013 can crash from time to time, and the more recently you've saved your work, the less you'll have to redo when a crash happens.
Filling in the envelope
As shown in Figure 2.3, the template you selected created a page for the envelope at the top of the document. It also includes several placeholders or content controls enclosed in square brackets—[ ]. Examples include [COMPANY ADDRESS] at the upper left and one for each line of the addressee information in the center of the envelope. To fill in a control, simply click it and type to replace the placeholder information. Fill in the envelope content controls now.
- If you want to add your own custom information to the letter, you can do one of two things:
- Click each content control on the envelope page and type the desired information.
- Click each content control listed below and type the specified information:
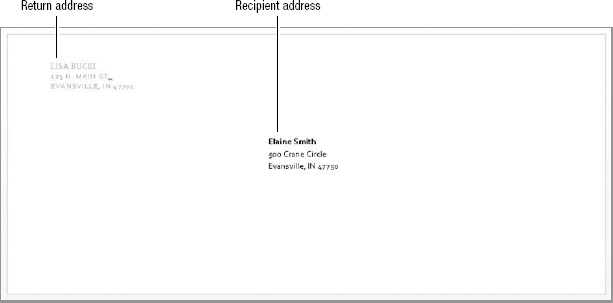
[COMPANY ADDRESS] 123 N. Main St.
Evansville, IN 47701[Recipient Name] Elaine Smith [Street Address] 500 Crane Circle [City, State ZIP Code] Evansville, IN 47750
NOTE
Press Enter at the end of the first line when making your entry in the [COMPANY ADDRESS] content control. Notice that the template is set up to format the text for that control with all caps.
- Right-click the [Address 2] content control, and click Remove Content Control in the shortcut menu. You will also need to take this step when filling in your own information if you don't use this particular control.
- Press Delete to remove the blank line.
- Press Ctrl+S to save your work. The envelope text should now appear as shown in Figure 2.4.
Filling in the content controls on the envelope goes quickly and results in a nicely formatted envelope.
NOTE
Some templates use a legacy type of content placeholder called a field. Chapter 24, “Creating Custom Forms,” explains how you can create content controls and fields and explores the differences in working with them. When working with a field code, you can press Shift+F9 to toggle between the code itself and the displayed result, so that's one way to tell the two types of placeholders apart.
Filling in the letter
Some content controls in templates offer even more automation, and the Letterhead and envelope template contains a couple of examples. At the top of the second page of the document, which holds the letter, a [Pick the date] control appears. When you click that control, a down arrow appears. Clicking it in turn displays a drop-down calendar or date picker that you can use to select the date. Below the date, the inside address for the letter includes content controls that are set up to retrieve information entered in other controls—in this case, the recipient information you already entered on the envelope. Even the name in the greeting or salutation line is filled in for you. The remaining controls for the body, closing, and footer work like those on the envelope page in the file.
Fill in the rest of the letter now, either using the text suggested in the steps below or your own text if you prefer.
- Scroll down the document so that you can see the top half or so of the second page. To scroll, you can click the down arrow at the bottom of the vertical scroll bar at the right side of Word, or drag the scroll box on the bar down.
- Click the [Pick the date] content control, and then click the down arrow at its right side to display the date picker calendar. See Figure 2.5.
A date picker content control shows a calendar to make date entry faster.
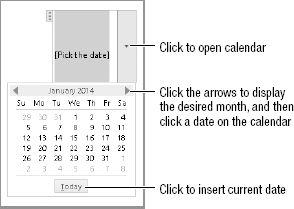
- Click the Today button at the bottom of the date picker calendar. This inserts the current date. To insert another date, use the left and right arrows in the upper corners of the date picker to move to the desired month, and then click a date.
- Click the [Address 2] control in the inside address, and press the Delete key three times. This deletes the control and the line it occupied.
- Scroll down if needed, and click the body text control under the greeting line. This selects all the text in the control, which will be replaced by the text you type.
- Type the following text, pressing Enter after the first line to create a new paragraph:
Thank you for joining the Evansville Evenings Book Club.
We have received your membership fee payment: check #152 in the amount of $20. Membership fees fund basic refreshments for our meetings, but members are free to bring additional snacks and beverages as desired.
- Click the closing content control ([Sincerely]), and type:
Welcome to the group,
- Scroll down to the bottom of the page until you see the light blue footer text, which includes the return address you typed for the envelope.
- Double-click the [COMPANY E-MAIL] content control. This opens the footer area for editing and selects the control.
- Either type an email address or press Delete three times to remove the control.
- Click the [COMPANY PHONE] content control in the footer, and either type a phone number or press the Backspace key nine times. The use of Backspace in this instance both removes the control and the two vertical pipe characters used to set off each piece of information in the footer.
- On the Header & Footer Tools Design subtab, click the Close Header and Footer button in the Close group.
Formatting, saving, and printing the letter
The predefined formatting set up in every template also makes using a template a great time-saver. That doesn't mean you have to be 100 percent satisfied with the predefined formatting. You can change the appearance as well as the content of any document based on a template. For example, the body text in the letter you've just created might look a little small to you. One quick and dirty way to change document formatting is to apply a new theme, a technique you'll try out now. From there, you can save the letter and print it. During the printing process, you'll be able to see a preview of the finished document. Go for it now.
- Click the Design tab on the Ribbon.
- In the Document Formatting group, click Themes.
- Move your mouse pointer over the Facet theme. Live Preview displays the document body text using the appearance specified by that theme, which includes slightly larger text.
- Click the Facet theme to apply it to the document.
- Press Ctrl+S or choose File Save. This saves your most recent additions to the document text, as well as the new theme setting.
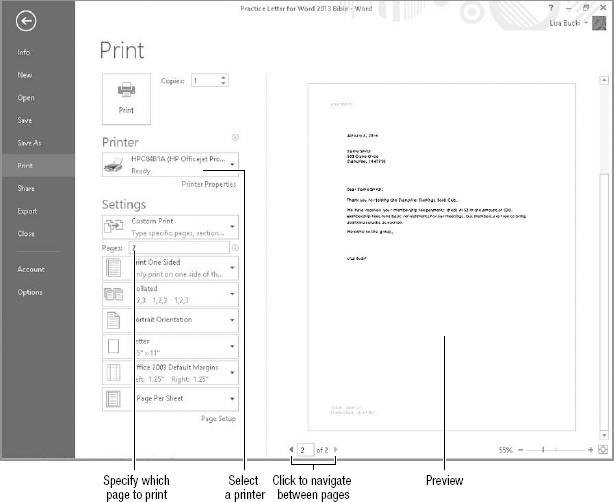
- Choose File Print. A preview of the first envelope page of the document appears.
- Below the envelope preview, click the Next Page (right arrow) button. The second page, which is the letter itself, appears in the preview pane, as shown in Figure 2.6.
- Under Printer, if you don't see the name of the printer to use, click the drop-down box, and then click the desired printer in the list. “Ready” appears below the name of any printer that's connected to your computer and turned on.
- Under Settings, click in the Pages text box and type 2. This tells Word to print only the letter page of the document. (Page 1 is the envelope.)
- Click Print. Word sends the letter page to the printer.
The printing process enables you to preview the finished document.
Printing the envelope
The process for printing an envelope page works just like printing a letter: give the Print command, choose which page to print, and go. The trickiest part is inserting the blank envelope correctly in your printer. Many of today's printers have sliding guides in either the manual feed or the paper tray. You slide those guides closer together so that they feed the envelope into the printer at the right spot and prevent slipping. You also need to insert the envelope itself in the right aspect for your printer: face up or face down. Look for a small icon on your printer's tray or feed that diagrams how to place the envelope, or consult the printer manual to find out how to do it correctly. Once your blank envelope is in place and the printer is turned on, you can send the envelope information for your first document to the printer.
- Choose File Print.
- Under Printer, if you don't see the name of the printer to use, click the drop-down box, and then click the desired printer in the list.
- Under Settings, click in the Pages text box and type 1. This tells Word to print only the envelope page of the document.
- Click Print. Word sends the letter page to the printer.
For most of today's printers, you need not even change the paper size when printing. However, if the envelope prints incorrectly, you could click the Letter paper size under Settings after choosing the Print command, and then click one of the Envelope sizes, such as Envelope #10.
TIP
If you choose a letter template that doesn't include an envelope page, Word still gives you an easy way to create one. Select the inside address at the top of your letter, and press Ctrl+C to copy it. Choose Mailings ![]() Create
Create ![]() Envelopes. The Envelopes and Labels dialog box opens with the copied address in the Delivery address text box. Enter a Return address if desired. From there you can click Print to send the envelope to the printer or click Add to Document to add it to the letter document file.
Envelopes. The Envelopes and Labels dialog box opens with the copied address in the Delivery address text box. Enter a Return address if desired. From there you can click Print to send the envelope to the printer or click Add to Document to add it to the letter document file.
Creating a Blank File
When you start the Word 2013 app, the upper-left choice in the collection of templates that appears is Blank document. Selecting it creates a new, blank document file by default for you. (The actual name of the template applied to new, blank files is Normal.dotm.) This document file has the placeholder name Document1 until you save it to assign a more specific name, as described later in the chapter. You can immediately start entering content into this blank document.
If you need another blank document at any time after starting Word, you can create it by following these steps:
- Select File New. The New Document dialog box appears.
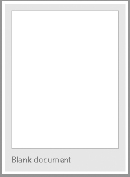
- Click the Blank Document tile. See Figure 2.7.
Clicking Ctrl+N also creates a new, blank file directly.
Click this tile or icon to create a blank file.
Typing text
When you create a new, blank document, you can begin typing text to fill the page. As you type, each character appears to the left of the blinking vertical insertion point. You can use the Backspace and Delete keys to delete text, the spacebar to enter spaces, and all the other keys that you're using for typing.
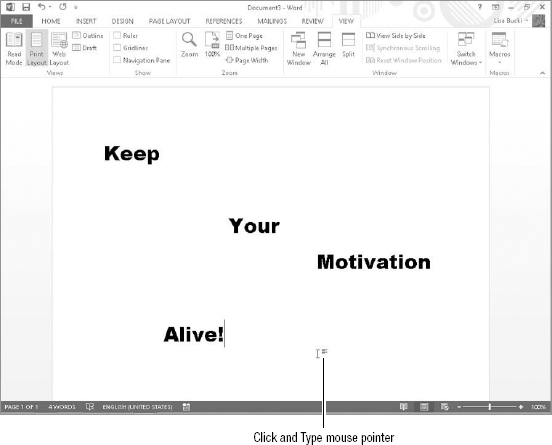
Word also enables you to start a line of text anywhere on the page using the Click and Type feature. To take advantage of Click and Type, move the mouse pointer over a blank area of the page. If you don't see formatting symbols below the I-beam mouse pointer, click once. This enables Click and Type and displays its special mouse pointer. Then, you can double-click to position the pointer on the page and type your text. Figure 2.8 shows snippets of text added to a page using Click and Type.
NOTE
Click and Type only works in the Print Layout view, so to learn more about that view, see the section called “Choosing the Right Word View for the Task at Hand” later in this chapter. Changing to another view does not remove the Click and Type text positioning, even though it might appear to n a view such as Outline view. The document will look the same when you change back to Print Layout view.
Double-click and type anywhere on the page.
Using word wrap
By default, the margins for a blank document in Word 2013 are 1 inch on the left and the right. When you type enough text to fill each line, hitting the right margin boundary, Word automatically moves the insertion point to the next line. This automated feature is called word wrap, and it's a heck of a lot more convenient than having to make a manual carriage return at the end of each line.
If you adjust the margins for the document, word wrap always keeps your text within the new margin boundaries. Similarly, if you apply a right indent, divide the document into columns, or create a table and type in a table cell, word wrap automatically creates a new line of text at every right boundary. Just keep typing until you want or need to start a new paragraph (covered shortly). Later chapters cover changing margins and indents and working with tables and columns.
Inserting versus overtyping
Like its prior versions, Word 2013 offers two modes for entering text: Insert mode and Overtype mode. In Insert mode, the default mode, if you click within existing text and type, Word inserts the added text between the existing characters, moving text to the right of the insertion point farther right to accommodate your additions and rewrapping the line as needed. In contrast, when you switch to Overtype mode, any text you type replaces text to the right of the insertion point.
Overtyping is a fine method of data entry—when it's the mode that you want. Unfortunately, in older Word versions, the Insert key on the keyboard toggled between Insert and Overtype modes by default. Because the Insert key is often found above or right next to the Delete key on the keyboard, many a surprised user would accidentally hit the Insert key and then unhappily type right over his text.
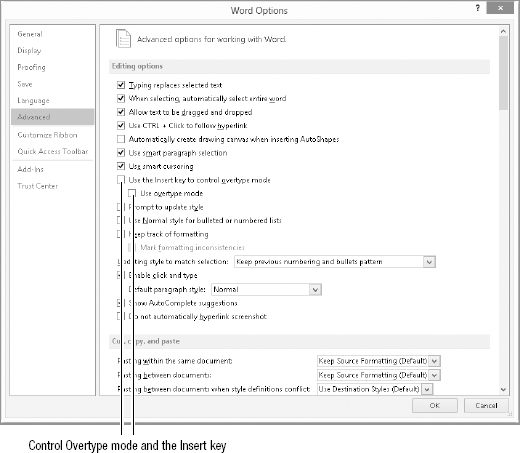
In Word 2013, the Insert key's control of Overtype mode is turned off by default. You can use the Word Options dialog box to turn Overtype mode on and off, and also to enable the Insert key's control of Overtype mode. Select File ![]() Options, and then click Advanced in the list at the left side of the Word Options dialog box. Use the Use overtype mode check box (Figure 2.9) to toggle Overtype mode on and off, and the Use the Insert key to control overtype mode check box to toggle the Insert key's control of Overtype mode on and off. Click OK to apply your changes.
Options, and then click Advanced in the list at the left side of the Word Options dialog box. Use the Use overtype mode check box (Figure 2.9) to toggle Overtype mode on and off, and the Use the Insert key to control overtype mode check box to toggle the Insert key's control of Overtype mode on and off. Click OK to apply your changes.
The Word Options dialog box enables you to turn Overtype mode on and off.
Using default tabs
Every new, blank document has default tab stops already set up for you. These tabs are set at ½-inch (0.5-inch) intervals along the whole width of the document between the margins. To align text to any of these default tab stops, press the Tab key. You can press Tab multiple times if you need to allow more width between the information that you're using the tab stops to align.
TIP
To display the rulers so that you can better work with text alignment features like tabs in a document, click the View ![]() Show
Show ![]() Ruler check box to check it.
Ruler check box to check it.
Making a new paragraph
In legacy versions of Word, when you wanted to create a new paragraph in a blank document, you had to press the Enter key twice. That's because the default body text style didn't provide for any extra spacing after a paragraph mark, which is a hidden symbol inserted when you press Enter.
Starting with Word 2007, pressing Enter by default not only inserts the paragraph mark to create a new paragraph, but also inserts extra spacing between paragraphs to separate them visually and eliminate the need to press Enter twice. As shown in Figure 2.10, when you press Enter after a paragraph, the insertion point moves down to the beginning of a new paragraph, and Word includes spacing above the new paragraph.
Press Enter to create a new paragraph in Word.
Creating a File from a Template
Every new document you create in Word 2013—even a blank document—is based on a template that specifies basic formatting for the document such as margin settings and default text styles. When you create a blank document, Word automatically applies the default global template, Normal.dotm.
While a document theme supplies the overall formatting for a file, a template takes that a step further. A template may not only include particular text and document formatting selections, but also has placeholders and example text as you saw when you created your first document earlier in the chapter. Templates also can contain automatic macros that swing into action each time you create, open, or close a document, as well as other macros you can use to perform tasks for building the document.
Using templates can dramatically reduce the amount of time you spend thinking about your document's content and formatting, because someone else has already invested the time to answer those questions. For example, a home repair company might set up a template for written estimates, job contracts, and change orders. Rather than starting every such document from scratch, the project manager could simply create a new document using the applicable template, and fill in the information pertinent to the current client.
In that type of scenario or in your business and personal life, using templates offers the following benefits:
- The documents produced will be consistent, even when they are produced by different people.
- If the templates are carefully developed and reviewed, using them ensures that your documents will be complete with all the needed information, every time.
- Setting up templates with your company logo and contact information ensures that information will appear on every document you create, which helps with branding and promoting your organization.
- For longer documents like reports or newsletters, the benefit of using a template increases, because designing all the formatting in such documents can be time consuming.
Take a look at the templates available to you via Word now.
NOTE
Templates can contain macros with shortcut key assignments, styles for working on particular kinds of documents, and even custom content controls like those you worked with earlier in the chapter. You'll learn about creating your own styles, macros, fields, and controls in later chapters, as well as how to save the custom features you create in your own templates.
Reviewing available document templates
When you start Word 2013 or click File ![]() New, the right pane of the screen displays a selection of templates, shown in Figure 2.11. You can scroll down this screen to see a selection of suggested templates.
New, the right pane of the screen displays a selection of templates, shown in Figure 2.11. You can scroll down this screen to see a selection of suggested templates.
Starting Word or clicking File ![]() New shows you Word's templates.
New shows you Word's templates.

TIP
You can save a step by adding the New command to your Quick Access Toolbar. Click the Customize Quick Access Toolbar arrow at the right end of the QAT, and then click New.
Blank document and pinned templates
The Blank document template always appears among the templates. Selecting it creates a new document based on Normal.dotm. Figure 2.11 also shows the Letterhead and envelope template. If you followed the earlier example, it will appear the next time you choose File ![]() New, because Word automatically includes recently used templates in the list. If you look carefully at Figure 2.11, you'll see that a small pushpin icon to the right of the Welcome to Word template name. That means that item is pinned to stay on the list of templates. To pin or unpin a template, point to its thumbnail, move the mouse pointer over the pushpin icon, and click the icon to toggle it to be pinned or unpinned.
New, because Word automatically includes recently used templates in the list. If you look carefully at Figure 2.11, you'll see that a small pushpin icon to the right of the Welcome to Word template name. That means that item is pinned to stay on the list of templates. To pin or unpin a template, point to its thumbnail, move the mouse pointer over the pushpin icon, and click the icon to toggle it to be pinned or unpinned.
Common templates you might want to pin to the list include:
- Blog post: This creates a new document based on Blog.dotx, a special template that's designed for blog entries.
- Single spaced (blank): This creates a new document based on the Single spaced.dotx template, with a Normal style that lacks extra spacing after paragraphs. If you choose this template, you have to press Enter twice to create paragraphs, as in older versions of Word.
To create a blank document based on Normal.dotm, you could simply press Ctrl+N, bypassing the need to choose the New command.
NOTE
It is possible to update the Normal.dotm template file on your system with custom content and text, but most experts don't recommend doing so. Keeping Normal.dotm clean and lean enables you to always start with a clean document slate when you need to.
Online templates
Virtually all of the templates in Word 2013 exist in the cloud rather than being installed on your computer. In addition to the suggested templates shown when you click File ![]() New, you can scroll down to see and select additional templates. Any template that you select is downloaded to your system and stored there for future use.
New, you can scroll down to see and select additional templates. Any template that you select is downloaded to your system and stored there for future use.
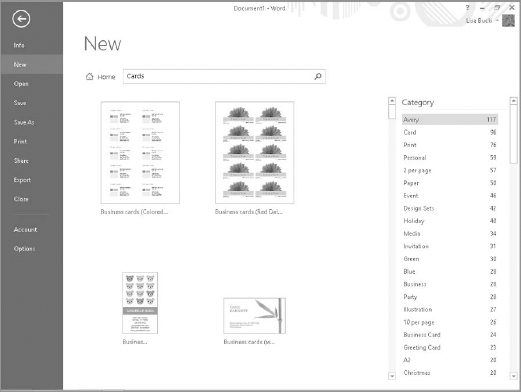
If you don't see a template that suits your needs, you can search online for additional templates. You can type a search word or phrase in the Search online templates text box above the templates and press Enter to begin a search. Or you can click one of the Suggested searches links below the Search online templates text box, such as Cards. After the search runs, scroll down to view additional results, or use the Filter by list at the right (see Figure 2.12) to refine the results.
You can refine the Cards search by clicking the Avery (or another) category under Filter by in the right pane.
Creating the file from the template
Now that you're familiar with what templates do and where to find them, follow these steps when you want to create a new document based on a template:
- Select File New.
- To search for a template, type a search word or phrase in the Search online templates text box and press Enter, or click one of the Suggested searches links. (If you don't need to search for a template, skip to Step 4.) Thumbnails or tiles and names for the matching templates appear in the middle section of the screen.
- To narrow the list of templates shown, click a category under Filter by in the right pane.
- Click the thumbnail for the desired template. Documents for the three direct templates discussed earlier will open immediately. For other templates, a preview for the template appears in its own window, as you saw back in Figure 2.2.
NOTE
As noted earlier, when you see FEATURED and PERSONAL above the template thumbnails, it means you have saved a custom template. Click PERSONAL to find and select one of your custom templates.
- Click the Create button to download the template and create the new file. The window displays a message that the template is downloading, and then the new document opens onscreen, showing a page for the envelope at top, and then a page for the letter itself.
The new document appears onscreen.
NOTE
Some of the templates available via Office.com were created in earlier Word versions. Those documents will open in Compatibility mode, which is described later in this chapter.
Working with template content
As shown in Figure 2.13, a template might hold a variety of sample contents and placeholders.
Replace template placeholders with your own content.
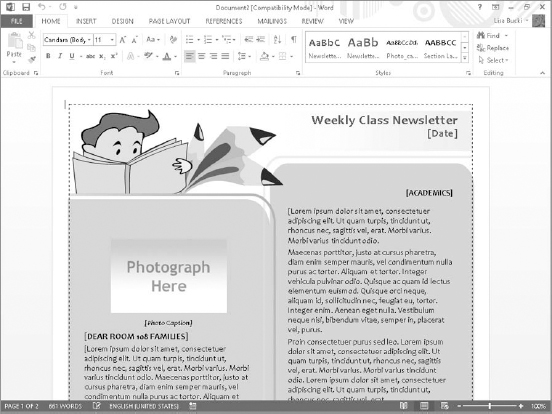
You can work with these placeholders and other contents as follows to finish your document:
- Graphics Placeholders. The box in Figure 2.13 that says Photograph Here is a placeholder for a graphic. Click the placeholder to select it, click the Insert tab on the Ribbon, and then click the Pictures or Online Pictures choice in the Illustrations group to select a replacement item. Chapter 14 provides more information about working with artwork in your Word documents.
- Labels for Text. Some templates include lists of items with a colon after each. Clicking to the right of the colon for any of the label item places the insertion point at a precise position, ready for you to enter the text to go with the label.
- Bracketed or Gray Field Placeholders. Template text that appears with square brackets and sometimes gray shading, such as the [Date], [Photo Caption], and other such fields shown in Figure 2.13, may be either content controls or text form fields. Clicking one of these placeholders selects the entire placeholder, and then any text you type replaces the placeholder contents.
- Content Controls. As you saw earlier in the chapter, these types of controls may feature automation such as a date picker, graphic selector, or linked entries. Click the control and make a selection or type to use it.
- Other Text. You can supplement the template's contents by adding your own text anywhere in the document.
- Styles. Templates also include predefined styles (formatting) that you can apply to text that you add. See Chapter 7, “Using Styles to Create a Great-Looking Document,” to learn more about applying styles to text.
Opening an Existing File
Even the best writers revisit their work to edit and improve it. You will typically work on a given Word document any number of times, whether to correct spelling and grammar errors, rearrange information, update statistics and other details, or polish up the formatting.
You learn in Chapter 1 that you can choose File ![]() Open to display a list of Recent documents, which you can pin or unpin for faster access. The left pane of the Word 2013 Start screen displays the list of Recent documents as well, and you can also pin and unpin files there by clicking the pushpin icon that appears when you point to the right side of the file name.
Open to display a list of Recent documents, which you can pin or unpin for faster access. The left pane of the Word 2013 Start screen displays the list of Recent documents as well, and you can also pin and unpin files there by clicking the pushpin icon that appears when you point to the right side of the file name.
As you might guess, you can open an existing file by clicking it in the Recent files list on either the Word Start screen or the Open screen.
However, the Recent files list is dynamic, so if your document no longer appears there, you will need to navigate to it and open it from the location where you saved it. (The next section covers saving.) You can save documents to and open them from one of two overall locations from the Open screen:
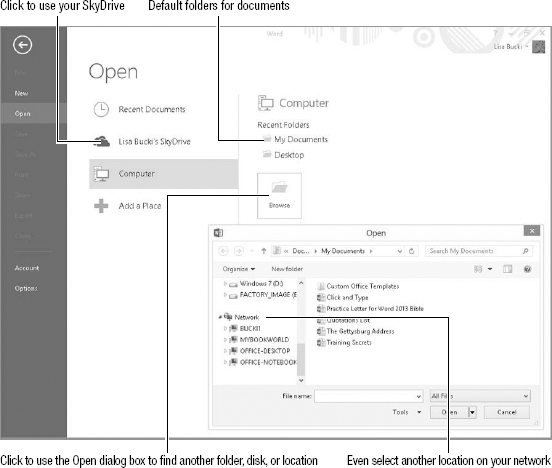
- Computer: Clicking Computer displays Recent Folders that have been used for storing documents, which is by default set as your user My Documents folder (part of the Documents library by default) and Desktop folder (files on the desktop). If you click either of those folders or the Browse button, the Open dialog box appears, as shown in Figure 2.14. You can use it to navigate to other locations, including shared folders on your local network.
You can open files stored on your computer or network.
- SkyDrive: Microsoft hosts SkyDrive cloud storage. When you create a Microsoft account to sign in to Windows, your account automatically includes your own SkyDrive storage. To take advantage of that storage from within Word, sign in to Word with your Microsoft account information, and click your SkyDrive in the middle list shown in Figure 2.14. If you have installed the SkyDrive for Windows client application in Windows, that process sets up SkyDrive folders on your system that automatically sync with your SkyDrive storage in the cloud, so you can access those files from another computer or device if needed. Chapter 27, “Collaborating in the Cloud with SkyDrive,” will show you how to set up and use SkyDrive. You can jump ahead to that chapter if you want to use SkyDrive in the near future.
NOTE
As mentioned in Chapter 1, if you've downloaded a Word file directly from the Web, the Open list of places also includes an Other Web Locations choice. Click it to see websites from which you've downloaded files listed as Recent Folders at the right. If clicking a folder doesn't reconnect with the website as expected, right-click a choice and click Copy path to clipboard. You can then paste the path into your Web browser's address bar and press Enter to return to the site from which you downloaded the file.
For now, use these steps to open a file that's not on the Recent files list:
- From the Word Start screen, click Open Other Documents; within Word, select File Open.
- Under Recent Folders, click My Documents, Desktop, or the Browse button.
All three choices display the Open dialog box, the difference being that both My Documents and Browse initially show the Documents library, whereas Desktop shows your user Desktop folder. - Navigate to the desired folder using the Navigation pane at the left side of the Open dialog box or by double-clicking subfolder icons in the list of files. In the Navigation pane, double-click a higher-level location such as Computer or Network to open its tree, and then navigate down through the tree by clicking the white triangles that appear beside computer, disk, and folder names to open those locations. Click the folder or subfolder that holds the file to open when you see it in the tree.
- Click the name of the file to open in the main file list, and then click the Open button. Or simply double-click the file name when you see it.
TIP
You can still directly open a Word file by double-clicking it in a File Explorer (Windows 8) or Windows Explorer (Windows 7) window on the desktop. Use the Search box in the upper-right corner of a folder window in either operating system to search for a file. In Windows 8, you also can point to a right screen corner, click the Search charm, click Files in the right pane, and then type a file to search for in the text box under Search; if the desired file name appears, click it.
Saving and File Formats
As long as you see “Document1” in Word's title bar, you run the risk of losing your investment of time and creativity if a power surge zaps your computer or Word crashes. Even for previously saved files, you should save your work often to ensure that you won't have to redo much work should something go wrong. Saving in Word works as it does in most other apps, with a few variations based on how you want to use or ultimately share the document.
Saving as a Word file
The first time you save any file, even one created from a template, you will choose the location where you want to save it, and give the file a meaningful name. Word will suggest a name that's based on the first line of text in the document, but chances are it won't provide the benefit of making the file easy to find when you need to reopen it. I always recommend establishing a consistent file-naming system, particularly when you create many similar files. Including the date and client or contact person name in the file name are two tricks. For example, Smith Systems Marketing Plan 12-01-15 is more descriptive than Smith Marketing or even Smith Marketing v1. When viewing dated file names, you can easily see which one's the latest and greatest. Word automatically adds the .docx extension to every file saved in the default format. This section and the next present more ins and outs concerning file formats.
Here's how to save a file for the first time:
- Choose File Save As or press Ctrl+S. The Save As screen appears.
- Click Computer in the middle pane. As noted earlier, you could leave your SkyDrive selected, and save the file there. Chapter 27 describes that process.
- Under Computer, click a folder, or the Browse button. Any choice displays the Save As dialog box, which is similar to the Open dialog box shown in Figure 2.14.
- Navigate to the desired folder using the Navigation pane at the left side of the Save As dialog box or by double-clicking subfolder icons in the list of files. In the Navigation pane, double-click a higher-level location such as Computer or Network to open its tree, and then navigate down through the tree by clicking the white triangles that appear beside computer, disk, and folder names to open those locations. Click the folder or subfolder that holds the file you want to open when you see it in the tree.
- Drag over the contents of the File name text box to select them if needed, and then type the desired file name.
- Press Enter or click the Save button. Word saves the file and returns to it onscreen.
TIP
Use the New folder button above the list of files in the Save As dialog box to create a new folder within the current folder. After clicking the button, type a folder name and press Enter. You can add a folder to the Favorites list in the Navigation pane by dragging it from the file list to the Favorites section.
After you've named the file, you can press Ctrl+S or choose File ![]() Save to save the current document.
Save to save the current document.
If you want to create a copy of the file, save it, and then choose File ![]() Save As. This reopens the Save As dialog box. You can choose another save location, enter another file name, and then click Save to create the file copy. Changes you make to the copy appear only there. Save As is a quick and dirty alternative to setting up a template. The upside is that you may have less text to replace than with a template. The downside is that you may forget to update text that needs changing that otherwise would not have been in the template.
Save As. This reopens the Save As dialog box. You can choose another save location, enter another file name, and then click Save to create the file copy. Changes you make to the copy appear only there. Save As is a quick and dirty alternative to setting up a template. The upside is that you may have less text to replace than with a template. The downside is that you may forget to update text that needs changing that otherwise would not have been in the template.
Converting to another format
Not every user immediately upgrades to the latest version of a particular program or uses the same platform as each of us. Nearly every Word user experiences a situation where they need to convert a document to another file format so someone else can open it on their computer or other device. And there may be instances where you need to save a document as a web page for addition to a website, as a PDF file that can be opened on an iPad, and so on. Word can handle other file formats for both incoming and outgoing files.
Converting a file from an earlier Word version
When you open a file in Word 2013 that was created in an earlier version of Word, [Compatibility Mode] appears in the title bar to the right of the file name. In this mode, some of the latest features in Word are disabled so that you can still use the file easily in an older Word version. In some cases, you may prefer to convert the file to the current Word format to take advantage of all Word's features. The only caution is that this can result in some layout changes to the document. If that's worth it to you, then by all means, convert the file. Even though Word 2007 and Word 2010 files use the same .docx file name extension as for Word 2013, the formats are not precisely identical, so even files from those versions may need to be converted.
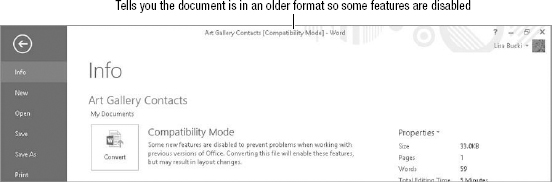
- Choose File Info. The Info screen appears, with options for finalizing the current document file. As shown in Figure 2.15, a Convert button appears beside Compatibility Mode in the list of choices.
Convert a file to the current Word format and leave Compatibility Mode.
- Click Convert. A message box appears, telling you that the document will be upgraded to the newest file format.
- Click OK. Word changes the document to the Word 2013 .docx format and removes [Compatibility Mode] from the title bar.
- Save the file.
CAUTION
Once converted, the previous version of the file is gone forever. If you think you might need the file in that previous version, such as to share it with other users, make a copy of the file or save the file under a new name before clicking Convert. The Convert option renames the original file–the .doc version will be gone. The first time you convert, Word does alert you to what it's doing, but if you're like most users you won't read the fine print and you'll click “Do not ask me again about converting documents.” If you do happen to click that option, in the future there will be no warning–and if you're like me, you will forget it was there the first time.
When you convert, Word converts the document currently displayed to Word 2013 .docx format. At this point you can still recover the original file by closing the file without saving the changes. Until you save, the converted file exists only in the current window.
Using Save As
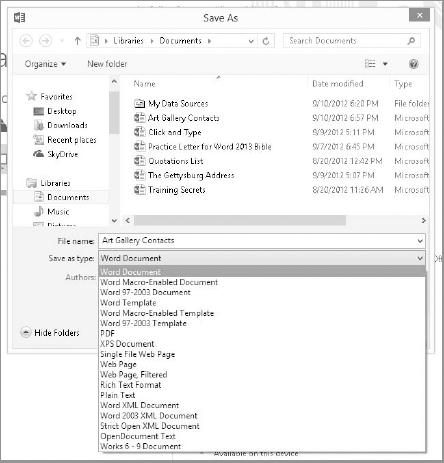
The Save As dialog box includes a Save as type drop-down list directly below the File name text box. After you choose File ![]() Save As, click Save as type to display the choices shown in Figure 2.16. Click a choice in the list, specify the file name, and then click Save. Word saves the file in the designated format, adding the file name extension for that format.
Save As, click Save as type to display the choices shown in Figure 2.16. Click a choice in the list, specify the file name, and then click Save. Word saves the file in the designated format, adding the file name extension for that format.
You might notice added behavior in the Save As dialog box when you select certain file types. For example, if you click Word Template, the folder specified for the save changes automatically. This is because storing your Office templates in a centralized location makes them easier to use. In an example like this, it's usually best to stick with the change suggested in the Save As dialog box and just click Save.
TIP
Most other word processing programs can open a Rich Text Format or Plain Text document. Even spreadsheet and database programs can open plain text files that are set up correctly with delimiters (characters such as commas used to separate each field or “column” of data). The OpenDocument Text format comes in handy when sharing with users of such freeware tools as OpenOffice. If you don't see the specific format requested by someone who needs your file on the Save as type list, try one of these three formats.
Use the Save as type drop-down to select another file format.
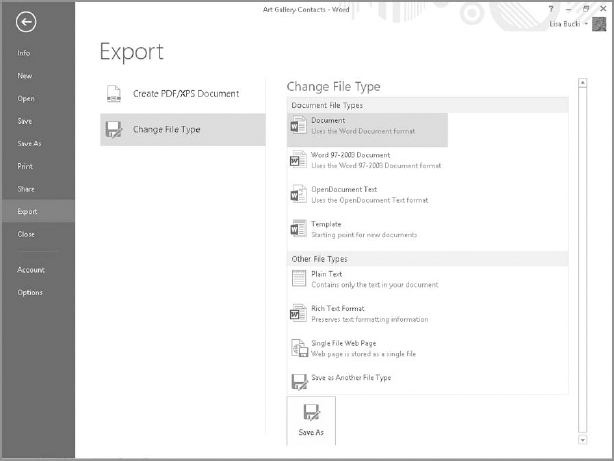
Using Export
If you need to save a file in another common format, you might choose to use the File ![]() Export
Export ![]() Change File Type command instead. As shown in Figure 2.17, choosing this command opens an Export screen with a Change File Type list at the right. Word gives a small description of each of the file types there to make it easier to select the right one. Click the format to use, and then click Save As. Word opens the Save As dialog box with the specified format already selected for Save as type. From there, specify a file name and save location as usual, and click Save.
Change File Type command instead. As shown in Figure 2.17, choosing this command opens an Export screen with a Change File Type list at the right. Word gives a small description of each of the file types there to make it easier to select the right one. Click the format to use, and then click Save As. Word opens the Save As dialog box with the specified format already selected for Save as type. From there, specify a file name and save location as usual, and click Save.
NOTE
Chapter 25, “Sharing and Publishing Documents,” will detail even more specialized formats and methods you can use for making your Word docs available to others, including publishing to your blog and a cool new method of presenting online.
Learn more about and choose an alternate save format on the Export screen.
Compatibility with Previous Versions of Word
Between the 97 and 2003 versions of Word, the .doc file format remained basically unchanged. Feature enhancements such as document versioning and floating tables necessitated some modifications to the file format.
Even so, you can still open most Word 2003 files in Word 97 and the documents will look basically the same. Only if you use newer features will you see a difference, and usually that just means reduced functionality rather than lost data or formatting. However, when it comes to post-2003 versions of Word, file format changes introduce meaningful differences.
Understanding .docx
Word 2013, Word 2010, Word 2007, and Word 2003 users will continue to see interoperability. However, Word 2013's, 2010's, and 2007's “native” format is radically different—and better—than the old format. The new format boasts a number of improvements over the older format:
- Open format: The basic file is in ZIP format, an open standard, which serves as a container for .docx and .docm files. Additionally, many (but not all) components are in XML format (Extensible Markup Language). Microsoft makes the full specifications available free, and they may be used by anyone royalty-free. In time, this should improve and expand interoperability with products from software publishers other than Microsoft.
- Compression: The ZIP format is compressed, resulting in files that are much smaller. Additionally, Word's “binary” format has been mostly abandoned (some components, such as VBA macros, are still written in binary format), resulting in files that ultimately resolve to plain text and that are much smaller.
- Robustness: ZIP and XML are industry-standard formats with precise specifications that offer fewer opportunities to introduce document corruption. Hence, the frequency of corrupted Word files should be greatly reduced.
- Backward-compatibility: Though Word 2013, 2010, and 2007 have slightly different formats, they still fully support the opening and saving of files in legacy formats. A user can opt to save all documents in an earlier format by default. Moreover, Microsoft makes available a Compatibility Pack that enables Word 2000–2003 users to open and save in the new format. In fact, Word 2000–2003 users can make the .docx format their default, providing considerable interoperability among users of the different versions.
- Extensions: Word 2013 has four native file formats: .docx (ordinary documents), .docm (macro-enabled documents), .dotx (templates that cannot contain macros), and .dotm (templates that are macro-enabled, such as Normal.dotm).
Calling the x-file format “XML format” actually is a bit of a misnomer. XML is at the heart of Word's x format; however, the files saved by Word are not XML files. You can verify this by trying to open one using Internet Explorer. What you see is decidedly not XML. Some of the components of Word's x files, however, do use XML format.
Using the Compatibility Checker
Word runs an automatic compatibility check when you attempt to save a document in a format that's different from the current one. You can, without attempting to save, run this check yourself at any time from Word 2013. To see whether features might be lost in the move from one version of Word to another, open the document in Word 2013. Choose File ![]() Info
Info ![]() Check for Issues
Check for Issues ![]() Check Compatibility.
Check Compatibility.
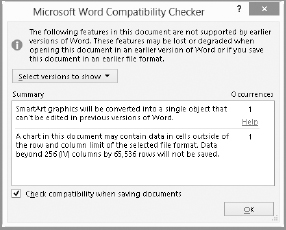
For the most part Word 2013 does a good job of checking compatibility when trying to save a native .docx file in .doc format. For example, if you run the Compatibility Checker on a Word 2013 document containing advanced features, you will be alerted, as shown in Figure 2.18.
Using the Compatibility Checker to determine whether converting to a different Word version will cause a loss of information or features.
When moving in the other direction—checking a Word 2003 (or earlier) document for compatibility with Word 2013—the checker usually will inform you that “No compatibility issues were found.” Note, however, that the Compatibility Checker doesn't check when you first open a document formatted for Word 2003 (or earlier). It's not until you try to save the file that it warns you about any unlikely issues.
Choosing between .doc and .docx
Word's options enable you to choose to save in the older .doc format by default. A person may opt to do this, for example, if the majority of users in his or her organization still use Word 2003 or earlier. That's certainly a plausible argument, but consider one occasional down side to Word's binary .doc format. With a proprietary binary file format, the larger and more complex the document, the greater the possibility of corruption becomes, and it's not always possible to recover data from a corrupted file.
Another issue is document size. Consider a simple Word document that contains just the phrase “Hello, Word.” When saved in Word 97–2003 format, that basic file is 26 K. That is to say, to store those 11 characters it takes Word about 26,000 characters!
The same phrase stored in Word 2013's .docx format requires just 11 K. Make no mistake: that's still a lot of storage space for just those 11 characters, but it's a lot less than what's required by Word 2003. The storage savings you get won't always be that dramatically different, but over time you will notice a difference. Smaller files mean not only lower storage requirements but faster communication times as well.
Still another issue is interoperability. When a Word user gives a .doc file to a user of WordPerfect or another word processor, it's typical that something is going to get lost in translation, even though WordPerfect claims to be able to work with Word's .doc format. Such documents seldom look identical or print identically, and the larger and more complex they are, the more different they look.
With Word's adoption of an open formatting standard, it is possible for WordPerfect and other programs to more correctly interpret how any given .docx file should be displayed. Just as the same web page looks and prints nearly identically when viewed in different web browsers, a Word .docx file should look and print nearly identically regardless of which program you use to open it (assuming it supports Word's .docx format).
Persistent Save As
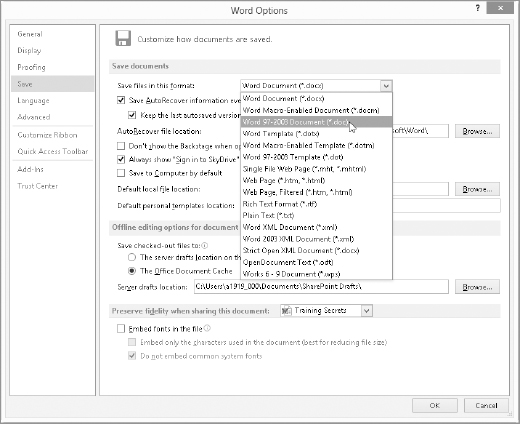
If, despite the advantages of using the new format, you choose to use Word's .doc format, you can do so. Choose File ![]() Options
Options ![]() Save tab. As shown in Figure 2.19, set “Save files in this format” to “Word 97–2003 Document (*.doc).”
Save tab. As shown in Figure 2.19, set “Save files in this format” to “Word 97–2003 Document (*.doc).”
You can tell Word to save in any of a variety of formats by default.
Note that even if you set .doc or some other format as your default you can still override that setting at any time by using Save As and saving to .docx or any other supported format. Setting one format as the default does not lock you out of using other formats as needed.
Microsoft Office Compatibility Pack
As of this writing, users of legacy versions of Word such as Word 2003 could open Word 2007, 2010, and 2013 files after installing a Compatibility Pack. While the Compatibility Pack was not developed specifically for Word 2013 files, in my testing, I was able to open a Word 2013 file in Word 2003 with the Compatibility Pack installed. The Compatibility Pack is a free download found at www.microsoft.com/en-us/download/default.aspx. Click in the Search Download Center text box at the top, type Compatibility Pack, and press Enter. Check the Search results for “Microsoft Office Compatibility Pack for Word, Excel, and PowerPoint File Formats,” and download it. At this time, that was the latest version of the Compatibility Pack available, but it's possible an update could be released at a later time.
Converting a .docx file into a .docm file
Word 2013 uses four primary XML-based file formats:
- .docx: An ordinary document containing no macros
- .docm: A document that either contains macros or is macro-enabled
- .dotx: A template that does not contain macros
- .dotm: A template that either contains macros or is macro-enabled
It is important for some purposes for users to be able to include macros not just in document templates, but in documents as well. This makes documents that contain automation a lot more portable. Rather than having to send both document and template—or, worse, a template masquerading as a document—you can send a document that has macros enabled.
Because Word 2003 documents can contain legitimate macros, there is no outward way to know whether any given .doc document file contains macros. If someone sends you a .doc file, is opening it safe?
Though it's not clear that the new approach—distinct file extensions for documents and templates that are macro-enabled—is going to improve safety a lot, it does provide more information for the user. This is true especially in business environments, where people don't deliberately change file extensions. If you see a file with a .docm or .dotm extension, you know that it contains macros, and that it might warrant careful handling.
If you want to convert a .docx file so that it can contain macros, you must use Save As and choose Word Macro-Enabled Document as the file type. You can do this at any time—it doesn't have to be when the document is first created. You can also remove any macros from a .docm file by saving it as a Word document (*.docx).
Even so, you can create or record a macro while editing a .docx file, and even tell Word to store it in a .docx file. There will be no error message, and the macro will be available for running in the current session. However, when you first try to save the file, you will be prompted to change the target format or risk losing the VBA project. If you save the file as a .docx anyway and close the file, the macro will not be saved.
Understanding and Avoiding Macro Viruses
When Word macro viruses first started appearing, ordinary Word documents could not contain macros—only templates could. Therefore, one of the most popular ways of “packaging” macro viruses was in a .dot file that had been renamed with a .doc extension. The virus itself often was an automatic macro (typically AutoExec) that performed some combination of destruction and propagation when the rogue .dot file was first opened. A common precaution was to press Shift as you opened any Word file—.doc or .dot—to prevent automatic macros from running. In fact, even with various advances in security and antivirus software, pressing Shift when you open an unfamiliar Word document is still not being overly cautious. It's a good policy to check the Trust Center macro settings by choosing File ![]() Options
Options ![]() Trust Center and then clicking the Trust Center Settings button. Make sure that Macro Settings is selected at the left side of the menu and that the Disable all macros with notification option is selected. With this setting enabled as it is by default, you will be prompted about whether to enable macros when you open a file that has them, as shown here.
Trust Center and then clicking the Trust Center Settings button. Make sure that Macro Settings is selected at the left side of the menu and that the Disable all macros with notification option is selected. With this setting enabled as it is by default, you will be prompted about whether to enable macros when you open a file that has them, as shown here.

Further exploring the .docx structure
A last look at the .docx file structure reveals clues about why it's different from the older .doc format. As indicated earlier, Word's new .docx format doesn't itself use XML format. Rather, the main body of your document is stored in XML format, but that file isn't stored directly on disk. Instead, it's stored inside a ZIP file, which gets a .docx, .docm, .dotm, or .dotx file extension.
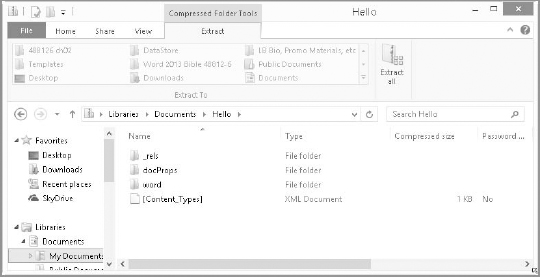
To verify this, you could create a simple Word 2013 file, and save and close it. Next, in Windows Explorer (Windows 7) or File Explorer (Windows 8), display file name extensions and change the file's extension to .zip. Finally, the double-click the file to display the contents of that ZIP file, as shown in Figure 2.20.
Word .docx files can contain additional folders as well, such as one named customXml. This folder is used if the document contains content control features that are linked to document properties, an external database or forms server, and so forth.
The main parts of the Word document are inside the folder named word. (See Figure 2.20.) A typical word folder for a simple document is shown in Figure 2.21.
When viewed as ZIP files, most .docx files contain three main folders and a Content Types XML document.
The Word document's main components are stored inside the .docx file in the folder named word.
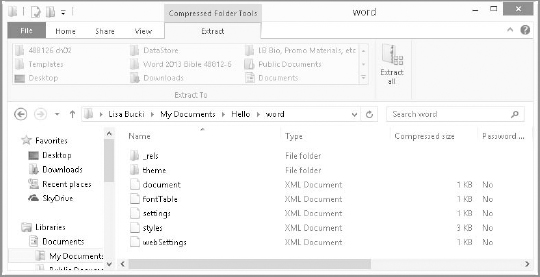
The main text of the document is stored in document.xml. Using an XML editor you could actually make changes to the text in document.xml, replace the original file with the changed one, rename the file so that it has a .docx extension instead of .zip, and open the file in Word, and those changes would appear. More complex Word files contain additional elements, such as clip art, an embedded Excel chart, several pictures, and some SmartArt, as well as custom XML links to document properties.
Quick Q & A
Q: What's an XML editor? When I double-click an XML file, it just opens Internet Explorer, which doesn't let me edit anything.
A: There are specialized XML editors. You can also use Expression Web or SharePoint Designer. You can also use anything that edits plain-text files, such as Notepad.
TIP
You can replace the images in a .docx file without editing the file in Word. Rename the .docx file so that it has a .zip extension. Extract the images stored in the wordmedia folder so you can see what's what. Give the replacement images the same respective names as the existing ones. Replace the contents of the wordmedia folder with the new images. Finally, replace the .zip extension with the original extension. This might not make ergonomic sense for just a few images, but if you have dozens it could save you a substantial amount of time.
Navigation and Selection Tips and Tricks
Bible readers already know the basics of using the Windows interface, so this book skips the stuff that I think every Windows user already knows about, and instead covers aspects of Word you might not know about. In our great hurry to get things done, ironically, we often overlook simple tricks and tips that might otherwise make our computing lives easier and more efficient.
Selecting text
When you want to make a change in Word, such as formatting text, you have to select it first. This limits the scope of the change to the selection only. Word lets you take advantage of a number of selection techniques that use the mouse or the mouse and keyboard together.
Dragging
Dragging is perhaps the most intuitive way to select text, and it works well if your selection isn't limited to a complete unit such as a word or sentence. Simply move the mouse pointer to the beginning of what you want to select, press and hold the left mouse button, move the mouse to extend the selection highlighting, and release the mouse button to complete the selection.
Triple-clicking
When you triple-click inside a paragraph, Word selects the entire paragraph. However, where you click makes a difference. If you triple-click in the left margin, rather than in a paragraph, and the mouse pointer's shape is the arrow shown in Figure 2.22, the entire document is selected.
A right-facing mouse pointer in the left margin indicates a different selection mode.

Is triple-clicking in the left margin faster and easier than pressing Ctrl+A, which also selects the whole document? Not necessarily, but it might be if your hand is already on the mouse. In addition, if you want the Mini Toolbar to appear, the mouse method will summon it, whereas Ctrl+A won't.
Ctrl+clicking
Want something faster than triple-clicking? If you just happen to have one hand on the mouse and another on the keyboard, Ctrl+click in the left margin. That also selects the entire document and displays the Mini Toolbar.
If you Ctrl+click in a paragraph, the current sentence is selected. This can be handy when you want to move, delete, or highlight a sentence. As someone who sometimes highlights as I read, I also find that this can help me focus on a particular passage when I am simply reading rather than editing.
Alt+clicking
If you Alt+click a word or a selected passage, it looks up the word or selection using Office's Research pane. This method of displaying the Research pane can just be a little faster than selecting one of the Proofing group options on the Review tab.
Alt+dragging
You can use Alt+drag to select a vertical column of text—even if the text is not column oriented. This can be useful when you are working with monospaced fonts (where each character has the same width) and there is a de facto columnar setup. Note that if the text uses a proportional font (where character widths vary), the selection may appear to be irregular, with letters cut off as shown in Figure 2.23.
With the Alt key pressed, you can drag to select a vertical swath of text.
Shift+click
Click where you want a selection to start, and then Shift+click where you want it to end. You can continue Shift+clicking to expand or reduce the selection. This technique can be useful if you have difficulty dragging to highlight exactly the selection you want.
Multi-selecting
A few versions of Word ago, it became possible to make multiple noncontiguous selections in a document. While many know this, many more don't. To do it, make your first selection. Then, hold down the Ctrl key to make additional selections. Once you've made as many selections as you want, you can then apply the desired formatting to them, copy all of the selections to the clipboard, paste the contents of the clipboard over all of the selections, and so forth.
Gestures and touch navigation
The 2013 version of the Office applications now can be used effectively on touch-enabled devices in addition to desktop and laptop computers. Although your desktop or notebook computer will likely remain your primary Office 2013 platform for now, the new convenience and flexibility of using Word on a touch-enabled device like a tablet makes that platform a viable choice for road trips and extra work at home. Here's a brief introduction to the touch gestures and their basic uses in Word 2013:
- Tap: This is the equivalent of a mouse click. Move your finger over the desired item, and then touch and release, as when pressing a keyboard key. Tap to select buttons and other interface features and position the insertion point.
- Tap-hold: Move your finger over the desired item, and then touch and hold as when holding down a keyboard key. For example, tap-hold a QAT button to display the menu for customizing the QAT.
- Double-tap: This is the equivalent of double-clicking. Move your finger over the desired item, and touch and release twice. For example, you can double-tap to zoom in on graphics in one of Word's new views. (More on this later in the chapter.)
- Pinch: Drag your thumb and forefinger together on the screen. Use this action to zoom out in a document.
- Stretch: The opposite of pinch, in this gesture you drag your thumb and forefinger apart on the screen. Use this action to zoom in.
- Slide: Tap-hold, and then drag your finger. The tap-hold generally selects an object, and then dragging moves it into position.
- Swipe: Quickly drag your finger on screen, then lift it off. This action also can be used for scrolling and selecting.
Touch-enabled systems also give you the ability to display an onscreen keyboard for entering text. Tapping the Touch Keyboard button on the taskbar opens the keyboard. Tap its Close (X) button to close it when you've finished entering information.
TIP
Word Help has a topic called Office Touch Guide that provides even more specifics about navigating and working via touch.
Using the Navigation pane
You can press Page Up or Page Down to scroll a document a screen at a time, but that can become tedious for a lengthy document such as a report or book chapter. Word includes a Navigation pane that enables you to use three quick methods for navigating in a document. To display the Navigation pane, check the View ![]() Show
Show ![]() Navigation Pane check box visible in Figure 2.24.
Navigation Pane check box visible in Figure 2.24.
Use the Navigation pane to move around a long document quickly.
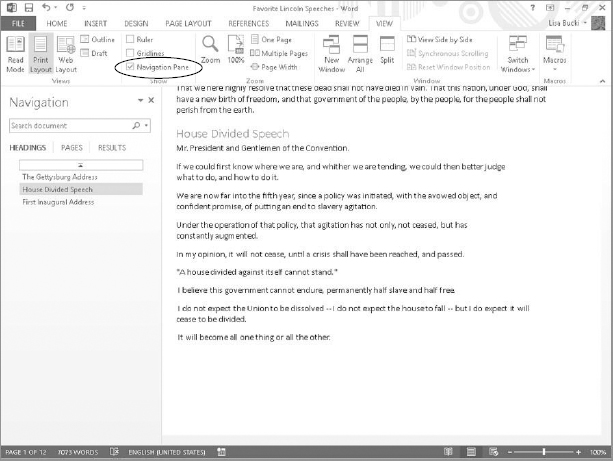
Once you've displayed the pane, here's how to use it:
- Move between headings: Click HEADINGS under the Search document text box, and then click the heading to jump to in the document. For example, in Figure 2.24, I've jumped to the “House Divided Speech” heading. Click the top bar to go back to the beginning of the document.
- Move between pages: Click PAGES to display page-by-page thumbnails of the document in the pane, scroll down the thumbnails, and then click the thumbnail for the page to go to.
- Search and move between results: This technique involves searching for text, displaying the RESULTS, and navigating to the found matches. Chapter 9, “Find, Replace, and Go To,” provides more detail about how to navigate by searching.
Clear the Navigation Pane check box or select the pane's Close (X) button to close the Navigation pane.
Keyboard shortcuts
Word 2013 continues to offer you the option of performing many tasks via keyboard shortcuts. If you're a highly skilled typist, using keyboard shortcuts can save time over using the mouse, because you never have to lift your hands off the keyboard. For example, say you're typing and want to underline a word for emphasis. Just before typing the word, press Ctrl+U to toggle underlining on. Type the word and then press Ctrl+U again to toggle the underlining back off.
In addition to keyboard shortcuts for applying formatting, Word enables you to use keyboard shortcuts to navigate in a document, perform tasks such as inserting a hyperlink, or select commands from the Ribbon (using KeyTips, as described in Chapter 1). This section helps to round out your knowledge of keyboard shortcuts in Word 2013.
Creating a list of built-in keyboard shortcuts
Word boasts a broad array of keystrokes to make writing faster. If you've been using Word for a long time, you very likely have memorized a number of keystrokes (some of them that apply only to Word, and others not) that make your typing life easier. You'll be happy to know that most of those keystrokes still work in Word 2013.
Rather than provide a list of all of the key assignments in Word, here's how to make one yourself:
- Press Alt+F8. The Macros dialog box appears.
- In the Macro name text box, type listcommands.
- Click the Run button or press Enter. The List Commands dialog box opens.
- Leave the Current keyboard settings options selected, and click OK or press Enter. Word creates a new document with a table showing all of Word's current keyboard shortcuts.
- Save and name the file as desired.
If you've reassigned any built-in keystrokes to other commands or macros, your own assignments appear in place of Word's built-in assignments. If you've redundantly assigned any keystrokes, all assignments will be shown. For example, Word assigns Alt+F8 to ToolsMacro. If you also assigned Ctrl+Shift+O to it, your commands table would include both assignments. The table also shows those assignments and commands you haven't customized.
TIP
If you want a list of Word's default built-in assignments, open Word in safe mode (hold down the Ctrl key as Word is starting and then click Yes) and run the listcommands macro again as just described.
Office 2003 menu keystrokes
One of Microsoft's aims was to assign as many legacy menu keystrokes as possible to the equivalent commands in Word 2007, 2010, and 2013, so if you're used to pressing Alt+I,B to choose Insert ![]() Break in Word 2003, you'll be glad to know it still works. So does Alt+O,P, for Format
Break in Word 2003, you'll be glad to know it still works. So does Alt+O,P, for Format ![]() Paragraph.
Paragraph.
Now try Alt+HA for Help ![]() About. It doesn't work. In fact, none of the Help shortcuts work, because that Alt+H shortcut is reserved for the Ribbon's Home tab. Some others don't work either, but at least Microsoft tried. See Chapter 29, “Keyboard Customization,” to learn more about setting up keyboard combinations that work for you.
About. It doesn't work. In fact, none of the Help shortcuts work, because that Alt+H shortcut is reserved for the Ribbon's Home tab. Some others don't work either, but at least Microsoft tried. See Chapter 29, “Keyboard Customization,” to learn more about setting up keyboard combinations that work for you.
Some key combinations can't be assigned because the corresponding commands have been eliminated. There are very few in that category. Some other legacy menu assignments haven't been made in Word 2013 because there are some conflicts between how the new and old keyboard models work. There are, for example, some problems with Alt+F because that keystroke is used to select the File tab. For now at least, Microsoft has resolved to use a different approach for the Alt+F assignments. Press Alt+I and then press Alt+F to compare the different approaches.
Custom keystrokes
You can also make your own keyboard assignments. I cover this in greater detail in Chapter 29, but to get a sneak peek, choose File ![]() Options
Options ![]() Customize Ribbon, and then click the Customize button beside Keyboard shortcuts under the left-hand list.
Customize Ribbon, and then click the Customize button beside Keyboard shortcuts under the left-hand list.
If you prefer to highly customize the keyboard shortcuts, you can assign Alt+K (it's unassigned by default) to the ToolsCustomizeKeyboard command. Then, whenever you see something you want to assign, pressing Alt+K will save you some steps. To assign Alt+K to that command:
- Choose File Options Customize Ribbon. The Customize Ribbon choices appear in the Word Options dialog box.
- Click the Customize button to the right of Keyboard shortcuts, below the left list. The Customize Keyboard dialog box opens.
- Scroll down the Categories list, and click All Commands.
- Click in the Commands list, and press the T key to skip to the Ts.
- Scroll down and click ToolsCustomizeKeyboard.
- Click in the Press new keyboard shortcut key text box, and then press Alt+K (or whatever other assignment you might find preferable or more memorable). Make sure that the Save changes in drop-down list has Normal selected, so the keyboard shortcut change will be saved to the default document template.
- Click Assign, click Close, and click Cancel to dismiss the Word Options dialog box. If you've told Word to prompt before saving changes in Normal.dotm, make sure you click Yes to saving this change (when prompted).
TIP
You can determine Word's name for most Ribbon or status bar-based commands with a simple keystroke and a click. First, switch to Print Layout view as described in the next section. Press Ctrl+Alt and the plus (+) sign on the numeric keypad. This turns the mouse pointer into a cloverleaf. Click (just about) any tool, and Word displays the Customize Keyboard dialog box. The Commands box displays the command's actual name, and the Current keys list shows the currently assigned keyboard shortcuts. Close the Customize Keyboard dialog box or press Esc to return the mouse to normal.
Choosing the Right Word View for the Task at Hand
To expand the ways of working with documents, Word offers a number of different environments you can use, called views. For reading and performing text edits on long documents with a minimum of UI (user interface) clutter, you can use the Read Mode view. For composing documents and reviewing text and basic text formatting, you can choose a fast-display view called Draft view.
For working with documents containing graphics, equations, and other nontext elements, where document design is a strong consideration, there's Print Layout view. If the destination of the document is online (Internet or intranet), Word's Web Layout view removes paper-oriented screen elements, enabling you to view documents as they would appear in a web browser.
For organizing and managing a document, Word's Outline view provides powerful tools that enable you to move whole sections of the document around without having to copy, cut, and paste. An extension of Outline view, Master Document view enables you to split large documents into separate components for easier management and workgroup sharing.
Change to most of the views using the Views group of the Ribbon's View tab.
Print Layout
Print Layout is Word 2013's default view, and one that many users will be comfortable sticking with. One of Word 2013's strongest features, Live Preview, works only in Print Layout and Web Layout views.
Print Layout view shows your document exactly as it will print, with graphics, headers and footers, tables, and other elements in position. It presents an accurate picture of the margin sizes and page breaks, so you will have a chance to page through the document and make design adjustments such as adding manual page breaks to balance pages or using shading and paragraph borders to set off text. Figure 2.25 shows this workhorse view.
Print Layout view reproduces how the printed document will look.

Change back to this view at any time with View ![]() Views
Views ![]() Print Layout, or click the Print Layout button on the status bar, near the zoom slider.
Print Layout, or click the Print Layout button on the status bar, near the zoom slider.
Draft view
When you want to focus on crafting the text of your document, you can turn to Draft view. Choose View ![]() Views
Views ![]() Draft to flip your document to this view. Draft view hides all graphics and the page “edges” so that more text appears onscreen. By default, it continues to display using the styles and fonts designated in the document.
Draft to flip your document to this view. Draft view hides all graphics and the page “edges” so that more text appears onscreen. By default, it continues to display using the styles and fonts designated in the document.
You can further customize Draft view to make the text even plainer. Choose File ![]() Options. In Word's Options dialog box, click Advanced at the left, and then scroll down to the Show document content section. Near the bottom of the section, notice the option to Use draft font in Draft and Outline views. Check this option to enable it, and then use the accompanying Name and Size drop-downs to select the alternate text appearance. Click OK to apply the changes. For an example, Figure 2.26 shows Draft view customized to use 10 pt. Courier New font for all styles.
Options. In Word's Options dialog box, click Advanced at the left, and then scroll down to the Show document content section. Near the bottom of the section, notice the option to Use draft font in Draft and Outline views. Check this option to enable it, and then use the accompanying Name and Size drop-downs to select the alternate text appearance. Click OK to apply the changes. For an example, Figure 2.26 shows Draft view customized to use 10 pt. Courier New font for all styles.
You can customize Draft view to use a plainer font.

If you plan to toggle between regular and custom Draft view fonts very often, you should know that Word has a built-in ViewDraft command that toggles the Use draft font in Draft and Outline views setting on and off. To make it more accessible, you might either assign it to a keyboard shortcut or put it onto the QAT for ready access. In the Word Options settings for QAT customization, it's in the All Commands list. Chapter 30, “Customizing the Quick Access Toolbar and Ribbon,” explains how to customize the QAT.
Read Mode and Object Zoom
Read Mode, also new in Word 2013, displays a limited number of tools, zooms the document to a larger size, and repaginates it for reading. You can't edit document text in this view, but you can move and resize other objects such as pictures. Use the arrow buttons to the left and right of the text to page through the text. (This latter functionality seems tailor made for touch-enabled devices.) Use this mode's View menu to change some of the onscreen features. For example, as shown in Figure 2.27, you can choose another page background color to make your eyes more comfortable while reading. You also can display and hide the Navigation pane or Comments, change Column with, or change the overall Layout of the view. The Tools menu enables you to find document contents or search the web with Microsoft's Bing for a highlighted text selection.
Kick back and enjoy your document's contents in Read Mode.
One great feature of the Read Mode view is that it enables you to zoom in on graphics in the document. Double-click a graphic to display the zoomed version of it, as shown in Figure 2.28. Clicking the button with the magnifying glass at the upper-right corner of the zoomed content zooms in one more time. To close the zoomed object, press Esc or click outside it on the page.
Double-click a graphic to zoom in on it in Read Mode.
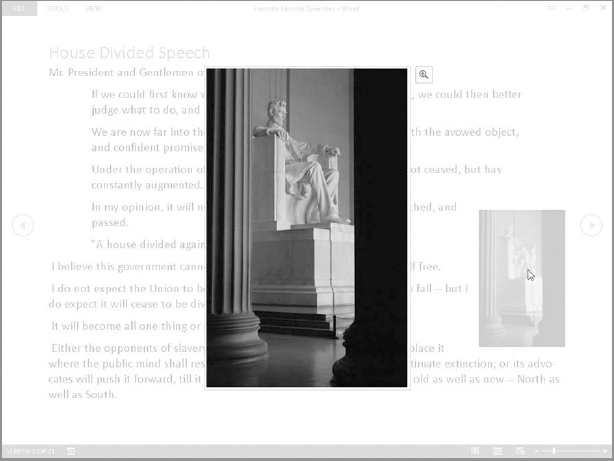
If you want, you can use the Auto-hide Reading Toolbar button at the upper-right to hide even the few menus in the view. From there, you can click the three dots near upper-right to temporarily redisplay the tools, or click Always Show Reading Toolbar to toggle them back on.
To exit Read Mode, you can click the Print Layout view button on the Status bar, or press Esc. In some cases, when Always Show Reading Toolbar is not toggled on, you may need to press Esc twice to exit Read Mode.
TIP
In addition to the arrow buttons on the screen, Read Mode offers a variety of ways to scroll the document pages: Page Down/Page Up, Space/Shift+Space, Enter/Shift+Enter, Right/Left arrow keys, Down/Up arrow keys, and the scroll wheel on your mouse.
Web Layout
Web Layout is designed for composing and reviewing documents that will be viewed online rather than printed. Hence, information such as page and section numbers is excluded from the status bar. If the document contains hyperlinks, they are displayed underlined by default. Background colors, pictures, and textures are also displayed.
Outline (Master Document tools)
The final distinct Word view is Outline (View ![]() Views
Views ![]() Outline). Outlining is one of Word's most powerful and least-used tools for writing and organizing your documents. Using Word's Heading styles is one way to take advantage of this tremendous resource. Heading levels one through nine are available through styles named Heading 1 through Heading 9. You don't need to use all nine levels—most users find that the first three or four are adequate for most structured documents. If your document is organized with the built-in heading levels, then a wonderful world of document organization is at your fingertips.
Outline). Outlining is one of Word's most powerful and least-used tools for writing and organizing your documents. Using Word's Heading styles is one way to take advantage of this tremendous resource. Heading levels one through nine are available through styles named Heading 1 through Heading 9. You don't need to use all nine levels—most users find that the first three or four are adequate for most structured documents. If your document is organized with the built-in heading levels, then a wonderful world of document organization is at your fingertips.
As an outline manager, this view can be used on any document with heading styles that are tied to outline levels. (If you don't want to use Word's built-in Heading styles, you can use other styles and assign them to different outline levels. Additionally, you can build a document from the headings found in Outline view. You can expand and collapse text to focus on different sections of the document as you work, or to see an overview of how the topics in your document are flowing. (I cover the myriad tricks you can use for outlining in Chapter 3, “Working Smarter, Not Harder, in Word.”) Click Outlining ![]() Close
Close ![]() Close Outline View to finish working with outlining.
Close Outline View to finish working with outlining.
As suggested by the title of this section, Outline view has a split personality, of sorts. Outline view's other personality includes the Master Document tools. As shown in Figure 2.29, if you click Show Document in the Master Document group of the Outlining Ribbon tab, additional tools appear.
I cover the Master Document feature in detail in Chapter 18. For now, though, I'll just dish out a little description. This is an extremely powerful document control feature for users who are working on parts of the same document. Each document part can be developed as a separate file, and then combined into a single longer document. Master documents provide a way to carefully control the checking out and checking in of document parts, as well as to manage problems inherent in working with very large documents.
Click Show Document in the Master Document group to display the Master Document tools.

Resume Reading
Word 2013 includes a new Resume Reading feature. When you reopen a document you were previously editing, and the insertion point was on a page beyond page 1 when you closed the file, a prompt appears at the right side of the screen asking if you want to go back to the page you were last working on, as shown in Figure 2.30. Click the pop-up to go to the specified location. If you don't initially click the message, it shrinks to a smaller pop-up with a bookmark icon on it. You can move the mouse over it or click it to redisplay the message, and then click to jump to the later spot in the document. Scrolling the document makes the pop-up disappear.
Click the pop-up to return to the page you were last working on before you closed the document.
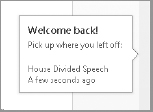
Controlling the Ribbon display
You can choose whether or not to display the Ribbon in views other than Read Mode. Figure 2.25 identified the Ribbon Display Options button, visible in Print Layout, Web Layout, Outline, and Draft views. Clicking it opens a menu of options for controlling Ribbon display:
- Auto-hide Ribbon: Clicking this choice totally hides the Ribbon and displays three dots near the upper-right corner of the screen instead. Click the three dots button to redisplay the Ribbon temporarily. When you click back in the document, the Ribbon hides itself again.
- Show Tabs: Choosing this option collapses the Ribbon to a row of the tab names only. Click a tab to see its command.
- Show Tabs and Commands: Choose this option to return the Ribbon to its normal functionality.
As mentioned in Chapter 1, you can press Ctrl+F1 or click the arrow button at the lower-right corner of the Ribbon to collapse and expand the Ribbon. You also can double-click a Ribbon tab to collapse and re-expand it. When the Ribbon is collapsed, you can click any tab once to turn it back on temporarily. In that case, you'll see a pin button at lower-right where the arrow previously appeared. Clicking the pin button expands the Ribbon so that it stays onscreen.
Showing and hiding rulers
Another sometimes-overlooked tool is the ruler. It's useful for aligning and positioning text and other objects, which you'll learn about in later chapters. The ruler toggles on and off via the View ![]() Show
Show ![]() Ruler check box.
Ruler check box.
Splitting the view
Choose View ![]() Window
Window ![]() Split to divide the document window into two equal panes.
Split to divide the document window into two equal panes.
This feature comes in handy when you need to look at a table or a figure on one page of a document while you write about it on another page.
As another example, you might want to have one view of your document in one pane while using another view in the other, as shown in Figure 2.31. When viewing a document in two split panes, note that the status bar reflects the status of the currently active pane. Not only can you display different views in multiple panes, but you can display them at different zoom levels as well.
Split panes can display different views.
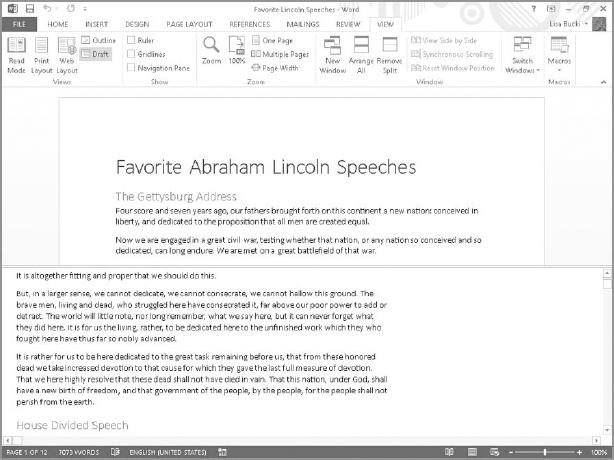
You can remove the split by dragging it up or down to the top or bottom of the screen, leaving the desired view in place, or double-clicking anywhere on the split line. Alternatively, Choose View ![]() Window
Window ![]() Remove Split.
Remove Split.
Printing a Document
You got a taste of printing a document in the project you tackled at the beginning of the chapter. Here are the steps for printing a document:
- Choose File Print. A preview of the first page of the document appears.
- Below the preview, use the Next Page (right arrow) and Previous Page (left arrow) buttons to preview all the document contents. This gives you a final opportunity to check page breaks, headers and footers, and features that may be issues before you waste paper.
- To print more than one copy, change the Copies text box entry.
- Under Printer, if you don't see the name of the printer to use, click the drop-down box, and then click the desired printer in the list. “Ready” appears below the name of any printer that's connected to your computer and turned on.
- Under Settings, use the various drop-down lists shown in Figure 2.32 to finetune aspects of the printout. These include:
- Number of pages: Either use the drop-down to specify a range such as a section or selection, or enter the pages to print in the Pages text box. You can use a hyphen to specify a range of pages (1-3), separate noncontiguous pages with commas (5, 7), or combine the two (1-3, 5, 7).
- Sides and flipping: If your printer can print on both sides, you can specify two-sided printing with the second drop-down. You also have the option of flipping on the long or short end, depending on the page orientation.
- Collated or Uncollated: When printing multiple copies of a document, this determines how the pages will emerge. For example, if you printed 10 copies of a 24-page document, selecting Collated would print 10 separate copies of the document, but selecting Uncollated would print 10 page 1s, followed by 10 page 2s, and so on.
- Orientation: Set up the document to print in Portrait Orientation (tall) or Landscape Orientation (wide).
- Paper size: Select the size that you've loaded into your printer from this drop-down list, which reads Letter by default, or use the More Paper Sizes choice to find other sizes.
- Margins: If you didn't change the margins prior to printing, you can use this drop-down to choose a different margin setting than the one initially shown.
- Pages per sheet: If the selected printer is capable, use this drop-down to print up to 16 Pages Per Sheet or scale the printout.
Take a careful look at print settings before sending the document to the printer.
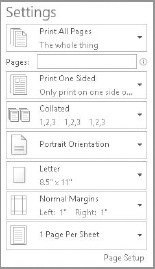
- Click Print. Word sends the page to the printer.
Summary
In this chapter you've learned basic yet essential skills for creating and working with document files, using file formats, navigating a document, and more. Putting it all together, you should now have no problem doing the following:
- Creating and printing a basic document and envelope
- Creating a document using a blank template or one with predefined content
- Opening a document you've already saved
- Saving a document or copy, including choosing another format
- Navigating issues of file formats and compatibility
- Selecting text and moving between pages and headings
- Using Word's keyboard shortcuts, views, and view tools
- Sending your document to the printer with the right settings