
CHAPTER 25
Sharing and Publishing Documents
- Understanding the PDF and XPS formats
- Creating and viewing PDF files
- Creating and viewing XPS files
- Emailing a document
- Presenting a document online
- Blogging from Word
In this chapter we look at Word's ability to save files in either of two competing printer-ready formats: PDF and XPS. Each is a more or less open file format that aspires to be the industry standard for distributing documents in such a way that they appear identical to the reader regardless of platform—PC, Macintosh, Unix, Linux, and so on. Word 2013 adds the ability to edit PDF files.
The chapter also looks at other ways of digitally sharing information, including emailing a Word file to others and presenting a document online. Finally, this chapter looks at publishing for the Web in the form of HTML (Hyperttext Markup Language) and blogging (short for web logging, a web log being a journal published to the Web).
Working with PDF Files in Word
PDF stands for portable document format. It is an open-standard file format owned and developed by Adobe Systems. PDF is designed so that any given document looks identical regardless of the operating system and other software used to display or print it.
A Word document you send to someone else will look different depending on a variety of circumstances, including the following:
- Whether the reader has Word or is using different software to view the document.
- Whether the reader is running Word on Windows or on a Mac makes a difference, as well as whether the document is being viewed in an older version of Word via a converter.
- Whether the reader has the template on which the document was based.
- The capabilities of the printer and printer driver on the reader's system.
- Whether the reader's system has the fonts needed to display the file.
The PDF format is designed to make those conditions irrelevant. Each PDF file contains everything that's needed to completely display/render the file so that it looks reasonably identical for each person who views it, regardless of operating system or computer hardware. A PDF also enables you to encrypt and password-protect a document so that it can be read only by those with the password, preventing it from being copied, printed, or otherwise modified (even with Adobe Acrobat Pro, the premier PDF-authoring program).
Furthermore, when the resulting files are printed, regardless of what kind of computer or operating system is being used, the printed results should be more or less identical. Whether the documents are viewed onscreen or printed, all readers have essentially the same reading experience. Yes, there are always going to be variations caused by hardware capabilities, but to the greatest extent possible, those variations are minimal.
Viewing PDF files in Word
Previously, to view PDF files you needed a PDF reader, such as Adobe Reader (http://get.adobe.com/reader) or another PDF reader of your preference. Windows 8 now also includes the built-in Reader app, accessible from the Start screen, although its tools for viewing and working with document content are much more limited than those found in Adobe Reader.
Now you can open PDF documents directly in Word to view and work with them. The new feature called PDF Reflow enables Word to open PDF files directly so that you can read, edit, and reformat the contents in Word. Open a PDF in Word using these steps:
- Choose
 File Open Computer Browse. The Open dialog box appears.
 - Click All Files to the right of the File name text box, and then click PDF Files.
- Navigate to the folder holding the file. As shown in Figure 25.1, only PDF files appear due to the choice you made in the prior step. (You can use the Change your view button located at left just below the Search text box in the Open dialog box to change to the Details view, which includes the Type column, as shown in Figure 25.1.)
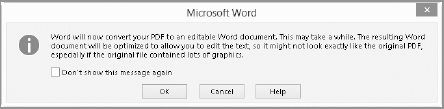
- Click the file, and then click Open. Word displays the message shown in Figure 25.2, informing you it will convert the file so that you can edit it in Word.
- Click OK to continue and open the file. The file appears in Word.
Choose the PDF Files file type to make it easier to locate PDF files in the Open dialog box.

NOTE
The file type icons for the PDF files shown in Figure 25.1 show that they would typically open in the Windows 8 Reader app by default. Your icons may be different, depending on whether you are using Windows 7 or Windows 8, what PDF viewers you have installed, and which PDF viewer you have configured as the default for your system.
Word informs you it will be performing a conversion to make the PDF file editable.
Editing PDF files
If the PDF file is one that you've created yourself in Word or another program, it opens immediately for editing.
Word treats PDFs that you've downloaded from the Web, received as an email attachment, or opened from a potentially unsafe network location a little differently. In such instances, the converted PDF file initially opens in Protected View in Word, as indicated by the Protected View Message Bar that appears (see Figure 25.3). Click the Enable Editing button to continue working with the document. Word displays another message about converting the file. Click OK. It's a good idea to click the Save button on the QAT right away, because even though the file name from the PDF appears in the title bar, the file hasn't yet been saved in Word format. In the Save As dialog box, edit the file name and change the save location as needed, and then click Save.
The converted PDF file initially appears in Protected View.
![]()
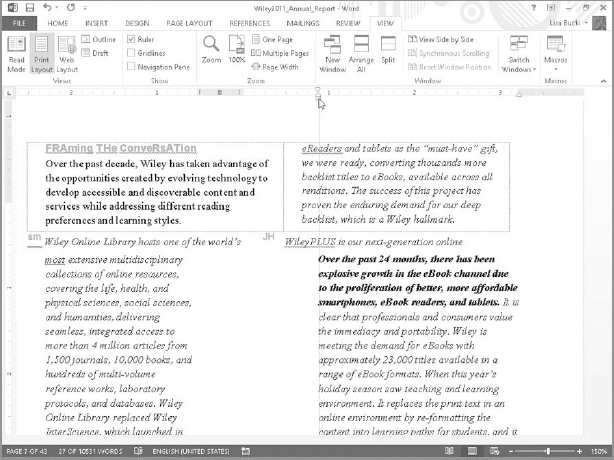
You can use Word's editing tools to make changes to the file's contents. Depending on the methods used to create and format the content in the original PDF file, the conversion results may vary. However, you can use Word's tools to make adjustments as needed. For example, Figure 25.4 shows a page from Wiley's 2011 Annual Report PDF. Note that some of the text at the top of the page appears in a table. I've selected a sentence in the right column and applied bold for emphasis. I've also displayed the rulers and am dragging the Left Indent tool on the Horizontal ruler to fix the indention issue in the right column.
Understanding and Viewing XPS Files
XPS stands for XML paper specification. It is Microsoft's response to PDF—intended to provide a computer-independent method for distributing files so that they look the same to anyone who opens them for viewing or for printing. XPS is a potential competitor of PDF, but perhaps only in the long term.
Windows 7 and 8 enable you to view XPS files directly, but each uses a different viewer or reader application. If you double-click an XPS file in a Windows Explorer window in Windows 7, the file opens in the XPS Viewer application. If you double-click an XPS file (or OpenXPS file) in a File Explorer window in Windows 8, it opens in the Reader app. You also can use the Search charm and double-click the XPS Viewer tile under Windows Accessories to use the XPS Viewer in Windows 8.
You may need to make some corrections to the formatting of the imported PDF file, but you generally will be able to use Word's tools to edit and format it as needed.
CAUTION
Like PDF, the XPS format is not natively supported by pre–Windows 7 versions or by non-Windows operating systems. To view XPS files you might need to install a reader or viewer. (Find one via a web search, if needed.) So if you share a majority of your documents with users of the Mac OS or pre–Windows 7 versions of Windows, don't count on XPS files having the same portability as PDF files.
NOTE
In both Windows 7 and Windows 8, you can open the Print capability from any application (including Word) and select Microsoft XPS Document Writer as the printer. Then when you click Print, the Save Print Output As dialog box appears and asks you for a file name and save location. After you specify those, click Save. In Windows 7, this saves the file as an XPS document with the .xps file name extension. In Windows 8, the file is saved as an OpenXPS document with the .oxps file name extension. OpenXPS is the next-generation, more open variation of XPS, and you can view OpenXPS in the Reader app or XPS Viewer in Windows 8.
Deciding Which Format to Use for Output
If you are distributing documents for a more controlled environment in which document permissions are being set (where Windows Rights Management Services is in use, a subject that's beyond the scope of this book) or the environment for some reason has standardized on XPS, then XPS might be the way to go. If you need to create documents for the widest possible audience, at this time at least, the decision is a no-brainer: PDF.
The best way to determine whether Word 2013's PDF capability works for your documents is to try it. Does the resulting PDF look the way you expect it to look? Is it legible? Are the colors correct? Is anything missing or distorted? Are all of the graphics—including borders—present and accounted for? Is the file size acceptable?
Of course, if you have Adobe Acrobat or other PDF-writing software, you can try saving a PDF from both it and Word using similar quality settings and compare the results. Although small differences may be present in the sample pages, generally speaking a PDF generated from Word 2013 will be adequate for onscreen viewing and everyday printing. It might well be that for a document with tables, SmartArt, WordArt, and a variety of other document elements, Acrobat or another converter that offers more options such as PrimoPDF might even be outperformed by Word. (Of course, given that Acrobat is the standard for professional high-end printing, Word won't match its capabilities in that arena.)
Creating PDF or XPS Output
Creating a PDF or XPS document from Word is as easy as saving a file, but likely not quite as fast. Here's how to handle the process:
- Open the Word file that you'd like to convert to PDF or XPS.
- Choose File Export Create PDF/XPS Document Create a PDF/XPS. The Publish as PDF or XPS dialog box shown in Figure 25.5 appears.
- Open the Save as type drop-down list, and click PDF or XPS Document as needed. When saving as XPS, the main Publish as PDF or XPS dialog box offers the same options for PDF format.
- Change the File name if the one suggested isn't acceptable.
- If you want to preview the resulting PDF file, make sure Open file after publishing is checked. (If this option is grayed out, then your default PDF or XPS viewer either does not exist or is not installed correctly.)
- (Optional) Choose Optimize for and Options settings. (These are described further in the upcoming sections.)
- Click Publish. After conversion, the file opens in the default PDF viewer.
Creating a PDF/XPS is not an ergonomic exercise.

If you try to save a password-protected Word file as a PDF, the warning shown in Figure 25.6 appears and tells you the password protection will be removed. You can click No and then Cancel to back out of the PDF save process. Remove the password protection in Word. Return to the Publish as PDF or XPS dialog box, and then use Options as described shortly to add a password when creating the PDF.
Saving as a PDF removes any password assigned to the source Word document.

CAUTION
Although you can save from Word to PDF and then open your new PDF again in Word as a converted Word document, be careful about editing and saving back to PDF from there. Though Word's conversion capabilities work pretty well, if you have a source Word document with complex formatting and copious graphics and tables, it's best to edit in the original Word document (not the one reimported from PDF) to ensure your formatting remains as intended.
Choosing the optimization
In Figure 25.5, note the Optimize for choices: Standard (publishing online and printing) and Minimum size (publishing online). Graphics typically do not need resolutions above the current screen's DPI (usually 96) for display onscreen, whereas considerably higher resolutions are needed for quality printing. (Word's default setting for graphics resolution is 220 PPI or DPI.) If you don't intend to print the document or it will be made available online for viewing and downloading, you can save storage space by choosing Minimum size (publishing online). It's never a bad idea, however, to create a PDF using each of the settings and then compare the two results to ensure that Minimum size doesn't result in an unacceptable quality difference.
Setting options
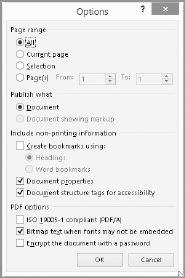
Click Options in the Publish as PDF or XPS dialog box after choosing a Save as type to view additional settings for the selected file type. Figure 25.7 shows the options for the PDF file type. Use the Page range and Publish what choices to specify what parts of the document to print. Under Include non-printing information, you can choose whether to include Document properties and Document structure tags for accessibility. Word also can automatically generate bookmarks in the PDF if you check Create bookmarks using, and then choose whether the bookmarks should come from Headings (assuming you've formatted with heading styles) or Word bookmarks (that you already created in the document).
Under PDF options, you generally will find that checking ISO 19005-1-compliant (PDF/A) produces files that are significantly larger (often as much as 80 percent larger) than those produced by the default Bitmap text when fonts may not be embedded option. At the same time, the fidelity is greater as well. Note that choosing the ISO option grays out the Document properties option under Include non-printing information, as well as the Bitmap text… and Encrypt the document… options.
When you need to password-protect the PDF file, check Encrypt the document with a password. After choosing options as needed, click OK to return to the Publish as PDF or XPS dialog box. If you checked Encrypt the document with a password, the Encrypt PDF Document dialog box shown in Figure 25.8 appears. Type the desired password in the Password and Reenter password text boxes, and click OK.
Options for publishing a PDF file
You can apply a password while saving to PDF.

TIP
If you use PDF format often, you can save steps by adding the Publish as PDF or XPS command to your Quick Access Toolbar. Right-click the QAT and choose Customize Quick Access Toolbar. Set Choose commands from to All Commands. Scroll down to Publish as PDF or XPS and click Add, then OK.
If you've chosen the XPS Document format in the Publish as PDF or XPS dialog box, when you click Options, most of the choices in the Options dialog box are the same. You can specify a Page range or make a choice under Publish what, as well as determine what to check under Include non-printing information. The bottom section holds the only difference. There, under XPS Document options, you can check Preserve restricted permissions in XPS if available. Select any options you need, and click OK to return to the Publish as PDF or XPS dialog box.
Emailing a Document
Word enables you to send the current file directly to an Outlook message as a file attachment. This makes it easy to shoot a document over to a colleague for feedback. To email a document as a file attachment:
- Open the Word file that you'd like to send.
- Choose File Share Email. The Share choices shown in Figure 25.9 appear in Backstage view.
Word provides choices for how to format the attached file.
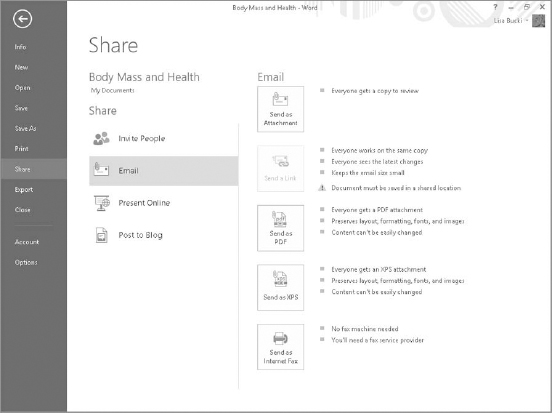
- Click Send as Attachment under Email at right. Only use Send as PDF or Send as XPS if you want to both convert and send the file. However, for normal collaboration, sending the file in its native Word document format works best. Word opens an Outlook message window with the file already inserted as an attachment, as shown in Figure 25.10.
The initial email message with a Word file attached
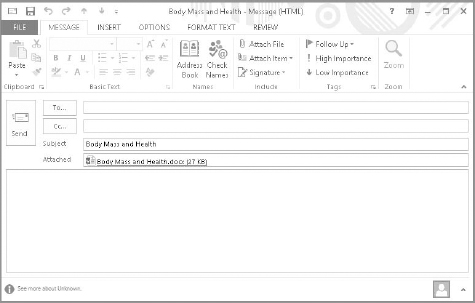
- Enter the recipient email addresses in the To field, edit the Subject field as needed, and type a message in the body text area.
- Click Send. The message goes to the Outlook Outbox folder and will be routed to the recipients the next time messages are sent and received, either automatically or manually.
NOTE
The steps for emailing documents assume you have an email account configured in Outlook. If you don't, you will see a message prompting you to set one up after you click Send.
Presenting a Document to an Online Audience
Microsoft offers a free online platform called the Office Presentation Service that you can use to present documents from some Office applications online. You can show a Word document to your audience page by page over the Web while simultaneously holding a conference call, which is a great way to encourage greater buy in and audience interaction. Here's how to present a Word document online:
- Open the Word file that you'd like to present.
- Choose File Share Present Online. The Present Online choices shown in Figure 25.11 appear in Backstage view.
Share a presentation online through the Microsoft Presentation Service.
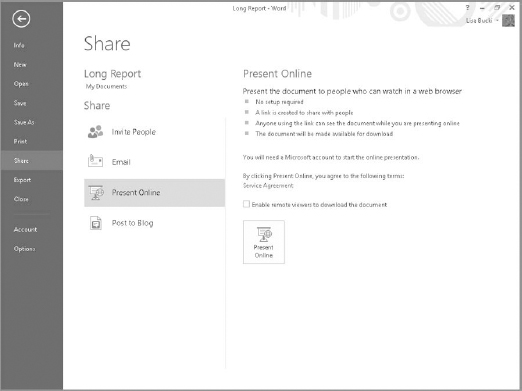
- (Optional) Click Enable remote viewers to download the document to check it. Enabling this option enables the colleagues who you invite to view the presentation to choose to download a copy of the file for later viewing in Word.
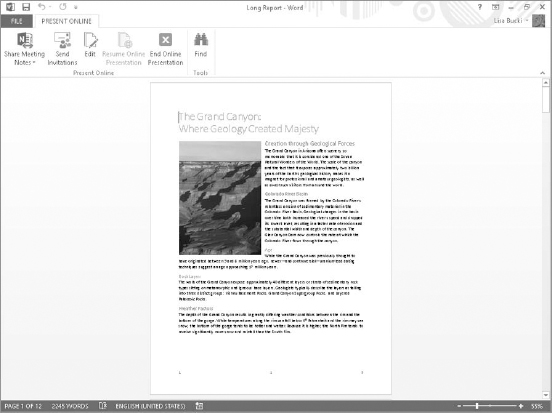
- Click Present Online. The Present Online window shown in Figure 25.12 appears. After it prepares the online presentation, it displays the link that you can use to invite colleagues to your online presentation. You can use Copy Link to copy the link so you can paste it into an IM message (such as in Microsoft Lync), or click Send in Email to open an Outlook message window with the link in the message body. Address and send the message.
- After you've invited recipients and given time for them to be ready to join the online presentation, click Start Presentation. The Present Online tab appears on the Ribbon, as shown in Figure 25.13.
- Use Page Down and Page Up on your keyboard or the vertical scroll bar on the right side of the screen to move through the document.
- If you need to make changes or comments, click Edit in the Present Online group, make the desired changes, and then click Resume in the Online Presentation Paused Message Bar.
- When you finish, click End Online Presentation in the Present Online group of the Present Online tab.
- In the message box, click End Online Presentation to confirm.
The online presentation is ready to go at this point.

Use the Present Online tools and other Word tools to work with the presentation.
NOTE
The idea is that you and colleagues viewing the show will be conversing by conference call or Lync as you're viewing the document online.
If you've received an invitation to view a document presented online, simply click it to launch your system's web browser and go to the shared file. You can click the tab to open the Comments pane, where you can review questions, as in the example in Figure 25.14.
Viewing the document and a comment online.

HTML Overview
HTML (Hypertext Markup Language) is the primary language of the Web. Most basic web pages are saved as HTML files, with the .html or .htm file name extension. Why markup? Imagine that you have some text that someone has edited or marked up to indicate which words are bold, which are italicized, which are larger, and so on. The markup aspect of HTML involves the insertion of tags that tell a web browser how to display the text.
Suppose, for example, that a browser, such as Internet Explorer, Chrome, or Firefox, encounters the following:
<b>This</b> is a <i>test</i>.
The bits between the angle brackets are called tags. <b> is a tag that means bold. <i> means italics. The <b> tag means “begin bold”; </b> means “end bold.” The tags tell the browser where certain kinds of formatting begin and end. For example, a browser would display the preceding example line as follows:
This is a test.
Tags also are used to perform other chores, such as displaying pictures or hyperlinks, the beginning and ending of paragraphs, numbering, bullets, centering, and a variety of other attributes. The word hyperlink is where the hyper part of HTML's name comes from. Clicking a hyperlink causes a browser or other HTML-content displayer to jump to that link. Hyperlinks have revolutionized the way people use computers over the past two decades. (If you want to learn how to code HTML, sources abound, including many free resources on the Web. A simple search will lead you in directions and to places that this book isn't going.)
To save a Word file as HTML:
- Design the file as desired and preview it in Web Layout view.
- Choose File Save As Computer Browse.
- Choose a save location, set Save as type to Web Page, and edit the File name as needed.
- Click Change Title, enter a page title in the Page title text box, and click OK.
- Click Save.
You can then upload the resulting filename.htm file and its matching filename_files folder to your site folder on your web host using a service such as FTP or your host's online uploading tools.
NOTE
If the page is the home page for your website, most web hosts have rules about how that page should be named, for example, Index.htm.
Understanding differences in Word's HTML
Using Word to save a document for the Web (thus creating an HTML file) is tempting, especially if it's the only means you have for doing so. Just save any file in HTML format. Nothing could be easier.
However, that's where the advantages begin and end. Why? Let's begin with a simple example. Consider the Hello, World, a common phrase used in programming and design examples (we'll instead use Hello, Word). The raw truth is that if you put that phrase into a plain text editor and name the file hello.htm, any web browser can display it. You don't need anything other than those 12 characters (including punctuation and spaces). Yes, there are additional elements that browsers want to see, but there's a difference between wanting and needing.
If you use SharePoint Designer and feed it those 12 characters, it's not quite so frugal, but it's not so bad. Here's what you get:
<title>Untitled 2</title>
</head>
<body>
<p>Hello, Word.</p>
</body>
</html>
SharePoint Designer is designed to produce HTML, so we would expect it to be good at what it's designed to do.
Now, say you press Ctrl+N in Word to start a new Document window and try the same thing. Type Hello, Word., and then choose File ![]() Save As
Save As ![]() Computer
Computer ![]() Browse, set Save as type to Web Page, accept the proposed name (Hello), and click Save. To see what this file really looks like, you could then open it in a text editor such as Notepad.
Browse, set Save as type to Web Page, accept the proposed name (Hello), and click Save. To see what this file really looks like, you could then open it in a text editor such as Notepad.
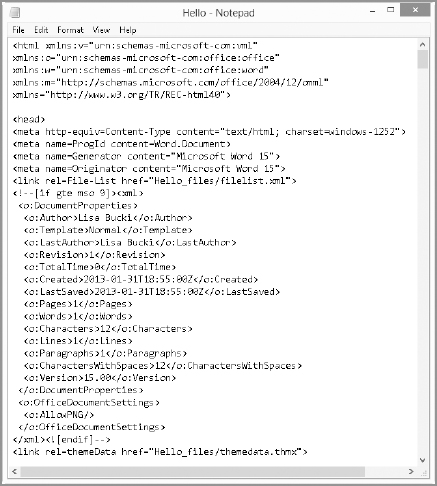
Remember that simple phrase “Hello, Word.”? Converted into HTML by Word, it now has hundreds of lines, tags, and properties, as shown in Figure 25.15. But that's not the end of the story. At the same time, Word also created a folder named Hello_files, which contains three additional files—the infrastructure for a much more complex HTML file than the one we created.
Word converts a 12-character text message into a highly complex HTML file.
In fairness to Word, we didn't use the optimal approach to saving HTML. Selecting the Web Page, Filtered Save as type results in a much more compact file.
Although Microsoft has put a lot of effort into including HTML in Office and Word, the truth is that there are other programs that are much better at HTML—from an authoring standpoint, from a publishing standpoint, and from a maintenance standpoint. Moreover, Word has rightfully earned a reputation in the HTML world for producing HTML documents that don't necessarily play well with modern web tools such as CSS, scripting, and various menuing tools. So, depending on your needs and capabilities, you can go with something other than Word—something such as SharePoint Designer, Microsoft Expression Web, Dreamweaver, or something else.
HTML is an endlessly deep subject about which a great many books have been written. Doing any sort of justice to it is well beyond the scope of the Microsoft Word 2013 Bible. If you want to explore all of the capabilities of HTML in depth, a great resource is HTML, XHTML, and CSS Bible, by Steven M. Schafer (Wiley, ISBN: 978-0-470-52396-4).
What Is MHTML?
The Single File Web Page Save as type is based on MIME HTML. MIME (Multipurpose Internet Mail Extensions) is the standard format in which email is sent over the Internet. Its specification includes the capability to encode graphics and other binary attachments into plain text so they can be transmitted over older computers that support only plain text (the original 128 characters known as ASCII, or American Standard Code for Information Interchange).
If you choose to save a Word document for the Web using the Single File Web Page format, it assigns the .mht file name extension. The idea here is that if you have pictures, sound files, or other binary content, it's often better to encapsulate them within the body of the HTML file itself so that when you email the file to someone, the recipient will have all the ingredients needed to properly display it. MHTML is an emerging standard. That means that not every browser will display the same MHTML file identically.
Blogging
The Post to Blog feature enables you to publish directly from Word to supported blogs, which include SharePoint Blog, WordPress, Blogger, Telligent Community, and TypePad. Simply put, blogging enables you to share your own articles and ideas online without maintaining a separate website. Each post you make to your blog can be followed by and often commented on by your readers. The different blog sites offer different levels of functionality, so you may want to visit each of them before deciding which one to sign on with. Create your account with the desired blog provider before moving on to the next steps for registering your blog account with Word.
Registering with a blog platform
The first time you choose File ![]() Share
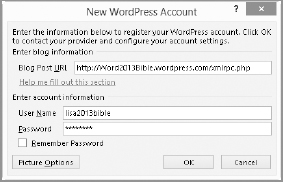
Share ![]() Post to Blog, and then click the Post to Blog button in Word 2013, it prompts you to register for a blog account, as shown in Figure 25.16. Click Register Now. The New Blog Account dialog box shown in Figure 25.17 appears. If you already have a blog provider, select it from the Blog drop-down list, click Next, and follow the prompts to enter your sign-in information. (The procedure will vary depending on your provider.) Figure 25.18 shows example information entered for a WordPress account.
Post to Blog, and then click the Post to Blog button in Word 2013, it prompts you to register for a blog account, as shown in Figure 25.16. Click Register Now. The New Blog Account dialog box shown in Figure 25.17 appears. If you already have a blog provider, select it from the Blog drop-down list, click Next, and follow the prompts to enter your sign-in information. (The procedure will vary depending on your provider.) Figure 25.18 shows example information entered for a WordPress account.
Click Register now to sign up for or specify a blog account.

Select your blog provider and click Next, or click I don't have a blog yet.

Enter blog sign-in information, and then click OK.
Click OK to finish registering, and then click Yes in the warning about account information. If you succeed, you'll see a message box saying that account registration was successful. Click OK to start blogging!
Composing and publishing your blog entry
For each blog post, you should start by creating a new document for it in Word. You can do this in one of two ways:
- Choose File Share Post to Blog Post to Blog.
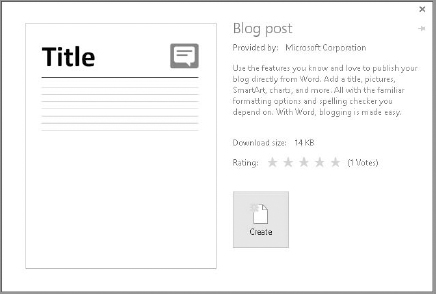
- Choose File New. Scroll down the templates, and click Blog post. Click Create in the description window that appears (Figure 25.19).
Use File a New a Blog post a Create to begin a new blog post.
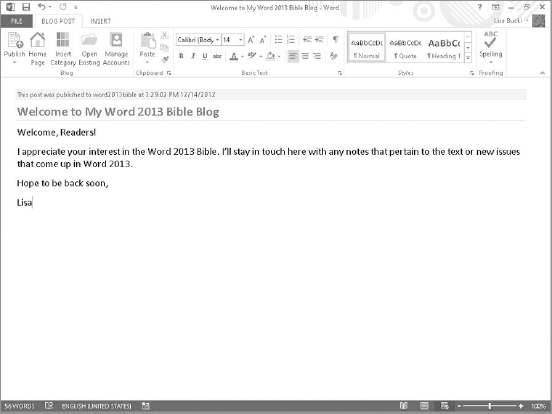
No matter which method you use, the empty blog post document appears and the Blog Post tab appears on the Ribbon, as shown in Figure 25.20.
NOTE
When you choose File ![]() New
New ![]() Blog post
Blog post ![]() Create, Word opens a new document window based on the Blog.dotx template. See Chapter 18, “Saving Time with Templates, Themes, and Master Documents,” for more information about templates.
Create, Word opens a new document window based on the Blog.dotx template. See Chapter 18, “Saving Time with Templates, Themes, and Master Documents,” for more information about templates.
When you start a blog document, Word displays the Blog Post tools.

Create your post, replacing the post title placeholder text and adding body text as desired. When you're done, save a copy of the post as a Word document, if desired. Note that the Publish button in the Ribbon is a split button. Click the top half to publish immediately. Use the bottom half to choose between Publish and Publish as Draft. Enter you username and password in the Connect to dialog box that appears; click OK, then Yes in the message that appears. When you publish you'll see a notification bar above your blog entry indicating that posting was successful, as shown in Figure 25.21.
Word lets you know that a blog entry was successfully published. Log on to your blog account to verify that it actually worked.
If a blog post fails, you'll see an error message box. That usually just means a temporary communication issue. Try to post again in a few minutes, and it will usually work fine.
CAUTION
Do you have a business and a personal blog? If so, be careful not to accidentally post to the wrong one. It's extremely easy to do, and if your blog is syndicated through RSS, there's absolutely no way to guarantee that an “Oops!” entry won't be read by someone you don't want reading it. If there's any risk of this happening, set the least harm blog as your default. Better still, create a throwaway blog somewhere—one that nobody else can read—and set that one as your default. That way, if you inadvertently forget to choose a destination, there's no harm done.
Taking advantage of other blog tools
Other useful blog-related items in the Blog Post tab include Home Page and Insert Category—both in the Blog group. The Home Page tool opens your browser to the main web page for the currently selected blog account.
Use the Insert Category tool if your blog supports categories for organizing your posts. When you click Insert Category, you'll be prompted to sign in to your blog account, and then a Category drop-down appears under the post title placeholder. Select a category from the category drop-down list or type a new one into the text box.
NOTE
To register additional accounts, or to manage existing ones, click Manage Accounts in the Blog group of the Blog Post tab. In the Blog Accounts dialog box, use the New button to add a new account. Select an account in the list, and click Change to edit it, Set As Default to make it the default account, or Remove to delete it.
Using Open Existing to correct and revise
The best way to find errors in a blog is to publish the blog online and then read it. A post you moments ago pronounced “good-to-go” may contain errors upon a second read.
To edit an existing post, click Open Existing in the Blog group of the Blog Post tab. (Start a new blank blog entry first if you need to display the Blog Post tools.) Sign in to your blog account when prompted. In the Open Existing Post dialog box (Figure 25.22), scroll to the desired post if needed, select it, and click OK. Sign in again if prompted. At the top of the post, an information bar displays the publication time and date as shown in Figure 25.21. Make any changes you see fit, click Publish, and sign in. Word will now display the re-publication time and date in the information bar at the top of the post, above the title.
Select an existing post to edit and republish.

There is a limited number of existing posts that Word can fetch in this manner. You might be able to increase this number using your blog settings (from the Web interface—not from Word). If the existing post does not show up in the Open Existing Post dialog box, however, you will need to edit the post using your Web interface to make changes. Or if you require Word's capabilities, you can sometimes trick the post into appearing in the Open Existing Post dialog box by changing the posting date using the Web interface.
Summary
In this chapter you've explored the difference between PDF files and XPS files. You also learned about sharing a document via email or an online presentation, and how to publish your work as an HTML file or blog post. You should now be able to handle these tasks:
- Decide whether to use PDF or XPS format
- Decide whether to use higher-quality or lower-file-size PDF or XPS files
- View PDF and XPS files
- Create PDF and XPS files, optimizing and setting options as needed
- Email a Word document to colleagues
- Present a document online
- Convert a Word document to an HTML file
- Register any of a number of popular blog hosts for blogging directly from Word
- Blog from Word 2013
- Use Open Existing to correct and revise existing blog posts