
CHAPTER 18
Saving Time with Templates, Themes, and Master Documents
- Comparing templates and themes
- Creating and modifying templates
- Managing templates
- Working with themes and theme components
- Saving custom themes
- Understanding master documents
- Finding the Master Document group tools
- Creating and working with master documents
Templates and themes are the foundation when it comes to creating, formatting, and maintaining Word documents. They supply the professional styling and formatting you need so that you don't have to start from scratch for every document, as well as providing example content (when it comes to templates). Using the styles provided in a template enables you to format and reformat a document much more quickly than you otherwise could, and then update it globally just by changing the theme or a component of the theme. Similarly, the master document feature enables you to repurpose content that you and your collaborators have already created. When you combine multiple documents in a master document, you can organize the information as desired and provide uniform formatting to create a cohesive final product.
This chapter looks at templates, themes, and master documents. It shows you how to create and manage your own templates, change key theme components, and create and work with a master document. Read on to learn how you can exploit each of these tools to the max.
Creating Your Own Templates
Word users need a clear understanding of the relationship between templates and themes. You can think about templates and themes as different layers of formatting. When you create or open a document, you start with the formatting that's assigned via styles in the underlying template. (As you'll recall, the default document template in Word is Normal.dotm.) You can then layer on top of those formats the colors and other elements provided by the theme. The default theme for new blank documents is Office, but you can change it as needed. Applying a new theme or Style Set doesn't change the underlying template. It merely changes certain aspects of the formatting, enabling you to quickly change the overall look of a document, as described in more detail later in the chapter.
Not only can templates include styles and basic formatting, but they also can include legacy fields and content controls that prompt you (or another user) to enter information, as in the example in Figure 18.1. After you add the fields and/or controls and protect the document, the user can only enter information where specified, and will in some instances see an error message if they enter the wrong type of data, such as entering text in a date field. Chapter 24, “Forms,” explains how to set up and protect a fill-in document like this. In addition, templates can include macros (see Chapter 32, “Macros: Recording, Editing, and Using Them”) and other Word fields (see Chapter 22, “Data Documents and Mail Merge,” or Chapter 23, “Automating Document Content with Fields”). The more formatting, content, and automation you build into a template in advance, the more work you'll save later—but that doesn't mean that you can't save even a very simple document that you use frequently as a template.
The primary way to create your own template is via the Save As command:
- Make the desired modifications to the document or template you want to save as a template. You can either open and alter an existing document or create a new one from scratch.
- Choose File
 Save As Computer Browse, and from Save as type, choose one of the Word Template options (Word Template, Word Macro-Enabled Template, or Word 97-2003 Template). The new template will be 100 percent identical to the current file, and will contain any text, formatting, macros (assuming the correct type is selected), and styles that the original contains—limited, of course, by compatibility issues if you're saving from a Word 2013 type to a Word 97–2003 type (for example, a Word 97–2003 template cannot retain Word 2013 Building Blocks Gallery items; they are converted to AutoText items).
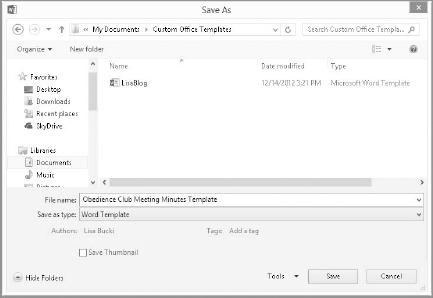
 - Edit the name in the File name text box as desired, but leave the current folder selected. As shown at the top of Figure 18.2, when you start saving templates, Word creates a Custom Office Templates folder within your My Documents folder in your personal folders in Windows 7 or 8. (The My Documents folder contents appear in the Documents library.) Leaving this folder selected ensures that you will be able to access it from the PERSONAL choices in the Word Start screen or the Backstage choices that appear when you choose File New.
- Click Save.
In addition to custom styles, formatting, and example text, you can add legacy fields and content controls before saving as a template.

Choose Word Template from Save as type and enter a file name, but leave the default folder selected.
To ensure that you properly saved the template and it's now available for use, choose File ![]() New, and click Personal under Suggested searches. The templates in your Custom Office Templates folder appear and are available for use, as shown in Figure 18.3.
New, and click Personal under Suggested searches. The templates in your Custom Office Templates folder appear and are available for use, as shown in Figure 18.3.
Other valid ways to create new Word template files include the following:
- Using any folder window from the Windows desktop: Right-click an existing template file to copy it, move to the destination window (if needed), right-click, and click Paste. Then rename the new file, which is a clone of the original that you can then modify as desired.
- Cloning everything (styles and so on) except for suggested text: Open an existing document or template, press Ctrl+A to select everything, and press Delete. If desired, double-click in the header and/or footer areas and delete everything there as well. Then resave and rename as needed with File Save As.
Click Personal after choosing File
New to find the templates you create and save to Custom Office Templates.
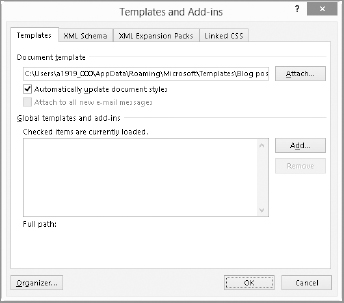
- Cloning everything except for text and nonstyle formatting: Press Ctrl+N to create a new blank document, and then choose File Options Add-Ins. Open the Manage drop-down list, click Templates, and then click Go. In the Templates and Add-Ins dialog box, click Attach on the Templates tab. In the Attach Template dialog box, select a template in the current folder, or navigate to your Custom Office Templates folder. Select the desired template and click Open. Click to check and enable the Automatically update document styles check box as shown in Figure 18.4, and then click OK. Then resave and rename as needed with File Save As. Top-level formatting, such as page and section formatting, is not copied to the new document, but any styles, macros, and Building Block items (limited by version compatibility considerations) will be available in the new template.
TIP
If the Developer tab is displayed, click Add-Ins in the Add-Ins group or Document Template in the Templates group to open the Templates and Add-ins dialog box directly. To display the Developer tab, right-click any Ribbon tab, click Customize the Ribbon, click Developer to check it in the right Main Tabs list, and click OK.
Click Automatically update document styles to add the styles from the template into the current document, including any blank document you want to resave as a new template.
For each of these methods, in order for the templates to be available from the New screen, you need to save them to your Custom Office Templates folder within My Documents. Templates saved elsewhere can still be used, but you need to navigate to them in order to use them.
Using the Organizer
Use the Organizer to move styles and macro projects between open files. You can also use it to delete and rename macro projects (except for built-in styles, of course).
To open the Organizer, use one of two methods:
- Choose File Options Add-Ins. Open the Manage drop-down list, click Templates, and then click Go. In the Templates and Add-Ins dialog box, click Attach on the Templates tab
- Or, if the Developer tab is displayed on the Ribbon, click Document Template in the Templates group.
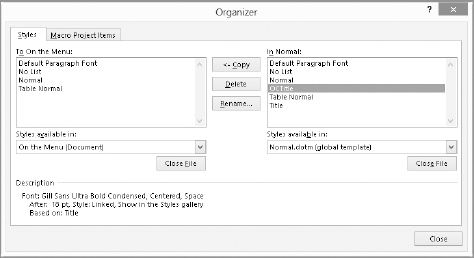
The Organizer dialog box appears in Figure 18.5. On the Styles tab, use the two Styles available in drop-down lists to choose the source and target document(s) and/or template(s). (On the Macro Projects Items tab, the lists are named Macro Project items available in.) If either the target or source isn't available on the drop-down list, click either of the Close File buttons to close either currently open file. The button immediately changes to Open File. Use the Open dialog box to navigate to the desired file, and then click Open. Of course, when you finish making any of the following changes, click Close to close the dialog box.
Use the Organizer to copy styles and macros between documents and templates, or to rename and delete specific styles and macros.
Copying styles and macros
To copy styles or macro project items, use standard Windows list-selection techniques to select the items you want to copy in the source (In) list—the moment you select an item, the opposite pane's preposition changes from In to To, as shown in the left list in Figure 18.5. Click Copy to copy the selected item(s) to the To file. You aren't limited to one direction—either pane can become the “To” pane depending on which pane contains the selection.
Deleting styles and macros
One common reason for deleting a style is when you intend to save a new style in the current file or a template you're updating and mistakenly save it to Normal.dotm. As a result, you may want to clean it out of the default template. To delete items, select the items you want to delete and then click Delete. Click Yes to confirm the deletion. You can delete only one item at a time. You cannot delete built-in styles such as Heading 1 and Normal.
CAUTION
If you delete a user-created style, all text formatted with that style will be reformatted as Normal. If you want to assign a new style to that text, do it before deleting the old style. Better still, if the new style doesn't yet exist, simply rename the unwanted style using the new name. As noted in the next section, however, you cannot rename built-in styles.
Renaming styles and macros
To rename an item, select it and click Rename. In the Rename dialog box, type a new name and click OK. Note that built-in styles cannot be renamed—all you can do is add alternative, or alias, names. For example, if you type 1h into the Rename dialog box when trying to rename Heading 1, it will be renamed to Heading 1,1h. This feature is not without utility, mind you, since it then lets you press Ctrl+Shift+S, type 1h, and press Enter to apply Heading 1 to the current paragraph. You can add multiple aliases to any style.
Removing style aliases
To remove a style name's alias, select the style and click Rename. In the Rename dialog box, delete the portion of the name that you want to remove. Continuing with the preceding example, if you no longer want to be able to refer to Heading 1 as 1h, delete ,1h and leave the Heading 1 portion. If a style has multiple aliases, remove just the ones you no longer want, keeping in mind that the built-in name, if there is one, will survive regardless of what you try to do.
Modifying Templates
You can modify or customize any template on your computer; you first have to open the template file itself, rather than just creating a document based on the template. To do so:
- Choose File Open Computer Browse, and from the drop-down list to the right of File name, choose All Word Templates.
- Navigate to the folder holding the template to edit, such as the Custom Office Templates folder in the Documents Library. Other templates may reside in the C:Usersuser nameAppDataRoamingMicrosoftTemplates folder, or its custom Word Templates subfolder.
- Click the desired template to select it.
- Click Open.
Once you have the template open, make the desired changes, and then save and close the edited file. If you don't want to open the template file and make the changes directly, there are a few ways to make changes indirectly:
- Via styles: Modify styles in the Modify Style dialog box as shown in Chapter 7, “Using Styles to Create a Great Looking Document,” taking care to enable the New documents based on this template check box before clicking OK to apply your changes. When and if prompted, click Yes to saving changes in the underlying template file.
- Organizer: As described earlier, after opening the template file, open the Organizer. Make sure the template is one of the selected files, and then use the choices on the Styles and Macro Project Items tabs to copy, delete, and rename styles and macros as needed. When you're done, click Close.
- Building Blocks Organizer: Use the Building Blocks Organizer to move Building Blocks Gallery items between templates, as shown in Chapter 12, “Getting Smart with Text: Building Blocks, Quick Parts, Actions (Tags), and More.”
Working More Effectively with Themes
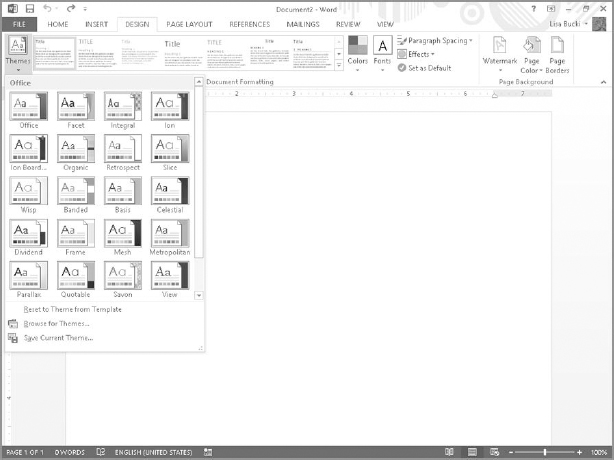
Like many other Word features, Themes work with Live Preview. Unless a document explicitly uses theme-based formatting, such as styles relying on colors and fonts specified by the theme, changing themes will appear to have no effect. Themes are housed at the left end of Word 2013's Design tab, shown in Figure 18.6. The rest of the tab's Document Formatting group contains other theme-related features that you'll learn more about in the following sections.
Theme settings color-coordinate document contents and change other overall features.
NOTE
Note also that the Themes feature set does not work in Compatibility Mode. There is no mechanism for storing Word 2013 theme information in the standard Word 97–2003 document format, even though Word 2003 has its own different brand of theme formatting.
What are themes?
Themes are coordinated sets of colors, fonts, table formats, and other graphic elements used to change the overall look of a document while leaving its content unchanged. Word comes with 21 built-in themes, some of which are shown in Figure 18.6. Although the applied theme's impact hinges on using certain Word 2013 formatting features such as styles and theme colors, themes are not part of style formatting. There is no way to associate or assign a theme with a particular style. Themes are applied to the entire document, wholly apart from styles, and affect many different aspects of document formatting.
Understanding themes
As noted in the earlier discussion about themes versus templates, the template provides the base level of formatting through styles, page setup, and so on. The theme applies the next level of formatting on top of the template. The theme includes theme colors, theme fonts, and theme effects, each of which you'll learn more about later in this section.
The best way to understand themes and what they bring to the document design table is to use them on documents designed with themes specifically in mind. Follow these steps as a practice example to see how a theme impacts a document:
- Press Ctrl+N to create a new blank document.
- Type Heading 1, and apply the Heading 1 style from the Style gallery of the Home tab.
- Type Heading 2, and apply the Heading 2 style from the Style gallery of the Home tab.
- Click the Insert tab, click Shapes in the Illustrations group, click Oval under Recently Used Shapes at the top of the gallery, and then click in the document to insert a circle in the default size.
- With the circle still selected, click Shape Effects in the Shape Styles group of the Drawing Tools Format tab, point to Preset, and click Preset 5 (second row, first column).
- Click a blank area of the document.
- Click the Themes button in the Document Formatting group of the Design tab (refer to Figure 18.6), and note the names of the themes—Facet, Integral, Ion, Ion Boardroom, Organic, and so on.
- Click Integral. Note the changes in the example document. The text formatted with heading styles changes color and font, and the circle color change as well. Figure 18.7 shows the example document with the new theme applied.
- Close the document without saving changes, or if you want to save it for future practice feel free to do so.
The Integral theme applies new heading fonts and more in the quickie practice document.

Differences between themes and templates
Word templates are stored in .dotx and .dotm files, and contain styles, macros, QAT settings, and keyboard customization settings. Templates are essentially documents, so they can contain text, graphics, and formatting as well.
Themes, on the other hand, transcend the boundaries of traditional Word structures. They instead owe their existence to .thmx files stored in the C:Program Files (x86)Microsoft OfficeDocument Themes 15 folder (32-bit version) or C:Program FilesMicrosoft OfficeDocument Themes 15 folder (64-bit version). Like Word's .docx files, .thmx files are actually compressed .zip files that contain a number of subfolders and files. The structure of the Slice.thmx file is shown in Figure 18.8. Note that this theme file's name was changed to include a .zip extension so that its contents could be viewed by Windows Explorer (Windows 7) or File Explorer (Windows 8). For Word to recognize the file as a theme file, the .zip part of the name would need to be deleted.
Word gets its theme information from .thmx files, which are compressed .zip files that contain the XML structure and supporting files.

Another piece to this puzzle are additional files (for example, Green Yellow.xml and Grunge Texture.eftx) contained in the Theme Colors, Theme Effects, and Theme Fonts subfolders in the Document Themes 15 folder. The Theme Colors and Theme Fonts folders hold .xml files; the Theme Effects folder holds .eftx files. (The latter file type also represents a compressed .zip file.) Feel free to perform additional research on these file structures at your leisure.
Themes work by adding additional information to the current document, with much the same kinds of results as Style Sets, as discussed in Chapter 7. While the method for themes is different, using XML structures, the result is that the colors, fonts, and effects are added to the current document's formatting.
Theme elements or components
Themes consist of three elements:
- Theme colors
- Theme fonts
- Theme effects
By modifying theme elements, you can apply a new overall look for the document. By creating a new combination of any of these three elements, you effectively create new a new theme that you can save. Here's more about each of these three settings for an applied theme.
Theme colors
While each of the named themes that come with Word has a preassigned set of theme colors, there's no reason you have to stick with that set of colors. If you want the Organic theme but prefer the Slipstream theme colors set rather than the default colors, you can change the theme colors.
To change color sets, in the Design tab, click the Colors button in the Document Formatting group to display the gallery shown in Figure 18.9. Drag the mouse over the various color sets to see a Live Preview, and then click a color set when you see the colors you want.
After applying a theme, you can apply a different set of theme colors.

TIP
When you create a style or other template feature with a color other than Automatic, make sure the color you apply is one of the Theme Colors, not one of the Standard Colors in the color gallery. The Theme Colors will change as desired when you change themes, but the Standard Colors won't change.
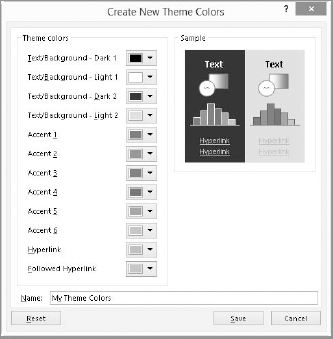
If you click Customize Colors at the bottom of the gallery shown in Figure 18.9, the Create New Theme Colors dialog box shown in Figure 18.10 appears, where you can customize the colors and create your own theme colors. Click the various color buttons to display the color gallery, and click alternate colors as desired. Enter the theme colors set name in the Name text box, and then click OK. The file will be saved in .xml format in C:Usersuser nameAppDataRoamingMicrosoftTemplatesDocument ThemesTheme Colors. (This folder is created the first time you save a theme.)
Create a custom set of theme colors here.
Theme fonts
Theme fonts are a bit simpler to understand because there are only two components: the heading font and body text font. Click the Fonts button in the Document Formatting group of the Design tab to change theme fonts. Notice in Figure 18.11 that the Arial Black-Arial theme fonts are selected. For each theme, the larger font shown is the one that will be applied to Heading styles (Heading 1, Heading 2, etc.), and the smaller one is the one that will be applied to body text.
TIP
The theme fonts for the currently applied theme appear in the Theme Fonts group at the top of Font drop-down list in the Font group of the Home tab.
For each theme, the Theme Fonts gallery shows the fonts used for headings and body text.

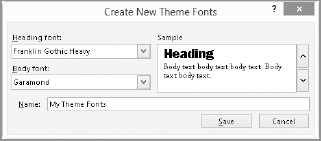
As for theme colors, you can create new theme font sets. Click Theme Fonts in the Document Formatting group of the Design tab, and then click Customize Fonts below the gallery choices, as shown in Figure 18.11. In the Create New Theme Fonts dialog box, shown in Figure 18.12, choose the Heading font and Body font, enter an informative name, and click Save. The theme font will be saved in .xml format in C:Usersuser nameAppDataRoamingMicrosoftTemplatesDocument ThemesTheme Fonts.
When you create new theme fonts, it's useful if the name you choose either describes the purpose for the fonts or includes the font names.
Theme effects
Theme effects are a bit harder to grasp than other theme elements, mostly because they're used a good deal less often by the average user. In the Design tab, click the Effects button in the Document Formatting group to display the gallery of options shown in Figure 18.13. If you study the different theme effects, you will see sometimes subtle and sometimes not-so-subtle differences among the elements shown. For example, the Office set looks soft-edged and perhaps a little blurred with shadows at the edges. Grunge has mottled fills applied. (It's unlikely you can see this in the picture in the book, so look onscreen.)
Apply theme effects to SmartArt, WordArt, Charts, and Shapes.

The easiest way to see theme effects in action is to create an example shape or graphic and use Live Preview to see the various effects.
You have seen how to save custom theme colors and theme fonts. The Word 2013 interface does not provide a built-in, direct way for you to save custom theme effects. You can indirectly save them, however, by saving the whole theme, as shown shortly.
Style Sets and paragraph spacing
The Document Formatting group of the Design tab includes a couple of additional settings along with all the theme settings. Chapter 7 discussed Style Sets, which enable you to change the style fonts used throughout the document. Although they are not technically a component of the applied theme, the fonts in the available Style Sets do change when you apply a different theme to the document. Change Style Sets using the Style Sets gallery in the Document Formatting group of the Design tab.
That group also includes a Paragraph Spacing gallery, shown in Figure 18.14. Choose one of the presets from the gallery to apply the combination of line and paragraph spacing that looks appropriate in the current document. For example, you may want to use the Relaxed preset to space out the paragraphs and lines in a flyer document to fill the page better.
Change overall document paragraph spacing with the Paragraph Spacing choices on the Design tab.

Saving custom themes
Using the Colors, Fonts, and Effect controls in the Document Formatting group of the Design tab, it's possible to create sets of theme elements that you want to preserve for future use. As indicated, you can save custom colors and fonts. In addition, you can save entire themes. To save a custom theme, in the Document Formatting Group of the Design tab, choose Themes ![]() Save Current Theme. In the Save Current Theme dialog box, shown in Figure 18.15, type a descriptive name and click Save.
Save Current Theme. In the Save Current Theme dialog box, shown in Figure 18.15, type a descriptive name and click Save.
Alternatively and additionally, you can include other elements, such as text, styles, pre-built headers and footers, and other document elements, and save the entire setup as a template. When you do that, any custom themes employed automatically become part of the saved template. See the “Creating Your Own Templates” section earlier in this chapter for additional information on saving document templates.
Overall themes, theme colors, theme fonts, and theme effects are saved in the same folder set by default.

Setting the default theme
In previous Word versions, changing the default theme was a hassle. In Word 2013, open a new blank document, display the Design tab, choose a theme from the Themes gallery in the Document Formatting group, and then click Set as Default in the same group. To change the default theme for a particular template file, open the template file, change the theme, and then save and close the template.
Building on an Existing Foundation with Master Documents
A master document lets you create a single container file that provides access to, and control over, a number of smaller documents called subdocuments. Using a master document potentially solves a number of problems, including managing a complex assortment of cross-references when different sources are housed in a variety of documents. Other problems potentially solved include creating inclusive tables of contents, indexes, and tables of figures, as well as coordinating headers, footers, page numbers, footnotes, and endnotes.
Another potential advantage in all this is the possibility that different users can edit different subdocuments of the master document. Someone in one office might be working on Chapter 1, someone else working on Chapter 2, and so on, all at the same time. Then, in theory, the edits to multiple subdocuments would appear the next time you opened the master document.
CAUTION
The master document feature has had a reputation for a propensity for document corruption as well as crashes. In part this may be attributed to trying to link between too many documents and storage locations. To minimize issues, it's a good practice to store all the subdocument files in a single location along with the master document. Also keep a current backup of that location to facilitate recovering files, if needed.
Because the master document itself is a smaller document that serves as a control center for all of the subdocuments, the expectation was that it would use less system memory and result in overall documents that were easier to handle. As it turned out, however, master documents often required at least as much memory as the most conspicuous alternative—which is to put all of the document components into a single document. Depending on the size of the individual components, as well as what they contain (such as numerous tables, equations, and graphics), using a master document can be about as easy as trying to steer an aircraft carrier through the aisles of your neighborhood grocery store.
But that wasn't the worst of it. The worst of it was that the master document feature tended to corrupt the component documents. All of the coordination advantages in the world aren't worth anything if there is a fairly strong likelihood that the document components are going to become so hopelessly corrupted that they can't be opened.
Here are a few tips to reduce the risks and enhance your chances for success when using master documents:
- Use the same template for all documents that will be components for the master document.
- For individual document control, if you have access to a SharePoint server, put the component documents themselves onto a SharePoint server (for example), and let it handle the check-ins and check-outs.
- Master documents' potential strength is in coordinating things such as tables of contents, indexes, page numbering, and cross-references. Page numbering, tables of contents, and indexes are easy to redo if the master document feature fails. Cross-references are not. Although it's more work, create cross-references from the individual component documents, and don't rely on the master document itself. It may be more work, but it's less work than having to redo everything if the master document feature fails.
- Use Word's Heading 1 through 9 styles for formatting your headings, keeping in mind that they will need to be coordinated at the top level. If the master document is organized into chapters, with each chapter residing in a single document, reserve Heading 1 for chapter titles, rather than for major headings within chapters.
One of the greatest potential advantages of master documents is for performing Replace operations across multiple files at the same time. For example, suppose you need to change Smith to Smyth in 100 chapter files. Imagine doing it with one simple Replace command. If you succumb to the temptation, make a complete backup copy of the components before proceeding.
Creating a Master Document
You have essentially two approaches to creating a master document:
- Organize from existing files: Create a master document from a container file, and then insert and coordinate existing files with heading styles/outlining applied. Remember to back up those files before turning them into subdocuments.
- Convert an existing formatted document: When a document that you've formatted with heading styles (and thus outlining) has become unwieldy, convert it into a master document, converting major sections into subdocuments.
NOTE
Chapter 3, “Working Smarter, not Harder, in Word,” explains how to use outlining to organize document content.
Before we launch into how to do this, it's helpful to be familiar with the available tools. Let's take a look.
The Master Document group
In theory, the Master Document view is the Outline view on steroids. In the View tab, or in the Views section of the status bar, click the Outline choice. To display the Master Document tools, click Show Document in the Master Document group of the Outlining tab, as shown in Figure 18.16.
Click Show Document to display all of the Master Document tools. Most tools are grayed out until a master document has been created.

Tools in the Master Document group of the Outlining tab include:
- Show Document: Toggles the display of all master document tools except for Show Document and Collapse Subdocuments.
- Collapse Subdocuments: Toggles between showing the path and name of the subdocument and showing the subdocument content itself.
- Create: Transforms selected outline items into subdocuments. Each major outline division becomes a separate file.
- Insert: Inserts an independent file into the master document as a subdocument. Use this approach to assemble existing files into a master document.
- Unlink: Deletes the link to the subdocument and copies the subdocument contents into the master document. If you do this for all subdocuments, the resulting document is no longer a master document.
- Merge: Combines multiple subdocuments into a single subdocument. The newly combined subdocument inherits the name of the first subdocument in the selection.
- Split: Splits the selected subdocument into new subdocuments at the next lower level of organization. For example, if the subdocument has one Heading 1 but multiple Heading 2 styles, there will be one subdocument for each Heading 2 in the selection.
- Lock Document: Toggles the write state of subdocuments in the selection on and off.
Creating a master document from existing documents
It's pretty typical for people from different departments in an organization to be fielding different parts of an RFQ (Request for Quotation), RFP (Request for Proposal), annual report, or other types of documents, such as applications for company-wide certifications such as ISO. These are exactly the types of situations that the master document feature was intended to assist with. Each department's portion of the overall task can be assigned to a single person charged with preparing the text. Then, the overall point person for the project can gather the documents provided by the other team members, insert them into the master document, and tweak the finished product.
To create a master document from existing files, follow this process:
- Press Ctrl+N to create a new blank document to serve as the master document, or create the master document from an existing template file. It isn't essential, but it will greatly simplify document formatting if the master document itself and each of the component files are all based on the same document template and have a relatively similar outline structure applied.
- Type a title and any other setup text you might need or insert a cover page, and then position the insertion point where the first subdocument should be inserted.
- Click the View tab of the Ribbon, and click Outline.
- In the Master Document group, click Show Document. The Master Document group expands to show the rest of the Master Document tools.
- Click Insert in the Master Document group. The Insert Subdocument dialog box appears.
- Navigate to the file to insert, click it, and click Open.
- Repeat Steps 5 and 6 to insert additional subdocument files.
- Save and name the master document file.
NOTE
If an inserted subdocument's template is different from that of the master document, Word notifies you in a message box, and you can click OK to continue.
If the subdocument and master document contain user-created styles of the same name, you will be prompted about how to handle the styles, as shown in Figure 18.17. Even if the styles are identically defined, Word offers you an opportunity to rename the incoming styles to something else. Rename the incoming style if the styles really are different and used for different things.
Word offers to rename any user-created styles that exist in both the subdocument and master document.

The options are as follows:
- Yes: Word automatically renames the incoming style, and then prompts about the next one. Word appends a 1 to the end of the style name (GX1, in this case). In later subdocument insertions, Word increments as needed (that is, GX2, GX3, and so on).
- Yes to All: Word automatically renames all incoming styles.
- No: Word skips the noted style and prompts about the next one. Word applies the master document's version of the style to the associated text.
- No to All: Word skips all of them, and uses the master document's version of all user-created styles for the associated incoming text.
Once you've added all of the files you want to insert, when you save, the master document assumes command and control of the subdocuments, and saves them whenever changes are made to the master document.
Converting an existing file into a master document
You can also create a master document from a single existing file organized with outlining. When you do this, Word enables you to use the Heading 1–9 styles as a basis for identifying how to separate the content of a single document into a series of subdocuments, as follows. Because Word will make major changes to your document, it is a good idea to make a backup copy. Then follow these steps to break it into subdocuments:
- Open the outlined file you want to break into subdocuments.
- Switch to Outline view and, in the Master Document group of the Outlining tab, click Show Document.
- Use Show Level in the Outline Tools group to select the heading level that will help you to subdivide the document. Displaying one level below the level that you will use as the dividing line ensures you will include the right level of detail.
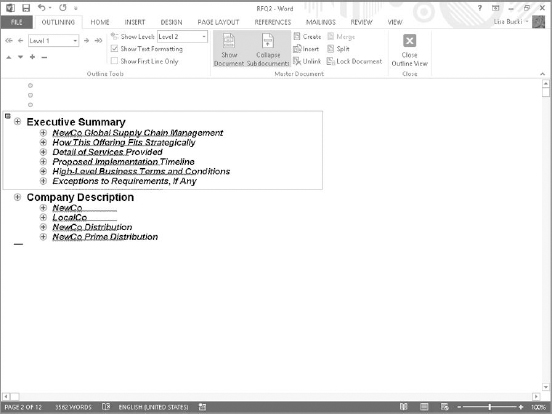
- Drag to select headings you want to include in a subdocument, and click the Create button in the Master Document group of the Outlining tab. As shown in Figure 18.18, a box appears around the new subdocument.
The box identifies the new subdocument.
- Repeat Step 4 to identify additional subdocuments.
- Click Save on the QAT. When you save the master document, each of the subdocuments will be assigned a name based on the beginning text of each subdocument. If you don't like the names, you can rename them.
Working with Master Documents
Working with master documents can have some unexpected speed bumps. For those without infinite patience, this section's mission is to lift the veil as much as possible, so you can use master documents effectively without inadvertently introducing issues.
Converting subdocuments into master document text
When working with master documents, text can reside either inside the master document itself or within the subdocuments. If you start seeing “Too many files are open” errors because you've included too many subdocument files in the master document, or if you realize that some subdocument content would logically work better as master document text instead, you can convert a subdocument into master document text.
To convert subdocuments into master document text, click or select the subdocument to convert, and click the Unlink tool in the Master Document group of the Outlining tab in Outline view.
Merging subdocuments
You can merge subdocuments to simplify the structure of a master document, or if you want to combine subdocuments so that you can assign a new subdocument to a team member for revision. To merge, while in Master Document view (Outlining tab with Show Document selected), select the subdocuments you want to merge, ensuring that you include each subdocument in its entirety, and click the Merge tool in the Master Document group of the Outlining tab. When you do this, the several subdocument icons are replaced by a single one. All of the merged subdocuments are combined into a single file that keeps the name of the first subdocument in the group selected. Save the master document file to finish the process.
Locking subdocuments
When managing a complex project, you sometimes don't want parts of a master document changed. You can lock all or part of a master document against write access. When locked, a lock appears next to the subdocument icon, as shown in Figure 18.19. To lock subdocuments, select the subdocuments you want to lock and click Lock Document in the Master Document group of the Outlining tab. Note that Lock Document is a toggle; if you click different locked and unlocked subdocuments, the Lock Document tool looks flat for unlocked subdocuments, and pushed-in for locked subdocuments. To unlock a locked subdocument, select it and click Lock Document again.
Locked subdocuments can be opened, but changes can't be saved.

Expand/collapse subdocuments
When you reopen a master document, it doesn't initially show the contents of the subdocuments in expanded form. Instead, it shows the links to the inserted subdocuments, as shown in Figure 18.20. Click the View tab, click Outline in the views group, and then click Expand Subdocuments in the Master Document group to redisplay the outline. You can later use the Collapse Subdocuments button in the Master Document group to collapse one or more subdocuments back to a link.
When you open a master document, all subdocuments appear as links because the master document is collapsed.

Handle with care—moving subdocuments
In Chapter 3, you learned how wonderfully easy it is to organize documents in Outline view. In addition, you need to know that Word encases each subdocument within section breaks, a feature covered in Chapter 16, “Setting Up the Document with Sections, Headers/Footers, and Columns.” When you move a subdocument, it is imperative that the opening and closing section breaks be moved as well. If one of them is left behind, the moved section will suddenly become part of another subdocument, so select with care, and drag and drop with even greater care.
It is almost impossible to properly move a subdocument unless section breaks are visible (toggle on and off with Ctrl+* [Ctrl+Shift+8]). Make sure you turn section breaks on before trying to select and move a subdocument.
Summary
In this chapter you've seen what templates are, how to use existing templates from a variety of sources, and how to create and modify templates. You've also learned about Word 2013's theme feature, how to apply themes and theme elements, and how to save custom themes. Finally, you saw how to create a master document to combine content from various authors and standardize formatting for a cohesive result. You should now be able to do the following:
- Understand the relationship between themes and templates
- Create a new document template
- Copy styles and macros from one template to another
- Change document themes at will, and understand why a theme might not have any effect on a document
- Change theme component settings, and save a custom theme
- Create a master document from existing multiple documents
- Break a single large file into subdocuments
- Lock and merge subdocuments when the need arises