
CHAPTER 1
Taking Your First Steps with Word
- Learning Word's startup methods
- Taking a look at the new Word
- Locating and using Word's tools
- Understanding the File tab and its purpose
- Reviewing Word option settings
- Finding Help in Word
- Shutting down Word when you've finished working
Word 2013 and its companion Office programs have been retooled and updated to help you get things done faster. Underneath its streamlined new look, Word integrates smoothly with the new features built into the Windows 8 operating system and Windows 8 devices, though you can use Word on a Windows 7 system, too. (It also runs on Windows Server 2008 R2 and Windows Server 2012, but this book limits coverage to using Word on the end-user versions of Windows.)
Word 2013 keeps the Ribbon interface found in the 2007 and 2010 versions. Its “bang for your buck” improvements show up elsewhere, from a new view that makes it easier to peruse a document, to new templates and guides that make document design faster and easier, to improved PDF handling, to integration with the cloud and your social media services. Even if you know the Ribbon, there's a lot to discover about Word in this book. This chapter kicks it off with your first look at starting Word in Windows 8 (and some in Windows 7), getting around in Word, finding options to customize your work setup, getting help, and exiting the program when you're done.
Starting Word
Your work in Word 2013 begins with starting the program, and there are multiple ways to get that done. This book assumes that you're using Windows 8 in its default configuration. If you're using Windows 7, some actions won't apply, and the text will point them out along the way. Office 2013 applications no longer run on Windows XP or Vista, and although Word 2013 does run on Windows Server 2008 R2 and Windows Server 2012, this book primarily limits coverage to using Word on Windows 8, with some coverage of differences when using it with Windows 7.
Start screen or Start menu
When you install Word 2013 in Windows 8, a tile for the program automatically appears on the Windows 8 Start screen. The Start screen appears after you start your computer and sign in to your user account, and it is the central location for accessing applications like Word. The fastest way to return to the Start screen at any time is to press the Windows logo key on the keyboard. You also can point to the lower-left corner of the Windows desktop—which retains the much the same appearance in Windows 8 that it had in Windows 7—until a Start tile appears, and then click it. Here's how to start Word 2013 from the Windows 8 Start screen:
- If needed, press the Windows logo key to go to the Start screen.
- Depending on your screen resolution, you may need to point to the bottom of the screen to display a scroll bar and then scroll right to display the Word 2013 tile. Figure 1.1 shows the Word 2013 tile.
The Word 2013 tile appears on the Start screen.

- Click the Word 2013 tile. Word opens on the Windows desktop.
In Windows 8, you can sign on using two account types: a local account or a cloud-connected Microsoft account. (Microsoft accounts can be associated with any email address, although older Hotmail or Windows Live accounts, as well as newer Outlook.com accounts are automatically recognized during user setup in Windows 8 and there are no additional steps for creating the account online.) If you want to take full advantage of Word's online, social, and collaboration features, sign on to Windows with a Microsoft account. Then, the first time you start Word, it will use your Microsoft account as your Word account and you should enter that account's information if prompted to activate the program.
NOTE
If your Start screen is too cluttered and you want to remove the Word 2013 tile and use another method for starting Word, you can unpin Word from the Start screen. Press the Windows logo key, scroll right to display the tile, and right-click it. In the commands that appear along the bottom of the screen, click Unpin from Start.
If you're still using Windows 7, you can start Word via the Start menu. To do this, you choose Start ![]() All Programs
All Programs ![]() Microsoft Office 2013
Microsoft Office 2013 ![]() Word 2013. Perhaps even easier, you can choose Start, and then type word into the search box. When Word 2013 is highlighted under Programs in the results list, press Enter.
Word 2013. Perhaps even easier, you can choose Start, and then type word into the search box. When Word 2013 is highlighted under Programs in the results list, press Enter.
NOTE
In Windows 8, you also can use the Search charm to start Word from the desktop (or the Start screen, if you've removed the Word 2013 tile). Move the mouse pointer to the upper- or lower-right corner of the screen to display the charms. Click the Search charm, which is the top charm. Move the mouse pointer off the Search pane that appears, over the scroll bar at the bottom of the screen. Scroll right until you see the Word 2013 tile under Microsoft Office 2013, and click the tile.
Pinning Word to the taskbar
You can place a shortcut for starting up Word 2013 onto the Windows 7 or 8 taskbar. This makes a lot of sense in Windows 8, in particular, because you use File Explorer from the desktop to manage your files. Pinning Word 2013 to the desktop in Windows 8 is a quick process:
- Go to the Start screen if needed by pressing the Windows logo key or pointing to the lower-left corner of the screen and clicking the Start tile.
- Scroll right to display the Word 2013 tile, if needed.
- Right-click the tile, and then click Pin to taskbar in the commands that appear along the bottom of the screen.
- Click the Desktop tile on the Start screen, or if you were previously working at the desktop, press the Windows logo key or point to the lower-left corner of the screen and click the desktop tile to redisplay the desktop. The Word shortcut will be added to the taskbar.
To pin Word 2013 to the taskbar in Windows 7, first start the program from the Start menu. Then right-click the program's taskbar button, and click Pin this program to taskbar in the jump list.
Once you've pinned Word to the taskbar in either version of Windows, simply click the Word 2013 button to start the program.
If you no longer want the taskbar shortcut, right-click the taskbar button and click Unpin this program from taskbar.
Creating a desktop shortcut and shortcut key
You also can start Word from a shortcut icon that you create on the desktop. To create a shortcut in Windows 8 you need to find the program startup file (WINWORD.EXE) for Word 2013. This process works in a similar way in Windows 7, which offers another way to create a less flexible type of shortcut that you'll learn about later.
Although locations vary (depending on user and network settings, for example), the usual default location for Word 2013 in both Windows 8 and Windows 7 is C:Program FilesMicrosoft OfficeOffice15WINWORD.EXE for the 64-bit version or C:Program Files (x86)Microsoft OfficeOffice15WINWORD.EXE for the 32-bit version.
Working from the desktop, open File Explorer and navigate to WINWORD.EXE following the path just noted. When you find it, right-click it and choose Send To ![]() Desktop (create shortcut). Close the File Explorer window. On the desktop, locate WINWORD - Shortcut. Double-click the new shortcut icon to start Word at any time.
Desktop (create shortcut). Close the File Explorer window. On the desktop, locate WINWORD - Shortcut. Double-click the new shortcut icon to start Word at any time.
To improve the shortcut, right-click it and choose Properties. As shown in Figure 1.2, the Target text box shows the path to the program startup file. You can add a program startup switch to this Target entry to customize Word startup; Appendix A covers the available switches. The Properties dialog box also includes a Change Icon button, which enables you to choose a new icon for this shortcut. The dialog box also offers the Shortcut key text box, where you can specify a keyboard combination that you can press to launch Word quickly from the desktop.
To assign a shortcut key, click in the Shortcut key text box shown in Figure 1.2, and press the key combination you want to use. You need to choose a shortcut key combination that's not currently used by Windows or another program. Ctrl+Alt+Shift combinations usually are available, so you might choose Ctrl+Alt+Shift+W for Word. After you press the key combination, click OK to finish assigning it to the shortcut. From there, any time you're at the desktop, pressing the keyboard shortcut combination will start Word.
The properties for the desktop shortcut enable you to change icons, add a shortcut key, or add a startup switch.

TIP
To select a desktop shortcut, display the desktop, click anywhere on it, and press the first character of the shortcut's name on the keyboard, such as W for winword. Repeatedly pressing that key cycles among all shortcuts that begin with that character. Press Enter to launch the program or file associated with the selected shortcut.
If you have multiple desktop shortcuts that begin with the same character, repeatedly pressing the same key still might be tedious. The solution is to rename the shortcut icon. To do this, select the shortcut icon as just described and press the F2 key. Type a new name starting with a different letter to replace the highlighted text, and then press Enter to finish renaming.
Windows 7 offers a faster alternative for creating a desktop shortcut icon to Word. Choose Start ![]() All Programs
All Programs ![]() Microsoft Office 2013. Right-drag Word 2013 from the menu over the desktop. Release the mouse button, and choose Create shortcuts here.
Microsoft Office 2013. Right-drag Word 2013 from the menu over the desktop. Release the mouse button, and choose Create shortcuts here.
A shortcut created by this method lacks flexibility, because you can't add a startup switch to the target or change the shortcut icon. However, you can add a shortcut key combination.
TIP
Windows 8 enables you to access a folder that seems to be a legacy version of the Start menu from prior Windows versions. You can copy shortcuts from there to the desktop. Word's Windows 8 “Start Menu” shortcut is found at C:ProgramDataMicrosoftWindowsStart MenuProgramsMicrosoft Office 2013. You can go directly to this folder from the Start screen (or after selecting the Search charm) by right-clicking the Word 2013 tile and clicking Open file location in the commands that appear at the bottom of the screen. The Word shortcut to copy and paste is Word 2013. You could add a shortcut to the Microsoft Office 2013 folder to the desktop to give you quick access to the startup shortcuts for all the Office apps.
Starting Word from File Explorer
Yet another way to start Word is by double-clicking the icon for a document created in Word 2013 or an earlier version in a File Explorer window on the desktop. Simply click the File Explorer taskbar button, navigate to the desired document, and double-click it. Alternatively, you can select it and press Enter, or right-click it and choose Open.
TIP
In fact, you can open multiple Word files this way—at the same time. Select the first one you want to open, and then Ctrl+click on each additional file you want to open. Then press Enter. This also works in Word's own Open dialog box.
NOTE
File Explorer in Windows 8 is basically the same as Windows Explorer in Windows 7, just updated and given a new name. This book primarily uses File Explorer to keep things simple, but if you are using Word in Windows 7, you can assume that “File Explorer” means “Windows Explorer” in any instructions.
Launching Word and a document via the Web
While you're browsing online, you may find links to documents created in Word, such as white papers, research reports, resumes, fiction works, and more. Clicking a Word document link in a browser window launches Word and opens the document. Keep a couple of cautions in mind when opening documents this way, however. If the file is large, the server is slow, or you are on a slow Internet connection, the download can hang up your browser or appear to hang up Word, in which case you might see a “Word is not responding” error message.
Even more important, however, Word files can carry computer viruses, so unless you have a virus protection program that scans files as they download, you risk infecting your system.
You can reduce the potential risks and problems by right-clicking the document link in question, clicking Save Target As (or your browser's equivalent), and saving the file to a local folder (a folder on your hard disk). Although most (but not all) popular antivirus programs monitor files you open from links, better safe than sorry. After you've saved a file to your hard drive, you can scan it with your antivirus program to remove viruses before proceeding to open the file.
TIP
Any time you open a Word file of uncertain origin, hold down the Shift key as you open the file. This prevents any automatic macros from running. Inspect it for suspicious macros, and once you're sure it's safe, proceed—but cautiously. In theory, this is less necessary in Word 2010 and 2013 than in previous versions of Word, however. When Word detects that a file has come from an outside source (Internet, email attachment, etc.), it can open it in Protected View. If you trust the source of the file, you can click Enable Editing to work with it.
Saving the file also gives you the opportunity to store it somewhere other than with your temporary Internet files. That way, if you need it again later, you won't have to download it again.
Using the Windows 7 Start menu Search box
If you're running Word 2013 from Windows 7, you also can use the Start menu's Search programs and files text box to find and run the program. Click the Start button and type word (or winword if you need additional parameters or switches) into the Search programs and files text box, and then click the entry for Word under Programs.
Safe Mode
Any time you start Word, you have the option of starting it in safe mode. You might want to do this for a variety of reasons, including the following:
- Word experienced problems and you're trying to diagnose them.
- You need to observe Word's default behavior to help someone else.
- You need to suppress a Word add-in, for whatever reason.
- You're curious about something (my own personal favorite).
To start Word in safe mode, simply hold down the Ctrl key, start Word by double-clicking a desktop shortcut icon or taskbar button for the program (it doesn't work with the Windows 8 Start screen tile), and continue holding the Ctrl key until the dialog box shown in Figure 1.3 appears. Click Yes to continue starting in safe mode.
Hold down the Ctrl key to start Word in safe mode.

Starting Word in safe mode suppresses a number of Word options and Windows registry settings. Word also does not load add-ins or user settings stored in the default document template Normal.dotm. The idea is to prevent user and other customizations from interfering with Word's default behavior. This can be useful in circumstances from diagnosing problems to writing books and articles about Word in which you don't want to confuse your own customizations with Word's normal built-in defaults.
When you are in safe mode, (Safe Mode) appears in the program title bar. To leave safe mode, exit Word as described in the final section of this chapter, and then restart Word normally.
NOTE
Starting Word in safe mode is not the same as starting Word using the /a command-line switch. More on this in Appendix A.
The Office Look
In redesigning Windows 8, Microsoft incorporated a sleeker look that would be at home on either tablets or PCs, greater integration with cloud-based features such as SkyDrive, and even more social media functionality. You don't have to spend much time working in the new Word to find that it follows the lead of Windows 8:
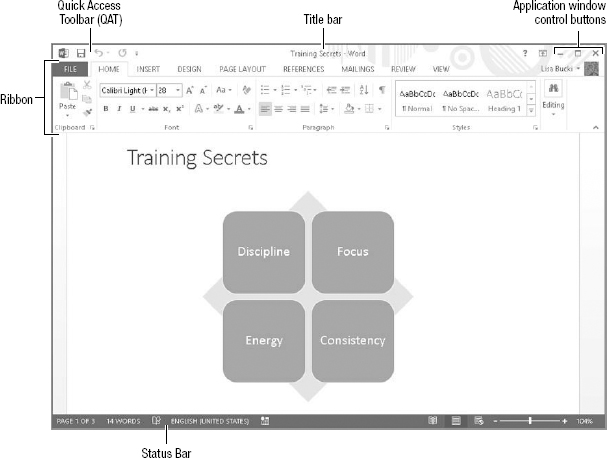
- Sleeker look: As shown in Figure 1.4, Word's title bar has eliminated the previous 3-D look in favor of flat tabs and a customizable Office Background graphic. The status bar likewise is strictly 2-D and easier to read. The upper-right corner of the screen has an icon you can click to see Ribbon Display Options; for example, clicking Auto-hide the Ribbon puts away all of the onscreen tools and shows you your document head on. Similarly, a new Read Mode displays a document in a format more comfortable for “paging” through it rather than editing. (Read Mode and the Ribbon Display Options are discussed more in Chapter 2, “Diving Into Document Creation.”)
Word's sleek new look helps you focus on your documents.

- Cloud integration: The upper-right corner of Figure 1.4 also illustrates that the Microsoft account (or other applicable account type) you use to sign in to Word appears, along with any picture assigned to the account. This means you can save and open documents directly to and from the account's SkyDrive, a feature you'll learn more about in Chapter 2 and Chapter 27, “Collaborating in the Cloud with SkyDrive.” Other new features tie into the cloud independent of your account. For example, the new Insert Online Pictures feature enables you to find and add images from Office.com Clip Art, Bing Image Search, or your SkyDrive to a document. Chapter 14, “Adding Pictures and WordArt to Highlight Information,” covers the details of this more flexible way to find document images.
- Social media functions: The Insert Online Pictures feature also enables you to insert pictures from a Flickr account associated with your Microsoft account. Just make the connection when prompted, and pictures you've shared to Flickr will be available for use in Word documents. And you can more easily share a document saved to your SkyDrive and present a document online, making collaboration with your contacts a seamless and productive experience. Chapters 14 and 27 delve into these social and collaboration features.
Your Interface to Faster Document Creation and Design
If you're like most users, when you begin a letter or a report, the first thing you do is check whether you've ever created a similar letter or report. If you have written and formatted a similar document, then you very likely will open it and use it as a starting point.
However, even if you have a document to use as a starting point, you are only recycling the same look and feel you've used before. Instead, you could take advantage of an existing template in Microsoft Word's ever-expanding repertoire. You can either select one of the more popular templates or search for a template using a description such as letter, resume, brochure, or event planner. Chapter 2 explains how you can find and use a template to create a document that has a professional appearance, even if you don't have a document design background.
If you also do not want to use a template, you can start with the clean slate of a blank document. Even with that starting point, Word provides a collection of designs and tools to save time and guesswork. Word includes built-in galleries of already formatted options. For example, if you create a table, rather than formatting the text, borders, and fills separately, you can apply a single table style to format all the table elements with an attractive combination of settings. Most galleries work with the Live Preview feature. Simply move the mouse pointer over a choice in a gallery, and the selected text or object temporarily morphs in the document to show you how the gallery choice would look when applied. You can either click that choice to select it or move the mouse pointer along to preview other gallery choices. Some galleries even present special elements you can add to a document page. For example, when you insert a text box into a document, you have the option of inserting a box formatted as a pull quote or sidebar to add design interest to your document. You'll learn about the numerous galleries throughout later chapters in the book.
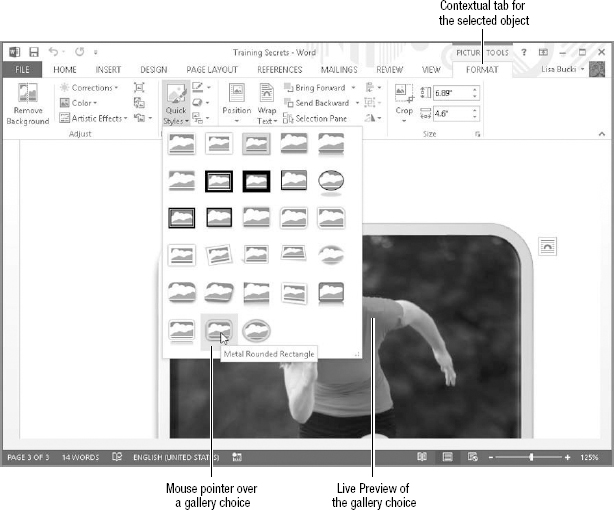
Word continues to streamline the number of tools onscreen at any time to help you achieve results quickly, rather than combing through myriad tabs and commands to discover possibilities. Depending on what you select onscreen, one or more new contextual tabs of options appears. For example, if a picture is selected, the Picture Tools' Format subtab appears on the Ribbon, as shown in Figure 1.5. It offers, among other tools, a gallery of styles for formatting the selected picture, and a preview of the style under the mouse pointer appears for the selected picture. Details about the various contextual tabs appear where applicable throughout the book.
Finally, Word 2013 retains the most powerful design tool of all: themes. The theme defines the document color scheme, fonts, and effects. Changing the theme changes the look of the entire document. Chapter 18, “Saving Time with Templates, Themes, and Master Documents,” provides the details about working with themes.
The Format contextual tab or subtab presents picture formatting options, including a gallery of styles.
Using the Word Start Screen
When you first start Word 2013, you'll see a new feature called the Start screen. The Start screen is basically divided into two panes. At the left, you can click a file in the Recent list—which contains files you've worked with in recent Word work sessions—to open it immediately. Or, you can click Open Other Documents below the recent list to navigate to various storage locations and open an existing file. See “Opening an Existing File” in Chapter 2. Finally, you can use the gallery of templates at right to choose a template, as described in “Creating a File from a Template” in Chapter 2. For now, if you're interested in seeing Word's tools, you can click Blank document in the templates at the to open a blank file and look around.
TIP
If you want to turn the Start screen off, click the File tab on the Ribbon, and then click Options. Leave the General tab selected in the list at the left, and under Start up options, click to remove the check beside Show the Start screen when this application starts. Click OK to apply the change.
Touring the Word Screen
This chapter has already pointed out a few elements of the Word screen that you'll use to create and enhance your documents. Now it's time to review all the tools available via the Word screen, several of which are identified in Figure 1.6. Word 2013 retains many of the same elements of the 2007 and 2010 versions of the programs. If you're new to Word, this section presents the essential roadmap to help you around the screen. Users of all levels can have an Aha! moment or two via the tips and notes found in the next few pages.
Title bar
The title bar at the top of the Word window shows the name of the current document and the program, as in Figure 1.6. In addition to identifying the working document, the title bar enables you to control the size of the Word window. Double-clicking the title bar toggles Word between maximized (full screen) and restored (less than full screen) states. If you've set your screen to a fairly high resolution and have used the Windows Snap feature to snap a screen to full size or half-screen size, double-clicking the title bar also returns the window to its prior size. The three application control buttons at the far-right end of the title bar also enable you to work with the window size. The left one, Minimize, collapses the current Word window down to a button on the Windows desktop taskbar. The middle button toggles between being a Maximize and Restore Down button, and works just like double-clicking the title bar. Finally, the Close button at the far right closes the current document and shuts down Word if that's the only open document. Pressing Alt+F4 also closes the document window. You also can right-click the title bar to see commands for sizing the window. And, if the window is less than full-screen size, dragging a window border resizes the window.
TIP
Use the Snap feature in Windows 7 and 8 to resize a restored down Word window. Drag the Word window by its title bar toward the top of the screen, and when you see a full-screen preview outline, release the mouse button to maximize the window. Or, drag the window to the left or right edge of the screen until you see a half-screen preview outline, and then release the mouse button to resize the window to half screen size. These features only work in Windows 8 when your screen is set to a 1366×768 or higher resolution.
Word screen elements
The far-left button at the right end of the title bar is the Help button, with the question mark on it. Clicking it opens Word's Help function, which you'll learn more about at the end of the chapter.
Ribbon
The Ribbon appears just below the title bar and is organized to put the tool you need where you need it when you need it. When you click one of the major tabs on the Ribbon, the tools you need for specific tasks related to the tab name appear. For example, click the Insert tab to find commands for inserting tables, pictures, and other graphics into a document. Click the Page Layout tab to find choices for setting up the document overall, click the View tab to change views and find other screen settings, and so on. The tabs offer buttons for commands, as well as drop-down menus of settings such as formatting choices, galleries of styles, and other formatting options, as has already been touched on in this chapter.
Each Ribbon tab further offers groups containing related commands. For example, all of the commands for formatting paragraphs appear in the Paragraph group on the Home tab. Groups help you drill down to the command you need more rapidly, so you can click and move on to the next task.
Exactly what you see in any given Ribbon tab is determined by a number of factors, including your screen resolution, the orientation of your monitor, the size of the current Word window, and whether you're using Windows' display settings to accommodate low vision. Hence, what you see might not always be what is pictured in this book. If your screen is set to a fairly high resolution, you will see the entirety of the Home tab of the Ribbon, shown in the top of Figure 1.7. The bottom image shows the Ribbon at the lower 1024×768 resolution used for the screen shots in this book. You'll notice in the top image that the Home tab shows the Format Painter label in the Clipboard group and more styles in the Styles gallery. At an even higher resolution and/or with Word stretched across multiple monitors, the Home tab would show even more labels and styles.
At a high resolution, Word's Ribbon displays additional gallery options and text labels (top) not seen at lower resolutions (bottom).

TIP
You can press Ctrl+F1 or click the arrow button at the lower-right corner of the Ribbon to collapse and expand the Ribbon. You also can double-click a Ribbon tab to collapse and re-expand it. At times the Ribbon might seem large or distracting when you're simply reading a document or when you're trying to see a graphic and write about it at the same time. And if you are fluent in the keystrokes you need to perform basic formatting, you don't necessarily need the Ribbon onscreen at all times. When the Ribbon is collapsed, you can click any tab once to turn it back on temporarily. In that case, you'll see a pin button at lower-right where the arrow previously appeared. Clicking the pin button expands the Ribbon so that it stays onscreen. You'll learn more about controlling the Ribbon in “Controlling the Ribbon display” in Chapter 2.
Note that you can customize the tabs that appear on the Ribbon. For example, if you want to create macros to handle certain document formatting tasks for you, you would need to display the Developer tab. Or you may want to hide tabs that you seldom use, such as the Mailings or Review tab. Chapter 30, “Customizing the Quick Access Toolbar and Ribbon,” explains how to set up the Ribbon to suit your own needs.
To see what any individual control or command on a Ribbon tab does, simply move the mouse pointer over it. A ScreenTip pops up with a description of the tool. Move the mouse pointer away from the button to hide the ScreenTip.
Ribbon groups
At the bottom of the Home tab shown in Figure 1.7, note the names Clipboard, Font, and Paragraph. These labels identify the command groups. Each contains individual tools or controls. You can customize the groups that appear on any Ribbon tab. For example, you might want to add a group that collects all of your most-used commands in a single location. You'll also learn more about this level of customization in Chapter 30.
NOTE
Throughout this book, you may see command shortcuts such as Insert ![]() Header & Footer
Header & Footer ![]() Header. These Ribbon tab name
Header. These Ribbon tab name ![]() group
group ![]() command sequences help you navigate through the Ribbon to find and choose the appropriate command. When referencing contextual tabs, an arrow will also appear between the upper part of the contextual tab name and the subtab, as in Picture Tools
command sequences help you navigate through the Ribbon to find and choose the appropriate command. When referencing contextual tabs, an arrow will also appear between the upper part of the contextual tab name and the subtab, as in Picture Tools ![]() Format. After the first mention in a chapter, the text may refer to the contextual tab by its subtab name only, that is, Format rather than Picture Tools
Format. After the first mention in a chapter, the text may refer to the contextual tab by its subtab name only, that is, Format rather than Picture Tools ![]() Format.
Format.
Contextual tabs
Along with the default set of seven main tabs, additional context-sensitive or contextual tabs or subtabs appear depending on what you are working on in the document. For example, if you change to Outline view, the Outlining toolbar, with commands for changing outline levels and more, automatically appears to the left of the Home tab. In other instances, a contextual tab might appear when you select part of a document or an object such as a table. For example, if you choose Insert ![]() Header & Footer
Header & Footer ![]() Header and insert a header from the Header gallery, the Header & Footer Tools
Header and insert a header from the Header gallery, the Header & Footer Tools ![]() Design contextual tab appears, as shown in Figure 1.8.
Design contextual tab appears, as shown in Figure 1.8.
When you work with the header, the Header & Footer Tools ![]() Design contextual tab and its commands appears.
Design contextual tab and its commands appears.

Notice that the right end of the contextual tab in Figure 1.8 has a Close group with a button for closing the tab. Some contextual tabs have such a button, and you have to use it to close the contextual tab. In the case of the Design subtab in Figure 1.8 and many other contextual tabs related to a selected object, you also can deselect or click outside the object, which closes the contextual tab automatically.
In some cases, multiple contextual tabs might appear. For example, when you select a table in a document, the Table Tools appear, with Design and Layout subtabs, as shown in Figure 1.9. In this instance, click a subtab to display its tools. For example, click the Design contextual tab to find the table design choices, or click the Layout contextual tab to find commands for changing the table's layout.
Selecting some objects, such as tables, displays multiple contextual tabs.

Command keyboard shortcuts or KeyTips
While many users can move fluidly between using the mouse or the keyboard, for the best typists, doing so can actually be a hindrance that slows them down. For such users, shortcut key combinations provide a way to handle formatting tasks and select commands without taking their hands off the keyboard.
In Word 2013 the command shortcut keys are called KeyTips, and some users also refer to keyboard shortcuts as hot keys. The keyboard shortcuts remain hidden until you need them. Press the Alt key on the keyboard to reveal them. As shown in Figure 1.10, when you press Alt the letters for selecting the Ribbon tabs and Quick Access Toolbar (QAT) commands appear. From there, you would press the keyboard key for the Ribbon tab you want to display. For example, pressing Alt+H displays the Home tab, Alt+N displays the Insert tab, and so on. The choices on the QAT are numbered rather than lettered, so you would press Alt+1 to select the first button there, Alt+2 the second one, and so on. Note that if you add more choices to the QAT as described later in the book, Word will automatically assign a keyboard shortcut.
Notice that Figure 1.10 also shows the Table Tools ![]() Design and Layout contextual tabs. Each has a two-letter shortcut key. To display the Design contextual tab, you would need to press Alt+J,T. Pressing Alt+J,L displays the Layout contextual tab.
Design and Layout contextual tabs. Each has a two-letter shortcut key. To display the Design contextual tab, you would need to press Alt+J,T. Pressing Alt+J,L displays the Layout contextual tab.
After you press Alt + a letter to select a tab, a new set of letters and (sometimes) numbers appears. These identify the keys you need to press to choose a command from the displayed Ribbon tab. For example, if you press Alt+P to display the Page Layout tab, the shortcuts shown in Figure 1.11 appear. From there, you could press O if you want to change page Orientation, M to change page Margins, IL to add an Indent, and so on.
TIP
After you press Alt and then a letter to select a Ribbon tab, you can press Tab and Shift+Tab to move forward and backward between the commands on that tab. When you've highlighted the command you want to use, press either the Spacebar or Enter key.
Press the Alt key to display Word's command keyboard shortcuts.

After you press Alt + a letter to select a Ribbon tab, press the next shortcut keys to select a command.

If you decide not to use a shortcut after you've displayed the keys onscreen, no problem. Just press Alt again, click a blank area with the mouse, or press the Esc key once or twice to remove them from the screen.
NOTE
Word also includes an extensive collection of keyboard shortcuts for selecting document text and navigating in a document. You'll learn about these in Chapter 2.
Quick Access Toolbar
I mentioned earlier that you can add a group to the Ribbon to collect all your favorite commands in a single easy-access location. Another and perhaps even faster way to accomplish this goal is to add your favorite commands to the Quick Access Toolbar, or QAT. The QAT remains onscreen no matter which Ribbon tab is displayed, so any commands on the QAT are available at all times.
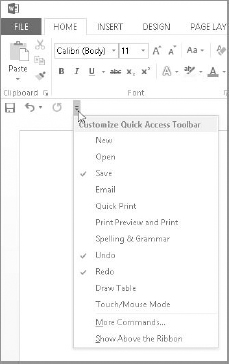
By default, the QAT has buttons for three commands: Save, Undo, and Redo. In Figure 1.12, I've moved the QAT below the Ribbon, so you can see these default buttons from left to right respectively. Note that the Redo button is unavailable (grayed out) until you perform an action that Word can repeat. Also, if you move the mouse pointer over the Undo and Redo buttons to see a ScreenTip, the ScreenTip name of each of those buttons changes depending on your last action. For example, the Redo button ScreenTip might read “Repeat Typing.”
As shown in Figure 1.12, clicking the Customize Quick Access Toolbar button at the right end of the QAT opens a menu of options for setting up the QAT. You can use the choices above the line on the menu to toggle commands on and off, choose More Commands to access all of the Word commands, or determine whether the QAT appears above or below the Ribbon.
The Quick Access Toolbar (QAT) always appears, no matter which Ribbon tab you've selected.
TIP
If you click the Customize Quick Access Toolbar button, you'll see a new command called Touch/Mouse Mode. Click it to add a button for toggling Touch Mode on and off in Word. When enabled, this mode adjusts the Ribbon buttons and other areas of the Word interface to make them easier to select by tapping a touch-enabled screen. Touch Mode can be a good option for people who have large fingers or who have cold hands and therefore have to tap harder to make a selection.
You can add any item from the Ribbon—individual tools, groups, and even dialog box launchers—to the QAT without opening the Customize Quick Access Toolbar menu. For example, right-click Bold in the Font group of the Home tab and choose Add to Quick Access Toolbar. If you add a command such as Bold to the QAT and want to remove it later, right-click it and click Remove from Quick Access Toolbar.
Galleries and Live Preview
In Word and the other Office applications, a gallery is a set of formatting results or preformatted document parts. Virtually every set of formatting results or document parts in Word 2013 (indeed, in all of Office 2013) might be called a gallery, although Word itself does not use the word gallery to refer to every feature set. Some, such as the list of bullets, are called libraries instead, and the drop-down galleries for selecting colors also may be called color pickers.
Word includes galleries for text styles, themes, headers, footers, page colors, tables, WordArt, equations, symbols, and more. In most cases, you click a button or drop-down arrow to open a gallery, and then click the gallery choice to apply to the selected text or object. Galleries often work hand in hand with the Live Preview feature.
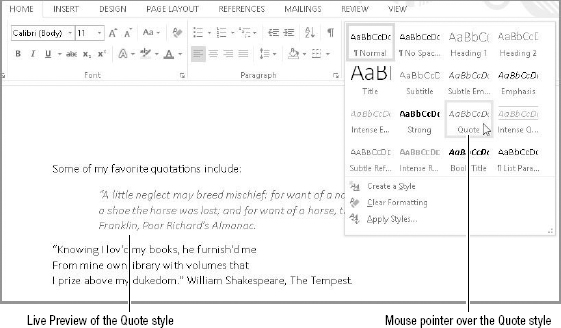
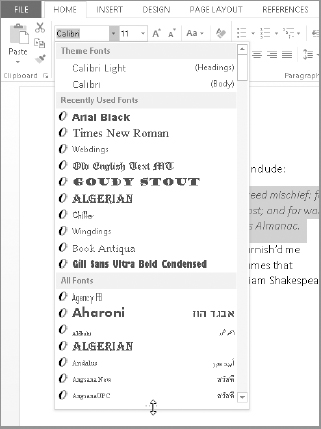
Live Preview temporarily applies the highlighted gallery choice to the current document selection, enabling you to instantly see the results without actually having to apply that formatting, as shown in Figure 1.13. Move the mouse pointer over the different gallery options to display the formatting on the document selection instantly.
Live Preview showing the Quote style applied to the selected paragraph
Note that not all galleries and formatting options have Live Preview enabled. For example, on the Page Layout tab, none of the Page Setup items produce live previews, nor do its Paragraph group settings. Another time you won't see Live Preview is when working with dialog boxes, such as the Paragraph dialog box. Many of those offer internal Preview areas but do not take advantage of Office 2013's Live Preview capability.
A gotcha in all this newfangled functionality is that sometimes the gallery itself covers up all or part of the Live Preview. This gets old quickly and can negate much of Live Preview's functionality, unless you're blessed with lots of screen real estate.
Fortunately, some galleries and controls have draggable borders that enable you to see more of what you're trying to preview, as shown in Figure 1.14. A handle with four dots indicates when you can resize a control's border by dragging up. If a gallery has three dots in the lower-right corner, that means you resize both its height and width by dragging diagonally.
Once you've determined through Live Preview that you want to apply particular formatting, click the choice in the gallery. If necessary, you can always use the venerable Ctrl+Z (Undo) if you don't like the result.
Some galleries can be resized to reveal the Live Preview that otherwise would be covered.
CAUTION
When using Live Preview, it's easy to forget to click the desired gallery or formatting command when you come to it. Particularly in extensive lists (such as lists of fonts, colors, or styles), it's possible to get exactly the right effect without noticing what it's called. In the case of colors, you usually don't even have a name to use as a guide. Sometimes, the hand really is quicker than the eye. Once you move your mouse away from your selection, it's lost. You might have to re-inspect that entire list to find exactly what you already found, so once you find what you're looking for, don't forget to click! Ctrl+Z is your friend!
The MiniBar or Mini Toolbar
Another feature in Word 2013 is the MiniBar, more formally known as the Mini Toolbar. The MiniBar is a set of formatting tools that appears when you first select text. It is not context-sensitive, and it always contains an identical set of formatting tools. There is no MiniBar for graphics and other nontext objects.
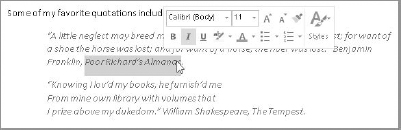
When you first select text, the MiniBar appears above and to the right of the mouse pointer, as shown in Figure 1.15. If you move the mouse pointer off the selection, the MiniBar disappears.
The MiniBar appears when text is first selected.
NOTE
Once the MiniBar disappears, you cannot redisplay it by hovering the mouse over the selection. You can, however, redisplay the MiniBar and a shortcut menu for the selection by right-clicking the selection. Note also that only the mouse triggers the MiniBar. If you display the pop-up context menu by pressing Shift+F10 or by tapping the Menu button on a Windows keyboard, the MiniBar will not appear.
When the Home tab is selected, the MiniBar might seem superfluous, as all of the MiniBar's commands also appear on that tab. However, consider for a moment how far the mouse has to travel to access the Ribbon commands. With the MiniBar, you only have to move the mouse less than an inch or so to move the pointer to the command you need. For those with repetitive motion injuries, this can save a lot of wear and tear on the wrist.
If you decide that the MiniBar gets in the way, you can turn it off. Even when it is turned off, however, you can still summon it by right-clicking the current selection. If you want to turn the Mini Toolbar off, click the File tab on the Ribbon, and then click Options. Leave the General tab selected in the list at the left, and under User Interface options, click to remove the check beside Show Mini Toolbar on Selection. Click OK to apply the change.
NOTE
Unlike many Ribbon tools, the MiniBar tools do not produce Live Previews of formatting and other effects. If you need to see a Live Preview, use the Ribbon instead.
Shortcut menus and contextual command buttons
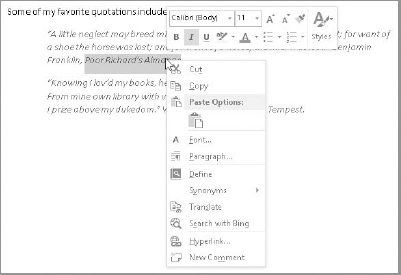
If navigating through all the Ribbon tabs still seems like a lot of work to you, Word's shortcut menus, also called contextual or pop-up menus, remain. To display a shortcut menu, just select text or an object such as a picture in the document, and right-click or press the menu key on your keyboard. As shown in Figure 1.16, the shortcut menu offers the commands you're most likely to use next for the selected item.
When you right-click a selection, a context-sensitive shortcut menu appears, along with the MiniBar.
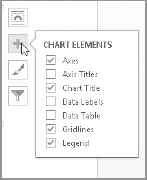
Word 2013 adds a new form of contextual tools to speed your work with some document objects, particularly on a touch-enabled system. When you select some types of objects, such as a chart, one or more contextual buttons will appear to the right of the object. Clicking some of these buttons opens a flyout gallery or formatting options for the selection, as shown in Figure 1.17. Clicking other buttons opens a flyout list of choices that you can click to toggle on and off, as shown in Figure 1.18. Simply click the desired choice in either type of flyout, or deselect the object to hide the buttons.
New contextual command buttons appear when you select certain objects, such as a chart.

Clicking some of the buttons opens a gallery, as shown in the prior figure, or a list of toggled options, as shown here.
TIP
Some of the Office 2013 apps more optimized for touch also include compact radial menus that you can tap to expose the commands you need.
Enhanced ScreenTips
Word 2013 includes the enhanced ScreenTips feature. By default, the ScreenTips for the Ribbon tools and many other screen elements include not just the item name but also a feature description. Enhanced ScreenTips help you find the right tool more quickly and reduce the need to search for help.
A ScreenTip appears when you hover the mouse pointer over a Ribbon command or other choice on the Word interface. Figure 1.19 shows an example. Notice that the ScreenTip includes a shortcut key combination for choosing the specified item. You can customize the ScreenTips by turning off the shortcut key display, turning off the feature description for smaller ScreenTips, or turning off ScreenTips altogether. Chapter 31, “Word Options and Settings,” covers setting these and other options throughout Word.
Enhanced ScreenTips include the name and description for a command or other tool.

Dialog boxes and launchers
To the right of some group names, a small box button with a diagonal arrow appears. This button is a dialog box launcher. Clicking a dialog box launcher opens a dialog box with more detailed options for the commands in the group. For example, if you click the dialog box launcher for the Home tab's Paragraph group, the Paragraph dialog box opens. Point to any dialog box launcher to display a ScreenTip explaining what it does, as illustrated in Figure 1.19 in the previous section.
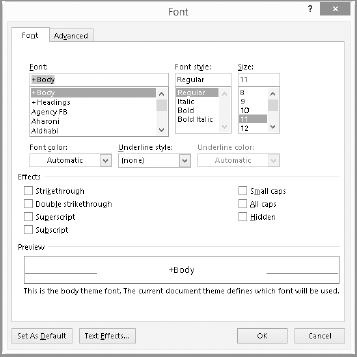
Clicking the dialog box launcher shown in Figure 1.19 opens the Font dialog box shown in Figure 1.20. Dialog boxes offer scrolling lists, drop-down lists, text boxes, check boxes, option buttons, command buttons, and other controls familiar to most computer users. You can click Cancel to close a dialog box without applying settings, or OK to finalize and apply your choices.
Dialog boxes enable you to refine formatting and other commands using familiar controls.
Task panes or panes
Similar to dialog boxes, task panes (now in Word 2013 more often simply referred to as panes) appear onscreen to help you navigate, perform research, apply formatting, and more. Think of them as dialog boxes that enable you to type while they're onscreen. Some of the panes open when you select a particular command such as the Thesaurus, while you toggle others such as the Navigation pane on and off as you work in Word. Still others appear when you select certain items for formatting, such as when you double-click a chart title. Figure 1.21 shows the Format Chart Title pane.
Some task panes appear docked on the left or right side of the document window, whereas others automatically appear undocked. You can undock a pane by pointing to its title until you see a four-arrow move mouse pointer, and then drag it to the desired location with the mouse. Double-click a floating pane's title bar to return it to its docked position. You can display and size multiple task panes onscreen at any time. To close a pane, you can click its Close (X) button at the upper right, or in some cases reselect the command you used to toggle it on.
Other Word features that manifest as task panes include the Navigation pane, the Mail Merge Wizard, Restrict Editing, Dictionary, the Clipboard, and the Reviewing Pane, among others. Later chapters of the book introduce the various panes and when they come into action.
Word's task panes make commands available while still enabling you to type and make selections in the document.

Status bar
Now we turn to the status bar. Shown in Figure 1.22, the status bar is the bar at the bottom of the Word window. The status bar provides more than 20 optional pieces of information about the current document. Right-click the status bar to display its configuration options.
Do you need to keep track of the word count? Not only does Word update the word count continuously, but if you select text, it tells you how many words are selected, with one of the indicators near the left end of the status bar changing to read 39 OF 69 WORDS or something similar.
To display the configuration choices shown in Figure 1.22, right-click the status bar. At the top and bottom of the shortcut menu, you can choose options to specify what indicators appear at the left and what view controls appear at the right. In between, it presents choices for turning features such as Track Changes or Overtype on and off. Then close the menu to apply your changes by clicking in the document or pressing Esc.
Customize the status bar and control several features with the status bar shortcut menu.

NOTE
The status bar shortcut menu stays onscreen until you click somewhere else in the Word window. That means that you can enable or disable as many options as you want without having to repeatedly right-click the status bar. Notice also that the menu displays the current status too, so if you just want to quickly refer to it to find out what section of the document you're working in—but don't really want Section on the status bar—you don't have to put it on the status bar and then remove it. Note additionally that the status items aren't just pretty pictures. For example, clicking the Page Number (PAGE X OF X) item opens the Navigation pane. Clicking the Macro Recording item opens the Record Macro dialog box.
Exploring the File Tab
The File tab in all of the Office 2013 apps works a bit differently than the other tabs. That's because the settings on the File tab enable you to manage the file itself, not the contents within the file, more like the File menu in Word 2003 and other applications with a menu-based interface. When you click the File tab, it displays what is sometimes called Backstage view. The contents of the view change depending on the command selected at left; initially it displays the Info choices shown in Figure 1.23. This screen lets you view and add file properties, as well as work with document protection, hidden properties, document issues, and versions.
NOTE
Backstage view is also sometimes just called the “File tab.”
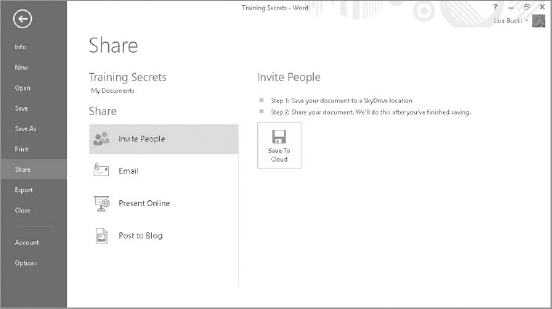
Clicking most of the commands along the left side of the File tab—Info, New, Open, Save, Save As, Print, Share, Export, Close, Account, and Options—causes the right pane of the screen to display the choices for that category. For example, if you click Share, as shown in Figure 1.24, options for presenting and publishing a document in the cloud appear.
Displaying and closing the tab
As noted, displaying the File tab is as easy as clicking any other tab. Just click the tab itself. If you decide you don't want to use any of the choices on the File tab and need to return to editing your document, click the Back (left arrow) button at the upper left, or press Esc.
CAUTION
If you click the Close (X) button in the upper-right corner, Word not only closes the File tab, but closes itself, too, which is probably not what you want.
Manage your file with the File tab choices.

A cornucopia of online options is found in the Share tab.
Finding recent documents and pinning
Some users might have documents that they want to open and revise or reread frequently. For example, if you have a hot project for a new client and your work on the project is due in the near future, you'll want those documents at your fingertips rather than having to navigate around your hard disk or network to find them.
Word gathers the files you've most recently opened into a Recent Documents list. You can simply display that list via the File tab, and click a file to open it. However, the Recent Documents list updates itself based on the files you open. To ensure quick access to a particular document, you can pin it to the Recent Documents list on the File ![]() Open screen. To do that:
Open screen. To do that:
- Click the File tab, and click Open at the left.
- Move the mouse pointer over the file you want to pin until you see the horizontal Pin this item to the list icon, shown in Figure 1.25.
Pinning a file in Recent Documents gives you fast access.
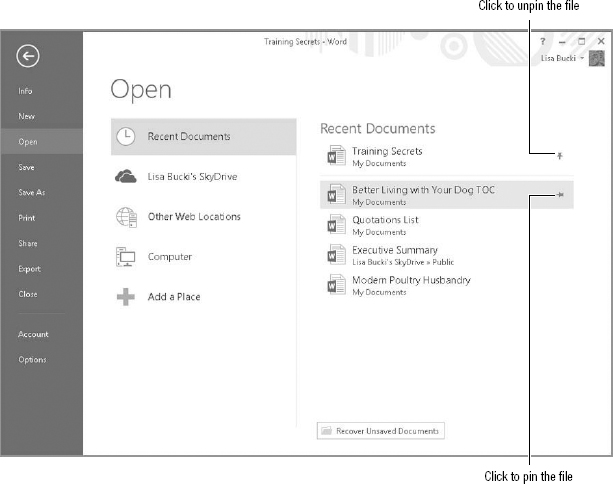
- Click the Pin this item to the list icon. The file moves above the line separating pinned and unpinned files, and the pin icon changes to a vertical Unpin this item from the list icon.
Chapter 2 provides more information about using the File menu to open an existing file.
NOTE
You will only see the Other Web Locations choice shown in the middle under Open in Figure 1.25 if you have downloaded and opened a Word document directly from a Web site. If needed you can click Other Web Locations and then click a choice under Recent Folders to re-download the file.
Undoing and Redoing Actions
Figures 1.6 and 1.12 show the Quick Access Toolbar. By default, the QAT has buttons for three commands: Save, Undo, and Redo. As their names suggest, Undo and Redo enable you to rescue your progress if you inadvertently slip up while working. Here's how they work:
- Undo: Click the Undo button or press Ctrl+Z immediately to rescind a prior action. For example, if you mistakenly delete some text, the name of the Undo button changes to “Undo Clear,” and clicking the button reinstates the text.
- Redo: The Redo button is unavailable (grayed out) until you perform an action that Word can repeat. When it's active, click it or press Ctrl+Y to Redo the prior action. Note that the shape and the name of this button change. When it's a round arrow shape, it's called the Repeat button, and clicking it repeats an action such as entering a word you just typed again (in which case the button name is “Repeat Typing). When it's the mirror image of the Undo button, it's the Redo button and clicking it redoes any action you just undid.
- Multiple undo or redo: The Undo and Redo buttons both include drop-down list buttons. Click the button to display a list of previously undone or redone actions, and then click an action in the list to undo/redo that action and all the ones listed above it.
Setting Word Options
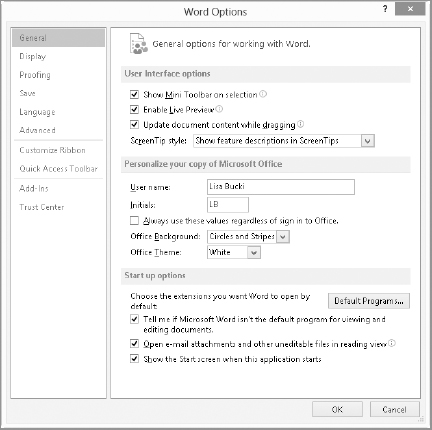
Word 2013 offers a centralized dialog box for changing Word options. Most beginning users don't need to dive into customizing their Word setup. However, because chapters throughout this book refer to various Word options, take a moment now to familiarize yourself with where the options are and how they are organized. To open Word Options, choose File ![]() Options to open the dialog box shown in Figure 1.26.
Options to open the dialog box shown in Figure 1.26.
The Word Options dialog box groups options by category.
NOTE
I've had to resize the Word window and some dialog box windows to a narrower width to accommodate the book design. The Word Options dialog box will appear much wider for you when you open it.
Finding the option you want
Word's Options dialog has 10 sections, or tabs, on the left. Do not be fooled by the labels. Note that one of the tabs is called Advanced. Microsoft's idea of advanced might not be the same as yours. What's optional for someone else might be essential for you.
Microsoft's logic is to try to put at the top of the list the controls and options it thinks you are most likely to want to change. The first set, General, is therefore the group it thinks will matter most to the typical user. If you're reading the Microsoft Word 2013 Bible, however, you might not be a typical user. Keep this in mind as you look at the 10 tabs.
Another caveat is that the labels aren't even objectively accurate. For example, there is a tab labeled Display. If you don't find the display option you're looking for there, don't give up. Some display options actually reside in General, such as Show Mini Toolbar on selection, Enable Live Preview, and Open e-mail attachments and other uneditable files in reading view.
A number of display options are also sheltered under the Advanced umbrella, including great favorites such as the Show document content options, the Display options (duh!), and Provide feedback with animation (under General). If you're keeping track, there's a General tab, and there's a General section within the Advanced tab. Options are covered in more detail in Chapter 31, but you can also discover a lot of options simply by taking a little time to explore the various tabs.
TIP
If an information icon (an i in a circle) appears to the right of one of the Word options, you can point to the icon to display a ScreenTip with more information about the option.
Advanced…versus not advanced?
The Advanced tab, partially shown in Figure 1.27, has 13 major sections. Also depending on how you count, the Advanced tab offers more than 150 different settings, including the Layout options.
Scroll down the Advanced tab a bit, and you can see both the Save and Preserve fidelity when sharing this document sections at the same time. While “Prompt before saving Normal template” seems pretty clear as an option name, others such as “Embed linguistic data” might trip most people up. You can press F1 or click the ? icon at the upper-right corner of the window to use the Help system to search for more information about an option. A section later in this chapter, “Getting Help,” explains how to use Help.
TIP
In many instances, but not always, you can find help on what you want by typing the exact feature name (e.g., “embed linguistic data”) into the Search box.
Word's Advanced options contain over 150 settings.

Switching Accounts
As you learned earlier in the chapter, Word is set up to work with the Microsoft account you use to sign on to Windows 8 so that you can take full advantage of cloud features such as SkyDrive, and be able to access your information no matter what device you're using. You may need to work with multiple online accounts in Word to access different storage locations, email accounts, or social media accounts. Or you may want to have separate accounts for work and personal information. Here's a brief description of how to add and select accounts in Word.
Even if you have Windows 8 (or even Windows 7) set up with multiple user accounts, Word by default only uses the one that you were first signed on to when you started and set up the program. If you have other Microsoft accounts already set up with Outlook.com or Live.com and need to switch the account you're using in Word for the first time, follow these steps:
- Click your user name at the upper-right corner of the Word window, and then click Switch account.
- In the Sign in to Office box, click either Personal or Organization or School. If you need to sign in with your Office365 user name, click Organization or School. As discussed in Chapter 27, signing in with your Office365 credentials enables you to use SkyDrive Pro to sync files with your online library or access your Office365 team SharePoint online.
- Enter your user name and password at the Sign in screen that appears, and then click Sign in. Your new account information appears.
After you switch accounts the first time during a work session, Word “remembers” the previous account you used and makes switching easier. When you click your user name and click Switch account, Word displays an Account window with your Current account and a list of Other accounts. Click the desired account under Other accounts to switch back to that account without having to re-enter your sign-in information.
Getting Help
Word retains a hybrid Help system to keep you up and running with your work. While some information is installed with Word on your hard disk, most of the information resides online, so for all practical purposes, you need an Internet connection to ensure you can access the specific Help that you need.
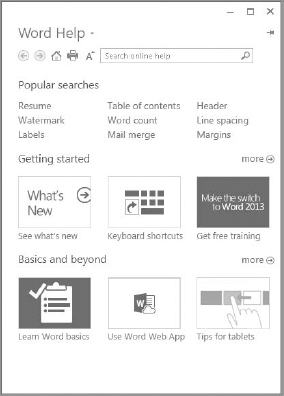
Starting Help is easy: either press the F1 key or click the Microsoft Word Help (?) button near the upper-right corner of the Word window. If you want to browse through Help, start by clicking one of the major topics on the home Help screen shown in Figure 1.28, and then click additional links from there to navigate to a specific topic. Or, to jump more directly to a list of topics that potentially addresses your issue, click in the Search help text box, type a search word or phrase, and press Enter or click the Search help (magnifying glass) icon at the right end of the text box. Then you can click and read a topic in the search results.
To return to the home Help contents at any time, click the Home button that looks like a house. Click the window's Close (X) button to close Help.
TIP
If you want to view the contents of the displayed Help topic while working in the document, use the Keep Help on Top icon just below the Word Help window Close (X) button to pin it in front of the document window. Click the button again to return the Word Help window to normal operation.
You can browse Help by topic or search for what you need.
Exiting Word
When you finish working in Word, it's a good practice to close the app just to keep your desktop clutter free. You can use one of these methods to shut down Word:
- Click the File tab, and click Close.
- Click the Word window's Close (X) button at the upper right.
- Press Alt+F4.
If you haven't saved your most recent changes to the document, a dialog box prompts you to do so. Click Save or Don't Save as desired.
TIP
The close methods just close the current document window. If you have multiple Word documents open and want to close them all at once, right-click Word's taskbar icon, and click Close all windows.
Summary
This chapter gave you your first tour of Word 2013. You learned the numerous ways you can start the program and make sure you're signed in with the proper Microsoft account. You've seen how Word has been updated with a sleek, modern look that mirrors other newer Windows 8 apps, while retaining familiar commands and functions like the Ribbon and File tab. The chapter helped you find Word's options for the first time, and you learned how to switch accounts, get help, and exit the program when you finish working. You should now be able to:
- Start and exit Word in Windows 7 and Windows 8
- Identify the key parts of the Word screen
- Use the Ribbon and other Word tools such as panes and dialog boxes
- Undo and redo actions
- Sign in to Word
- Navigate in Help