Chapter 6
Working with Apps and Files

You can customize the Home screen to optimize the layout of the icons you need most and to organize them into folders. You can switch quickly among open apps, use the iPad’s multitasking features, and manage your apps by installing apps, updating apps to the latest versions, and removing apps you do not use. You can also manage files; apply formatting; and use Cut, Copy, and Paste.
Customize the Home Screen and the Dock
Switch Quickly from One App to Another
Multitask with Split-Screen Views
Manage Automatic Downloads and Your Apple ID
Manage Files with the Files App
Customize the Home Screen and the Dock
You can customize the Home screen to put the apps you use most frequently within easy reach. When the existing Home screens fill up with icons, the iPad adds more Home screens automatically, as needed. You can also create more Home screens — up to 11 screens total — manually and move the app icons among them.
You can customize the Dock by adding icons to it, rearranging icons on it, and removing icons from it.
Customize the Home Screen and the Dock

Move an Icon
![]() Press Home.
Press Home.
The Home screen appears.
![]() Swipe left or right to display the Home screen you want to customize.
Swipe left or right to display the Home screen you want to customize.
![]() You can also tap the dot for the Home screen you want to display.
You can also tap the dot for the Home screen you want to display.
![]() Tap and hold the icon you want to move until the icon expands momentarily, indicating that it is movable.
Tap and hold the icon you want to move until the icon expands momentarily, indicating that it is movable.
![]() Drag the icon to where you want it.
Drag the icon to where you want it.
Any other icons move out of the way.
![]() When the icon is in the right place, drop it by lifting your finger from the screen.
When the icon is in the right place, drop it by lifting your finger from the screen.
The icon stays in its new position.
Note: To move the icon to a different Home screen, drag it to the left edge or right edge of the current Home screen, wait until the previous or next Home screen appears, and then drag the icon to where you want to place it.
Note: To create a new Home screen, drag an icon to the right edge of the last current Home screen.

Customize the Dock
![]() Tap and hold the icon you want to move until the icon expands momentarily, indicating that it is movable.
Tap and hold the icon you want to move until the icon expands momentarily, indicating that it is movable.
![]() Drag an icon from the Home screen to the Dock.
Drag an icon from the Home screen to the Dock.
The existing Dock icons move out of the way.
![]() Drop the icon.
Drop the icon.
Note: To remove a Dock icon, drag the icon from the Dock to the Home screen.

![]() Tap and hold the Dock icon you want to move until the icon expands momentarily, indicating that it is movable.
Tap and hold the Dock icon you want to move until the icon expands momentarily, indicating that it is movable.
![]() Drag the icon from its existing position to where you want it.
Drag the icon from its existing position to where you want it.
![]() Drop the icon.
Drop the icon.
Note: If you synchronize your iPad with a computer, you can use iTunes to customize the Home screens and the Dock. You may find this an easier way to make extensive changes.
Organize Apps with Folders
You can organize the Home screen by arranging the icons into folders. The default Home screen layout on your iPad does not include any folders, but you can create as many as you need.
You create a folder by dragging one icon onto another icon. Doing this creates a folder containing both items. You can then rename the folder and add other items to it. To run an app stored in a folder, you open the folder to reveal its contents, and then tap the app.
Organize Apps with Folders

Create a Folder
![]() Display the Home screen that contains the item you want to put into a folder.
Display the Home screen that contains the item you want to put into a folder.
![]() Tap and hold an icon until the icons start to jiggle.
Tap and hold an icon until the icons start to jiggle.
Note: When creating a folder, you may find it easiest to first put at least the first two items you will add to the folder on the same screen.
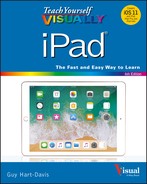
![]() Drag one of the app icons you want to place in the folder and hold it over the icon of another app destined for the folder.
Drag one of the app icons you want to place in the folder and hold it over the icon of another app destined for the folder.
The iPad creates a folder, puts both icons in it, and assigns a default name based on the genre.
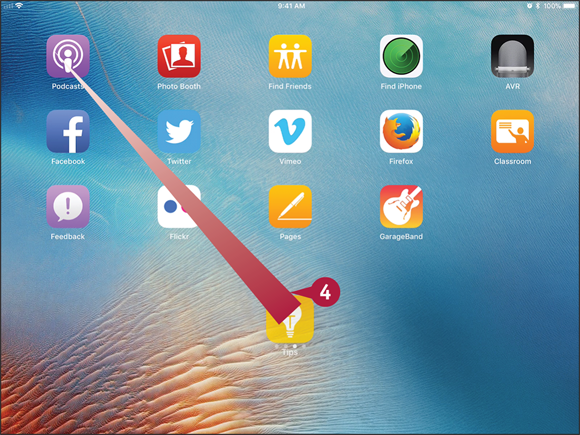
![]() Tap Delete (
Tap Delete (![]() ) in the folder name field.
) in the folder name field.
The keyboard appears.
![]() Type the name for the folder.
Type the name for the folder.
![]() Tap outside the folder.
Tap outside the folder.
Note: You can also tap Done on the keyboard.
The iPad applies the name to the folder.
![]() Press Home.
Press Home.
The icons stop jiggling.

Open an Item in a Folder
![]() Display the Home screen that contains the folder.
Display the Home screen that contains the folder.
![]() Tap the folder’s icon.
Tap the folder’s icon.
The folder’s contents appear, and the items outside the folder fade.
![]() If necessary, tap a dot to display a different screen in the folder. You can also swipe left or right to change screens in the folder.
If necessary, tap a dot to display a different screen in the folder. You can also swipe left or right to change screens in the folder.
![]() Tap the item you want to open.
Tap the item you want to open.
The item opens.

Add an Item to a Folder
![]() Display the Home screen that contains the item.
Display the Home screen that contains the item.
![]() Drag the icon on top of the folder, hold it there for a moment, and drop it there.
Drag the icon on top of the folder, hold it there for a moment, and drop it there.
Note: If the folder is on a different Home screen from the icon, drag the icon to the left edge to display the previous Home screen or to the right edge to display the next Home screen.
The item goes into the folder.
Switch Quickly from One App to Another
You can run many apps on your iPad at the same time, switching from one app to another as needed. The most straightforward way to switch among apps is to press Home to display the Home screen and then tap the icon for the app you want to start using.
For faster switching among apps that are already running, use the App Switcher. The App Switcher also enables you to close running apps.
Switch Quickly from One App to Another

![]() While using an app, swipe up from the bottom of the screen.
While using an app, swipe up from the bottom of the screen.
Note: If swiping up displays only the Dock, swipe up farther to display the App Switcher.
Note: You can also press Home twice in quick succession to display the App Switcher.
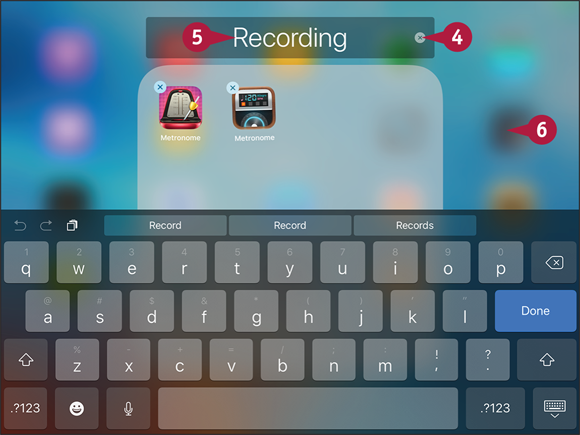
The App Switcher appears, showing a thumbnail for each open app.
![]() The app you were using appears in the upper-right position.
The app you were using appears in the upper-right position.
![]() The previous app appears in the lower-right position.
The previous app appears in the lower-right position.
![]() Other apps appear farther to the left in the order you last used them.
Other apps appear farther to the left in the order you last used them.
Note: If necessary, swipe right until you can see the app you want.
![]() Tap the thumbnail of the app you want to use.
Tap the thumbnail of the app you want to use.

The app appears, and you can work in it as usual. For example, in the Maps app, navigate to the area you want to view.
![]() When you are ready to switch back, swipe up from the bottom of the screen or press Home twice in quick succession.
When you are ready to switch back, swipe up from the bottom of the screen or press Home twice in quick succession.

The App Switcher appears.
![]() Tap the app to which you want to return.
Tap the app to which you want to return.
The app appears, ready to resume from where you stopped using it.
Note: You can also tap another app’s thumbnail to switch to that app instead.
Multitask with Split-Screen Views
Your iPad normally runs each app full-screen, so you see a single app at a time. But on recent iPad models you can also split the screen between two apps in any of three ways.
The Slide Over feature displays a second app in the rightmost third of the screen. The Split View feature divides the screen evenly or unevenly between the two apps. The Picture-in-Picture feature displays a video in a pop-up window over another app or the Home screen.
Multitask with Split-Screen Views

Enable and Configure Multitasking
![]() Press Home.
Press Home.
The Home screen appears.
![]() Tap Settings (
Tap Settings (![]() ).
).
The Settings screen appears.
![]() Tap General (
Tap General (![]() ).
).
The General screen appears.
![]() Tap Multitasking & Dock.
Tap Multitasking & Dock.

The Multitasking & Dock screen appears.
![]() Set the Allow Multiple Apps switch to On (
Set the Allow Multiple Apps switch to On (![]() ) to enable multitasking.
) to enable multitasking.
![]() Set the Persistent Video Overlay switch to On (
Set the Persistent Video Overlay switch to On (![]() ) if you want to be able to overlay a playing video on other screens.
) if you want to be able to overlay a playing video on other screens.
![]() Set the Gestures switch to On (
Set the Gestures switch to On (![]() ) if you want to be able to give multitasking gestures with four or five fingers. See the tip for details on the gestures.
) if you want to be able to give multitasking gestures with four or five fingers. See the tip for details on the gestures.
![]() Set the Show Suggested and Recent Apps switch to On (
Set the Show Suggested and Recent Apps switch to On (![]() ) if you want to display suggested apps and recent apps on the right side of the Dock.
) if you want to display suggested apps and recent apps on the right side of the Dock.
![]() Tap General (
Tap General (![]() ).
).
The General screen appears.

Use Two Apps with Slide Over and Split View
![]() With an app open that you want to use, swipe up a short way from the bottom of the screen.
With an app open that you want to use, swipe up a short way from the bottom of the screen.
Note: You can use the multitasking views in either landscape orientation or portrait orientation.
The Dock appears.
![]() Tap and hold the icon for the app you want to display, and then drag upward from the Dock.
Tap and hold the icon for the app you want to display, and then drag upward from the Dock.

A thumbnail for the app appears.
![]() Release the app’s icon.
Release the app’s icon.
You can multitask with many of the apps that come with your iPad and with many third-party apps. But some apps cannot run in either Slide Over or Split View. For example, the Settings app can run only full-screen, so you cannot multitask with it. Other apps can run in Slide Over but not in Split View.

The app appears in Slide Over view on the right side of the screen.
You can start using the app.
Note: You can also open other apps in Slide Over view. Each app you open appears over the previous Slide Over app.
![]() You can drag the app’s handle to the left to move the Slide Over app to the left side of the screen.
You can drag the app’s handle to the left to move the Slide Over app to the left side of the screen.
![]() Drag the app’s handle down a short way.
Drag the app’s handle down a short way.

iOS switches the app to Slide Over view.
The app appears in a separate pane, taking up the right-hand third of the screen.
The other app occupies the left-hand two-thirds of the screen.
![]() Drag the handle on the divider bar between the apps to the left.
Drag the handle on the divider bar between the apps to the left.

iOS changes the division of the screen between the apps.
![]() When the division is where you want it, lift your finger.
When the division is where you want it, lift your finger.

The apps appear in the panes, and you can work in either app.
Note: Drag the handle on the divider bar all the way to the left to switch the right-hand app to full-screen. Drag the handle all the way to the right to switch the left-hand app to full-screen.
The Picture-in-Picture feature enables you to switch a video you are playing from full-screen to a small floating window. You can reposition the floating window in any of the four quadrants of the screen so that you can continue to watch the video while working in another app — or in two other apps using Slide Over or Split View.
The Picture-in-Picture feature works only on recent iPad models, such as the iPad mini 2, iPad mini 4, iPad Air 2, the iPad Pro, and later models.

Use the Picture-in-Picture Feature
![]() Press Home.
Press Home.
The Home screen appears.
![]() Tap TV (
Tap TV (![]() ).
).
Note: You can also use Picture-in-Picture with other apps, such as YouTube and Safari.
The TV app opens.
![]() Navigate to and tap the video you want to view, and then tap Play (
Navigate to and tap the video you want to view, and then tap Play (![]() ).
).
The video starts playing.
![]() You can tap Picture-in-Picture (
You can tap Picture-in-Picture (![]() ) to shrink the video to a floating window without displaying the Home screen.
) to shrink the video to a floating window without displaying the Home screen.
![]() Press Home.
Press Home.

The video shrinks down to a floating window and continues playing unless you pause it.
The Home screen appears, with the video window floating above it.
![]() Tap the app you want to launch. This example uses Notes (
Tap the app you want to launch. This example uses Notes (![]() ).
).

The app opens.
Note: If you last used the app in Slide Over or in Split View with another app, the app appears in that view with that app next to it.
![]() Tap the video window and drag it to the quadrant where you want it.
Tap the video window and drag it to the quadrant where you want it.
![]() Work in the app you have launched.
Work in the app you have launched.
![]() Tap the video window.
Tap the video window.

The video controls appear.
Note: The video controls disappear after a few seconds if you do not use them.
![]() You can tap Pause (
You can tap Pause (![]() ) to pause playback.
) to pause playback.
![]() You can tap Full Screen (
You can tap Full Screen (![]() ) to switch the video back to full-screen.
) to switch the video back to full-screen.
![]() You can tap Close (
You can tap Close (![]() ) to close the video window.
) to close the video window.
Find the Apps You Need
The iPad comes with essential apps, such as Safari for surfing the web, Mail for e-mail, and Calendar for keeping your schedule. But to get the most out of your iPad, you will likely need to add other apps.
To get apps, you use the App Store, which provides apps that Apple has approved as correctly programmed, suitable for their intended purpose, and free of malevolent code. Before you can download any apps, including free apps, you must create an App Store account.
Find the Apps You Need

![]() Press Home.
Press Home.
The Home screen appears.
![]() Tap App Store (
Tap App Store (![]() ).
).
The App Store app opens.
![]() Tap Apps (
Tap Apps (![]() changes to
changes to ![]() ).
).
The Apps screen appears.
![]() Swipe up to scroll down.
Swipe up to scroll down.

![]() If you need to change the Apple ID for the App Store, tap Account (
If you need to change the Apple ID for the App Store, tap Account (![]() ). In the Account dialog that opens, tap Sign Out. Then tap Sign In and specify the other Apple ID.
). In the Account dialog that opens, tap Sign Out. Then tap Sign In and specify the other Apple ID.
Further lists on the Apps screen appear.
![]() Tap See All or the category or group you want to see.
Tap See All or the category or group you want to see.
Note: Apple ties each app you buy or get for free from the App Store to the Apple ID you use. To avoid confusion, use the same Apple ID for each app you get. When setting up the Apple ID, use an e-mail address you plan to use for the long term. If you change your Apple ID or e-mail address, you will need to re-authenticate your apps.

The linked screen appears, showing its lists of apps.
Note: Swipe up to see more apps in a list.
![]() Tap the app you want to view.
Tap the app you want to view.

The app’s screen appears.
Note: To understand what an app does and how well it does it, look at the app’s rating, read the description, and look through the user reviews.
![]() You can tap More (
You can tap More (![]() ) to share the app’s details with others via e-mail, messaging, AirDrop, or other means.
) to share the app’s details with others via e-mail, messaging, AirDrop, or other means.
![]() Tap the price button or the Get button.
Tap the price button or the Get button.
The price button or Get button changes to an Install App button.
![]() Tap Install App.
Tap Install App.
![]() If the iPad prompts you to sign in, type your password and then tap OK.
If the iPad prompts you to sign in, type your password and then tap OK.
Note: If you have not created an App Store account already, the iPad prompts you to create one now.
The iPad downloads and installs the app.
![]() Tap Open to launch the app.
Tap Open to launch the app.
Update and Remove Apps
To keep the apps running smoothly on your iPad, you should install app updates when they become available. Most updates for paid apps are free, but you must usually pay to upgrade to a new version of the app. You can download and install updates using the App Store app on your iPad.
When you no longer need an app, you can remove it from the iPad and recover the space it was occupying.
Update and Remove Apps

Update an App
![]() Press Home.
Press Home.
The Home screen appears.
![]() The badge on the App Store icon shows the number of available updates.
The badge on the App Store icon shows the number of available updates.
![]() Tap App Store (
Tap App Store (![]() ).
).
The App Store app opens.
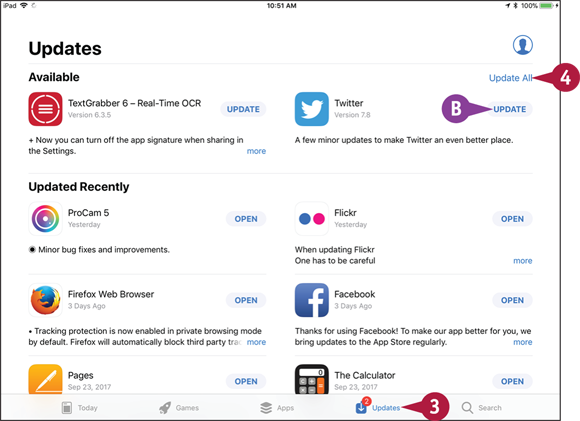
The Updates screen appears.
![]() Tap Updates (
Tap Updates (![]() changes to
changes to ![]() ).
).
![]() You can tap Update to update a single app.
You can tap Update to update a single app.
![]() Tap Update All.
Tap Update All.
Note: If the Apple ID Password dialog opens, type your password and then tap OK.
Your iPad downloads and installs the updates.

Remove an App from the iPad
![]() Press Home.
Press Home.
The Home screen appears.
![]() Display the Home screen that contains the app you want to delete.
Display the Home screen that contains the app you want to delete.
![]() Tap and hold the item until the icons start to jiggle.
Tap and hold the item until the icons start to jiggle.
![]() Tap Delete (
Tap Delete (![]() ) on the icon.
) on the icon.

The Delete dialog appears.
![]() Tap Delete.
Tap Delete.
The iPad deletes the app, and the app’s icon disappears.
![]() Press Home.
Press Home.
The icons stop jiggling.
Manage Automatic Downloads and Your Apple ID
The App Store and iTunes Store can automatically download apps, music, and other content for you. You can turn off automatic downloads if you prefer to keep manual control, and on a cellular iPad, you can control whether downloads can use the cellular network.
From the iTunes & App Store screen in the Settings app, you can also view the details of your current Apple ID and switch from one Apple ID to another.
Manage Automatic Downloads and Your Apple ID

Choose Which Items to Download Automatically
![]() Press Home.
Press Home.
The Home screen appears.
![]() Tap Settings (
Tap Settings (![]() ).
).
The Settings screen appears.
![]() Tap iTunes & App Store (
Tap iTunes & App Store (![]() ).
).
The iTunes & App Stores screen appears.
![]() Set the Music switch, Apps switch, Books & Audiobooks switch, and Updates switch to On (
Set the Music switch, Apps switch, Books & Audiobooks switch, and Updates switch to On (![]() ) or Off (
) or Off (![]() ), as needed, to specify which items to download automatically.
), as needed, to specify which items to download automatically.
![]() Tap Video Autoplay to display the Video Autoplay screen; tap On, Wi-Fi Only, or Off, as needed; and then tap iTunes & App Stores (
Tap Video Autoplay to display the Video Autoplay screen; tap On, Wi-Fi Only, or Off, as needed; and then tap iTunes & App Stores (![]() ).
).
![]() Set the In-App Ratings & Reviews switch to On (
Set the In-App Ratings & Reviews switch to On (![]() ) if you agree to allow apps to prompt you for feedback.
) if you agree to allow apps to prompt you for feedback.
![]() Set the Offload Unused Apps switch to On (
Set the Offload Unused Apps switch to On (![]() ) if you want iOS to automatically remove unused apps.
) if you want iOS to automatically remove unused apps.
![]() Tap Password Settings.
Tap Password Settings.

The Password Settings screen appears.
![]() In the Purchases and In-App Purchases box, tap Always Require or Require After 15 Minutes, as needed.
In the Purchases and In-App Purchases box, tap Always Require or Require After 15 Minutes, as needed.
![]() If you choose Require After 15 Minutes, set the Require Password switch to On (
If you choose Require After 15 Minutes, set the Require Password switch to On (![]() ) or Off (
) or Off (![]() ), as needed.
), as needed.
![]() Tap iTunes & App Stores (
Tap iTunes & App Stores (![]() ).
).

Switch Apple ID or View Its Details
![]() On the iTunes & App Stores screen in the Settings app, tap Apple ID.
On the iTunes & App Stores screen in the Settings app, tap Apple ID.
The Apple ID dialog opens.
![]() To switch the Apple ID, tap Sign Out.
To switch the Apple ID, tap Sign Out.
![]() Tap Apple ID and type the e-mail address for the Apple ID you want to use.
Tap Apple ID and type the e-mail address for the Apple ID you want to use.
![]() Tap Password and type the password.
Tap Password and type the password.
![]() Tap Sign In.
Tap Sign In.
Your iPad signs in using the Apple ID.
![]() To view the details of your current Apple ID, tap View Apple ID.
To view the details of your current Apple ID, tap View Apple ID.

The Account dialog opens.
![]() Examine the Apple ID as needed:
Examine the Apple ID as needed:
![]() Tap Apple ID to display the My Apple ID web page in Safari.
Tap Apple ID to display the My Apple ID web page in Safari.
![]() Tap Family Sharing to view Family Sharing information.
Tap Family Sharing to view Family Sharing information.
![]() Tap Payment Information to display an Account dialog that contains your credit- or debit-card details.
Tap Payment Information to display an Account dialog that contains your credit- or debit-card details.
![]() Tap Country/Region to change your country or region.
Tap Country/Region to change your country or region.
![]() Tap Done when you finish reviewing your Apple ID.
Tap Done when you finish reviewing your Apple ID.
Manage Files with the Files App
The Files app enables you to work with files stored on your iPad; files stored on network servers, such as macOS Server; and files stored on online storage services, such as iCloud Drive. You can quickly locate files by using the Recents screen, by using the Browse screen, or by searching by keyword. You can also recover recently deleted files by using the Recently Deleted Location. You navigate the Files app using similar techniques to those for navigating file-opening and file-saving features within apps.
Manage Files with the Files App
Open the Files App
![]() Press Home.
Press Home.
The Home screen appears.
![]() Tap Files (
Tap Files (![]() ).
).
The Files app opens.
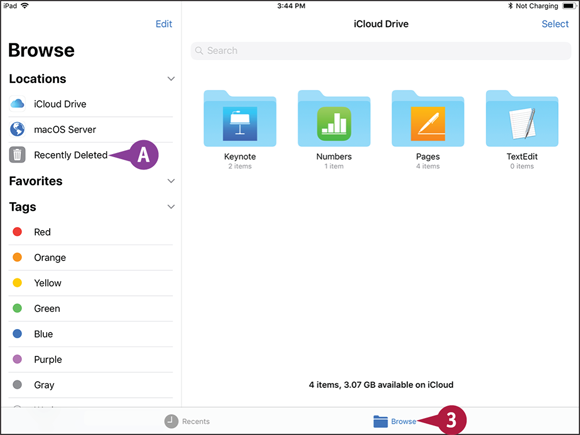
![]() Tap Browse (
Tap Browse (![]() changes to
changes to ![]() ).
).
The Browse screen appears.
![]() The Recently Deleted location contains files that you have deleted recently, somewhat like the Trash on macOS or the Recycle Bin on Windows. To retrieve a deleted file, tap Recently Deleted, tap and hold the file, and then tap Recover on the command bar that appears.
The Recently Deleted location contains files that you have deleted recently, somewhat like the Trash on macOS or the Recycle Bin on Windows. To retrieve a deleted file, tap Recently Deleted, tap and hold the file, and then tap Recover on the command bar that appears.

Browse Files and Open Files
![]() Tap Recents (
Tap Recents (![]() changes to
changes to ![]() ).
).
The Recents screen appears.
![]() You can search your recent files by tapping Search (
You can search your recent files by tapping Search (![]() ) and then typing a search term.
) and then typing a search term.
![]() Some of your most recent files appear at the top.
Some of your most recent files appear at the top.
![]() Older files appear listed by their tags, such as the Health tag and the Important tag in this example.
Older files appear listed by their tags, such as the Health tag and the Important tag in this example.
![]() Tap Browse (
Tap Browse (![]() changes to
changes to ![]() ).
).
The Browse screen appears.
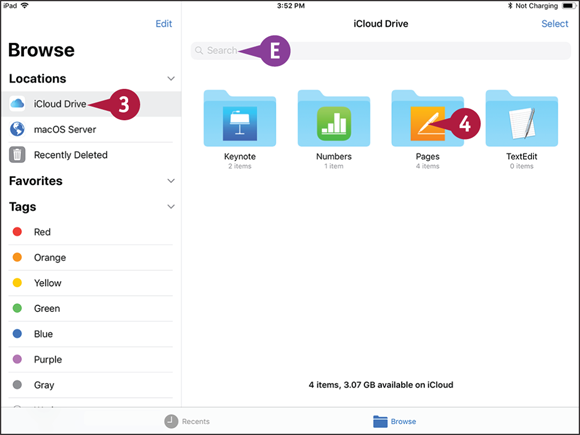
![]() You can search all your files by tapping Search (
You can search all your files by tapping Search (![]() ) and then typing a search term.
) and then typing a search term.
![]() Tap the location you want to browse. This example uses iCloud Drive.
Tap the location you want to browse. This example uses iCloud Drive.
The screen for the location appears.
![]() Tap the folder you want to open.
Tap the folder you want to open.

The folder opens and its contents appear.
![]() You can tap Download (
You can tap Download (![]() ) to download a file stored online to your iPad.
) to download a file stored online to your iPad.
![]() Tap the file you want to open.
Tap the file you want to open.
The file opens in the default app for the file type, assuming your iPad has such an app.
The app appears, and you can work on the file.
Note: You can open only those files for which your iPad contains a suitable app. If there is no suitable app, Files displays the file for viewing if it has a suitable viewer, but you cannot change the file.
As well as opening a file, the Files app enables you to take other actions with a file, such as renaming it, copying it and pasting a copy, duplicating it in the same location, or moving it to another location.
The Files app also enables you to use tags to group and sort your files. The Files app comes with default tags with color names, such as Red and Orange, but you can customize the names and create new tags as needed.

Take Other Actions with a File
![]() Tap and hold the file you want to affect.
Tap and hold the file you want to affect.
The control bar appears.
![]() Tap Copy to copy the file. Navigate to where you want to paste the copy, tap and hold open space, and then tap Paste on the control bar.
Tap Copy to copy the file. Navigate to where you want to paste the copy, tap and hold open space, and then tap Paste on the control bar.
![]() Tap Duplicate to create a duplicate file in the same folder.
Tap Duplicate to create a duplicate file in the same folder.
![]() Tap Rename to display the Rename Document screen. Type the new name, and then tap Done.
Tap Rename to display the Rename Document screen. Type the new name, and then tap Done.
![]() Tap Move to display a screen for moving the file. Tap the location, and then tap Move.
Tap Move to display a screen for moving the file. Tap the location, and then tap Move.
![]() Tap Delete to delete the file.
Tap Delete to delete the file.
![]() Tap Share to open the Share sheet for sharing the file.
Tap Share to open the Share sheet for sharing the file.
![]() Tap Info to display information about the file.
Tap Info to display information about the file.
![]() Tap Tags.
Tap Tags.

The Tags panel opens.
![]() Tap each tag you want to apply to the file. Also tap any applied tag that you want to remove.
Tap each tag you want to apply to the file. Also tap any applied tag that you want to remove.
![]() Tap outside the Tags panel.
Tap outside the Tags panel.
The Tags panel closes.

Organize Your Locations and Tags
![]() Tap Browse (
Tap Browse (![]() changes to
changes to ![]() ).
).
The Browse screen appears.
![]() Tap Edit.
Tap Edit.

The Browse screen switches to Edit Mode.
![]() In the Locations list, set a switch to Off (
In the Locations list, set a switch to Off (![]() changes to
changes to ![]() ) if you want to hide the location.
) if you want to hide the location.
![]() Tap a handle and drag a location up or down, as needed.
Tap a handle and drag a location up or down, as needed.
![]() In the Tags list, tap Delete (
In the Tags list, tap Delete (![]() ) and then tap Delete to delete a tag.
) and then tap Delete to delete a tag.
![]() To change the tag order, tap the handle (
To change the tag order, tap the handle (![]() ) and drag the tag up or down the list.
) and drag the tag up or down the list.
![]() To rename a tag, tap it, and then type the new name.
To rename a tag, tap it, and then type the new name.
![]() When you finish editing the Browse screen, tap Done.
When you finish editing the Browse screen, tap Done.
The Browse screen switches off Edit Mode.
Enter Text Quickly in Apps
Even though your iPad does not come with a physical keyboard, it offers powerful time-saving features that enable you to enter text quickly in the apps you use. You can split and reposition the on-screen keyboard to make it easier to use, or keep it in its standard docked position. You can enter words more quickly by accepting predictive text suggestions. And you can configure keyboard settings and create your own shortcuts to enter boilerplate text quickly.
Enter Text Quickly in Apps

Undock and Split the Keyboard and Use Predictions
![]() In an app that supports text input, tap a text field.
In an app that supports text input, tap a text field.
The keyboard appears in its docked position at the bottom of the screen.
![]() Tap and hold Hide Keyboard (
Tap and hold Hide Keyboard (![]() ).
).
The keyboard pop-up menu opens.
![]() Tap Undock.
Tap Undock.
The keyboard moves up the screen.
![]() Start typing a word.
Start typing a word.
Suggested words or phrases appear.
![]() Tap the word or phrase you want to insert.
Tap the word or phrase you want to insert.
![]() Tap and hold Hide Keyboard (
Tap and hold Hide Keyboard (![]() ).
).
![]() Tap Split.
Tap Split.

The keyboard splits.
Note: With the keyboard split, you can type using “ghost” keys on the opposite side of the keyboard. For example, tap to the right of the T key to type Y, and tap to the left of the Y key to type T.
Note: Tap and drag Hide Keyboard (![]() ) to move the undocked or split keyboard up or down.
) to move the undocked or split keyboard up or down.
![]() Tap and hold Hide Keyboard (
Tap and hold Hide Keyboard (![]() ).
).
![]() Tap Merge or Dock and Merge, as needed.
Tap Merge or Dock and Merge, as needed.

Configure Keyboard Settings and Create Shortcuts
![]() Press Home.
Press Home.
![]() Tap Settings (
Tap Settings (![]() ).
).
The Settings screen appears.
![]() Tap General (
Tap General (![]() ).
).
The General screen appears.
![]() Tap Keyboard.
Tap Keyboard.
The Keyboards screen appears.
![]() Set the Auto-Capitalization switch, Auto-Correction switch, Check Spelling switch, Enable Caps Lock switch, Shortcuts switch, Predictive switch, Smart Punctuation switch, Split Keyboard switch, Enable Key Flicks switch, and “.” Shortcut switch to On (
Set the Auto-Capitalization switch, Auto-Correction switch, Check Spelling switch, Enable Caps Lock switch, Shortcuts switch, Predictive switch, Smart Punctuation switch, Split Keyboard switch, Enable Key Flicks switch, and “.” Shortcut switch to On (![]() ) or Off (
) or Off (![]() ), as needed.
), as needed.
Note: The “.” Shortcut switch enables you to type a period by pressing ![]() twice in quick succession.
twice in quick succession.
![]() Tap Text Replacement.
Tap Text Replacement.

The Text Replacement screen appears.
![]() Tap Add (
Tap Add (![]() ).
).
![]() Type the word or phrase.
Type the word or phrase.
![]() Type the shortcut to use for entering the word or phrase.
Type the shortcut to use for entering the word or phrase.
![]() Tap Save.
Tap Save.
Note: To prevent the spell checker from querying a word, create a shortcut with the word as the phrase text but with no shortcut. The spell checker then accepts the word as correct.
Cut, Copy, and Paste Text
Your iPad enables you to copy existing text and paste it elsewhere. For example, you can copy text from a note and paste it into an e-mail message you are composing.
If the text is in a document you can edit, you can cut — remove — the text from the document instead of copying it. If the text is in a document you cannot edit, you can copy the text but not cut it.
Cut, Copy, and Paste Text

Select and Copy Text
![]() Tap and hold a word in the text you want to copy.
Tap and hold a word in the text you want to copy.
Note: If the text is editable, either double-tap a word to select it, or tap the word to position the insertion point and then tap Select on the command bar to display the selection handles.

![]() A selection highlight with handles appears around the word.
A selection highlight with handles appears around the word.
![]() The command bar appears above the selection.
The command bar appears above the selection.
![]() Drag the handles of the selection highlight around the text that you want.
Drag the handles of the selection highlight around the text that you want.
![]() Tap Copy.
Tap Copy.
Note: If the text is editable, you can tap Cut on the command bar to cut the text from the document, placing it on the Clipboard.
Your iPad places the text on the Clipboard, a hidden storage area.

Paste the Content You Have Copied or Cut
![]() Open the app in which you want to paste the text.
Open the app in which you want to paste the text.
Note: This example shows text being pasted into a new message in the Mail app.
![]() Tap where you want to paste the text.
Tap where you want to paste the text.
![]() In some apps, you can also tap Paste (
In some apps, you can also tap Paste (![]() ) on the bar above the keyboard to paste.
) on the bar above the keyboard to paste.
![]() Tap Paste.
Tap Paste.

![]() The pasted text appears in the document.
The pasted text appears in the document.
Note: You can store only one item on the Clipboard at a time. Each item you cut or copy replaces the existing item on the Clipboard. But until you replace the existing item on the Clipboard, you can paste it as many times as needed.
Bold, Italicize, Underline, and Replace Text
Some apps enable you to add formatting such as boldface, underline, and italics to text to make parts of it stand out. For example, you can apply formatting in e-mail messages you create using the Mail app and in various apps for creating word-processing documents.
To apply formatting, you first select the text, and then choose options from the pop-up command bar. Some apps also offer other text commands, such as replacing a word or phrase from a menu of suggestions.
Bold, Italicize, Underline, and Replace Text

Apply Bold, Italics, and Underline
![]() Tap and hold the text to which you want to apply bold, italics, or underline.
Tap and hold the text to which you want to apply bold, italics, or underline.
A command bar appears.
![]() Tap Select.
Tap Select.
Note: Some apps have their own formatting tools, many of which are more extensive than the standard formatting tools shown here.
Note: Some e-mail services and notes services do not support formatting.

Part of the text is highlighted and handles appear.
![]() Drag the handles to select the text that you want to bold, italicize, or underline.
Drag the handles to select the text that you want to bold, italicize, or underline.
![]() Tap the BIU button in the command bar.
Tap the BIU button in the command bar.
![]() In some apps, you can also tap BIU on the bar above the keyboard to display a formatting bar.
In some apps, you can also tap BIU on the bar above the keyboard to display a formatting bar.
The command bar displays formatting options.
![]() Tap Bold, Italics, or Underline, as needed.
Tap Bold, Italics, or Underline, as needed.
The text takes on the formatting you chose.
![]() Tap outside the selected text to deselect it.
Tap outside the selected text to deselect it.

Replace Text with Suggested Words
![]() Double-tap the word you want to replace.
Double-tap the word you want to replace.
Note: You can tap and hold in the word, and then tap Select on the command bar to select the word.
Selection handles appear around the word.
The command bar appears.
![]() Tap Replace.
Tap Replace.

The command bar displays suggested replacement words.
![]() Tap the word with which you want to replace the selected word.
Tap the word with which you want to replace the selected word.
Your iPad replaces the word.
Take Screenshots and Use Instant Markup
iOS includes an easy shortcut for taking a screenshot, a picture that captures whatever currently appears on the screen. Screenshots can be useful for recording items you want to remember or for capturing the details of a problem so that you can report it to tech support.
iOS also provides an Instant Markup feature that you can use to annotate screenshots or other pictures. Instant Markup can include pen drawings, text, and signatures.
Take Screenshots and Use Instant Markup

![]() Set up the screen to show the content you want to capture.
Set up the screen to show the content you want to capture.
![]() Press Sleep/Wake and Home at the same time.
Press Sleep/Wake and Home at the same time.

iOS captures the screen.
![]() A thumbnail of the screenshot appears.
A thumbnail of the screenshot appears.
Note: If you do not want to annotate the screenshot, wait a few seconds, and iOS removes the thumbnail from the screen automatically. Alternatively, swipe the thumbnail left off the screen.
Note: The thumbnail does not appear in screenshots, so if you want to take another screenshot immediately, you do not need to remove the thumbnail from the screen first.
![]() Tap the thumbnail.
Tap the thumbnail.

The screenshot opens.
The Instant Markup tools appear.
![]() Tap the pen style you want to use.
Tap the pen style you want to use.
![]() Tap the pen color you want to use.
Tap the pen color you want to use.
![]() Annotate the screenshot as needed.
Annotate the screenshot as needed.
![]() You can tap Eraser and then tap pen input to erase it.
You can tap Eraser and then tap pen input to erase it.
![]() To add other markup, tap Add (
To add other markup, tap Add (![]() ).
).

A pop-up panel opens.
![]() Tap Text (
Tap Text (![]() ), Signature (
), Signature (![]() ), Magnifier (
), Magnifier (![]() ), Rectangle (
), Rectangle (![]() ), Circle (
), Circle (![]() ), Caption (
), Caption (![]() ), or Arrow (
), or Arrow (![]() ), and then position the item, following any prompts provided.
), and then position the item, following any prompts provided.
![]() Tap Done.
Tap Done.
A pop-up panel opens.
![]() Tap Save to Photos.
Tap Save to Photos.
iOS saves the marked-up screenshot to the Photos app.
Note: If you do not want to save the screenshot and markup, tap Done and then tap Delete Screenshot on the pop-up panel to delete the screenshot.